

Owners Manual
Page 38
... Rear seat (Double Cab models) Vertical adjustment Up Pull the head restraints up . Lock release button Front bench type seat Vertical adjustment Up Pull the head restraints up . Lock release button 73 Adjust a ble c om pone nt s (se a t s, m irrors, st e e ring w he e l) H e a d re... st ra int s Head restraints are provided for all seats. Down Push the head restraint down while pushing the lock release button. Front separated type seats Vertical adjustment 1 Up Pull the head restraints up. Before driving Down Push the head restraint down while pushing the lock...
... Rear seat (Double Cab models) Vertical adjustment Up Pull the head restraints up . Lock release button Front bench type seat Vertical adjustment Up Pull the head restraints up . Lock release button 73 Adjust a ble c om pone nt s (se a t s, m irrors, st e e ring w he e l) H e a d re... st ra int s Head restraints are provided for all seats. Down Push the head restraint down while pushing the lock release button. Front separated type seats Vertical adjustment 1 Up Pull the head restraints up. Before driving Down Push the head restraint down while pushing the lock...

Owners Manual
Page 39
Lock release button Adjustable components (seats, mirrors, steering wheel) Rear seat (CrewMax models) Vertical adjustment Up Pull the head restraints up. Down Push the head restraint down while pushing the lock release button. 1-3.
Lock release button Adjustable components (seats, mirrors, steering wheel) Rear seat (CrewMax models) Vertical adjustment Up Pull the head restraints up. Down Push the head restraint down while pushing the lock release button. 1-3.

Owners Manual
Page 40
1-3. Adjustable components (seats, mirrors, steering wheel) CrewMax models Pull the head restraint up while pushing the lock release button. 1 Before driving
1-3. Adjustable components (seats, mirrors, steering wheel) CrewMax models Pull the head restraint up while pushing the lock release button. 1 Before driving

Owners Manual
Page 43
1-3. Release button Adjustable components (seats, mirrors, steering wheel) Releasing the belt Press the release button.
1-3. Release button Adjustable components (seats, mirrors, steering wheel) Releasing the belt Press the release button.

Owners Manual
Page 45
Adjustable components (seats, mirrors, steering wheel) Rear seats (CrewMax models) Down Push the lock release button and slide the height adjuster down. Up Move the height adjuster up as needed until you hear a click. Seat belt pretensioners (front seats) The pretensioner helps the seat belt to quickly restrain the occupant by retracting the seat belt when the vehicle is subjected to certain types of a minor frontal impact, a side impact or a rear impact. 80 1-3. The pretensioner may not activate in the event of severe frontal collision or a vehicle rollover.
Adjustable components (seats, mirrors, steering wheel) Rear seats (CrewMax models) Down Push the lock release button and slide the height adjuster down. Up Move the height adjuster up as needed until you hear a click. Seat belt pretensioners (front seats) The pretensioner helps the seat belt to quickly restrain the occupant by retracting the seat belt when the vehicle is subjected to certain types of a minor frontal impact, a side impact or a rear impact. 80 1-3. The pretensioner may not activate in the event of severe frontal collision or a vehicle rollover.

Owners Manual
Page 66
OPEN/CLOSE 1 Push the lock release lever and slide the back window. Before driving Ba ck w indow ∗ 1 -4 . Ope ning a nd c losing t he w indow s a nd m oon roof The back window can be opened and closed using the lock release lever.
OPEN/CLOSE 1 Push the lock release lever and slide the back window. Before driving Ba ck w indow ∗ 1 -4 . Ope ning a nd c losing t he w indow s a nd m oon roof The back window can be opened and closed using the lock release lever.
Owners Manual
Page 76
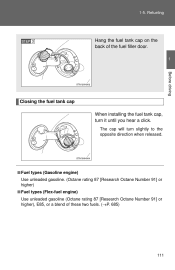
Refueling Hang the fuel tank cap on the back of the fuel filler door. 1 Before driving Closing the fuel tank cap When installing the fuel tank cap, turn slightly to the opposite direction when released. 1-5. The cap will turn it until you hear a click.
Refueling Hang the fuel tank cap on the back of the fuel filler door. 1 Before driving Closing the fuel tank cap When installing the fuel tank cap, turn slightly to the opposite direction when released. 1-5. The cap will turn it until you hear a click.

Owners Manual
Page 119
Check that the shoulder belt is correctly positioned over the child's shoulder, and that the belt is as low as possible. (→P. 77) Removing a child restraint installed with a seat belt Push the buckle release button and fully retract the seat belt. 154 1-7. Safety information Sit the child in the booster seat. Make sure that the lap belt is not twisted. Fit the seat belt to the booster seat according to the manufacturer's instructions and insert the plate into the buckle.
Check that the shoulder belt is correctly positioned over the child's shoulder, and that the belt is as low as possible. (→P. 77) Removing a child restraint installed with a seat belt Push the buckle release button and fully retract the seat belt. 154 1-7. Safety information Sit the child in the booster seat. Make sure that the lap belt is not twisted. Fit the seat belt to the booster seat according to the manufacturer's instructions and insert the plate into the buckle.

Owners Manual
Page 133
2-1. Release the parking brake. Driving procedures Starting on a steep uphill With the brake pedal depressed, firmly set the parking brake and shift the shift lever to D. Gently depress the accelerator pedal.
2-1. Release the parking brake. Driving procedures Starting on a steep uphill With the brake pedal depressed, firmly set the parking brake and shift the shift lever to D. Gently depress the accelerator pedal.

Owners Manual
Page 150
2 -1 . Driving proc e dure s Tur n signa l leve r Left turn Right turn Move and hold the lever partway to signal a lane change . The right hand signal will flash until you release the lever. Move and hold the lever partway to signal a lane change . The left hand signal will flash until you release the lever.
2 -1 . Driving proc e dure s Tur n signa l leve r Left turn Right turn Move and hold the lever partway to signal a lane change . The right hand signal will flash until you release the lever. Move and hold the lever partway to signal a lane change . The left hand signal will flash until you release the lever.

Owners Manual
Page 151
U.S.A. Driving proc e dure s Pa rk ing bra ke Sets the parking brake*. (Depressing the pedal again releases the parking brake.) At this time, the indicator will come on. Canada *: Fully depress the parking brake pedal with your left foot while depressing the brake pedal with your right foot. 2 When driving 2 -1 .
U.S.A. Driving proc e dure s Pa rk ing bra ke Sets the parking brake*. (Depressing the pedal again releases the parking brake.) At this time, the indicator will come on. Canada *: Fully depress the parking brake pedal with your left foot while depressing the brake pedal with your right foot. 2 When driving 2 -1 .

Owners Manual
Page 176
... 212 Raises the level of the headlights Lowers the level of the headlights can flash the high beams with the headlights on the high beams. Release the lever to turn on or off . Pull the lever toward you to turn them off . 2-3.
... 212 Raises the level of the headlights Lowers the level of the headlights can flash the high beams with the headlights on the high beams. Release the lever to turn on or off . Pull the lever toward you to turn them off . 2-3.

Owners Manual
Page 253
... blocks under both the vehicle's and trailer's wheels. 2-5. If the engine coolant temperature gauge indicates overheating, immediately turn off the air conditioning (if in place, release the brakes slowly until the blocks absorb the load.
... blocks under both the vehicle's and trailer's wheels. 2-5. If the engine coolant temperature gauge indicates overheating, immediately turn off the air conditioning (if in place, release the brakes slowly until the blocks absorb the load.

Owners Manual
Page 254
Stop and apply the brakes. Be sure to keep the brake pedal pressed. Have someone retrieve the blocks. Shift into D or R (if reversing). Release the parking brake and brake pedal, and slowly pull or back away from the wheel blocks. Driving information ● When restarting after parking on a slope: With the transmission in P, start the engine. 2-5.
Stop and apply the brakes. Be sure to keep the brake pedal pressed. Have someone retrieve the blocks. Shift into D or R (if reversing). Release the parking brake and brake pedal, and slowly pull or back away from the wheel blocks. Driving information ● When restarting after parking on a slope: With the transmission in P, start the engine. 2-5.

Owners Manual
Page 354
... entertainment system is not turned off when the display is loaded. Using the rear audio/video system Opening and closing the display Press the lock release button to an easily viewable angle (between 90° and 125°).
... entertainment system is not turned off when the display is loaded. Using the rear audio/video system Opening and closing the display Press the lock release button to an easily viewable angle (between 90° and 125°).

Owners Manual
Page 432
Using the storage features Map holder Map holder Center console (front separated type seats) Push the tab down to release the lock and remove the lid. Stow the lid. 470 3-7.
Using the storage features Map holder Map holder Center console (front separated type seats) Push the tab down to release the lock and remove the lid. Stow the lid. 470 3-7.

Owners Manual
Page 479
Repeat this step once again. Repeat the steps above to program another rolling code system for 2 seconds and release it. 3-8. If the garage door opens, the programming process is complete. The ceiling mounted garage door opener motor should now recognize the HomeLink&#...174; transceiver and operate the garage door. The garage door may open , press and release the button a third time. If the door does not open . Other interior features Press and hold the vehicle's programmed HomeLink® button for ...
Repeat this step once again. Repeat the steps above to program another rolling code system for 2 seconds and release it. 3-8. If the garage door opens, the programming process is complete. The ceiling mounted garage door opener motor should now recognize the HomeLink&#...174; transceiver and operate the garage door. The garage door may open , press and release the button a third time. If the door does not open . Other interior features Press and hold the vehicle's programmed HomeLink® button for ...

Owners Manual
Page 505
Do-it -yourse lf m a int e na nc e H ood Release the lock from the inside of the vehicle to open the hood. The hood will pop up the hood catch lever and lift the hood. Pull up slightly. CAUTION 4 -3 . Pull the hood lock release lever.
Do-it -yourse lf m a int e na nc e H ood Release the lock from the inside of the vehicle to open the hood. The hood will pop up the hood catch lever and lift the hood. Pull up slightly. CAUTION 4 -3 . Pull the hood lock release lever.

Owners Manual
Page 557
Do-it-yourself maintenance Unplug the connector while depressing the lock release. 4-3.
Do-it-yourself maintenance Unplug the connector while depressing the lock release. 4-3.

Owners Manual
Page 571
...o t a k e in the brake system. Immediately stop the vehicle in a safe place and contact your Toyota dealer. Immediately stop the vehicle in a safe place and contact your Toyota dealer. Warning light Warning light/Details Brake system warning light (warning buzzer)* • Low brake fluid • ...in the brake system This light also comes on or flashes, but then turns off after the parking brake is fully released, the system is not released. If a light turns on when the parking brake is operating normally. (U.S.A.) (Canada) *: Parking brake engaged warning ...
...o t a k e in the brake system. Immediately stop the vehicle in a safe place and contact your Toyota dealer. Immediately stop the vehicle in a safe place and contact your Toyota dealer. Warning light Warning light/Details Brake system warning light (warning buzzer)* • Low brake fluid • ...in the brake system This light also comes on or flashes, but then turns off after the parking brake is fully released, the system is not released. If a light turns on when the parking brake is operating normally. (U.S.A.) (Canada) *: Parking brake engaged warning ...