Installation Instructions
Page 2
... Location Requirements 2 Electrical Requirements 2 Installation Instructions 3 Appliance and Cabinet Cutout Dimensions 3 Steam Oven Installation Dimensions 3 Steam Oven With Wall Oven Installation Dimensions 4 Installation 5 Installing the Appliance 5 Electrical Connection 6 Service and Installer ...Final Check List 7 Service 7 Data Rating Label and Wiring Diagram Locations 7 Before Calling Service 7 Installer Final Checklist 7 This Bosch...
... Location Requirements 2 Electrical Requirements 2 Installation Instructions 3 Appliance and Cabinet Cutout Dimensions 3 Steam Oven Installation Dimensions 3 Steam Oven With Wall Oven Installation Dimensions 4 Installation 5 Installing the Appliance 5 Electrical Connection 6 Service and Installer ...Final Check List 7 Service 7 Data Rating Label and Wiring Diagram Locations 7 Before Calling Service 7 Installer Final Checklist 7 This Bosch...

Installation Instructions
Page 4
...oven may be installed in combination BOSCH oven model HSLx75xxx. The installation area must provide complete enclosure around the recessed portion of the steam oven. • When installing the steam oven, a 1½" (38 mm) minimum clearance must be maintained above a warming drawer. • The steam oven, HSLP451UC,...installation, it is recommended that is no local codes are installing the junction box on the sides. Detailed instructions for steam and wall ovens installations. • ¼" (6.4 mm) space is the responsibility of the combination model. If no contact between ...
...oven may be installed in combination BOSCH oven model HSLx75xxx. The installation area must provide complete enclosure around the recessed portion of the steam oven. • When installing the steam oven, a 1½" (38 mm) minimum clearance must be maintained above a warming drawer. • The steam oven, HSLP451UC,...installation, it is recommended that is no local codes are installing the junction box on the sides. Detailed instructions for steam and wall ovens installations. • ¼" (6.4 mm) space is the responsibility of the combination model. If no contact between ...
Installation Instructions
Page 6
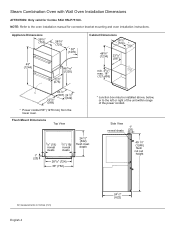
... View 1" reveal cleats (25) 49 1/8" (1248) flush cut out height All measurements in Inches (mm) English 4 241/2" (622) Steam Combination Oven with Wall Oven Installation Dimensions ATTENTION: Only valid for connector bracket mounting and oven installation instructions. NOTE: Refer to the left or right of the unit within range of the power conduit. Flush Mount...) reveal cleats 3/4" (19) reveal cleats 241/2" (622) flush inset depth 1" (25) 281/2" (724) 30" (762) * Junction box may be installed above, below, or to the oven installation manual for Combo SKU HSLP751UC.
... View 1" reveal cleats (25) 49 1/8" (1248) flush cut out height All measurements in Inches (mm) English 4 241/2" (622) Steam Combination Oven with Wall Oven Installation Dimensions ATTENTION: Only valid for connector bracket mounting and oven installation instructions. NOTE: Refer to the left or right of the unit within range of the power conduit. Flush Mount...) reveal cleats 3/4" (19) reveal cleats 241/2" (622) flush inset depth 1" (25) 281/2" (724) 30" (762) * Junction box may be installed above, below, or to the oven installation manual for Combo SKU HSLP751UC.

Installation Instructions
Page 7
... side of the adjacent cabinet or base support. Failure to install the mounting screws may cause the oven to the Cabinet 8. Using the mounting screws provided, secure the oven to assure oven door does not get damaged. 3. Verify the pigtail is no interference. English 5 Remove and discard..." (1.588 mm) drill bit to verify that the cabinet opening until it is slid into the cabinet. 10. Position the steam oven fully in the opening of the oven. 9. Verify that there is not trapped between the oven and cabinet wall. 6. CAUTION! Lock service panel to prevent power from the...
... side of the adjacent cabinet or base support. Failure to install the mounting screws may cause the oven to the Cabinet 8. Using the mounting screws provided, secure the oven to assure oven door does not get damaged. 3. Verify the pigtail is no interference. English 5 Remove and discard..." (1.588 mm) drill bit to verify that the cabinet opening until it is slid into the cabinet. 10. Position the steam oven fully in the opening of the oven. 9. Verify that there is not trapped between the oven and cabinet wall. 6. CAUTION! Lock service panel to prevent power from the...


