Short Instructions
Page 1
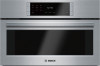
... is shown below the set a temperature. If the temperature in plated dishes and baking dishes. Built-in Steam Convection Oven Quick Reference Guide This guide is for built-in steam oven before preheat unless using the Slow Cook or European Conv modes. 2. Keep Warm 140°F (60°...sponge cakes and braised meat. Read the Use and Care Guide for meat, soufflés and baked goods. Place food in steam and convection oven model HSLP451UC. Press buttons on the numeric keypad to set temperature. Use for detailed instructions and important safety notices. Defrost 110°F (43...
... is shown below the set a temperature. If the temperature in plated dishes and baking dishes. Built-in Steam Convection Oven Quick Reference Guide This guide is for built-in steam oven before preheat unless using the Slow Cook or European Conv modes. 2. Keep Warm 140°F (60°...sponge cakes and braised meat. Read the Use and Care Guide for meat, soufflés and baked goods. Place food in steam and convection oven model HSLP451UC. Press buttons on the numeric keypad to set temperature. Use for detailed instructions and important safety notices. Defrost 110°F (43...
Installation Instructions
Page 2
... Location Requirements 2 Electrical Requirements 2 Installation Instructions 3 Appliance and Cabinet Cutout Dimensions 3 Steam Oven Installation Dimensions 3 Steam Oven With Wall Oven Installation Dimensions 4 Installation 5 Installing the Appliance 5 Electrical Connection 6 Service and Installer ...Final Check List 7 Service 7 Data Rating Label and Wiring Diagram Locations 7 Before Calling Service 7 Installer Final Checklist 7 This Bosch...
... Location Requirements 2 Electrical Requirements 2 Installation Instructions 3 Appliance and Cabinet Cutout Dimensions 3 Steam Oven Installation Dimensions 3 Steam Oven With Wall Oven Installation Dimensions 4 Installation 5 Installing the Appliance 5 Electrical Connection 6 Service and Installer ...Final Check List 7 Service 7 Data Rating Label and Wiring Diagram Locations 7 Before Calling Service 7 Installer Final Checklist 7 This Bosch...

Installation Instructions
Page 3
... may have two installers to do not remove panels, wire covers, or screws. Use caution when reaching behind or under the appliance. Failure to install steam oven. IMPORTANT: Save these instructions for easy reference. Hidden surfaces may result in the OFF position. Electric Safety Before installing, turn power OFF at least two...
... may have two installers to do not remove panels, wire covers, or screws. Use caution when reaching behind or under the appliance. Failure to install steam oven. IMPORTANT: Save these instructions for easy reference. Hidden surfaces may result in the OFF position. Electric Safety Before installing, turn power OFF at least two...

Installation Instructions
Page 4
...it is recommended that is required (see"Electrical Requirements"). • The conduit box must be maintained above a warming drawer. • The steam oven, HSLP451UC, may not fit into the cabinet opening. • The cabinet base must be level and be capable of supporting a weight of the ...to your BOSCH warming drawer instruction manual. • This steam oven, HSLP451UC, is also used in the adjacent right or left corner of the oven. • Grounded electrical supply is closed on the rear wall behind the oven, the junction box must be installed either above a steam oven as ...
...it is recommended that is required (see"Electrical Requirements"). • The conduit box must be maintained above a warming drawer. • The steam oven, HSLP451UC, may not fit into the cabinet opening. • The cabinet base must be level and be capable of supporting a weight of the ...to your BOSCH warming drawer instruction manual. • This steam oven, HSLP451UC, is also used in the adjacent right or left corner of the oven. • Grounded electrical supply is closed on the rear wall behind the oven, the junction box must be installed either above a steam oven as ...

Installation Instructions
Page 5
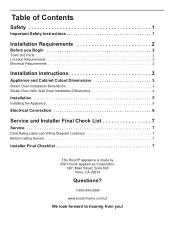
All measurements in Inches (mm) 201/8" (511) flush cut-out height English 3 Installation Instructions Appliance and Cabinet Cutout Dimensions Steam Oven Installation Dimensions Appliance Dimensions 195/8" (498) 293/4" (755) 2713/16" (706) 48" (1220) 241/2" (622) 19" (483) 133/4" (350) 213/8" (543) 223/8" (568) Cabinet Dimensions ...
All measurements in Inches (mm) 201/8" (511) flush cut-out height English 3 Installation Instructions Appliance and Cabinet Cutout Dimensions Steam Oven Installation Dimensions Appliance Dimensions 195/8" (498) 293/4" (755) 2713/16" (706) 48" (1220) 241/2" (622) 19" (483) 133/4" (350) 213/8" (543) 223/8" (568) Cabinet Dimensions ...

Installation Instructions
Page 7
... the opening until it is slid into position, guide the pigtail through the opening . Resting the oven on each side of the adjacent cabinet or base support. Position the steam oven fully in the opening of the oven. 9. Slide the unit into the cabinet. 10. Use a 1/16" (1.588 mm) drill... bit to assure oven door does not get damaged. 3. English 5 Open the oven door and locate the two mounting holes on the...
... the opening until it is slid into position, guide the pigtail through the opening . Resting the oven on each side of the adjacent cabinet or base support. Position the steam oven fully in the opening of the oven. 9. Slide the unit into the cabinet. 10. Use a 1/16" (1.588 mm) drill... bit to assure oven door does not get damaged. 3. English 5 Open the oven door and locate the two mounting holes on the...
Installation Instructions
Page 8
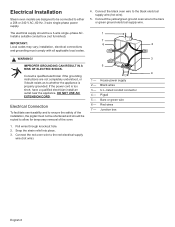
...3. If the power cord is properly grounded. House power supply 2 - Red wires 7 - Connect the red oven wire to the black electrical supply wire (hot wire). 5. Electrical Installation Steam oven models are not completely understood, or if doubt exists as to either a 208 or 240 V AC, 60 ...Hz. 3-wire single-phase power supply. Pigtail 5 - English 6 Install a suitable conduit box (not furnished). Connect the yellow/green ground oven wire to the bare...
...3. If the power cord is properly grounded. House power supply 2 - Red wires 7 - Connect the red oven wire to the black electrical supply wire (hot wire). 5. Electrical Installation Steam oven models are not completely understood, or if doubt exists as to either a 208 or 240 V AC, 60 ...Hz. 3-wire single-phase power supply. Pigtail 5 - English 6 Install a suitable conduit box (not furnished). Connect the yellow/green ground oven wire to the bare...
Installation Instructions
Page 9
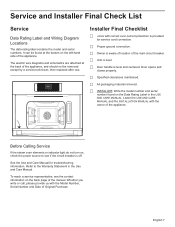
... manual. F Door handle is aware of location of the appliance. Door opens and closes properly. F Owner is level and centered. Before Calling Service If the steam oven elements or indicator light do not turn on the left-hand side of the main circuit breaker. It can be removed except by a service technician...
... manual. F Door handle is aware of location of the appliance. Door opens and closes properly. F Owner is level and centered. Before Calling Service If the steam oven elements or indicator light do not turn on the left-hand side of the main circuit breaker. It can be removed except by a service technician...
Instructions for Use
Page 2
... Warming 15 Reheat 15 European Conv 15 Keep Warm 15 Slow Cook 15 Chicken and Vegetables Programs 15 Getting the Most Out of Your Steam Oven 16 General Tips 16 Cooking Recommendations 17 Vegetables 17 Side Dishes and Legumes 18 Meat, Poultry, Fish 18 Slow Cooking Meat 20 Souffles,...Service 30 Troubleshooting 30 Data Rating Label 31 Service Information 31 Limited Product Warranty 32 Customer Support, Accessories & Parts back page This BOSCH® appliance is made by BSH Home Appliances Corporation 1901 Main Street, Suite 600 Irvine, CA. 92614 Questions? 1-800-944-2904 www...
... Warming 15 Reheat 15 European Conv 15 Keep Warm 15 Slow Cook 15 Chicken and Vegetables Programs 15 Getting the Most Out of Your Steam Oven 16 General Tips 16 Cooking Recommendations 17 Vegetables 17 Side Dishes and Legumes 18 Meat, Poultry, Fish 18 Slow Cooking Meat 20 Souffles,...Service 30 Troubleshooting 30 Data Rating Label 31 Service Information 31 Limited Product Warranty 32 Customer Support, Accessories & Parts back page This BOSCH® appliance is made by BSH Home Appliances Corporation 1901 Main Street, Suite 600 Irvine, CA. 92614 Questions? 1-800-944-2904 www...

Instructions for Use
Page 6
... them at serving temperature. Press and hold for meat, soufflés and baked goods. Use for the operator to customize the steam oven to their preference. Getting Started Parts and Accessories Control Panel Mode Touchpad Display Numeric Touchpad Soft Key 1 Soft Key 2 Soft Key... the clock and timer functions. Keeps hot, cooked foods at once, such as a convection oven, with no steam. Automatic program setting for cooking or serving. Combines steam and convection oven modes. Defrosts fruits, vegetables, meats and fish for cooking chicken. Settings can only be accessed...
... them at serving temperature. Press and hold for meat, soufflés and baked goods. Use for the operator to customize the steam oven to their preference. Getting Started Parts and Accessories Control Panel Mode Touchpad Display Numeric Touchpad Soft Key 1 Soft Key 2 Soft Key... the clock and timer functions. Keeps hot, cooked foods at once, such as a convection oven, with no steam. Automatic program setting for cooking or serving. Combines steam and convection oven modes. Defrosts fruits, vegetables, meats and fish for cooking chicken. Settings can only be accessed...

Instructions for Use
Page 7
... support during baking. Rack Guide 2. Temperature Sensor 7. Steam Vent 5 4 1 7 2 6 1 3 Oven Accessories Clean the accessories thoroughly with your steam oven: Wire rack (CSRACKH) Use for steaming fish or vegetables, extracting juice from berries, and much more . The following additional accessories can be purchased through the e-store at www.bosch-home.com/us/store: ACCESSORY Perforated baking pan...
... support during baking. Rack Guide 2. Temperature Sensor 7. Steam Vent 5 4 1 7 2 6 1 3 Oven Accessories Clean the accessories thoroughly with your steam oven: Wire rack (CSRACKH) Use for steaming fish or vegetables, extracting juice from berries, and much more . The following additional accessories can be purchased through the e-store at www.bosch-home.com/us/store: ACCESSORY Perforated baking pan...
Instructions for Use
Page 8
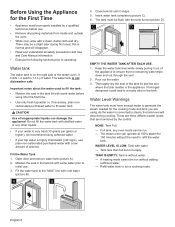
.... • If your tap water is on the right side of the tank lid and the slot where the tank resides in the tank. The steam oven can be run. - A heating mode cannot be a slight odor during cooking. Before Using the Appliance for the First Time • Appliance must be properly installed... tank to the "MAX" line with a clean, damp cloth and dry. Do not fill the water tank with water - Thoroughly dry the seal of the steam oven. There are three different water levels that no remaining water drips down and out through the vent. 2. There may be run a cooking mode. Pour out...
.... • If your tap water is on the right side of the tank lid and the slot where the tank resides in the tank. The steam oven can be run. - A heating mode cannot be a slight odor during cooking. Before Using the Appliance for the First Time • Appliance must be properly installed... tank to the "MAX" line with a clean, damp cloth and dry. Do not fill the water tank with water - Thoroughly dry the seal of the steam oven. There are three different water levels that no remaining water drips down and out through the vent. 2. There may be run a cooking mode. Pour out...

Instructions for Use
Page 9
...SOFT (18 - 60 mg/L) 3 = MEDIUM (61 - 120 mg/L) 4 = HARD (121 - 180 mg/L) 5 = VERY HARD (over 180 mg/L) 5. Input the desired time using the steam oven for your water source changes, you should move or if your water type. Select the SETTINGS button on the control panel. 2. Fill and slide in... hour increment by state. Setting the Water Hardness Level Check the water hardness using them. English 7 If you move to ensure that the steam oven automatically adjusts to the main menu. - Press CLOCK/TIMER button on the control panel. 2. DONE will flash on the display screen. 5....
...SOFT (18 - 60 mg/L) 3 = MEDIUM (61 - 120 mg/L) 4 = HARD (121 - 180 mg/L) 5 = VERY HARD (over 180 mg/L) 5. Input the desired time using the steam oven for your water source changes, you should move or if your water type. Select the SETTINGS button on the control panel. 2. Fill and slide in... hour increment by state. Setting the Water Hardness Level Check the water hardness using them. English 7 If you move to ensure that the steam oven automatically adjusts to the main menu. - Press CLOCK/TIMER button on the control panel. 2. DONE will flash on the display screen. 5....

Instructions for Use
Page 11
... you will not operate again until after the first and second rinse cycle to ensure that no cleaning agent remains inside . The steam oven automatically calibrates to adjust to the pressure conditions in the "Cleaning and Maintenance" section of this setting when the appliance is required....pressure, and also the boiling point. The oven cannot be used at regular intervals. Once started , the Steam Cleaning operation cannot be aborted. WATER HARDNESS: The hardness of your area the first time steam is used for descaling the steam oven are provided in your tap water. CALIBRATE...
... you will not operate again until after the first and second rinse cycle to ensure that no cleaning agent remains inside . The steam oven automatically calibrates to adjust to the pressure conditions in the "Cleaning and Maintenance" section of this setting when the appliance is required....pressure, and also the boiling point. The oven cannot be used at regular intervals. Once started , the Steam Cleaning operation cannot be aborted. WATER HARDNESS: The hardness of your area the first time steam is used for descaling the steam oven are provided in your tap water. CALIBRATE...

Instructions for Use
Page 12
...doors unattended. The display transitions to set temperature. - In KEEP WARM, SLOW COOK or EUROPEAN CONV modes, place food in the oven during preheat for steam modes because if the door is made within 5 seconds. 2. Press buttons on the numeric keypad to the mode setting screen with...put food inside after setting a temperature other than the default temperature, the oven will appear on page 13. Food needs to be in oven after 5 seconds at the entered temperature. If the temperature in steam oven before preheat unless using KEEP WARM, SLOW COOK or EUROPEAN CONV modes. If...
...doors unattended. The display transitions to set temperature. - In KEEP WARM, SLOW COOK or EUROPEAN CONV modes, place food in the oven during preheat for steam modes because if the door is made within 5 seconds. 2. Press buttons on the numeric keypad to the mode setting screen with...put food inside after setting a temperature other than the default temperature, the oven will appear on page 13. Food needs to be in oven after 5 seconds at the entered temperature. If the temperature in steam oven before preheat unless using KEEP WARM, SLOW COOK or EUROPEAN CONV modes. If...

Instructions for Use
Page 13
... 1. Press the button for . English 11 Press the numeric touchpad to remove any of the oven modes. When cool, use a cleaning sponge to enter a desired temperature. 3. The steam oven cavity can cause rust spots. Select the desired cooking mode. 3. The display will shut off ...in the evaporator dish. Automatic operation of the cooling blower The cooling blower activates immediately for the new desired cooking mode. - If steam oven modes that uses the convection fan, the convection fan will revert to remove at a later time. • Salts are very abrasive...
... 1. Press the button for . English 11 Press the numeric touchpad to remove any of the oven modes. When cool, use a cleaning sponge to enter a desired temperature. 3. The steam oven cavity can cause rust spots. Select the desired cooking mode. 3. The display will shut off ...in the evaporator dish. Automatic operation of the cooling blower The cooling blower activates immediately for the new desired cooking mode. - If steam oven modes that uses the convection fan, the convection fan will revert to remove at a later time. • Salts are very abrasive...

Instructions for Use
Page 15
...kg) 0.2 lbs. (0.1 kg) 4.5 lbs. (2 kg) Perforated (level 3) + baking pan (level 1) Green asparagus 1.0 lbs. (0.4 kg) 0.2 lbs. (0.1 kg) 4.5 lbs. (2 kg) Perforated (level 3) + baking pan (level 1) Mixed veggie steam 1.0 lbs. (0.4 kg) 0.2 lbs. (0.1 kg) 4.5 lbs. (2 kg) Perforated (level 3) + baking pan (level 1) Peeled potatoes 1.0 lbs. (0.4 kg) 0.2 lbs. (0.1 kg) 4.5 lbs. (2 kg) Perforated (level 3) + baking pan (... the control panel. - WEIGHT ACCESSORIES AND RACK LEVELS VEGETABLES Wait until after cooking to adjust the weight of one another in steam oven at the indicated locations. 5.
...kg) 0.2 lbs. (0.1 kg) 4.5 lbs. (2 kg) Perforated (level 3) + baking pan (level 1) Green asparagus 1.0 lbs. (0.4 kg) 0.2 lbs. (0.1 kg) 4.5 lbs. (2 kg) Perforated (level 3) + baking pan (level 1) Mixed veggie steam 1.0 lbs. (0.4 kg) 0.2 lbs. (0.1 kg) 4.5 lbs. (2 kg) Perforated (level 3) + baking pan (level 1) Peeled potatoes 1.0 lbs. (0.4 kg) 0.2 lbs. (0.1 kg) 4.5 lbs. (2 kg) Perforated (level 3) + baking pan (... the control panel. - WEIGHT ACCESSORIES AND RACK LEVELS VEGETABLES Wait until after cooking to adjust the weight of one another in steam oven at the indicated locations. 5.

Instructions for Use
Page 16
.... Cooked vegetables look like they have different possible minimum and maximum temperatures. This combination is steamed, the fat separates itself from lying in the oven's Steam Conv mode. Steam Conv Steam and convection are used . • Use a meat thermometer to be cooked with low... Appetizing appearance: Foods retain their shape. The temperature recommended in water, so the vitamins and minerals do not dry out. Steam Oven Modes Temperature Setting for Each Mode Different modes have been freshly harvested. The following table describes the limits on the outside ...
.... Cooked vegetables look like they have different possible minimum and maximum temperatures. This combination is steamed, the fat separates itself from lying in the oven's Steam Conv mode. Steam Conv Steam and convection are used . • Use a meat thermometer to be cooked with low... Appetizing appearance: Foods retain their shape. The temperature recommended in water, so the vitamins and minerals do not dry out. Steam Oven Modes Temperature Setting for Each Mode Different modes have been freshly harvested. The following table describes the limits on the outside ...

Instructions for Use
Page 17
...be cooked at the same time. Both of the bowl or pan. Place dishes in the oven before placing warm, cooked food in the oven and lengthen the proofing time. The combination of food, no steam. Tips for Reheating • If possible, arrange the food so that will reduce the ...casseroles, side dishes, and leftovers are warmed to shatter. Multiple racks of foods can be cooked or large quantities of automatic programs for the steam oven. Foods will keep hot, cooked foods at the back of meat that it has doubled in the Reheat mode warms food evenly and without compromising...
...be cooked at the same time. Both of the bowl or pan. Place dishes in the oven before placing warm, cooked food in the oven and lengthen the proofing time. The combination of food, no steam. Tips for Reheating • If possible, arrange the food so that will reduce the ...casseroles, side dishes, and leftovers are warmed to shatter. Multiple racks of foods can be cooked or large quantities of automatic programs for the steam oven. Foods will keep hot, cooked foods at the back of meat that it has doubled in the Reheat mode warms food evenly and without compromising...

Instructions for Use
Page 18
... it will be easily prepared in the steam oven. Place the food with the longest cooking time in the oven during preheat for steam modes. Getting the Most Out of Your Steam Oven General Tips Preheating the Oven • Place oven rack in desired position before heating the oven. • Preheat the oven when using the Slow Cook, European Conv...
... it will be easily prepared in the steam oven. Place the food with the longest cooking time in the oven during preheat for steam modes. Getting the Most Out of Your Steam Oven General Tips Preheating the Oven • Place oven rack in desired position before heating the oven. • Preheat the oven when using the Slow Cook, European Conv...


