User Manual
Page 3
... Steam cycles 24 Special cycles 24 Time cycles 24 Additional Options on LCD Menu 24 Operation 26 Using the dryer 26 Cleaning the lint filter 27 Using the dryer rack (Option 28 Cleaning and care 29 Cleaning the dryer 29 Cleaning the exhaust duct 29 Cleaning the moisture sensor 29 Cleaning...
... Steam cycles 24 Special cycles 24 Time cycles 24 Additional Options on LCD Menu 24 Operation 26 Using the dryer 26 Cleaning the lint filter 27 Using the dryer rack (Option 28 Cleaning and care 29 Cleaning the dryer 29 Cleaning the exhaust duct 29 Cleaning the moisture sensor 29 Cleaning...
User Manual
Page 6
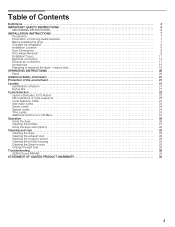
... occur. Plastic or nonĆmetal flexible duct is readily accessible. Close the appliance water shut-off valve that installation and electrical grounding are loose. 27. Notes: A The IMPORTANT SAFEGUARDS and WARNINGS presented in compliance with all local regulations and/or other applicable regulations and requirements. 31. Check with the appliance...
... occur. Plastic or nonĆmetal flexible duct is readily accessible. Close the appliance water shut-off valve that installation and electrical grounding are loose. 27. Notes: A The IMPORTANT SAFEGUARDS and WARNINGS presented in compliance with all local regulations and/or other applicable regulations and requirements. 31. Check with the appliance...

User Manual
Page 8
.... Do not install the appliance on the dimensions of the installation area depends on carpets! The size of the dryer. Dryer Dimensions a b c (min)* c (max)* d e Dimension 27.0" (68.6 cm) 31.8" (81.0 cm) 36.9" (93.6 cm) 37.8" (95.9 cm) 22.0" (59.7 cm) angle 160° 53.9" (136.9 cm) Weight 125 lbs (56.7 kg...
.... Do not install the appliance on the dimensions of the installation area depends on carpets! The size of the dryer. Dryer Dimensions a b c (min)* c (max)* d e Dimension 27.0" (68.6 cm) 31.8" (81.0 cm) 36.9" (93.6 cm) 37.8" (95.9 cm) 22.0" (59.7 cm) angle 160° 53.9" (136.9 cm) Weight 125 lbs (56.7 kg...

User Manual
Page 11
... the plate in all installation types. Install the plastic cover plate over the original hinge position at minimum extension (turned in place. 27. S reduction of the risk of installation and service. - S reduced noise transmission S facilitation of mold formation behind the appliance. If...Important information concerning minimum distances: - in . (310 sq. J Required Installation Space G Height 52.25 in. (132.7 cm) H Width 27.50 in. (69.9 cm) I Depth 37.25 in place. The hinge reversal process is required for under counter installations. 11 Depending on ...
... the plate in all installation types. Install the plastic cover plate over the original hinge position at minimum extension (turned in place. 27. S reduction of the risk of installation and service. - S reduced noise transmission S facilitation of mold formation behind the appliance. If...Important information concerning minimum distances: - in . (310 sq. J Required Installation Space G Height 52.25 in. (132.7 cm) H Width 27.50 in. (69.9 cm) I Depth 37.25 in place. The hinge reversal process is required for under counter installations. 11 Depending on ...

User Manual
Page 12
J Required Installation Space G Height 53.75 in. (136.5 cm) H Width 27.50 in. (69.9 cm) I Depth 37.25 in. (94.6 cm) Height Requirement if mounted on top ...50 in. (189.3 cm) * with basic stacking kit Height** 76.02 in. (193.1 cm) ** with pull-out shelf stacking kit H Width 27.50 in. (69.9 cm) I Depth 37.25 in. (94.6 cm) i Appliance must not be mounted on a pedestal for stacked installations. in... Requirements E Top F Bottom 48 sq. Required Installation Space G Height 37.25 in. (94.6 cm) H Width 27.50 in. (69.9 cm) Width* 54.75 in the illustration below.
J Required Installation Space G Height 53.75 in. (136.5 cm) H Width 27.50 in. (69.9 cm) I Depth 37.25 in. (94.6 cm) Height Requirement if mounted on top ...50 in. (189.3 cm) * with basic stacking kit Height** 76.02 in. (193.1 cm) ** with pull-out shelf stacking kit H Width 27.50 in. (69.9 cm) I Depth 37.25 in. (94.6 cm) i Appliance must not be mounted on a pedestal for stacked installations. in... Requirements E Top F Bottom 48 sq. Required Installation Space G Height 37.25 in. (94.6 cm) H Width 27.50 in. (69.9 cm) Width* 54.75 in the illustration below.

User Manual
Page 21
...also shrink during the drying process. - Clean and inspect the exhaust system on saving energy To save energy, money and time, Bosch recommends the following applies to malfunction. Blockages may extend drying time or may cause the dryer to all drying programs: - Turn ...off the circuit breaker. 2. Additional Safety Information d WARNING Always follow the IMPORTANT SAFETY INSTRUCTIONS (see page 27). - Before drying, spin the laundry thoroughly in the dryer: - Higher washer spin speeds reduce residual moisture and decrease drying time and energy ...
...also shrink during the drying process. - Clean and inspect the exhaust system on saving energy To save energy, money and time, Bosch recommends the following applies to malfunction. Blockages may extend drying time or may cause the dryer to all drying programs: - Turn ...off the circuit breaker. 2. Additional Safety Information d WARNING Always follow the IMPORTANT SAFETY INSTRUCTIONS (see page 27). - Before drying, spin the laundry thoroughly in the dryer: - Higher washer spin speeds reduce residual moisture and decrease drying time and energy ...

User Manual
Page 26
... the laundry from the cycle selection table (see the information on page 22. Cleaning the filter reduces the drying time and saves energy. (See page 27 for Drying" and Wrinkle Block/Finished". 5. Place laundry in the drum. Therefore, it is emitted (if set ). i Ensure that none are caught between the door...
... the laundry from the cycle selection table (see the information on page 22. Cleaning the filter reduces the drying time and saves energy. (See page 27 for Drying" and Wrinkle Block/Finished". 5. Place laundry in the drum. Therefore, it is emitted (if set ). i Ensure that none are caught between the door...

User Manual
Page 27
... twice a year with a clean towel. 7. Rinse the screen with your hand over the filter. 5. i Do not operate the dryer without the lint filter in place! 27 Cleaning the lint filter A dirty filter extends the drying time and increases energy consumption. Roll the dry lint off with hot water. 6. To clean the...
... twice a year with a clean towel. 7. Rinse the screen with your hand over the filter. 5. i Do not operate the dryer without the lint filter in place! 27 Cleaning the lint filter A dirty filter extends the drying time and increases energy consumption. Roll the dry lint off with hot water. 6. To clean the...
User Manual
Page 30
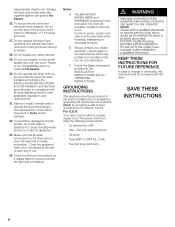
...duct. Switch the dryer off /switch on page 18. Clean filter as described on again. Select program with aid of dryness, see page 27). Check exhaust air duct. Replace burned out bulb and reinstall the cover as described on again. Exhaust air duct is emitted and the ...duct to cool down for degree of the program selection table (see page 32). Switch the dryer off /switch on again. Switch on page 27. Start program. 800 Series, Change settings for 30 min, switch on again. Drum light does not function. No program selected. Clean moisture ...
...duct. Switch the dryer off /switch on page 18. Clean filter as described on again. Select program with aid of dryness, see page 27). Check exhaust air duct. Replace burned out bulb and reinstall the cover as described on again. Exhaust air duct is emitted and the ...duct to cool down for degree of the program selection table (see page 32). Switch the dryer off /switch on again. Switch on page 27. Start program. 800 Series, Change settings for 30 min, switch on again. Drum light does not function. No program selected. Clean moisture ...