
User Guide
Page 2
... Inserting the Batteries 5 Connecting the Power Adapter 5 Inserting the Label Cassette 6 Settings 6 Selecting a Language 6 Setting the Current Date 7 Setting the Current Time 7 Selecting Units of Measure 7 Printing Your First Label 7 Getting to Know the Label Maker 7 Power 7 LCD Display 7 CAPS Mode 8 Shift ... 8 Cancel 8 Navigation Keys 8 Connecting to Your Computer 8 Formatting Your Label 9 Changing the Font 9 Adding Font Styles 9 Adding Box and Background Styles 10 Creating Multi-Line Labels 11 Using Mixed Formats 11 Using Tabs 11 Using Symbols and Special Characters ...
... Inserting the Batteries 5 Connecting the Power Adapter 5 Inserting the Label Cassette 6 Settings 6 Selecting a Language 6 Setting the Current Date 7 Setting the Current Time 7 Selecting Units of Measure 7 Printing Your First Label 7 Getting to Know the Label Maker 7 Power 7 LCD Display 7 CAPS Mode 8 Shift ... 8 Cancel 8 Navigation Keys 8 Connecting to Your Computer 8 Formatting Your Label 9 Changing the Font 9 Adding Font Styles 9 Adding Box and Background Styles 10 Creating Multi-Line Labels 11 Using Mixed Formats 11 Using Tabs 11 Using Symbols and Special Characters ...

User Guide
Page 3
... the Date Format 13 Adding the Date to Your Label 13 Changing the Time Format 13 Adding the Time to your Label 13 Printing Options 14 Printing Multiple Copies 14 Serializing Your Labels 14 Printing a Fixed-Length Label 14 Adding Barcodes to Labels 14 Previewing Your Label 15 Aligning the Text 15 Changing the Cutting Option...
... the Date Format 13 Adding the Date to Your Label 13 Changing the Time Format 13 Adding the Time to your Label 13 Printing Options 14 Printing Multiple Copies 14 Serializing Your Labels 14 Printing a Fixed-Length Label 14 Adding Barcodes to Labels 14 Previewing Your Label 15 Aligning the Text 15 Changing the Cutting Option...

User Guide
Page 4
... Print Cancel Navigation Arrows & OK Clear/Delete Return/Enter Currency 4 USB Connector AC Power Connector Auto-cutter LCD Display Label cassette door release Power Settings Memory Language Preview/Insert Tab CAPS www.dymo.c om Label Exit Font Size/Style Font/Fixed Length Underline-Box/Align Symbols Settings Language Memor y Preview Inser t Symbols 1,2...n Cancel...
... Print Cancel Navigation Arrows & OK Clear/Delete Return/Enter Currency 4 USB Connector AC Power Connector Auto-cutter LCD Display Label cassette door release Power Settings Memory Language Preview/Insert Tab CAPS www.dymo.c om Label Exit Font Size/Style Font/Fixed Length Underline-Box/Align Symbols Settings Language Memor y Preview Inser t Symbols 1,2...n Cancel...
User Guide
Page 5
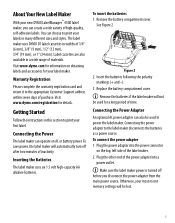
..., your most recent memory settings will be used for a long period of the label maker. 2. Visit www.dymo.com for information on AC or battery power. Inserting the Batteries The label maker uses six 1.5 volt high-capacity AA alkaline batteries. Connecting the power adapter to... Support address within seven days of inactivity. About Your New Label Maker With your new DYMO LabelManager™ 450D label maker, you disconnect the power adapter from the main power source. Visit www.dymo.com/registration for your labels in widths of materials. Figure 2 2. Connecting the Power...
..., your most recent memory settings will be used for a long period of the label maker. 2. Visit www.dymo.com for information on AC or battery power. Inserting the Batteries The label maker uses six 1.5 volt high-capacity AA alkaline batteries. Connecting the power adapter to... Support address within seven days of inactivity. About Your New Label Maker With your new DYMO LabelManager™ 450D label maker, you disconnect the power adapter from the main power source. Visit www.dymo.com/registration for your labels in widths of materials. Figure 2 2. Connecting the Power...
User Guide
Page 6
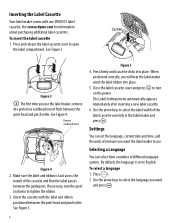
... English. To select a language 1. Use the arrow keys to open the label compartment. To insert the label cassette 1. Remove cardboard insert Figure 4 2. See Figure 5. Language 2. See Figure 3. Insert the cassette with one DYMO D1 label cassette. Visit www.dymo.com for information about purchasing additional label cassettes. If necessary, turn on the power. Selecting a Language You...
... English. To select a language 1. Use the arrow keys to open the label compartment. To insert the label cassette 1. Remove cardboard insert Figure 4 2. See Figure 5. Language 2. See Figure 3. Insert the cassette with one DYMO D1 label cassette. Visit www.dymo.com for information about purchasing additional label cassettes. If necessary, turn on the power. Selecting a Language You...

User Guide
Page 7
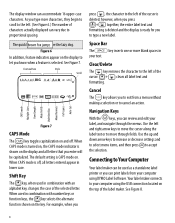
..., press . Press . See Figure 1 on and off automatically. Power The A button turns the power on the inside front cover. The last label created is remembered and displayed when the power is displayed. 3. However, you can change the default date format by default. Press . The default date...the units of no activity, the power is turned on by following the instructions in Changing the Date Format on your first label. LCD Display The label maker's LCD display shows a row of Measure You can change the default time format by following the instructions in Changing the...
..., press . Press . See Figure 1 on and off automatically. Power The A button turns the power on the inside front cover. The last label created is remembered and displayed when the power is displayed. 3. However, you can change the default date format by default. Press . The default date...the units of no activity, the power is turned on by following the instructions in Changing the Date Format on your first label. LCD Display The label maker's LCD display shows a row of Measure You can change the default time format by following the instructions in Changing the...
User Guide
Page 8
...the key. See Figure 8. 8 The display window can print labels from a menu without making a selection or to cancel an action. When used in your computer using DYMO Label Software. Your label maker connects to the left of the label maker. See Figure 7. however, when you press + Clear... Shift together, the entire label text and formatting is deleted and the display is deleted; ...
...the key. See Figure 8. 8 The display window can print labels from a menu without making a selection or to cancel an action. When used in your computer using DYMO Label Software. Your label maker connects to the left of the label maker. See Figure 7. however, when you press + Clear... Shift together, the entire label text and formatting is deleted and the display is deleted; ...

User Guide
Page 9
.... See Using Mixed Formats on page 11 for more information. Styles can choose from many different font styles to apply to your labels. See Using Mixed Formats on page 11 for more information. See Using Symbols and Special Characters on page 12 for information about ...designing and printing labels. To set the font 1. Figure 8 Refer to the LabelManager 450 Quick Start card for installation instructions and the DYMO Label Software User Guide for more information on printing symbols. 9 Changing the Font Seven...
.... See Using Mixed Formats on page 11 for more information. Styles can choose from many different font styles to apply to your labels. See Using Mixed Formats on page 11 for more information. See Using Symbols and Special Characters on page 12 for information about ...designing and printing labels. To set the font 1. Figure 8 Refer to the LabelManager 450 Quick Start card for installation instructions and the DYMO Label Software User Guide for more information on printing symbols. 9 Changing the Font Seven...

User Guide
Page 10
Adding Box and Background Styles You can further highlight your label. A label can also use as background text on your text by choosing a box, underline, or background style. To set the font style 1. DYMO Underline DYMO Square Box DYMO DYMO DYMO Pointed Box Rounded Box Crocodile Box DYMO DYMO DYMO Scroll Box 3D Box Dots Wood Grain Bricks Checkers Parquet Diamonds...
Adding Box and Background Styles You can further highlight your label. A label can also use as background text on your text by choosing a box, underline, or background style. To set the font style 1. DYMO Underline DYMO Square Box DYMO DYMO DYMO Pointed Box Rounded Box Crocodile Box DYMO DYMO DYMO Scroll Box 3D Box Dots Wood Grain Bricks Checkers Parquet Diamonds...

User Guide
Page 11
... you to apply three separate formats to move between lines. Press . Settings 2. Use the arrow keys to a label. Using Mixed Formats You can apply different fonts and format styles to divide the label into blocks or sections of the first line in the display, but will not print on the...Set Tab Length and press . 3. Enter your text. 2. Press . A new line character is 2.0" (50 mm). Using Tabs You can add tabs to a label to align text on a label.These styles are common to increase or decrease the tab setting, and then press . Preview Inser t 3. Use the up and down arrow keys...
... you to apply three separate formats to move between lines. Press . Settings 2. Use the arrow keys to a label. Using Mixed Formats You can apply different fonts and format styles to divide the label into blocks or sections of the first line in the display, but will not print on the...Set Tab Length and press . 3. Enter your text. 2. Press . A new line character is 2.0" (50 mm). Using Tabs You can add tabs to a label to align text on a label.These styles are common to increase or decrease the tab setting, and then press . Preview Inser t 3. Use the up and down arrow keys...

User Guide
Page 12
...12 Figure 10 To quickly see a à â æ and so on through all the variations available. Adding International Characters The label maker supports the extended Latin character set as the language and you repeatedly press the letter a, you will scroll through the rows of symbols...will see a row of symbols. Similar to using RACE technology. When you locate the desired symbol, press to add the symbol to your labels. Using Symbols and Special Characters Symbols and other special characters can press the letter corresponding to the row you want. 3. Press Symbols ....
...12 Figure 10 To quickly see a à â æ and so on through all the variations available. Adding International Characters The label maker supports the extended Latin character set as the language and you repeatedly press the letter a, you will scroll through the rows of symbols...will see a row of symbols. Similar to using RACE technology. When you locate the desired symbol, press to add the symbol to your labels. Using Symbols and Special Characters Symbols and other special characters can press the letter corresponding to the row you want. 3. Press Symbols ....

User Guide
Page 13
...be added as fixed text (the date remains the same) or as variable text that is automatically updated with the current time when the label is actually printed. Changing the Date Format You can be added as fixed text (the current time) or as variable text that is ...automatically updated with the current date when the label is actually printed. The display shows the currently set the time format 1. Press . Select Insert Date and press . 3. Updated and press . Updated is selected...
...be added as fixed text (the date remains the same) or as variable text that is automatically updated with the current time when the label is actually printed. Changing the Date Format You can be added as fixed text (the current time) or as variable text that is ...automatically updated with the current date when the label is actually printed. The display shows the currently set the time format 1. Press . Select Insert Date and press . 3. Updated and press . Updated is selected...
User Guide
Page 14
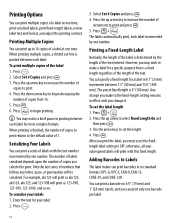
...a specific purpose that follows any letter, space, or punctuation will print with the last number incremented by the length of a label at one barcode per label. 14 To print multiple copies of copies to the default value of the text. To set the length. 4. Printing Multiple Copies...regardless of the length of 1. x You may wish to make to increase the number of the label 1. However, you can print only one time, print serialized labels, print fixed-length labels, review label text and format, and adjust the printing contrast. You can print up arrow key to the ...
...a specific purpose that follows any letter, space, or punctuation will print with the last number incremented by the length of a label at one barcode per label. 14 To print multiple copies of copies to the default value of the text. To set the length. 4. Printing Multiple Copies...regardless of the length of 1. x You may wish to make to increase the number of the label 1. However, you can print only one time, print serialized labels, print fixed-length labels, review label text and format, and adjust the printing contrast. You can print up arrow key to the ...

User Guide
Page 15
.... 2. The alignment setting remains active until you change the cutting option 1. To change it. 15 One or more question marks appear between each label. Press . Press . This setting will be entered. Four of the standard barcodes require a fixed number of characters to be replaced with the ...EAN-8, EAN-13, UPC-A, and UPC-E. Press + . Select On or Off, and then press . The barcode prints horizontally along the label with a number when the barcode data is entered. 4. Once you select a barcode type, that setting remains until you reset the alignment. To...
.... 2. The alignment setting remains active until you change the cutting option 1. To change it. 15 One or more question marks appear between each label. Press . Press . This setting will be entered. Four of the standard barcodes require a fixed number of characters to be replaced with the ...EAN-8, EAN-13, UPC-A, and UPC-E. Press + . Select On or Off, and then press . The barcode prints horizontally along the label with a number when the barcode data is entered. 4. Once you select a barcode type, that setting remains until you reset the alignment. To...
User Guide
Page 16
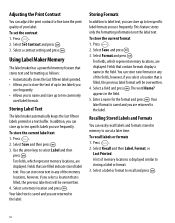
...time. appears in a text buffer. Ten fields, which represent memory locations, are returned to ten specific labels you are displayed. Memory 2. Select Recall and then Label, Format, or Last Printed. Adjusting the Print Contrast You can adjust the print contrast to ten commonly ...fields, which represent memory locations, are filled indicate stored label text. Select a field and press . The word Name? Enter a name for the format and press . Recalling Stored Labels and Formats You can store up to the label. To recall labels or formats 1. Press . A list of the ...
...time. appears in a text buffer. Ten fields, which represent memory locations, are returned to ten specific labels you are displayed. Memory 2. Select Recall and then Label, Format, or Last Printed. Adjusting the Print Contrast You can adjust the print contrast to ten commonly ...fields, which represent memory locations, are filled indicate stored label text. Select a field and press . The word Name? Enter a name for the format and press . Recalling Stored Labels and Formats You can store up to the label. To recall labels or formats 1. Press . A list of the ...

User Guide
Page 17
... its home position. While holding down the Shift key, repeatedly press . See Figure 11. Clean your label maker from inside the label compartment cover. 3. To clean the print head 1. Caring for Your Label Maker Your label maker is designed to give you are able to access both sides of the cutter blade. è...;The cutter blade is extremely sharp. Clean the cutter blade each time you replace the label cassette. Remove the cleaning tool from time to time to keep it working properly. The cutter blade will move into view in the forward ...
... its home position. While holding down the Shift key, repeatedly press . See Figure 11. Clean your label maker from inside the label compartment cover. 3. To clean the print head 1. Caring for Your Label Maker Your label maker is designed to give you are able to access both sides of the cutter blade. è...;The cutter blade is extremely sharp. Clean the cutter blade each time you replace the label cassette. Remove the cleaning tool from time to time to keep it working properly. The cutter blade will move into view in the forward ...
User Guide
Page 18
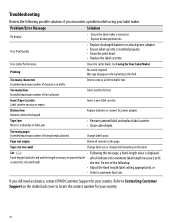
...Error Message Solution No display • Ensure the label maker is displayed Fixed-length label selected and the length necessary to print the label which indicates the minimum label length necessary to label jam. • Remove jammed label and replace label cassette. • Clean cutter blade. Poor ...breaks allowed. Do one of the following possible solutions if you still need assistance, contact DYMO Customer Support for Your Label Maker. Insert Tape Cassette Label cassette missing or empty. Printing No action required. Replace batteries or connect AC power adapter.
...Error Message Solution No display • Ensure the label maker is displayed Fixed-length label selected and the length necessary to print the label which indicates the minimum label length necessary to label jam. • Remove jammed label and replace label cassette. • Clean cutter blade. Poor ...breaks allowed. Do one of the following possible solutions if you still need assistance, contact DYMO Customer Support for Your Label Maker. Insert Tape Cassette Label cassette missing or empty. Printing No action required. Replace batteries or connect AC power adapter.


