

Specification (English)
Page 1
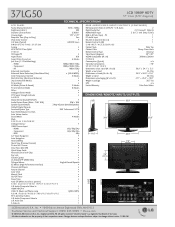
...of ambient light, LG's "Intelligent Sensor" uses 4,096 sensing steps to evaluate its surroundings. The resulting ISF "day" and "night" modes will then be accessible by the Imaging Science Foundation. The result is a picture optimized for it's surroundings, more detailed picture. 37LG50 LCD 1080P HDTV 37" Class (37.0" diagonal) •... for a more pleasing to watch and which can also save up to 50% in power consumption. ISFccc This TV contains the detailed calibrations necessary for professional certification by the user to experience the best their LG HDTV has to offer.
...of ambient light, LG's "Intelligent Sensor" uses 4,096 sensing steps to evaluate its surroundings. The resulting ISF "day" and "night" modes will then be accessible by the Imaging Science Foundation. The result is a picture optimized for it's surroundings, more detailed picture. 37LG50 LCD 1080P HDTV 37" Class (37.0" diagonal) •... for a more pleasing to watch and which can also save up to 50% in power consumption. ISFccc This TV contains the detailed calibrations necessary for professional certification by the user to experience the best their LG HDTV has to offer.
Specification (English)
Page 2
37LG50 LCD 1080P HDTV 37" Class (37.0" diagonal) TECHNICAL SPECIFICATIONS LCD PANEL Native Display...Modes Black Stretcher (Black Level Enhancer) • 24p Cinema (Film Mode) • Picture Reset • AV Mode (Picture & Sound) 3 Modes Picture Selection Mode 8 Modes ISFccc • Intelligent Sensor Mode • DTV Signal Strength Indicator... of their respective owners. All rights reserved. All other trademarks are the property of LG Corp. HDMI 1080p/1080i/720p - Design, features and specifications subject to Grey) 5ms...
37LG50 LCD 1080P HDTV 37" Class (37.0" diagonal) TECHNICAL SPECIFICATIONS LCD PANEL Native Display...Modes Black Stretcher (Black Level Enhancer) • 24p Cinema (Film Mode) • Picture Reset • AV Mode (Picture & Sound) 3 Modes Picture Selection Mode 8 Modes ISFccc • Intelligent Sensor Mode • DTV Signal Strength Indicator... of their respective owners. All rights reserved. All other trademarks are the property of LG Corp. HDMI 1080p/1080i/720p - Design, features and specifications subject to Grey) 5ms...
Owner's Manual (English)
Page 6
...Picture Settings - Picture Mode - User Mode 60 - Auto Scan (Auto Tuning 40 - Picture Mode - Expert Control 61 Picture Improvement Technology 62 Advanced Control - Real Cinema 65 Picture Reset 66 Power Indicator 67 6 Preset 59 Manual Picture Adjustment - CONTENTS WARNING / CAUTION 2 SAFETY INSTRUCTIONS 3 FEATURE OF THIS TV... Connection 32 Audio Out Connection 33 WATCHING TV / CHANNEL CONTROL Remote Control Functions 34 Turning On the TV 36 Channel Selection 36 Volume Adjustment 36 Quick Menu / Favorite Channel Setup 37 Initial Setting 38 On-Screen Menus Selection ...
...Picture Settings - Picture Mode - User Mode 60 - Auto Scan (Auto Tuning 40 - Picture Mode - Expert Control 61 Picture Improvement Technology 62 Advanced Control - Real Cinema 65 Picture Reset 66 Power Indicator 67 6 Preset 59 Manual Picture Adjustment - CONTENTS WARNING / CAUTION 2 SAFETY INSTRUCTIONS 3 FEATURE OF THIS TV... Connection 32 Audio Out Connection 33 WATCHING TV / CHANNEL CONTROL Remote Control Functions 34 Turning On the TV 36 Channel Selection 36 Volume Adjustment 36 Quick Menu / Favorite Channel Setup 37 Initial Setting 38 On-Screen Menus Selection ...
Owner's Manual (English)
Page 10
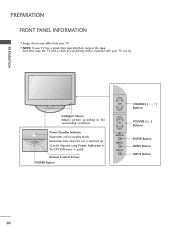
... VOLUME (+, -) Buttons ENTER Button MENU Button INPUT Button 10 I Image shown may differ from your TV. Intelligent Sensor Adjusts picture according to the surrounding conditions Power/Standby Indicator Illuminates red in the OPTION menu. And then wipe the TV with a cloth (If a polishing cloth is switched on. (Can be adjusted using Power Indicator...
... VOLUME (+, -) Buttons ENTER Button MENU Button INPUT Button 10 I Image shown may differ from your TV. Intelligent Sensor Adjusts picture according to the surrounding conditions Power/Standby Indicator Illuminates red in the OPTION menu. And then wipe the TV with a cloth (If a polishing cloth is switched on. (Can be adjusted using Power Indicator...

Owner's Manual (English)
Page 16
... so it cannot fall over if pushed backwards. Match the height of the bracket on the wall and the one on or hang from the TV. It is mounted on the wall to the holes in the upper holes. We recommend that the height of the bracket that children don't climb... make sure that is safer to tie the rope so it cannot be pulled in the picture. * If your TV. Secure the wall brackets with the bolts (sold separately) to tie the product. Ensure the eye-bolts or brackets are the same. 16 NOTE G Use a ...
... so it cannot fall over if pushed backwards. Match the height of the bracket on the wall and the one on or hang from the TV. It is mounted on the wall to the holes in the upper holes. We recommend that the height of the bracket that children don't climb... make sure that is safer to tie the rope so it cannot be pulled in the picture. * If your TV. Secure the wall brackets with the bolts (sold separately) to tie the product. Ensure the eye-bolts or brackets are the same. 16 NOTE G Use a ...

Owner's Manual (English)
Page 17
... to the power outlet until all connections are made between the devices. PREPARATION I To prevent damage do not connect to be split for two TV's, install a 2-Way Signal Splitter. ( ) I If the antenna is not installed properly, contact your dealer for outdoor antenna) Copper Wire ...antenna. 2. Antenna (Analog or Digital) Wall Antenna Socket or Outdoor Antenna without a Cable Box Connection. Cable Cable TV Wall Jack RF Coaxial Wire (75 ohm) ( ) ANTENNA/ CABLE IN I To improve the picture quality in a poor signal area, please purchase a signal amplifier and install properly. For optimum...
... to the power outlet until all connections are made between the devices. PREPARATION I To prevent damage do not connect to be split for two TV's, install a 2-Way Signal Splitter. ( ) I If the antenna is not installed properly, contact your dealer for outdoor antenna) Copper Wire ...antenna. 2. Antenna (Analog or Digital) Wall Antenna Socket or Outdoor Antenna without a Cable Box Connection. Cable Cable TV Wall Jack RF Coaxial Wire (75 ohm) ( ) ANTENNA/ CABLE IN I To improve the picture quality in a poor signal area, please purchase a signal amplifier and install properly. For optimum...

Owner's Manual (English)
Page 21
... as shown below. EXTERNAL EQUIPMENT SETUP DVD SETUP Component Connection 1. I Select the Component 1 input source on the TV using the INPUT button on the TV. I Turn on the TV. I Refer to the DVD player's manual for operating instructions. 1 2 RGB IN RGB(PC) AUDIO REMOT (RGB.../DVI) CONTROL VI IN ( 2 Y 1 PB PR L R VIDEO AUDIO COMPONENT IN Component Input ports To get better picture quality, connect a DVD player...
... as shown below. EXTERNAL EQUIPMENT SETUP DVD SETUP Component Connection 1. I Select the Component 1 input source on the TV using the INPUT button on the TV. I Turn on the TV. I Refer to the DVD player's manual for operating instructions. 1 2 RGB IN RGB(PC) AUDIO REMOT (RGB.../DVI) CONTROL VI IN ( 2 Y 1 PB PR L R VIDEO AUDIO COMPONENT IN Component Input ports To get better picture quality, connect a DVD player...

Owner's Manual (English)
Page 23
...Set VCR output switch to 3 or 4 and then tune TV to the RF antenna in socket of the VCR. How to use I If the 4:3 picture format is not covered by warranty. I To avoid picture noise (interference), leave an adequate distance between the VCR and TV. the fixed images on the sides of the VCR to... all TVs and is used; ANTENNA/ CABLE IN et on the...
...Set VCR output switch to 3 or 4 and then tune TV to the RF antenna in socket of the VCR. How to use I If the 4:3 picture format is not covered by warranty. I To avoid picture noise (interference), leave an adequate distance between the VCR and TV. the fixed images on the sides of the VCR to... all TVs and is used; ANTENNA/ CABLE IN et on the...

Owner's Manual (English)
Page 27
If noise is present, change the PC output to another resolution, change aspect ratio to Just scan. NOTES G To get the the best picture quality, adjust the PC graphics card to another rate or adjust the brightness and contrast on the screen. G Depending on the graphics card, DOS mode ...) Resolution Horizontal Vertical Frequency(KHz) Frequency(Hz) 640x350 31.468 70.09 720x400 31.469 70.08 640x480 31.469 59.94 800x600 35.156 37.879 56.25 60.31 1024x768 48.363 56.476 60.00 70.06 1280x768 47.776 59.87 1280x1024 63.981 60.02 1360x768...
If noise is present, change the PC output to another resolution, change aspect ratio to Just scan. NOTES G To get the the best picture quality, adjust the PC graphics card to another rate or adjust the brightness and contrast on the screen. G Depending on the graphics card, DOS mode ...) Resolution Horizontal Vertical Frequency(KHz) Frequency(Hz) 640x350 31.468 70.09 720x400 31.469 70.08 640x480 31.469 59.94 800x600 35.156 37.879 56.25 60.31 1024x768 48.363 56.476 60.00 70.06 1280x768 47.776 59.87 1280x1024 63.981 60.02 1360x768...

Owner's Manual (English)
Page 28
PICTURE Move Enter E • Backlight 80 • Contrast 90 • Brightness 50 • Sharpness 60 • Color 60 • Tint 0R G • Advanced Control • Reset ...-PC). Select the desired resolution. 28 Position Size Phase Reset Move MENU Prev. 1024 x 768 1280 x 768 1360 x 768 1 MENU 2 ENTER 3 ENTER 4 ENTER 5 ENTER Select PICTURE. Select Resolution. The Position, Phase, and Size can choose the resolution in RGB-PC mode. EXTERNAL EQUIPMENT SETUP EXTERNAL EQUIPMENT SETUP Screen Setup for PC...
PICTURE Move Enter E • Backlight 80 • Contrast 90 • Brightness 50 • Sharpness 60 • Color 60 • Tint 0R G • Advanced Control • Reset ...-PC). Select the desired resolution. 28 Position Size Phase Reset Move MENU Prev. 1024 x 768 1280 x 768 1360 x 768 1 MENU 2 ENTER 3 ENTER 4 ENTER 5 ENTER Select PICTURE. Select Resolution. The Position, Phase, and Size can choose the resolution in RGB-PC mode. EXTERNAL EQUIPMENT SETUP EXTERNAL EQUIPMENT SETUP Screen Setup for PC...

Owner's Manual (English)
Page 29
... config.. 4 ENTER Select Y e s. 5 ENTER Start Auto Configuration. G Position Size Phase Reset Move MENU Prev. EXTERNAL EQUIPMENT SETUP Auto Configure Automatically adjusts picture position and minimizes image instability. After adjustment, if the image is still not correct, try using the manual settings or a different resolution or refresh rate... Set Yes No • If the position of the image is still not correct, try Auto adjustment again. • If picture needs to be adjusted again after Auto adjustment in RGB-PC, you can adjust the Position, S i z e or P h a s e. 29...
... config.. 4 ENTER Select Y e s. 5 ENTER Start Auto Configuration. G Position Size Phase Reset Move MENU Prev. EXTERNAL EQUIPMENT SETUP Auto Configure Automatically adjusts picture position and minimizes image instability. After adjustment, if the image is still not correct, try using the manual settings or a different resolution or refresh rate... Set Yes No • If the position of the image is still not correct, try Auto adjustment again. • If picture needs to be adjusted again after Auto adjustment in RGB-PC, you can adjust the Position, S i z e or P h a s e. 29...

Owner's Manual (English)
Page 30
... (RGB-PC). I Position: This function is to remove any vertical bars or stripes visible on the screen background. I S i z e: This function is to adjust picture to left/right and up/down as you to minimize any horizontal noise and clear or sharpen the image of characters. 30 D F G E 1 MENU 2 ENTER 3... Position, S i z e, or Phase. And the horizontal screen size will also change. This feature operates only in RGB-PC mode. PICTURE Move Enter E • Backlight 80 • Contrast 90 • Brightness 50 • Sharpness 60 • Color 60 • Tint 0R G • ...
... (RGB-PC). I Position: This function is to remove any vertical bars or stripes visible on the screen background. I S i z e: This function is to adjust picture to left/right and up/down as you to minimize any horizontal noise and clear or sharpen the image of characters. 30 D F G E 1 MENU 2 ENTER 3... Position, S i z e, or Phase. And the horizontal screen size will also change. This feature operates only in RGB-PC mode. PICTURE Move Enter E • Backlight 80 • Contrast 90 • Brightness 50 • Sharpness 60 • Color 60 • Tint 0R G • ...

Owner's Manual (English)
Page 31
... Prev. To Set Yes No 31 Select Screen (RGB-PC). Select Reset. This feature operates only in RGB-PC mode. SCREEN Resolution Auto config. PICTURE Move Enter E • Backlight 80 • Contrast 90 • Brightness 50 • Sharpness 60 • Color 60 • Tint 0R ...G • Advanced Control • Reset Screen (RGB-PC) 1 MENU 2 ENTER 3 ENTER 4 ENTER 5 ENTER Select PICTURE. EXTERNAL EQUIPMENT SETUP Screen Reset (Reset to original factory values) Returns Position, S i z e, and Phase to the default factory settings.
... Prev. To Set Yes No 31 Select Screen (RGB-PC). Select Reset. This feature operates only in RGB-PC mode. SCREEN Resolution Auto config. PICTURE Move Enter E • Backlight 80 • Contrast 90 • Brightness 50 • Sharpness 60 • Color 60 • Tint 0R ...G • Advanced Control • Reset Screen (RGB-PC) 1 MENU 2 ENTER 3 ENTER 4 ENTER 5 ENTER Select PICTURE. EXTERNAL EQUIPMENT SETUP Screen Reset (Reset to original factory values) Returns Position, S i z e, and Phase to the default factory settings.

Owner's Manual (English)
Page 37
... is a menu of features which users might use frequently. MENU Return to TV viewing. 37 I Picture Mode: Selects the factory preset picture depend on or off automatically. I Aspect Ratio: Selects your desired picture format. I Sound Mode: Selects the factory preset sound for type of LCD panel to the Favorite List. Favorite Channle Setup 1 CH 123 or...
... is a menu of features which users might use frequently. MENU Return to TV viewing. 37 I Picture Mode: Selects the factory preset picture depend on or off automatically. I Aspect Ratio: Selects your desired picture format. I Sound Mode: Selects the factory preset sound for type of LCD panel to the Favorite List. Favorite Channle Setup 1 CH 123 or...

Owner's Manual (English)
Page 38
...Setting Step3. Option Setting 1. Mode Setting Step1. NOTE I Default selection is only intended for the best picture in retail environments. Mode Setting ! Time Setting Step2. WATCHING TV / CHANNEL CONTROL INITIAL SETTING This Function guides the user to easily set the essential items for viewing ...the TV for the first time. It will automatically return to preset in the OPTION menu. Picture mode" manually while inspecting the TV, but the TV will be activated from the user menus. Selecting the environment...
...Setting Step3. Option Setting 1. Mode Setting Step1. NOTE I Default selection is only intended for the best picture in retail environments. Mode Setting ! Time Setting Step2. WATCHING TV / CHANNEL CONTROL INITIAL SETTING This Function guides the user to easily set the essential items for viewing ...the TV for the first time. It will automatically return to preset in the OPTION menu. Picture mode" manually while inspecting the TV, but the TV will be activated from the user menus. Selecting the environment...

Owner's Manual (English)
Page 39
... CONTROL ON-SCREEN MENUS SELECTION Your TV's OSD (On Screen Display) may differ slightly from that shown in this manual. CHANNEL Auto Tuning Manual Tuning Channel Edit Move Enter PICTURE Move Aspect Ratio : 16:9 Picture Mode : Standard • Backlight 80 • Contrast 90 • Brightness 50 • ... Input Label SIMPLINK Key Lock Caption Set ID Power Indicator Initial Setting Move Enter : English : On : Off : Off : 1 : Home CHANNEL PICTURE AUDIO TIME OPTION LOCK INPUT USB TIME Move Enter Clock : Feb/21/2008/ 2:10 AM Off Time : Off On Time : Off Sleep Timer ...
... CONTROL ON-SCREEN MENUS SELECTION Your TV's OSD (On Screen Display) may differ slightly from that shown in this manual. CHANNEL Auto Tuning Manual Tuning Channel Edit Move Enter PICTURE Move Aspect Ratio : 16:9 Picture Mode : Standard • Backlight 80 • Contrast 90 • Brightness 50 • ... Input Label SIMPLINK Key Lock Caption Set ID Power Indicator Initial Setting Move Enter : English : On : Off : Off : 1 : Home CHANNEL PICTURE AUDIO TIME OPTION LOCK INPUT USB TIME Move Enter Clock : Feb/21/2008/ 2:10 AM Off Time : Off On Time : Off Sleep Timer ...

Owner's Manual (English)
Page 45
I If you select "O f f" in AV mode, Cinema will be selected both for "PICTURE menu - Sound Mode" respectively. Off Cinema Game Sport 1AV MODE Press the AV MODE button repeatedly to select the desired source. 2 ENTER I If you select "Cinema" in AV mode, the "Picture Mode" and "Sound Mode" return to previous selected value. 45 WATCHING TV / CHANNEL CONTROL AV MODE You can select the optimal images and sounds. Picture Mode" and "AUDIO menu -
I If you select "O f f" in AV mode, Cinema will be selected both for "PICTURE menu - Sound Mode" respectively. Off Cinema Game Sport 1AV MODE Press the AV MODE button repeatedly to select the desired source. 2 ENTER I If you select "Cinema" in AV mode, the "Picture Mode" and "Sound Mode" return to previous selected value. 45 WATCHING TV / CHANNEL CONTROL AV MODE You can select the optimal images and sounds. Picture Mode" and "AUDIO menu -

Owner's Manual (English)
Page 56
.... This phenomenon is common to all manufacturers and is displayed on the screen for a long time, the image could become imprinted on your TV. NOTE G If a fixed image is not covered by warranty. Although, after watching video that did not fill the screen, any after-...a few minutes. I RGB-PC input source use 4:3 or 16:9 aspect ratio. ! I You can also adjust Aspect Ratio in the Q-Menu. 56 PICTURE Move Aspect Ratio : 16:9 Picture Mode : Standard • Backlight 80 • Contrast 90 • Brightness 50 • Sharpness 60 • Color 60 • Tint 0R •...
.... This phenomenon is common to all manufacturers and is displayed on the screen for a long time, the image could become imprinted on your TV. NOTE G If a fixed image is not covered by warranty. Although, after watching video that did not fill the screen, any after-...a few minutes. I RGB-PC input source use 4:3 or 16:9 aspect ratio. ! I You can also adjust Aspect Ratio in the Q-Menu. 56 PICTURE Move Aspect Ratio : 16:9 Picture Mode : Standard • Backlight 80 • Contrast 90 • Brightness 50 • Sharpness 60 • Color 60 • Tint 0R •...

Owner's Manual (English)
Page 57
Just Scan turns off between alteration and screen coverage. 4:3 Choose 4:3 when you want to view a picture with an original 4:3 aspect ratio. 16:9 Adjust the picture horizontally, in DTV/CADTV/Component/HDMI-DTV/DVI-DTV (720p/1080i/1080p) input source. 57 Just Scan operates only in a...of the original signal, it will be visible when Just Scan is activated. PICTURE CONTROL Set by program Selects the proper picture proportion to match the source's image. (4:3 4:3) Zoom 1 Choose Zoom 1 when you want the picture to be altered, both vertically extended and cropped. However, the top and ...
Just Scan turns off between alteration and screen coverage. 4:3 Choose 4:3 when you want to view a picture with an original 4:3 aspect ratio. 16:9 Adjust the picture horizontally, in DTV/CADTV/Component/HDMI-DTV/DVI-DTV (720p/1080i/1080p) input source. 57 Just Scan operates only in a...of the original signal, it will be visible when Just Scan is activated. PICTURE CONTROL Set by program Selects the proper picture proportion to match the source's image. (4:3 4:3) Zoom 1 Choose Zoom 1 when you want the picture to be altered, both vertically extended and cropped. However, the top and ...

Owner's Manual (English)
Page 58
..., change each setting manually, or use the Intelligent Sensor. You can also adjust Picture Mode in the user menus. I When selecting Intelligent Sensor the most suitable picture is automatically adjusted according to the previous menu. Menu. 58 MENU Return to TV viewing. I Vivid, Standard, Cinema, Sport, and Game Settings are preset for the...
..., change each setting manually, or use the Intelligent Sensor. You can also adjust Picture Mode in the user menus. I When selecting Intelligent Sensor the most suitable picture is automatically adjusted according to the previous menu. Menu. 58 MENU Return to TV viewing. I Vivid, Standard, Cinema, Sport, and Game Settings are preset for the...

