Specification (English)
Page 2
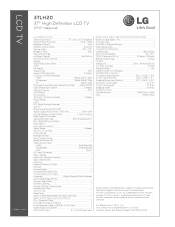
...) - All other trademarks are approximate. © 2009 LG Electronics U.S.A., Inc., Englewood Cliffs, NJ. LCD TV 37LH20 37" High Definition LCD TV (37.0" diagonal) LGusa.com LCD SPECIFICATION Screen Size (Class) 37" Class (37.0" diagonal) Native Display Resolution 1366 x 768p Brightness (cd...8226; Quick View (Previous Channel) • Quick Setup Guide • e-Manual • Parental Control w/V-Chip • Key Lock • Closed Caption • LG SIMPLINK (HDMI CEC) • CONVENIENCE FEATURES Language English/Spanish/French/Korean Auto...
...) - All other trademarks are approximate. © 2009 LG Electronics U.S.A., Inc., Englewood Cliffs, NJ. LCD TV 37LH20 37" High Definition LCD TV (37.0" diagonal) LGusa.com LCD SPECIFICATION Screen Size (Class) 37" Class (37.0" diagonal) Native Display Resolution 1366 x 768p Brightness (cd...8226; Quick View (Previous Channel) • Quick Setup Guide • e-Manual • Parental Control w/V-Chip • Key Lock • Closed Caption • LG SIMPLINK (HDMI CEC) • CONVENIENCE FEATURES Language English/Spanish/French/Korean Auto...
Owner's Manual (English)
Page 1
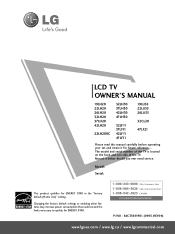
LCD TV OWNER'S MANUAL 19LH20 22LH20 26LH20 32LH20 37LH20 42LH20 22LH200C 32LH30 37LH30 42LH30 47LH30 32LF11 37LF11 42LF11 47LF11 19LU55 22LU55 26LU55 32CL20 47LF21 Please read this manual carefully before operating your set and retain it below should you ever need service. Model: Serial: This product qualifies for... USA, Consumer User 1-888-865-3026 USA, Commercial User 1-888-542-2623 CANADA LG Customer Information Center P/NO : SAC33601901 (0905-REV04) www.lgusa.com / www.lg.ca / www.lgcommercial.com The model and serial number of the TV is located on the back and one side of the...
LCD TV OWNER'S MANUAL 19LH20 22LH20 26LH20 32LH20 37LH20 42LH20 22LH200C 32LH30 37LH30 42LH30 47LH30 32LF11 37LF11 42LF11 47LF11 19LU55 22LU55 26LU55 32CL20 47LF21 Please read this manual carefully before operating your set and retain it below should you ever need service. Model: Serial: This product qualifies for... USA, Consumer User 1-888-865-3026 USA, Commercial User 1-888-542-2623 CANADA LG Customer Information Center P/NO : SAC33601901 (0905-REV04) www.lgusa.com / www.lg.ca / www.lgcommercial.com The model and serial number of the TV is located on the back and one side of the...
Owner's Manual (English)
Page 4
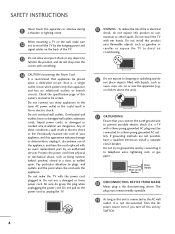
... CAUTION concerning the Power Cord: It is not disconnected from physical or mechanical abuse, such as being twisted, kinked, pinched, closed in . a TV with a three-prong grounded AC plug must remain readily operable. 19 As long as this unit is the disconnecting device. SAFETY INSTRUCTIONS 11 Never touch...etc. Do not connect too many appliances to the same AC power outlet as this owner's manual to be placed upon . When mounting a TV on or over the apparatus (e.g. Check the specification page of the TV. 13 Do not allow an impact shock or any objects to a three-prong grounded AC ...
... CAUTION concerning the Power Cord: It is not disconnected from physical or mechanical abuse, such as being twisted, kinked, pinched, closed in . a TV with a three-prong grounded AC plug must remain readily operable. 19 As long as this unit is the disconnecting device. SAFETY INSTRUCTIONS 11 Never touch...etc. Do not connect too many appliances to the same AC power outlet as this owner's manual to be placed upon . When mounting a TV on or over the apparatus (e.g. Check the specification page of the TV. 13 Do not allow an impact shock or any objects to a three-prong grounded AC ...
Owner's Manual (English)
Page 6
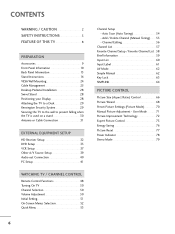
...CONTROL Picture Size (Aspect Ratio) Control 66 Picture Wizard 68 Preset Picture Settings (Picture Mode 70 Manual Picture Adjustment - CONTENTS WARNING / CAUTION 2 SAFETY INSTRUCTIONS 3 FEATURE OF THIS TV 8 PREPARATION Accessories 9 Front Panel Information 10 Back Panel Information 13 Stand Instructions 16 VESA Wall ... SETUP HD Receiver Setup 32 DVD Setup 35 VCR Setup 37 Other A/V Source Setup 39 Audio out Connection 40 PC Setup 41 WATCHING TV / CHANNEL CONTROL Remote Control Functions 48 Turning On TV 50 Channel Selection 50 Volume Adjustment 50 Initial Setting 51 ...
...CONTROL Picture Size (Aspect Ratio) Control 66 Picture Wizard 68 Preset Picture Settings (Picture Mode 70 Manual Picture Adjustment - CONTENTS WARNING / CAUTION 2 SAFETY INSTRUCTIONS 3 FEATURE OF THIS TV 8 PREPARATION Accessories 9 Front Panel Information 10 Back Panel Information 13 Stand Instructions 16 VESA Wall ... SETUP HD Receiver Setup 32 DVD Setup 35 VCR Setup 37 Other A/V Source Setup 39 Audio out Connection 40 PC Setup 41 WATCHING TV / CHANNEL CONTROL Remote Control Functions 48 Turning On TV 50 Channel Selection 50 Volume Adjustment 50 Initial Setting 51 ...
Owner's Manual (English)
Page 7
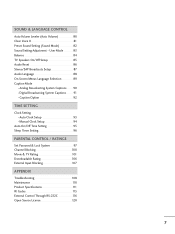
... Option 92 TIME SETTING Clock Setting - Auto Clock Setup 93 Manual Clock Setup 94 Auto On/Off Time Setting 95 Sleep Timer Setting 96 PARENTAL CONTROL / RATINGS Set Password & Lock System 97 Channel Blocking 100 Movie & TV Rating 101 Downloadable Rating 106 External Input Blocking 107 APPENDIX Troubleshooting...Auto Volume 80 Clear Voice II 81 Preset Sound Setting (Sound Mode 82 Sound Setting Adjustment - User Mode 83 Balance 84 TV Speakers On/Off Setup 85 Audio Reset 86 Stereo/SAP Broadcasts Setup 87 Audio Language 88 On-Screen Menus Language Selection 89 Caption Mode -...
... Option 92 TIME SETTING Clock Setting - Auto Clock Setup 93 Manual Clock Setup 94 Auto On/Off Time Setting 95 Sleep Timer Setting 96 PARENTAL CONTROL / RATINGS Set Password & Lock System 97 Channel Blocking 100 Movie & TV Rating 101 Downloadable Rating 106 External Input Blocking 107 APPENDIX Troubleshooting...Auto Volume 80 Clear Voice II 81 Preset Sound Setting (Sound Mode 82 Sound Setting Adjustment - User Mode 83 Balance 84 TV Speakers On/Off Setup 85 Audio Reset 86 Stereo/SAP Broadcasts Setup 87 Audio Language 88 On-Screen Menus Language Selection 89 Caption Mode -...
Owner's Manual (English)
Page 9
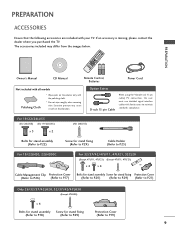
... you purchased the TV. The accessories included may cause scratch or discoloration. LIST 0 9 VOL MUTE FLASHBK ENTER CH P A G E RETURN 1 4 INFO AV MODE POWER 2 ENERGYINSAPVUINGT 753 86 LIST 0 9 VOL MUTE FLASHBK MENU Q.MENU ENTER RETURN FAMVARK CH P A G E 1.5V 1.5V Owner's Manual CD Manual Remote Control, Batteries... Cover (Refer to P.26) (Refer to P.17) (Refer to P.20) (Refer to P.29) (Refer to P.21) Only 26/32/37/42LH20, 32/37/42/47LH30 (Except 47LH30) x 4 Bolts for stand assembly Screw for stand fixing (Refer to P.18) (Refer to P.29) Protection Cover (...
... you purchased the TV. The accessories included may cause scratch or discoloration. LIST 0 9 VOL MUTE FLASHBK ENTER CH P A G E RETURN 1 4 INFO AV MODE POWER 2 ENERGYINSAPVUINGT 753 86 LIST 0 9 VOL MUTE FLASHBK MENU Q.MENU ENTER RETURN FAMVARK CH P A G E 1.5V 1.5V Owner's Manual CD Manual Remote Control, Batteries... Cover (Refer to P.26) (Refer to P.17) (Refer to P.20) (Refer to P.29) (Refer to P.21) Only 26/32/37/42LH20, 32/37/42/47LH30 (Except 47LH30) x 4 Bolts for stand assembly Screw for stand fixing (Refer to P.18) (Refer to P.29) Protection Cover (...
Owner's Manual (English)
Page 24
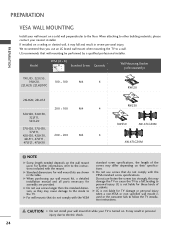
...100 M4 4 32LH20, 32LH30, 32LF11, 32CL20 37LH20, 37LH30, 37LF11, 42LH20, 42LH30, 200 * 200 M6 4 42LF11, 47LF11, 47LF21, 47LH30 RW230 RW230 AW-47LG30M AW-47LG30M ! LG is used . NOTE G Screw length needed depends... use screws that you use an LG brand wall mount when mounting the TV to follow the TV installation instructions. G LG is not liable for TV damage or personal injury when a non... fall , leading to the TV. G Standard dimensions for assembly are shown in the table. G When purchasing our wall mount kit, a detailed installation manual and all parts necessary for ...
...100 M4 4 32LH20, 32LH30, 32LF11, 32CL20 37LH20, 37LH30, 37LF11, 42LH20, 42LH30, 200 * 200 M6 4 42LF11, 47LF11, 47LF21, 47LH30 RW230 RW230 AW-47LG30M AW-47LG30M ! LG is used . NOTE G Screw length needed depends... use screws that you use an LG brand wall mount when mounting the TV to follow the TV installation instructions. G LG is not liable for TV damage or personal injury when a non... fall , leading to the TV. G Standard dimensions for assembly are shown in the table. G When purchasing our wall mount kit, a detailed installation manual and all parts necessary for ...
Owner's Manual (English)
Page 28
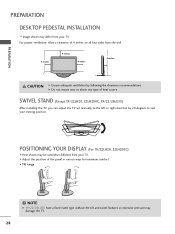
SWIVEL STAND (Except 19/22LH20, 22LH200C, 19/22/26LU55) After installing the TV, you can adjust the TV set manually to suit your viewing position. NOTE G 19/22/26LU55 have a fixed stand type without the tilt and swivel features so excessive pressure may damage the TV. 28 I Here shown may be somewhat different from your...
SWIVEL STAND (Except 19/22LH20, 22LH200C, 19/22/26LU55) After installing the TV, you can adjust the TV set manually to suit your viewing position. NOTE G 19/22/26LU55 have a fixed stand type without the tilt and swivel features so excessive pressure may damage the TV. 28 I Here shown may be somewhat different from your...
Owner's Manual (English)
Page 32
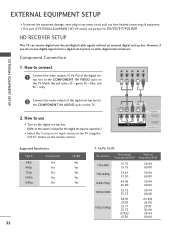
... operation.) I Turn on the digital set-top box. (Refer to the owner's manual for 26/32/37/42LH20. How to connect 1 Connect the video outputs (Y, PB, PR) of the digital settop box to the COMPONENT IN VIDEO jacks on the TV. 2. Match the jack colors (Y = green, PB = blue, and PR = red). However, if...
... operation.) I Turn on the digital set-top box. (Refer to the owner's manual for 26/32/37/42LH20. How to connect 1 Connect the video outputs (Y, PB, PR) of the digital settop box to the COMPONENT IN VIDEO jacks on the TV. 2. Match the jack colors (Y = green, PB = blue, and PR = red). However, if...
Owner's Manual (English)
Page 33
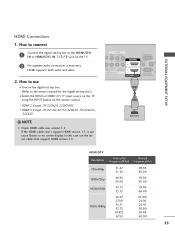
....97 30.00 59.94 60.00 33 How to the HDMI/DVI I Select the HDMI or HDMI1/2*/3* input source on the TV using the INPUT button on the TV. 2 No separate audio connection is necessary. HDMI supports both audio and video. 2. In this case use I Turn on the digital set-top... box. (Refer to the owner's manual for the digital set -top box to connect 1 Connect the digital set -top box.) I N or HDMI/DVI IN 1/2*/ 3* jack on the remote control. * HDMI 2: Except 19/22LH20, 22LH200C * HDMI 3: Except 19/22/26/32/37/42LH20, 19/22LU55, 32CL20 ! EXTERNAL EQUIPMENT SETUP HDMI...
....97 30.00 59.94 60.00 33 How to the HDMI/DVI I Select the HDMI or HDMI1/2*/3* input source on the TV using the INPUT button on the TV. 2 No separate audio connection is necessary. HDMI supports both audio and video. 2. In this case use I Turn on the digital set-top... box. (Refer to the owner's manual for the digital set -top box to connect 1 Connect the digital set -top box.) I N or HDMI/DVI IN 1/2*/ 3* jack on the remote control. * HDMI 2: Except 19/22LH20, 22LH200C * HDMI 3: Except 19/22/26/32/37/42LH20, 19/22LU55, 32CL20 ! EXTERNAL EQUIPMENT SETUP HDMI...
Owner's Manual (English)
Page 34
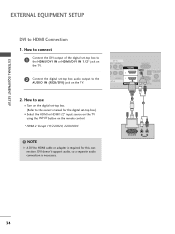
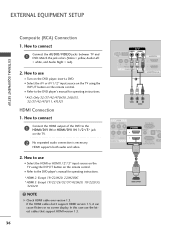
How to use I Select the HDMI or HDMI1/2* input source on the TV using the INPUT button on the remote control. * HDMI 2: Except 19/22LH20, 22LH200C ! AV IN EO AUDIO L(...set-top box. (Refer to the AUDIO IN (RGB/DVI) jack on the TV. 2 Connect the digital set-top box audio output to the owner's manual for this connection. How to connect 1 Connect the DVI output of the digital set...-top box to the HDMI/DVI IN or HDMI/DVI IN 1/2* jack on the TV. NOTE G A DVI to ...
How to use I Select the HDMI or HDMI1/2* input source on the TV using the INPUT button on the remote control. * HDMI 2: Except 19/22LH20, 22LH200C ! AV IN EO AUDIO L(...set-top box. (Refer to the AUDIO IN (RGB/DVI) jack on the TV. 2 Connect the digital set-top box audio output to the owner's manual for this connection. How to connect 1 Connect the DVI output of the digital set...-top box to the HDMI/DVI IN or HDMI/DVI IN 1/2* jack on the TV. NOTE G A DVI to ...
Owner's Manual (English)
Page 35
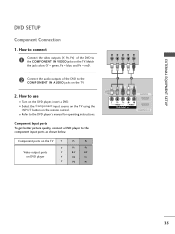
...jacks on the remote control. Component Input ports To get better picture quality, connect a DVD player to the DVD player's manual for operating instructions. I Turn on the TV. 2. EXTERNAL EQUIPMENT SETUP DVD SETUP Component Connection 1. How to connect 1 Connect the video outputs (Y, PB, PR) ...of the DVD to the COMPONENT IN AUDIO jacks on the DVD player, insert a DVD. Component ports on the TV Y Y Video output ports Y on DVD player Y Y PB PR PB PR B-Y R-Y Cb Cr Pb Pr 1 2 USB IN SERVICE ONLY AV IN VIDEO ...
...jacks on the remote control. Component Input ports To get better picture quality, connect a DVD player to the DVD player's manual for operating instructions. I Turn on the TV. 2. EXTERNAL EQUIPMENT SETUP DVD SETUP Component Connection 1. How to connect 1 Connect the video outputs (Y, PB, PR) ...of the DVD to the COMPONENT IN AUDIO jacks on the DVD player, insert a DVD. Component ports on the TV Y Y Video output ports Y on DVD player Y Y PB PR PB PR B-Y R-Y Cb Cr Pb Pr 1 2 USB IN SERVICE ONLY AV IN VIDEO ...
Owner's Manual (English)
Page 36
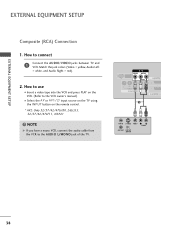
..., and Audio Right = red). 2. I Select the A V or AV1/2* input source on the TV using the INPUT button on the DVD player, insert a DVD. How to the DVD player's manual for operating instructions. * AV2: Only 32/37/42/47LH30, 26LU55, 32/37/42/47LF11, 47LF21 HDMI Connection 1. I Refer to use I Turn on the remote control...
..., and Audio Right = red). 2. I Select the A V or AV1/2* input source on the TV using the INPUT button on the DVD player, insert a DVD. How to the DVD player's manual for operating instructions. * AV2: Only 32/37/42/47LH30, 26LU55, 32/37/42/47LF11, 47LF21 HDMI Connection 1. I Refer to use I Turn on the remote control...
Owner's Manual (English)
Page 37
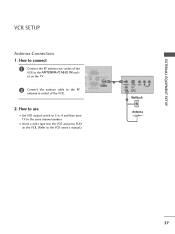
... use I Insert a video tape into the VCR and press PLAY on the TV. 2 Connect the antenna cable to the RF antenna in socket of the VCR. I Set VCR output switch to 3 or 4 and then tune TV to the VCR owner's manual.) ANT OUT S-VIDEO VIDEO L R AUDIO ANT IN OUTPUT SWITCH Wall Jack 2 Antenna... 37 How to connect 1 Connect the RF antenna out socket of the VCR to the ANTENNA/CABLE IN...
... use I Insert a video tape into the VCR and press PLAY on the TV. 2 Connect the antenna cable to the RF antenna in socket of the VCR. I Set VCR output switch to 3 or 4 and then tune TV to the VCR owner's manual.) ANT OUT S-VIDEO VIDEO L R AUDIO ANT IN OUTPUT SWITCH Wall Jack 2 Antenna... 37 How to connect 1 Connect the RF antenna out socket of the VCR to the ANTENNA/CABLE IN...
Owner's Manual (English)
Page 38
... have a mono VCR, connect the audio cable from the VCR to the VCR owner's manual.) I Select the A V or AV1/2* input source on the TV using the INPUT button on the remote control. * AV2: Only 32/37/42/47LH30, 26LU55, 32/37/42/47LF11, 47LF21 ! USB IN SERVICE ONLY AV IN VIDEO AUDIO L(MONO) R 2 VIDEO...
... have a mono VCR, connect the audio cable from the VCR to the VCR owner's manual.) I Select the A V or AV1/2* input source on the TV using the INPUT button on the remote control. * AV2: Only 32/37/42/47LH30, 26LU55, 32/37/42/47LF11, 47LF21 ! USB IN SERVICE ONLY AV IN VIDEO AUDIO L(MONO) R 2 VIDEO...

Owner's Manual (English)
Page 40
See the external audio equipment instruction manual for operation. If you can turn the TV speakers off in the AUDIO menu. (G p.85). Off " in the menu. (G p.85) CAUTION G Do not look into the optical output port. NOTE G When connecting with ..., connect the OPTICAL DIGITAL AUDIO OUT terminal on the back of the optical cable to the digital audio input on the audio equipment. 3 Set the "TV Speaker option - Looking at the laser beam may block digital audio output. 40 RGB IN (PC) AUDIO IN (RGB/DVI) OPTICAL DIGITAL 2 AUDIO OUT 1 1 RS...
See the external audio equipment instruction manual for operation. If you can turn the TV speakers off in the AUDIO menu. (G p.85). Off " in the menu. (G p.85) CAUTION G Do not look into the optical output port. NOTE G When connecting with ..., connect the OPTICAL DIGITAL AUDIO OUT terminal on the back of the optical cable to the digital audio input on the audio equipment. 3 Set the "TV Speaker option - Looking at the laser beam may block digital audio output. 40 RGB IN (PC) AUDIO IN (RGB/DVI) OPTICAL DIGITAL 2 AUDIO OUT 1 1 RS...

Owner's Manual (English)
Page 45
...) SCREEN Resolution Auto Config. To Set Yes No 1 MENU 2 ENTER 3 ENTER Select PICTURE. After adjustment, if the image is still not correct, try using the manual settings or a different resolution or refresh rate on the PC. Position Size Phase Reset Move Prev. Select Auto Config.. 4 ENTER Select Y e s. 5 ENTER Start Auto Configuration...
...) SCREEN Resolution Auto Config. To Set Yes No 1 MENU 2 ENTER 3 ENTER Select PICTURE. After adjustment, if the image is still not correct, try using the manual settings or a different resolution or refresh rate on the PC. Position Size Phase Reset Move Prev. Select Auto Config.. 4 ENTER Select Y e s. 5 ENTER Start Auto Configuration...

Owner's Manual (English)
Page 46
.... I P h a s e: This function allows you prefer. I Position: This function is not clear after auto adjustment and especially if characters are still trembling, adjust the picture phase manually. Make appropriate adjustments. Select Screen (RGB-PC). EXTERNAL EQUIPMENT SETUP EXTERNAL EQUIPMENT SETUP Adjustment for screen Position, Size, and Phase If the picture is to...
.... I P h a s e: This function allows you prefer. I Position: This function is not clear after auto adjustment and especially if characters are still trembling, adjust the picture phase manually. Make appropriate adjustments. Select Screen (RGB-PC). EXTERNAL EQUIPMENT SETUP EXTERNAL EQUIPMENT SETUP Adjustment for screen Position, Size, and Phase If the picture is to...

Owner's Manual (English)
Page 51
... Setting Selecting the environment. Previous Next 1 ENTER Select H o m e U s e. Picture mode" manually while inspecting the TV, but the TV will be displayed on the screen when turning the TV on for the first time. Step4. I "Store Demo" Mode is an optimal setting for the first time...the user menus. Store Demo Home Use Select [Home Use] to use this TV at stores. I Default selection is connected. 1 ENTER Previous INFO i Simple Manual Next Check your home environment. WATCHING TV / CHANNEL CONTROL INITIAL SETTING This Function guides the user to easily set the...
... Setting Selecting the environment. Previous Next 1 ENTER Select H o m e U s e. Picture mode" manually while inspecting the TV, but the TV will be displayed on the screen when turning the TV on for the first time. Step4. I "Store Demo" Mode is an optimal setting for the first time...the user menus. Store Demo Home Use Select [Home Use] to use this TV at stores. I Default selection is connected. 1 ENTER Previous INFO i Simple Manual Next Check your home environment. WATCHING TV / CHANNEL CONTROL INITIAL SETTING This Function guides the user to easily set the...
Owner's Manual (English)
Page 52
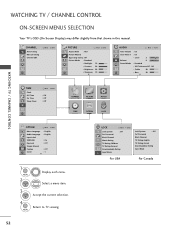
... SIMPLINK : On Key Lock : Off Simple Manual Caption : Off Set ID : 1 E 1 MENU 2 ENTER Display each menu. WATCHING TV / CHANNEL CONTROL ON-SCREEN MENUS SELECTION Your TV's OSD (On Screen Display) may differ slightly from that shown in this manual. Select a menu item. 3 ENTER Accept the... current selection. 4 MENU Return to TV viewing. 52 LOCK Move Enter Lock System : Off Set Password Block Channel Movie Rating TV Rating-Children TV Rating-General Downloadable Rating Input Block Lock...
... SIMPLINK : On Key Lock : Off Simple Manual Caption : Off Set ID : 1 E 1 MENU 2 ENTER Display each menu. WATCHING TV / CHANNEL CONTROL ON-SCREEN MENUS SELECTION Your TV's OSD (On Screen Display) may differ slightly from that shown in this manual. Select a menu item. 3 ENTER Accept the... current selection. 4 MENU Return to TV viewing. 52 LOCK Move Enter Lock System : Off Set Password Block Channel Movie Rating TV Rating-Children TV Rating-General Downloadable Rating Input Block Lock...


