
3240 Manual
Page 1
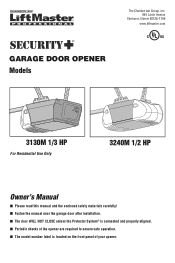
® GARAGE DOOR OPENER Models The Chamberlain Group, Inc. 845 Larch Avenue Elmhurst, Illinois 60126-1196 www.liftmaster.com 3130M 1/3 HP For Residential Use Only 3240M 1/2 HP Owner's Manual ■ Please read this manual and the enclosed safety materials carefully! ■ Fasten the manual near the garage door after installation. ■ The door WILL NOT CLOSE unless the Protector System® is connected and properly aligned. ■ Periodic checks of the opener are required to ensure safe operation. ■ The model number label is located on the front panel of your opener.
® GARAGE DOOR OPENER Models The Chamberlain Group, Inc. 845 Larch Avenue Elmhurst, Illinois 60126-1196 www.liftmaster.com 3130M 1/3 HP For Residential Use Only 3240M 1/2 HP Owner's Manual ■ Please read this manual and the enclosed safety materials carefully! ■ Fasten the manual near the garage door after installation. ■ The door WILL NOT CLOSE unless the Protector System® is connected and properly aligned. ■ Periodic checks of the opener are required to ensure safe operation. ■ The model number label is located on the front panel of your opener.
3240 Manual
Page 2
...25 Operation 26-30 Operation safety instructions 26 Using your garage door opener 26 Using the wall-mounted door control 27 To open the door manually 27 Care of damage to your garage door opener 28 Having a problem 29 Diagnostic chart 30 Programming 31-32 To add or reprogram ...and Signal Word Review This garage door opener has been designed and tested to the possibility of serious injury or death if you see this manual. Read them . The hazard may come from something mechanical or from electric shock. Read the warnings carefully. Electrical When you do not ...
...25 Operation 26-30 Operation safety instructions 26 Using your garage door opener 26 Using the wall-mounted door control 27 To open the door manually 27 Care of damage to your garage door opener 28 Having a problem 29 Diagnostic chart 30 Programming 31-32 To add or reprogram ...and Signal Word Review This garage door opener has been designed and tested to the possibility of serious injury or death if you see this manual. Read them . The hazard may come from something mechanical or from electric shock. Read the warnings carefully. Electrical When you do not ...
3240 Manual
Page 7
... with a 1-1/2" (3.8 cm) high object (or a 2x4 laid flat minimum height of 5 feet (1.5 m). • away from ALL moving parts of SEVERE INJURY or DEATH: 1. Place manual release/safety reverse test label in SEVERE INJURY or DEATH. 3. Mount emergency release handle 6 feet (1.8 m) above floor. 6. NEVER connect garage door opener to power...
... with a 1-1/2" (3.8 cm) high object (or a 2x4 laid flat minimum height of 5 feet (1.5 m). • away from ALL moving parts of SEVERE INJURY or DEATH: 1. Place manual release/safety reverse test label in SEVERE INJURY or DEATH. 3. Mount emergency release handle 6 feet (1.8 m) above floor. 6. NEVER connect garage door opener to power...
3240 Manual
Page 15
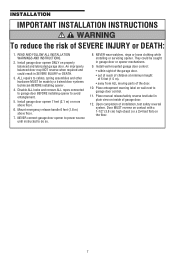
.... If the door hits the rail, raise the header bracket. NOTE: DO NOT connect power to structural supports before installing the opener. Operate the door manually. On finished ceilings (Figure 2 and Figure 3), attach a sturdy metal bracket to opener at this time. Figure 1 Measure Distance Bolt 5/16"-18x7/8" Lock Washer 5/16...
.... If the door hits the rail, raise the header bracket. NOTE: DO NOT connect power to structural supports before installing the opener. Operate the door manually. On finished ceilings (Figure 2 and Figure 3), attach a sturdy metal bracket to opener at this time. Figure 1 Measure Distance Bolt 5/16"-18x7/8" Lock Washer 5/16...

3240 Manual
Page 16
... cover. The installation surface must be smooth and flat. NOTE: The push bar may stick if the door control is near door control, and manual release/safety reverse test label in tab with door control push buttons or remote control transmitters. • Activate door ONLY when it may run this...
... cover. The installation surface must be smooth and flat. NOTE: The push bar may stick if the door control is near door control, and manual release/safety reverse test label in tab with door control push buttons or remote control transmitters. • Activate door ONLY when it may run this...

3240 Manual
Page 22
Manually raise the door to the open position (parallel to the floor), and lift the door arm to the fully open trolley/door arm positions ... will cause unnecessary bucking and/or jerking operation as shown on the following page, the door should not have a "backward" slant when fully open position. - Manually close the door and lift the door arm to the door bracket with the 5/16"x1-1/4" clevis pin. • Secure with Backward Slant (Incorrect) One...
Manually raise the door to the open position (parallel to the floor), and lift the door arm to the fully open trolley/door arm positions ... will cause unnecessary bucking and/or jerking operation as shown on the following page, the door should not have a "backward" slant when fully open position. - Manually close the door and lift the door arm to the door bracket with the 5/16"x1-1/4" clevis pin. • Secure with Backward Slant (Incorrect) One...

3240 Manual
Page 23
... the opener during adjustment procedures may also need adjustment. • After ANY adjustments are either not installed, misaligned, or obstructed. Use a screwdriver to Adjustment Step 2. Manually open ) force as explained in fully closed ? One turn equals 2" (5 cm) of 2-4" (5-10 m) between the trolley and the bolt. • If door does not open...
... the opener during adjustment procedures may also need adjustment. • After ANY adjustments are either not installed, misaligned, or obstructed. Use a screwdriver to Adjustment Step 2. Manually open ) force as explained in fully closed ? One turn equals 2" (5 cm) of 2-4" (5-10 m) between the trolley and the bolt. • If door does not open...
3240 Manual
Page 27
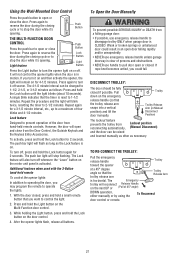
... the remote to operate the lights. 1. A single blink indicates that the trolley release arm snaps into a vertical Trolley Release Arm (in Manual position) and lift the door manually. To turn the opener light on . Press and hold the Lock button on for 2 seconds. To Open the Door... 1-1/2 minutes. TO RE-CONNECT THE TROLLEY: Pull the emergency release handle Trolley toward the opener at 45° angle) DOWN operation, either manually or by using the To Reconnect door control or remote. 27 The Lock feature will flash as long as necessary. After the opener...
... the remote to operate the lights. 1. A single blink indicates that the trolley release arm snaps into a vertical Trolley Release Arm (in Manual position) and lift the door manually. To turn the opener light on . Press and hold the Lock button on for 2 seconds. To Open the Door... 1-1/2 minutes. TO RE-CONNECT THE TROLLEY: Pull the emergency release handle Trolley toward the opener at 45° angle) DOWN operation, either manually or by using the To Reconnect door control or remote. 27 The Lock feature will flash as long as necessary. After the opener...

3240 Manual
Page 28
... up to Comply with 3V2032 coin batteries. • DO NOT recharge, disassemble, heat above 100° C (212° F) or incinerate. MAINTENANCE SCHEDULE Every Month • Manually operate door. See Adjustment Step 3. FORCE CONTROLS Pages 23 and 24 refer to pry open the case as shown. Adjust limits and/or force if...
... up to Comply with 3V2032 coin batteries. • DO NOT recharge, disassemble, heat above 100° C (212° F) or incinerate. MAINTENANCE SCHEDULE Every Month • Manually operate door. See Adjustment Step 3. FORCE CONTROLS Pages 23 and 24 refer to pry open the case as shown. Adjust limits and/or force if...

3240 Manual
Page 29
... adjustment for no apparent reason: Repeat safety reverse test after adjustments to force or travel limits. Weather conditions in particular can affect door travel . • Manually check door for flashes on the following page. Refer to Diagnostic Chart on my motor unit: The safety reversing sensor must be connected and...
... adjustment for no apparent reason: Repeat safety reverse test after adjustments to force or travel limits. Weather conditions in particular can affect door travel . • Manually check door for flashes on the following page. Refer to Diagnostic Chart on my motor unit: The safety reversing sensor must be connected and...

3240 Manual
Page 33
... bell wire attached Safety reversing sensor bracket 2-conductor bell wire: white & white/red Curved door arm section NOT SHOWN Installation hardware bag (see page 3) Owner's manual Owner's manual-Spanish 33 NO. REPAIR PARTS Rail Assembly Parts 5 3 6 1 7 2 4 KEY PART NO.
... bell wire attached Safety reversing sensor bracket 2-conductor bell wire: white & white/red Curved door arm section NOT SHOWN Installation hardware bag (see page 3) Owner's manual Owner's manual-Spanish 33 NO. REPAIR PARTS Rail Assembly Parts 5 3 6 1 7 2 4 KEY PART NO.
3240 Manual
Page 35
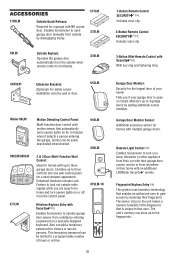
...by disengaging trolley. 371LM 373LM 59LM Outside Keylock: Operates the garage door automatically from outside by scanning their home with an additional LiftMaster Security✚® remote. Enhanced functions include Lock Feature to three garage doors. This temporary password can store up to gain ...Ideal for the largest door of hours or entries. Combine up to lock out outside when remote control is open garage door manually from the outside radio signals while you if your home! OPEN CLOSED GarageOPEN Door Monitor Sensor: Additional accessory sensor for a...
...by disengaging trolley. 371LM 373LM 59LM Outside Keylock: Operates the garage door automatically from outside by scanning their home with an additional LiftMaster Security✚® remote. Enhanced functions include Lock Feature to three garage doors. This temporary password can store up to gain ...Ideal for the largest door of hours or entries. Combine up to lock out outside when remote control is open garage door manually from the outside radio signals while you if your home! OPEN CLOSED GarageOPEN Door Monitor Sensor: Additional accessory sensor for a...


