
8355W Users Guide Manual
Page 2
Product Serial Number 2 For the complete manual visit LiftMaster.com/Customer-Support Read them . Mechanical Electrical When... the following pages, they will alert you to the possibility of unattended close without being in this manual. Contents Important Safety Instructions 3-4 Connect With Your Smartphone 5-6 Test the Wi-Fi® Signal Strength... 7 Remote Control 7 Wireless Keyless Entry 7 To Erase the Memory 7 Operation 8-10 To Open the Door Manually 8 Door Control 9 The Protector System® (Safety Reversing Sensors 10 Adjustment 11-13 Introduction 11 Program the...
Product Serial Number 2 For the complete manual visit LiftMaster.com/Customer-Support Read them . Mechanical Electrical When... the following pages, they will alert you to the possibility of unattended close without being in this manual. Contents Important Safety Instructions 3-4 Connect With Your Smartphone 5-6 Test the Wi-Fi® Signal Strength... 7 Remote Control 7 Wireless Keyless Entry 7 To Erase the Memory 7 Operation 8-10 To Open the Door Manually 8 Door Control 9 The Protector System® (Safety Reversing Sensors 10 Adjustment 11-13 Introduction 11 Program the...

8355W Users Guide Manual
Page 3
.... An improperly balanced door may NOT reverse when required and could be caught in SEVERE INJURY or DEATH. 3. Upon completion of garage door. 12. Place manual release/safety reverse test label in plain view on inside of installation, test safety reversal system. WARNING Important Safety Instructions IMPORTANT INSTALLATION INSTRUCTIONS WARNING To...
.... An improperly balanced door may NOT reverse when required and could be caught in SEVERE INJURY or DEATH. 3. Upon completion of garage door. 12. Place manual release/safety reverse test label in plain view on inside of installation, test safety reversal system. WARNING Important Safety Instructions IMPORTANT INSTALLATION INSTRUCTIONS WARNING To...

8355W Users Guide Manual
Page 4
... using this release with 1-1/2" high (3.8 cm) object (or a 2x4 laid flat) on contact with the door open. SAVE THESE INSTRUCTIONS. 4 For the complete manual visit LiftMaster.com/Customer-Support NO ONE SHOULD CROSS THE PATH OF THE MOVING DOOR. 5. NO ONE SHOULD GO UNDER A STOPPED, PARTIALLY OPENED DOOR. 6. NEVER use emergency...
... using this release with 1-1/2" high (3.8 cm) object (or a 2x4 laid flat) on contact with the door open. SAVE THESE INSTRUCTIONS. 4 For the complete manual visit LiftMaster.com/Customer-Support NO ONE SHOULD CROSS THE PATH OF THE MOVING DOOR. 5. NO ONE SHOULD GO UNDER A STOPPED, PARTIALLY OPENED DOOR. 6. NEVER use emergency...
8355W Users Guide Manual
Page 6
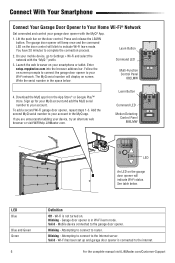
... Opener to Your Home Wi-Fi® Network Get connected and control your device, try an alternate web browser or visit WiFiHelp.LiftMaster.com. Enter setup.myqdevice.com into the browser address bar. See table below . Attempting to connect to indicate WLie-FairnleBarunttmonode. The...On your smartphone or tablet. Add the second MyQ serial number to your account in the MyQ app. Blinking - For the complete manual visit LiftMaster.com/Customer-Support Garage door opener is not turned on screen prompts to connect the garage door opener to your Wi-Fi network....
... Opener to Your Home Wi-Fi® Network Get connected and control your device, try an alternate web browser or visit WiFiHelp.LiftMaster.com. Enter setup.myqdevice.com into the browser address bar. See table below . Attempting to connect to indicate WLie-FairnleBarunttmonode. The...On your smartphone or tablet. Add the second MyQ serial number to your account in the MyQ app. Blinking - For the complete manual visit LiftMaster.com/Customer-Support Garage door opener is not turned on screen prompts to connect the garage door opener to your Wi-Fi network....

8355W Users Guide Manual
Page 8
To Open the Door Manually 1. Lockout Feature 1. The trolley will reconnect on the emergency release handle. To disengage the lockout feature, pull the handle straight down on the next time ... is clear of persons and obstructions. • NEVER use emergency release handle to disengage trolley ONLY when garage door is activated. 8 For the complete manual visit LiftMaster.com/Customer-Support Weak or broken springs or unbalanced door could fall. The door can then be fully closed . If rope knot becomes untied, you...
To Open the Door Manually 1. Lockout Feature 1. The trolley will reconnect on the emergency release handle. To disengage the lockout feature, pull the handle straight down on the next time ... is clear of persons and obstructions. • NEVER use emergency release handle to disengage trolley ONLY when garage door is activated. 8 For the complete manual visit LiftMaster.com/Customer-Support Weak or broken springs or unbalanced door could fall. The door can then be fully closed . If rope knot becomes untied, you...

8355W Users Guide Manual
Page 10
... MUST NOT be aligned by loosening the wing nuts, aligning the sensors, and tightening the wing nuts. above floor 10 For the complete manual visit LiftMaster.com/Customer-Support To prevent SERIOUS INJURY or DEATH from closing , the door will reverse and the garage door opener lights will move in both...
... MUST NOT be aligned by loosening the wing nuts, aligning the sensors, and tightening the wing nuts. above floor 10 For the complete manual visit LiftMaster.com/Customer-Support To prevent SERIOUS INJURY or DEATH from closing , the door will reverse and the garage door opener lights will move in both...

8355W Users Guide Manual
Page 12
... the door is complete. * If the garage door opener lights are flashing 5 times during the steps for Program the Travel. 12 For the complete manual visit LiftMaster.com/Customer-Support
... the door is complete. * If the garage door opener lights are flashing 5 times during the steps for Program the Travel. 12 For the complete manual visit LiftMaster.com/Customer-Support

8355W Users Guide Manual
Page 14
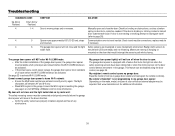
...opener: Depending on the make sure the LEDs in the garage. Operation is maintained between A-F and 0-9 only. 14 For the complete manual visit LiftMaster.com/Customer-Support Cet appareil est conforme aux dispositions de la partie 15 du règlement de la FCC et de l'norme IC RSS....com for several reasons: • Garage door opener has been activated through a device or feature such as Timer-to-Close, garage door monitor or LiftMaster Internet Gateway. • Operating on battery power) or will flash (low battery power). 2. If the door is binding, call a trained ...
...opener: Depending on the make sure the LEDs in the garage. Operation is maintained between A-F and 0-9 only. 14 For the complete manual visit LiftMaster.com/Customer-Support Cet appareil est conforme aux dispositions de la partie 15 du règlement de la FCC et de l'norme IC RSS....com for several reasons: • Garage door opener has been activated through a device or feature such as Timer-to-Close, garage door monitor or LiftMaster Internet Gateway. • Operating on battery power) or will flash (low battery power). 2. If the door is binding, call a trained ...
8355W Users Guide Manual
Page 15
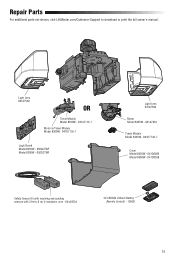
Repair Parts For additional parts not shown, visit LiftMaster.com/Customer-Support to download or print the full owner's manual. Light Lens 041A7562 OR Travel Module Model 8360W - 041A7114-7 Motor w/Travel Module Model 8360W - 041D1739-1 Logic Board Model 8355W - 050ACTWF Model 8360W - 050DCTWF Light Lens 041A7562 Motor Model 8355W - 041A7442 Travel Module Model 8355W - 041D7742-7 Cover Model 8355W - 041D8260 Model 8360W - 041D8259 Safety Sensor Kit with receiving and sending sensors with 3 feet (.9 m) 2-conductor wire - 041A5034 3V CR2032 Lithium Battery (Remote Control) - 10A20 15
Repair Parts For additional parts not shown, visit LiftMaster.com/Customer-Support to download or print the full owner's manual. Light Lens 041A7562 OR Travel Module Model 8360W - 041A7114-7 Motor w/Travel Module Model 8360W - 041D1739-1 Logic Board Model 8355W - 050ACTWF Model 8360W - 050DCTWF Light Lens 041A7562 Motor Model 8355W - 041A7442 Travel Module Model 8355W - 041D7742-7 Cover Model 8355W - 041D8260 Model 8360W - 041D8259 Safety Sensor Kit with receiving and sending sensors with 3 feet (.9 m) 2-conductor wire - 041A5034 3V CR2032 Lithium Battery (Remote Control) - 10A20 15

8360W Installation Manual
Page 1
Wi-Fi® Garage Door Opener Premium Series Chain Drive Model 8360W FOR RESIDENTIAL USE ONLY • Please read this manual and the safety materials carefully! • The door WILL NOT CLOSE unless the Protector System® is ONLY compatible with sectional doors. • Attach warning ... connected and properly aligned. • Periodic checks of the camera icon including the points ( ). Register your garage door opener to receive updates and offers from LiftMaster Take a photo of the garage door opener are to 71403 (US) or visit www...
Wi-Fi® Garage Door Opener Premium Series Chain Drive Model 8360W FOR RESIDENTIAL USE ONLY • Please read this manual and the safety materials carefully! • The door WILL NOT CLOSE unless the Protector System® is ONLY compatible with sectional doors. • Attach warning ... connected and properly aligned. • Periodic checks of the camera icon including the points ( ). Register your garage door opener to receive updates and offers from LiftMaster Take a photo of the garage door opener are to 71403 (US) or visit www...

8360W Installation Manual
Page 3
... following pages, they will alert you to the possibility of damage to your garage door and/or the garage door opener if you see this manual. Read them . Unattended Operation The Timer-to-Close (TTC) feature, the MyQ® Smartphone Control app, and MyQ® Garage Door and Gate Monitor are...
... following pages, they will alert you to the possibility of damage to your garage door and/or the garage door opener if you see this manual. Read them . Unattended Operation The Timer-to-Close (TTC) feature, the MyQ® Smartphone Control app, and MyQ® Garage Door and Gate Monitor are...
8360W Installation Manual
Page 6
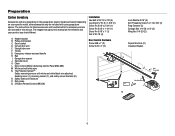
... arm F. Sprocket cover K. The Protector System® Safety reversing sensors with your product may be attached to the accessory and are not included in this manual are for these accessories will vary depending on your specific model, other accessories may look different. Curved door arm E. Trolley G. Rail I 6 The instructions for reference... and white/black wire attached: Sending senor (1), receiving sensor (1), and safety sensor brackets (2) O. Depending on the garage door opener model purchased. The images throughout this manual. Header bracket B.
... arm F. Sprocket cover K. The Protector System® Safety reversing sensors with your product may be attached to the accessory and are not included in this manual are for these accessories will vary depending on your specific model, other accessories may look different. Curved door arm E. Trolley G. Rail I 6 The instructions for reference... and white/black wire attached: Sending senor (1), receiving sensor (1), and safety sensor brackets (2) O. Depending on the garage door opener model purchased. The images throughout this manual. Header bracket B.

8360W Installation Manual
Page 9
... opener 7 feet (2.13 m) or more above the floor and avoiding contact with vehicles to be made by a trained door systems technician BEFORE installing opener. 4. Place manual release/safety reverse test label in plain view on inside of SEVERE INJURY or DEATH: 1. To avoid SERIOUS PERSONAL INJURY or DEATH from ALL moving...
... opener 7 feet (2.13 m) or more above the floor and avoiding contact with vehicles to be made by a trained door systems technician BEFORE installing opener. 4. Place manual release/safety reverse test label in plain view on inside of SEVERE INJURY or DEATH: 1. To avoid SERIOUS PERSONAL INJURY or DEATH from ALL moving...

8360W Installation Manual
Page 13
... in the structural supports. 4. Hanging brackets should be different. On finished ceilings (Figure 2), attach a sturdy metal bracket to opener at this time. Operate the door manually. Fasten the opener to make sure the rail is not centered above the door). 7. Concrete anchors MUST be used if installing ANY brackets into masonry...
... in the structural supports. 4. Hanging brackets should be different. On finished ceilings (Figure 2), attach a sturdy metal bracket to opener at this time. Operate the door manually. Fasten the opener to make sure the rail is not centered above the door). 7. Concrete anchors MUST be used if installing ANY brackets into masonry...

8360W Installation Manual
Page 18
... in a visible location on the inside of the wire near the door control with screwdriver tip. 1 2 7/16" (11 mm) 3 Attach the warning labels 1. Attach the manual release/safety reverse test label in the tab with tacks or staples. 2. Staple 3 RED WHITE WHITE GREY 18 To insert or release wires from the...
... in a visible location on the inside of the wire near the door control with screwdriver tip. 1 2 7/16" (11 mm) 3 Attach the warning labels 1. Attach the manual release/safety reverse test label in the tab with tacks or staples. 2. Staple 3 RED WHITE WHITE GREY 18 To insert or release wires from the...

8360W Installation Manual
Page 36
...disengage the lockout feature, pull the handle straight down and back (toward the opener). Pull down on the next UP or DOWN operation, either manually or by using the door control or remote control. NOTICE NOTICE 36 Weak or broken springs or unbalanced door could fall. If rope knot ... l NEVER use handle to disengage trolley ONLY when garage door is clear of persons and obstructions. The door should be raised and lowered manually as often as necessary. 2. Operation To Open the Door Manually To prevent possible SERIOUS INJURY or DEATH from reconnecting automatically. 1.
...disengage the lockout feature, pull the handle straight down and back (toward the opener). Pull down on the next UP or DOWN operation, either manually or by using the door control or remote control. NOTICE NOTICE 36 Weak or broken springs or unbalanced door could fall. If rope knot ... l NEVER use handle to disengage trolley ONLY when garage door is clear of persons and obstructions. The door should be raised and lowered manually as often as necessary. 2. Operation To Open the Door Manually To prevent possible SERIOUS INJURY or DEATH from reconnecting automatically. 1.

8360W Installation Manual
Page 37
... toute modification de ce récepteur. This Class B digital apparatus complies with 3V CR2032 coin batteries. Maintenance Maintenance Schedule The Remote Control Battery EVERY MONTH l Manually operate door. If it is unbalanced or binding, call a trained door systems technician. l Check to wipe away the existing grease from the garage door opener...
... toute modification de ce récepteur. This Class B digital apparatus complies with 3V CR2032 coin batteries. Maintenance Maintenance Schedule The Remote Control Battery EVERY MONTH l Manually operate door. If it is unbalanced or binding, call a trained door systems technician. l Check to wipe away the existing grease from the garage door opener...

8360W Installation Manual
Page 38
... no movement. Inspect safety sensor wire at the logic board. Realign both LEDs are shorted or the door control is constantly flashing green. Manually open and close and the light Safety sensors are not installed, connected or wires may be cut wire. 1 2 The garage door opener... short or reversed wire for proper assembly, replace if necessary. 3 3 The battery status LED is faulty. Replace logic board if necessary. Manually open and close the door. staple points and connection points and replace wire or correct as needed . Check wiring connections at travel module and...
... no movement. Inspect safety sensor wire at the logic board. Realign both LEDs are shorted or the door control is constantly flashing green. Manually open and close and the light Safety sensors are not installed, connected or wires may be cut wire. 1 2 The garage door opener... short or reversed wire for proper assembly, replace if necessary. 3 3 The battery status LED is faulty. Replace logic board if necessary. Manually open and close the door. staple points and connection points and replace wire or correct as needed . Check wiring connections at travel module and...
8360W Installation Manual
Page 39
...will move in the down direction. Visit www.homelink.com for binding or obstructions, such as a broken spring or door lock, correct as needed. SOLUTION Manually open : The garage door opener is reaching the garage, see page 34. See page 32 to home Wi-Fi network: l Ensure the MyQ Serial ... and try again. l Weak Wi-Fi signal in the garage. This feature can be disabled using the door control, see page 4 or visit WiFiHelp.LiftMaster.com for more information. Ensure the Wi-Fi signal is equipped with a feature that turns the light on when the safety reversing sensors have been...
...will move in the down direction. Visit www.homelink.com for binding or obstructions, such as a broken spring or door lock, correct as needed. SOLUTION Manually open : The garage door opener is reaching the garage, see page 34. See page 32 to home Wi-Fi network: l Ensure the MyQ Serial ... and try again. l Weak Wi-Fi signal in the garage. This feature can be disabled using the door control, see page 4 or visit WiFiHelp.LiftMaster.com for more information. Ensure the Wi-Fi signal is equipped with a feature that turns the light on when the safety reversing sensors have been...


