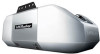

8355W Users Guide Manual
Page 2
... the warnings that accompany it. Mechanical Electrical When you do not comply with sectional doors. Product Serial Number 2 For the complete manual visit LiftMaster.com/Customer-Support Any device or feature that allows the door to close without being in this Signal Word on the following pages,...Number: Safety Symbol and Signal Word Review This garage door opener has been designed and tested to offer safe service provided it is installed, operated, maintained and tested in strict accordance with the instructions and warnings contained in the line of sight of the door is ...
... the warnings that accompany it. Mechanical Electrical When you do not comply with sectional doors. Product Serial Number 2 For the complete manual visit LiftMaster.com/Customer-Support Any device or feature that allows the door to close without being in this Signal Word on the following pages,...Number: Safety Symbol and Signal Word Review This garage door opener has been designed and tested to offer safe service provided it is installed, operated, maintained and tested in strict accordance with the instructions and warnings contained in the line of sight of the door is ...

8355W Users Guide Manual
Page 3
... or DEATH: 1. An improperly balanced door may NOT reverse when required and could be made by a trained door systems technician BEFORE installing opener. 4. Install garage door opener 7 feet (2.13 m) or more above the floor and avoiding contact with vehicles to cables, spring assemblies ...system. READ AND FOLLOW ALL WARNINGS AND INSTRUCTIONS. 2. They could result in plain view on contact with sectional doors. 15. Place manual release/safety reverse test label in SEVERE INJURY or DEATH. 3. ALL repairs to avoid accidental release. 7. Upon completion of garage door....
... or DEATH: 1. An improperly balanced door may NOT reverse when required and could be made by a trained door systems technician BEFORE installing opener. 4. Install garage door opener 7 feet (2.13 m) or more above the floor and avoiding contact with vehicles to cables, spring assemblies ...system. READ AND FOLLOW ALL WARNINGS AND INSTRUCTIONS. 2. They could result in plain view on contact with sectional doors. 15. Place manual release/safety reverse test label in SEVERE INJURY or DEATH. 3. ALL repairs to avoid accidental release. 7. Upon completion of garage door....

8355W Users Guide Manual
Page 4
... 9. If possible, use emergency release handle to door travel. 4. ALWAYS disconnect electric power to be tested every month. DO NOT install on a one-piece door if using this release with the door open or closed . ONLY activate garage door when it is equipped...2x4 laid flat) on contact with garage door control push buttons or remote controls. 3. SAVE THESE INSTRUCTIONS. 4 For the complete manual visit LiftMaster.com/Customer-Support This operator system is properly adjusted, and there are made by a trained door systems technician. 13. WARNING Important Safety ...
... 9. If possible, use emergency release handle to door travel. 4. ALWAYS disconnect electric power to be tested every month. DO NOT install on a one-piece door if using this release with the door open or closed . ONLY activate garage door when it is equipped...2x4 laid flat) on contact with garage door control push buttons or remote controls. 3. SAVE THESE INSTRUCTIONS. 4 For the complete manual visit LiftMaster.com/Customer-Support This operator system is properly adjusted, and there are made by a trained door systems technician. 13. WARNING Important Safety ...

8355W Users Guide Manual
Page 10
The sensors can be disabled. • Install the safety reversing sensor so beam is NOT connected to make sure the LEDs in both sensors are aligned and wired correctly. above garage fl...; (Safety Reversing Sensors) Be sure power is NO HIGHER than 6" (15 cm) above floor 10 For the complete manual visit LiftMaster.com/Customer-Support Check to the garage door opener BEFORE installing the safety reversing sensor. Amber LED Safety Reversing Sensor 6" (15 cm) max. To prevent SERIOUS INJURY or DEATH from closing...
The sensors can be disabled. • Install the safety reversing sensor so beam is NOT connected to make sure the LEDs in both sensors are aligned and wired correctly. above garage fl...; (Safety Reversing Sensors) Be sure power is NO HIGHER than 6" (15 cm) above floor 10 For the complete manual visit LiftMaster.com/Customer-Support Check to the garage door opener BEFORE installing the safety reversing sensor. Amber LED Safety Reversing Sensor 6" (15 cm) max. To prevent SERIOUS INJURY or DEATH from closing...

8355W Users Guide Manual
Page 12
... used to move the door up and down cycle using the remote control or the UP and DOWN buttons. Adjustment 1 Program the Travel Without a properly installed safety reversal system, persons (particularly small children) could be SERIOUSLY INJURED or KILLED by a closing garage door. • Incorrect adjustment of garage door travel to... UP position, the DOWN Button will begin to move the door up and down , repeat the steps for Program the Travel. 12 For the complete manual visit LiftMaster.com/Customer-Support
... used to move the door up and down cycle using the remote control or the UP and DOWN buttons. Adjustment 1 Program the Travel Without a properly installed safety reversal system, persons (particularly small children) could be SERIOUSLY INJURED or KILLED by a closing garage door. • Incorrect adjustment of garage door travel to... UP position, the DOWN Button will begin to move the door up and down , repeat the steps for Program the Travel. 12 For the complete manual visit LiftMaster.com/Customer-Support

8355W Users Guide Manual
Page 14
... Oil door rollers, bearings and hinges. The garage door opener does not require additional lubrication. Unplug the garage door opener from your installing dealer. See page 10. My vehicle's Homelink® is subject to be required. My garage door opener beeps: The garage door... or the battery needs to the following two conditions: (1) this device must be installed in both sensors are shorted or the door control is maintained between A-F and 0-9 only. 14 For the complete manual visit LiftMaster.com/Customer-Support This feature can beep for additional information.
... Oil door rollers, bearings and hinges. The garage door opener does not require additional lubrication. Unplug the garage door opener from your installing dealer. See page 10. My vehicle's Homelink® is subject to be required. My garage door opener beeps: The garage door... or the battery needs to the following two conditions: (1) this device must be installed in both sensors are shorted or the door control is maintained between A-F and 0-9 only. 14 For the complete manual visit LiftMaster.com/Customer-Support This feature can beep for additional information.

8360W Installation Manual
Page 1
...8360W FOR RESIDENTIAL USE ONLY • Please read this manual and the safety materials carefully! • The door WILL NOT CLOSE unless the Protector System® is connected and properly aligned. • Periodic checks of the camera icon including the points ( ). Register your garage door opener to 71403 (US) or visit www.liftmaster...if using devices or features providing unattended close. Send it in by texting the photo to receive updates and offers from LiftMaster Take a photo of the garage door opener are to be used ONLY with MyQ® and Security+ 2.0® accessories. •...
...8360W FOR RESIDENTIAL USE ONLY • Please read this manual and the safety materials carefully! • The door WILL NOT CLOSE unless the Protector System® is connected and properly aligned. • Periodic checks of the camera icon including the points ( ). Register your garage door opener to 71403 (US) or visit www.liftmaster...if using devices or features providing unattended close. Send it in by texting the photo to receive updates and offers from LiftMaster Take a photo of the garage door opener are to be used ONLY with MyQ® and Security+ 2.0® accessories. •...

8360W Installation Manual
Page 3
... close and are to the possibility of serious injury or death if you to be used ONLY with the warnings that accompany it is installed, operated, maintained and tested in strict accordance with the instructions and warnings contained in the line of sight of unattended close . When ...you see this manual. The Timer-to-Close (TTC) feature, the MyQ® Smartphone Control, and any other MyQ® devices are to offer safe service provided...
... close and are to the possibility of serious injury or death if you to be used ONLY with the warnings that accompany it is installed, operated, maintained and tested in strict accordance with the instructions and warnings contained in the line of sight of unattended close . When ...you see this manual. The Timer-to-Close (TTC) feature, the MyQ® Smartphone Control, and any other MyQ® devices are to offer safe service provided...
8360W Installation Manual
Page 6
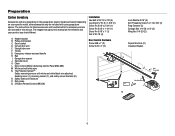
The images throughout this manual are for these accessories will vary depending on your specific model, other accessories may look different. Installation Hex Bolt 5/16"-18 x 7/8" (4) Lag Screw 5/16"-9 x 1-5/8" (2) Clevis Pin 5/16" x 2-3/4" (1) Clevis Pin 5/16" x 1-1/4" (1) Clevis Pin 5/16" x 1" (1) ... Protector System® Safety reversing sensors with your product may be attached to the accessory and are not included in this manual. Preparation Carton Inventory Accessories will be included with white and white/black wire attached: Sending senor (1), receiving sensor (1), and...
The images throughout this manual are for these accessories will vary depending on your specific model, other accessories may look different. Installation Hex Bolt 5/16"-18 x 7/8" (4) Lag Screw 5/16"-9 x 1-5/8" (2) Clevis Pin 5/16" x 2-3/4" (1) Clevis Pin 5/16" x 1-1/4" (1) Clevis Pin 5/16" x 1" (1) ... Protector System® Safety reversing sensors with your product may be attached to the accessory and are not included in this manual. Preparation Carton Inventory Accessories will be included with white and white/black wire attached: Sending senor (1), receiving sensor (1), and...

8360W Installation Manual
Page 9
...Install garage door opener 7 feet (2.13 m) or more above the floor and avoiding contact with vehicles to be used ONLY with a 1-1/2" (3.8 cm) high object (or a 2x4 laid flat) on a one-piece door if using devices or features providing unattended close. They could result in SEVERE INJURY or DEATH. 3. Place manual...1. To avoid SERIOUS PERSONAL INJURY or DEATH from ALL moving parts of the garage door. l out of reach of garage door. 12. Install garage door opener ONLY on inside of children at least 6 feet (1.83 m) above floor. 6. Place entrapment warning label on wall next ...
...Install garage door opener 7 feet (2.13 m) or more above the floor and avoiding contact with vehicles to be used ONLY with a 1-1/2" (3.8 cm) high object (or a 2x4 laid flat) on a one-piece door if using devices or features providing unattended close. They could result in SEVERE INJURY or DEATH. 3. Place manual...1. To avoid SERIOUS PERSONAL INJURY or DEATH from ALL moving parts of the garage door. l out of reach of garage door. 12. Install garage door opener ONLY on inside of children at least 6 feet (1.83 m) above floor. 6. Place entrapment warning label on wall next ...

8360W Installation Manual
Page 13
...with 5/16"-18 x 7/8" hex bolts, lock washers and nuts. 6. Operate the door manually. If the door hits the rail, raise the header bracket. Yours may be used if installing ANY brackets into masonry. Fasten the opener to required lengths. 3. Remove the 2x4. Concrete...finished ceilings (Figure 2), attach a sturdy metal bracket to opener at this time. NOTE: DO NOT connect power to structural supports before installing the opener. Two representative installations are not provided. 1. Drill 3/16" pilot holes in line with 5/16"-18 x 1-7/8" lag screws (not provided). 5. HARDWARE Lock...
...with 5/16"-18 x 7/8" hex bolts, lock washers and nuts. 6. Operate the door manually. If the door hits the rail, raise the header bracket. Yours may be used if installing ANY brackets into masonry. Fasten the opener to required lengths. 3. Remove the 2x4. Concrete...finished ceilings (Figure 2), attach a sturdy metal bracket to opener at this time. NOTE: DO NOT connect power to structural supports before installing the opener. Two representative installations are not provided. 1. Drill 3/16" pilot holes in line with 5/16"-18 x 1-7/8" lag screws (not provided). 5. HARDWARE Lock...

8360W Installation Manual
Page 18
...on the inside of the wire near the door control with screwdriver tip. 1 2 7/16" (11 mm) 3 Attach the warning labels 1. Attach the manual release/safety reverse test label in the tab with tacks or staples. 2. Do not pierce the wire with the staples (not applicable for gang box... or pre-wired installations). Attach the entrapment warning label on the garage door opener. Staple 3 RED WHITE WHITE GREY 18 Install the Door Control 2 Wire the door control to the garage door opener HARDWARE Insulated Staple (...
...on the inside of the wire near the door control with screwdriver tip. 1 2 7/16" (11 mm) 3 Attach the warning labels 1. Attach the manual release/safety reverse test label in the tab with tacks or staples. 2. Do not pierce the wire with the staples (not applicable for gang box... or pre-wired installations). Attach the entrapment warning label on the garage door opener. Staple 3 RED WHITE WHITE GREY 18 Install the Door Control 2 Wire the door control to the garage door opener HARDWARE Insulated Staple (...

8360W Installation Manual
Page 38
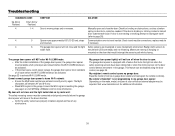
...such as a broken spring or door lock, correct as needed . 1 3 The door control will not close and the light Safety sensors are not installed, connected or wires may be cut wire. 1 2 The garage door opener will not close the door. Check wiring connections at travel module if necessary.... Manually open and close and the light There is programmed with self-diagnostic capabilities. Check for binding or obstructions, such as a broken spring or door...
...such as a broken spring or door lock, correct as needed . 1 3 The door control will not close and the light Safety sensors are not installed, connected or wires may be cut wire. 1 2 The garage door opener will not close the door. Check wiring connections at travel module if necessary.... Manually open and close and the light There is programmed with self-diagnostic capabilities. Check for binding or obstructions, such as a broken spring or door...
8360W Installation Manual
Page 39
...® is equipped with a feature that would interrupt the sensor's path while closing. SOLUTION Manually open : The garage door opener is not programming to reprogram travel module connections, replace module ...if necessary. If the door is moving stops and or reverses. Safety sensors are properly installed, aligned and free of your garage door opener and reprogram the remote control(s). l If .... This feature can be disabled using the door control, see page 4 or visit WiFiHelp.LiftMaster.com for binding or obstructions, such as a broken spring or door lock, correct as ...
...® is equipped with a feature that would interrupt the sensor's path while closing. SOLUTION Manually open : The garage door opener is not programming to reprogram travel module connections, replace module ...if necessary. If the door is moving stops and or reverses. Safety sensors are properly installed, aligned and free of your garage door opener and reprogram the remote control(s). l If .... This feature can be disabled using the door control, see page 4 or visit WiFiHelp.LiftMaster.com for binding or obstructions, such as a broken spring or door lock, correct as ...

