
Owner's Manual
Page 4
...behind the carrying handle . 4-thread overedge seam Threading the right looper Threading the left looper Threading the left and right needle Thread reel change on hobbylock 784 and 786 Adjusting the differential feed (hobbyfock 786) . . Disengaging the upper knife Adjusting the seam width Changing the ...sewing foot Changing the light bulb Cleaning the thread tensions Rolled hems Changing the needles Changing the knives Changing the upper ...
...behind the carrying handle . 4-thread overedge seam Threading the right looper Threading the left looper Threading the left and right needle Thread reel change on hobbylock 784 and 786 Adjusting the differential feed (hobbyfock 786) . . Disengaging the upper knife Adjusting the seam width Changing the ...sewing foot Changing the light bulb Cleaning the thread tensions Rolled hems Changing the needles Changing the knives Changing the upper ...

Owner's Manual
Page 5
... tension dial 7 Thread tension cover 8 Lint box 9 Handwheel 10 Looper cover with recess 11 Upper knife 12 Work support (swivel-type) 13 Needle plate 14 Sewing foot 15 Needle bar 16 Sewing foot lifting lever 17 Thread spool holder 18 Thread guides 19 Thread guide bar 20 Machine socket 21 Master switch...
... tension dial 7 Thread tension cover 8 Lint box 9 Handwheel 10 Looper cover with recess 11 Upper knife 12 Work support (swivel-type) 13 Needle plate 14 Sewing foot 15 Needle bar 16 Sewing foot lifting lever 17 Thread spool holder 18 Thread guides 19 Thread guide bar 20 Machine socket 21 Master switch...

Owner's Manual
Page 7
Foot control The speed of the needles and the upper knife, the user must take sufficient care to the up and down , the faster the machine will sew. Position = Half speed Position +4 = ... power source. C) The maximum approved wattage of the light bulb is regulated as follows: The more you press the foot control down movement of the Hobbylock is 15 watts. Electronic foot control Maximum speed can be pre-selected in two steps by anyone but an authorized...
Foot control The speed of the needles and the upper knife, the user must take sufficient care to the up and down , the faster the machine will sew. Position = Half speed Position +4 = ... power source. C) The maximum approved wattage of the light bulb is regulated as follows: The more you press the foot control down movement of the Hobbylock is 15 watts. Electronic foot control Maximum speed can be pre-selected in two steps by anyone but an authorized...
Owner's Manual
Page 9
... path of the thread spool stand and the thread guides behind the looper cover. First pull the respective threads through their corresponding guides (Figs. right needle (green) 4. To close the work support, push it to the machine behind the carrying handle The machine must be threaded correctly. A threacing diagram is fixed...
... path of the thread spool stand and the thread guides behind the looper cover. First pull the respective threads through their corresponding guides (Figs. right needle (green) 4. To close the work support, push it to the machine behind the carrying handle The machine must be threaded correctly. A threacing diagram is fixed...
Owner's Manual
Page 10
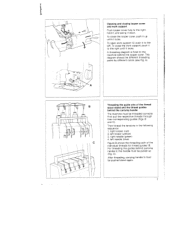
The 3-thread overedge seam is sewn with two needle threads and two looper threads. 21 - 3 4 - 75 - 4-thread overedge seam This seam is described on page 17. Important: In order to 9 and pull approximately 10 cm (4") of thread through the looper eye (the thread path is marked red). If' 5, /2 / 8 1 5 H 6 8 Threading the right looper: Thread the right looper in sequence 1 to obtain perfect sewing results, the thread must be pulled between the tension discs when threading the tensions.
The 3-thread overedge seam is sewn with two needle threads and two looper threads. 21 - 3 4 - 75 - 4-thread overedge seam This seam is described on page 17. Important: In order to 9 and pull approximately 10 cm (4") of thread through the looper eye (the thread path is marked red). If' 5, /2 / 8 1 5 H 6 8 Threading the right looper: Thread the right looper in sequence 1 to obtain perfect sewing results, the thread must be pulled between the tension discs when threading the tensions.
Owner's Manual
Page 12
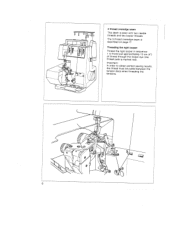
... pull the threads through the looper eye. 10 Pull about 15 cm past the looper eyes without interruption. .1 H- •f? 3 111.3 rrc 2 -3 5 Threading the right needle Threading of guide wires 18 and of the thread guide behind the carrying handle is shown on page 7. In the left...and of the thread guide behind the carrying handle is shown on page 7. Thread spool change on spool holders 17. Pull the needle threads out of thread through the respective needle eyes. The looper threads can be pulled behind the thread retainer. At point 5 the thread must be pulled behind the thread...
... pull the threads through the looper eye. 10 Pull about 15 cm past the looper eyes without interruption. .1 H- •f? 3 111.3 rrc 2 -3 5 Threading the right needle Threading of guide wires 18 and of the thread guide behind the carrying handle is shown on page 7. In the left...and of the thread guide behind the carrying handle is shown on page 7. Thread spool change on spool holders 17. Pull the needle threads out of thread through the respective needle eyes. The looper threads can be pulled behind the thread retainer. At point 5 the thread must be pulled behind the thread...
Owner's Manual
Page 16
... tightened, as shown in the illustration. Note: When sewing thin or medium fabrics, the screw of the upper knife is inhibited. For knit fabrics, a crochet needle can move axially. 14
... tightened, as shown in the illustration. Note: When sewing thin or medium fabrics, the screw of the upper knife is inhibited. For knit fabrics, a crochet needle can move axially. 14

Owner's Manual
Page 18
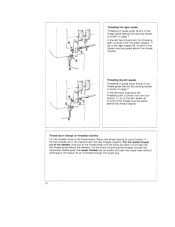
Correcting the thread tensions When the thread tension is turned in (-) direction it is decreased. J The right needle thread B is too tight (yellow thread tension) or the right looper thread C too loose (red thread tension). 16 Top side DC Reverse side The right looper thread C is too tight (red thread tension> or the left needle thread A is increased. The left looper thread D too loose (yellow thread tension). - The left looper thread D is too loose (green thread tension). When turned in (+) direction, the tension is too loose (blue thread tension).
Correcting the thread tensions When the thread tension is turned in (-) direction it is decreased. J The right needle thread B is too tight (yellow thread tension) or the right looper thread C too loose (red thread tension). 16 Top side DC Reverse side The right looper thread C is too tight (red thread tension> or the left needle thread A is increased. The left looper thread D too loose (yellow thread tension). - The left looper thread D is too loose (green thread tension). When turned in (+) direction, the tension is too loose (blue thread tension).

Owner's Manual
Page 19
fl Left needle 3-thread overedge seam Right needle !J Standard seam width N * 5,7 mm Max. The left or right needle must be removed. seam width 5 mm 17 seam width 7.2 mm Standard seam width N 3.5 mm Max. I 3-thread overedge seam: The with 3-thread overedge seam two looper threads and is sewn one needle thread.
fl Left needle 3-thread overedge seam Right needle !J Standard seam width N * 5,7 mm Max. The left or right needle must be removed. seam width 5 mm 17 seam width 7.2 mm Standard seam width N 3.5 mm Max. I 3-thread overedge seam: The with 3-thread overedge seam two looper threads and is sewn one needle thread.
Owner's Manual
Page 27
...7 to + 1 must be set higher or lower. left looper, yellow path needle thread, green path For threading of the sewing machine: Needle: Sewing foot: Seam width: Stitch length: Thread: reffperrnooomgmmlyaoegv31see..t00elrreottooflttlhe42rnd..e00eahedm(edsmlmh1eo2f0r(ot-...tensions Threading path: 1. Rolled hem, sewn This hem requires with polyester thread Preparation of needle and loopers, Tension setting: RYGeerldeloetwnhrttehharrdeeaatddenttseeinnossnii,oonnri,,gnhletefetlodloolepoeptrherread see pages 7 to polyester thread 11. right looper, red path 2. ...
...7 to + 1 must be set higher or lower. left looper, yellow path needle thread, green path For threading of the sewing machine: Needle: Sewing foot: Seam width: Stitch length: Thread: reffperrnooomgmmlyaoegv31see..t00elrreottooflttlhe42rnd..e00eahedm(edsmlmh1eo2f0r(ot-...tensions Threading path: 1. Rolled hem, sewn This hem requires with polyester thread Preparation of needle and loopers, Tension setting: RYGeerldeloetwnhrttehharrdeeaatddenttseeinnossnii,oonnri,,gnhletefetlodloolepoeptrherread see pages 7 to polyester thread 11. right looper, red path 2. ...
Owner's Manual
Page 28
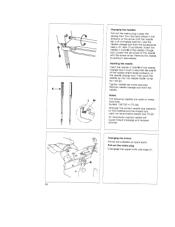
... hand wheel in hole M of the needle change tool. Use the needle change tool from the needle. LM I K Inserting the needle Insert the needle in hole M of the needle change tool in such a way that flat side K of the needle shank faces surface L of the needle change tool. An incorrectly inserted needle will go. Changing the knives are used...
... hand wheel in hole M of the needle change tool. Use the needle change tool from the needle. LM I K Inserting the needle Insert the needle in hole M of the needle change tool in such a way that flat side K of the needle shank faces surface L of the needle change tool. An incorrectly inserted needle will go. Changing the knives are used...
Owner's Manual
Page 30
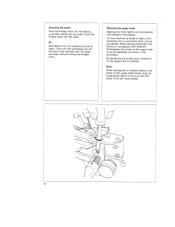
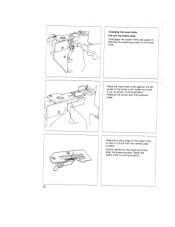
Align the cutting edge of the lower knife holder and push it is flush with the pressure plate. Before tightening the retaining screw, align the pressure plate. Remove the retaining screw of the lower knife. :;;: -ZL--1 p Place the new lower knife against the left guide of the lower knife so that it up, as shown in the illustration. Reset the upper knife to cutting position. 28 Replace the screw with the needle plate surface. I /( Changing the lower knife Pull out the mains plug' Disengage the upper knife (see page 21).
Align the cutting edge of the lower knife holder and push it is flush with the pressure plate. Before tightening the retaining screw, align the pressure plate. Remove the retaining screw of the lower knife. :;;: -ZL--1 p Place the new lower knife against the left guide of the lower knife so that it up, as shown in the illustration. Reset the upper knife to cutting position. 28 Replace the screw with the needle plate surface. I /( Changing the lower knife Pull out the mains plug' Disengage the upper knife (see page 21).
Owner's Manual
Page 32
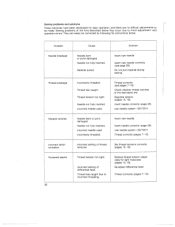
... be made. Thread has caught. Thread correctly (see page 26). Insert new needle. Use needle system 130/705 H Thread correctly (pages 7-10). Incorrect needle used . Thread breakage Incorrectly threaded. Insert new needle correctly (see pages 7-10). Thread correctly (pages 7-10). Sewing problems and ...developed for light materials) (pages 15, 16). Re-adjust differential feed. Problem ______ Needle breakage Cause Needle bent or point damaged. Thread tension too tight, Needle not fully inserted. Puckered seams 30 Thread tension too tight. Reduce thread tension (espe ...
... be made. Thread has caught. Thread correctly (see page 26). Insert new needle. Use needle system 130/705 H Thread correctly (pages 7-10). Incorrect needle used . Thread breakage Incorrectly threaded. Insert new needle correctly (see pages 7-10). Thread correctly (pages 7-10). Sewing problems and ...developed for light materials) (pages 15, 16). Re-adjust differential feed. Problem ______ Needle breakage Cause Needle bent or point damaged. Thread tension too tight, Needle not fully inserted. Puckered seams 30 Thread tension too tight. Reduce thread tension (espe ...
Owner's Manual
Page 33
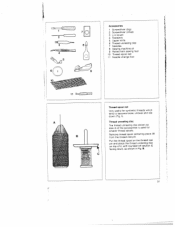
... •11 II#ICIIIII*IIIiIlI, Bfl E '1 Accessories 1 Screwdriver (big) t 2 Screwdriver (small) 3 Lint brush 4 Tweezers 5 Upper knife 6 Thread unreeling disc 7 Needles 8 Sewing machine oil I 9 Rolled hem sewing foot 10 Thread spool net 11 Needle change tool I item 6 of it, with rounded-off section C facing down, as I Thread spool net Very useful for smaller...
... •11 II#ICIIIII*IIIiIlI, Bfl E '1 Accessories 1 Screwdriver (big) t 2 Screwdriver (small) 3 Lint brush 4 Tweezers 5 Upper knife 6 Thread unreeling disc 7 Needles 8 Sewing machine oil I 9 Rolled hem sewing foot 10 Thread spool net 11 Needle change tool I item 6 of it, with rounded-off section C facing down, as I Thread spool net Very useful for smaller...
Owner's Manual
Page 34
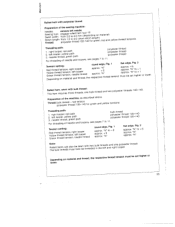
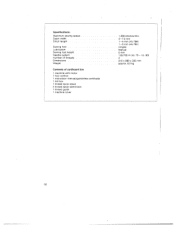
no . 75- Specifications: Maximum sewing speed Seam width Stitch length Sewing foot Lubrication Sewing foot height Needle system Number of threads Dimensions Weight Contents of cardboard box 1 machine with motor 1 foot control 1 instruction manual/guarantee certificate 1 lint box 1 thread spool stand 4 thread spool stand bars 1 thread guide 1 machine cover 1.300 stitches/mm. 3-7.2mm 1 -4 mm (HL-786) 1 -5 mm (HL-784) Hinged Manual 5mm 130/705 H (no . 90) 4 315 x 280 x 330mm approx. 8.0 kg 32
no . 75- Specifications: Maximum sewing speed Seam width Stitch length Sewing foot Lubrication Sewing foot height Needle system Number of threads Dimensions Weight Contents of cardboard box 1 machine with motor 1 foot control 1 instruction manual/guarantee certificate 1 lint box 1 thread spool stand 4 thread spool stand bars 1 thread guide 1 machine cover 1.300 stitches/mm. 3-7.2mm 1 -4 mm (HL-786) 1 -5 mm (HL-784) Hinged Manual 5mm 130/705 H (no . 90) 4 315 x 280 x 330mm approx. 8.0 kg 32

