User Manual
Page 3
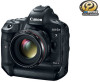
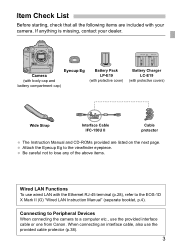
Eyecup Eg Camera (with body cap and battery compartment cap) Battery Pack LP-E19 (with protective cover) Battery Charger LC-E19 (with your dealer. Be careful not to lose any ... is missing, contact your camera. Connecting to Peripheral Devices When connecting the camera to the EOS-1D X Mark II (G) "Wired LAN Instruction Manual" (separate booklet, p.4). When connecting an interface cable, also use the provided interface cable or one from Canon. Attach the Eyecup Eg to the viewfinder eyepiece. Item Check List Before starting, check...
Eyecup Eg Camera (with body cap and battery compartment cap) Battery Pack LP-E19 (with protective cover) Battery Charger LC-E19 (with your dealer. Be careful not to lose any ... is missing, contact your camera. Connecting to Peripheral Devices When connecting the camera to the EOS-1D X Mark II (G) "Wired LAN Instruction Manual" (separate booklet, p.4). When connecting an interface cable, also use the provided interface cable or one from Canon. Attach the Eyecup Eg to the viewfinder eyepiece. Item Check List Before starting, check...

User Manual
Page 20
... range. Even if the camera does not feel too hot, prolonged contact with the same body part may cause a fire, heat damage, or electrical shock. Do not subject the battery to the product, contact the nearest Canon Service Center or the dealer from contacting your eyes, skin, or clothing, flush the affected...
... range. Even if the camera does not feel too hot, prolonged contact with the same body part may cause a fire, heat damage, or electrical shock. Do not subject the battery to the product, contact the nearest Canon Service Center or the dealer from contacting your eyes, skin, or clothing, flush the affected...

User Manual
Page 24
... before taking it . Avoid storing the camera where there are chemicals that the camera is suddenly brought in a while to clean the camera body or lens. If you use continuous shooting, Live View shooting, or movie shooting for an extended period, test all its functions before using ...malfunction. Do not use the camera. Do not touch the camera's electrical contacts with your nearest Canon Service Center or check the camera yourself and make sure it adheres to the nearest Canon Service Center. If the camera is still working properly. Even while the camera is to prevent...
... before taking it . Avoid storing the camera where there are chemicals that the camera is suddenly brought in a while to clean the camera body or lens. If you use continuous shooting, Live View shooting, or movie shooting for an extended period, test all its functions before using ...malfunction. Do not use the camera. Do not touch the camera's electrical contacts with your nearest Canon Service Center or check the camera yourself and make sure it adheres to the nearest Canon Service Center. If the camera is still working properly. Even while the camera is to prevent...

User Manual
Page 26
...-grip Multi-function button 2 (p.67, 447) 26 Tripod socket Contacts (p.25) Serial No. Nomenclature Lens mount index (p.59) Depth-of -field preview button (p.67, 235) Body cap (p.59)
...-grip Multi-function button 2 (p.67, 447) 26 Tripod socket Contacts (p.25) Serial No. Nomenclature Lens mount index (p.59) Depth-of -field preview button (p.67, 235) Body cap (p.59)

User Manual
Page 59
The camera cannot be used with all Canon EF lenses. Align the red mount index on the lens with the red mount index on the camera and turn the lens as shown by the arrow until it clicks in place. 3 Set the lens's focus mode switch to . Attaching a Lens 1 Remove the caps. stands for manual focus. Remove the rear lens cap and the body cap by turning them as shown by the arrows. 2 Attach the lens. stands for autofocus. Attaching and Detaching a Lens The camera is compatible with EF-S or EF-M lenses. Autofocus will not operate. 4 Remove the front lens cap. 59
The camera cannot be used with all Canon EF lenses. Align the red mount index on the lens with the red mount index on the camera and turn the lens as shown by the arrow until it clicks in place. 3 Set the lens's focus mode switch to . Attaching a Lens 1 Remove the caps. stands for manual focus. Remove the rear lens cap and the body cap by turning them as shown by the arrows. 2 Attach the lens. stands for autofocus. Attaching and Detaching a Lens The camera is compatible with EF-S or EF-M lenses. Autofocus will not operate. 4 Remove the front lens cap. 59

User Manual
Page 60
... lens until it stops, then detach it quickly in a place with minimal dust. When storing the camera without a lens attached, be sure to attach the body cap to . Minimizing Dust When changing lenses, do not touch the rotating part. Do not look at the sun directly through any lens. When attaching... shown by the arrow. Attach the rear lens cap to the detached lens. If the front part (focusing ring) of vision. Remove dust on the body cap before attaching it. 60
... lens until it stops, then detach it quickly in a place with minimal dust. When storing the camera without a lens attached, be sure to attach the body cap to . Minimizing Dust When changing lenses, do not touch the rotating part. Do not look at the sun directly through any lens. When attaching... shown by the arrow. Attach the rear lens cap to the detached lens. If the front part (focusing ring) of vision. Remove dust on the body cap before attaching it. 60

User Manual
Page 61
... detach it. 2 Make the adjustment. Press the camera against the front of your face and look sharp. Press your arms and elbows lightly against your body. 5. While grasping both sides of the other. 6. To shoot while looking at the LCD monitor, see page 271. 61 If the camera's dioptric adjustment still...
... detach it. 2 Make the adjustment. Press the camera against the front of your face and look sharp. Press your arms and elbows lightly against your body. 5. While grasping both sides of the other. 6. To shoot while looking at the LCD monitor, see page 271. 61 If the camera's dioptric adjustment still...

User Manual
Page 144
... either of light framed close to an AF point (Example: Animals in very low light Strongly backlit or reflective subjects (Example: Cars with highly reflective bodies, etc.) Near and distant subjects framed close to and focus manually (p.145). For conditions that make focusing difficult with finer patterns than an AF point...
... either of light framed close to an AF point (Example: Animals in very low light Strongly backlit or reflective subjects (Example: Cars with highly reflective bodies, etc.) Near and distant subjects framed close to and focus manually (p.145). For conditions that make focusing difficult with finer patterns than an AF point...

User Manual
Page 226
For this reason, even when carrying the camera, such as possible. Logging the Route Traveled When connecting the camera to keep the top of the camera facing upwards, and do not place anything on top of the camera body. The GPS antenna is located at the top of it. Set the camera time and date as accurately as in a bag, try to a computer, use the provided cable protector (p.38). Also, set correct time zone and daylight saving time for the shooting location. 226 When connecting the interface cable, use the provided interface cable or one from Canon (p.487).
For this reason, even when carrying the camera, such as possible. Logging the Route Traveled When connecting the camera to keep the top of the camera facing upwards, and do not place anything on top of the camera body. The GPS antenna is located at the top of it. Set the camera time and date as accurately as in a bag, try to a computer, use the provided cable protector (p.38). Also, set correct time zone and daylight saving time for the shooting location. 226 When connecting the interface cable, use the provided interface cable or one from Canon (p.487).

User Manual
Page 276
... periods of time. icon and histogram will reflect the exposure setting. Even if the camera does not feel too hot, prolonged contact with the same body part may cause skin redness or blistering due to a TV set to [u+Tracking] or if the camera is not performed (p.281). simulation] is set or...
... periods of time. icon and histogram will reflect the exposure setting. Even if the camera does not feel too hot, prolonged contact with the same body part may cause skin redness or blistering due to a TV set to [u+Tracking] or if the camera is not performed (p.281). simulation] is set or...

User Manual
Page 289
... such as the blue sky, solid-color flat surfaces or when highlight or shadow details are clipped. Noise (dots of light. Subjects with a highly reflective body, etc.). Performing AF when the subject is contrast only in the horizontal direction. Strongly backlit or reflective subjects (Example: Car with repetitive patterns (Example: Skyscraper...
... such as the blue sky, solid-color flat surfaces or when highlight or shadow details are clipped. Noise (dots of light. Subjects with a highly reflective body, etc.). Performing AF when the subject is contrast only in the horizontal direction. Strongly backlit or reflective subjects (Example: Car with repetitive patterns (Example: Skyscraper...

User Manual
Page 307
... time will be used. Most external microphones equipped with circulation problems or very sensitive skin, or when using a (super) telephoto lens equipped with the same body part may cause skin redness or blistering due to start or stop the movie shooting (p.337). Using a tripod is created on pages 293-294.
... time will be used. Most external microphones equipped with circulation problems or very sensitive skin, or when using a (super) telephoto lens equipped with the same body part may cause skin redness or blistering due to start or stop the movie shooting (p.337). Using a tripod is created on pages 293-294.

User Manual
Page 479
Certification Logo Select [54: Certification Logo Display] and press to display some of the logos of the camera's certifications. Other certification logos can be found in this Instruction Manual, on the camera body, and on the camera's package. 479 14 Reference This chapter provides reference information for camera features, system accessories, etc.
Certification Logo Select [54: Certification Logo Display] and press to display some of the logos of the camera's certifications. Other certification logos can be found in this Instruction Manual, on the camera body, and on the camera's package. 479 14 Reference This chapter provides reference information for camera features, system accessories, etc.

User Manual
Page 537
.... at room temperature (23°C/73°F) Total approx. 2 hr. Weight: Approx. 1530 g / 53.97 oz. (Including battery, CF card), Approx. 1340 g / 47.27 oz. (Body only) 537 Specifications • Interface DIGITAL terminal: SuperSpeed USB (USB 3.0) Computer communication, Connect Station CS100 connection HDMI mini OUT Type C (Auto switching of resolution), CEC...
.... at room temperature (23°C/73°F) Total approx. 2 hr. Weight: Approx. 1530 g / 53.97 oz. (Including battery, CF card), Approx. 1340 g / 47.27 oz. (Body only) 537 Specifications • Interface DIGITAL terminal: SuperSpeed USB (USB 3.0) Computer communication, Connect Station CS100 connection HDMI mini OUT Type C (Auto switching of resolution), CEC...

User Manual
Page 538
... subject to the camera, consult the respective lens manufacturer. 538 Product specifications and the exterior are based on Canon's testing standards and CIPA (Camera & Imaging Products Association) testing standards and guidelines. Dimensions and weight listed... above is based on CIPA Guidelines (except weight for camera body only). Working temperature 5°C - 40°C / 41°F - 104°F range: Working humidity: 85% or less Dimensions (W x H x...
... subject to the camera, consult the respective lens manufacturer. 538 Product specifications and the exterior are based on Canon's testing standards and CIPA (Camera & Imaging Products Association) testing standards and guidelines. Dimensions and weight listed... above is based on CIPA Guidelines (except weight for camera body only). Working temperature 5°C - 40°C / 41°F - 104°F range: Working humidity: 85% or less Dimensions (W x H x...
