User Manual
Page 2
... recycling waste electrical and electronic equipment (EEE) and batteries and accumulators. FCC NOTICE Multi-Purpose Camera, ME20F-SH Systems. This device complies with your household waste disposal service or visit www.canon-europe.com/weee, or www.canon-europe.com/battery. Improper handling of this type of this product, please contact your local city...
... recycling waste electrical and electronic equipment (EEE) and batteries and accumulators. FCC NOTICE Multi-Purpose Camera, ME20F-SH Systems. This device complies with your household waste disposal service or visit www.canon-europe.com/weee, or www.canon-europe.com/battery. Improper handling of this type of this product, please contact your local city...

User Manual
Page 3
... objects have fallen into the apparatus, the apparatus has been exposed to take adequate measures. Read these safety instructions the word "apparatus" refers to the Canon Multi-Purpose Camera ME20F-SH and all servicing to qualified service personnel. Important Safety Instructions In these instructions. 2. Keep these instructions. 3.
... objects have fallen into the apparatus, the apparatus has been exposed to take adequate measures. Read these safety instructions the word "apparatus" refers to the Canon Multi-Purpose Camera ME20F-SH and all servicing to qualified service personnel. Important Safety Instructions In these instructions. 2. Keep these instructions. 3.

User Manual
Page 4
Consult a Canon Service Center to have it replaced. • Do not point the camera toward an intense light source, such as the... • HDMI, the HDMI logo and High-Definition Multimedia Interface are not using a tripod. If the camera does not function properly, consult qualified service personnel. • Do not touch the lens contacts on a sunny...artificial light source. Consult a Canon Service Center as soon as possible. 4 • Be careful to use the camera near strong electromagnetic fields such as this may cause a poor contact between the camera and the lens resulting in ...
Consult a Canon Service Center to have it replaced. • Do not point the camera toward an intense light source, such as the... • HDMI, the HDMI logo and High-Definition Multimedia Interface are not using a tripod. If the camera does not function properly, consult qualified service personnel. • Do not touch the lens contacts on a sunny...artificial light source. Consult a Canon Service Center as soon as possible. 4 • Be careful to use the camera near strong electromagnetic fields such as this may cause a poor contact between the camera and the lens resulting in ...

User Manual
Page 5
... and ND filter; For more details on Canon Cinema EOS cameras. These include the following highlights some of the ways that this camera can shoot in a variety of situations. Highlights of the ME20F-SH The Canon ME20F-SH Multi-Purpose Camera boasts numerous features that allow it to have the camera focus automatically one time after you press...
... and ND filter; For more details on Canon Cinema EOS cameras. These include the following highlights some of the ways that this camera can shoot in a variety of situations. Highlights of the ME20F-SH The Canon ME20F-SH Multi-Purpose Camera boasts numerous features that allow it to have the camera focus automatically one time after you press...

User Manual
Page 6
... Monitor 18 Connection Diagram 18 Date and Time Settings 19 Using the Menu 20 Selecting an Option from the Menu 20 Preparing the Camera 22 Adjusting the Black Balance 22 Preparing the Lens 22 Overview of Connecting to an External Recorder 55 Synchronizing with the Joystick 32 ... Configuration: System Frequency, Frame Rate and Resolution 31 Selecting the System Frequency 31 Selecting the Frame Rate 31 Selecting the Resolution 31 Adjusting Main Camera Functions with an External Device 57 Audio Input and Output 58 Audio Input 58 Audio Output 58 6. Push Auto Iris 34 Exposure Compensation -...
... Monitor 18 Connection Diagram 18 Date and Time Settings 19 Using the Menu 20 Selecting an Option from the Menu 20 Preparing the Camera 22 Adjusting the Black Balance 22 Preparing the Lens 22 Overview of Connecting to an External Recorder 55 Synchronizing with the Joystick 32 ... Configuration: System Frequency, Frame Rate and Resolution 31 Selecting the System Frequency 31 Selecting the Frame Rate 31 Selecting the Resolution 31 Adjusting Main Camera Functions with an External Device 57 Audio Input and Output 58 Audio Input 58 Audio Output 58 6. Push Auto Iris 34 Exposure Compensation -...
User Manual
Page 7
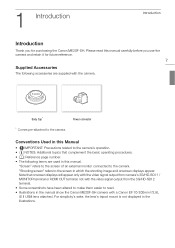
...number. • The following accessories are used in the illustrations. Note that onscreen displays will appear only with the video signal output from camera's 3G/HD-SDI 1 / MONITOR terminal or HDMI OUT terminal, not with the video signal output from the 3G/HD-SDI 2 ...reference. 7 Supplied Accessories The following terms are supplied with a Canon EF 70-200mm f/2.8L IS II USM lens attached. 1 Introduction Introduction Introduction Thank you use the camera and retain it for purchasing the Canon ME20F-SH. Conventions Used in which the shooting image and onscreen displays ...
...number. • The following accessories are used in the illustrations. Note that onscreen displays will appear only with the video signal output from camera's 3G/HD-SDI 1 / MONITOR terminal or HDMI OUT terminal, not with the video signal output from the 3G/HD-SDI 2 ...reference. 7 Supplied Accessories The following terms are supplied with a Canon EF 70-200mm f/2.8L IS II USM lens attached. 1 Introduction Introduction Introduction Thank you use the camera and retain it for purchasing the Canon ME20F-SH. Conventions Used in which the shooting image and onscreen displays ...

User Manual
Page 8
...used to refer to match the shooting conditions. Using the appropriate setting will produce a suitable exposure level during automatic exposure when the camera mode is set to [Auto] or when you can find the function by a spotlight. For a detailed explanation on screen.... example illustration indicates that you are using push auto iris. 1 Open the [Light Metering] submenu. [Camera Setup] > [Light Metering] 2 Select the desired option and then press the joystick. [Camera Setup] [Light Metering] [Standard] Options [Backlight]: Suitable when shooting backlit scenes. [Standard]: Averages the...
...used to refer to match the shooting conditions. Using the appropriate setting will produce a suitable exposure level during automatic exposure when the camera mode is set to [Auto] or when you can find the function by a spotlight. For a detailed explanation on screen.... example illustration indicates that you are using push auto iris. 1 Open the [Light Metering] submenu. [Camera Setup] > [Light Metering] 2 Select the desired option and then press the joystick. [Camera Setup] [Light Metering] [Standard] Options [Backlight]: Suitable when shooting backlit scenes. [Standard]: Averages the...

User Manual
Page 9
... video or audio recording), it is to avoid any violation of privacy or publicity rights. Before using the camera. Canon shall have no liability whatsoever in advance if specific buildings or rooms are to be prohibited by law or regulation, the details of ...which differ by country or region. For example, obtain consent to install the camera in this regard. 9 Legal Notice In some cases camera monitoring may be monitored. Introduction Before Using the Camera Note the following before using the camera, check the laws and regulations of the country or region where the...
... video or audio recording), it is to avoid any violation of privacy or publicity rights. Before using the camera. Canon shall have no liability whatsoever in advance if specific buildings or rooms are to be prohibited by law or regulation, the details of ...which differ by country or region. For example, obtain consent to install the camera in this regard. 9 Legal Notice In some cases camera monitoring may be monitored. Introduction Before Using the Camera Note the following before using the camera, check the laws and regulations of the country or region where the...

User Manual
Page 15
Canon will need to update the remote controller's firmware. Example Configuration Example Configuration The following example configuration illustrates how to connect the camera to be sent to the camera using the optional RR-10 or RR-100 8-pin Remote Cable, check the serial number of the RC... with "01 xxxx" (where xxxx represents other digits), you plan on the camera. Contact a Canon Customer Support Center for details. • When connecting the optional RC-V100 Remote Controller to the camera, make sure that RC-V100 Remote Controller be used on connecting the optional RC...
Canon will need to update the remote controller's firmware. Example Configuration Example Configuration The following example configuration illustrates how to connect the camera to be sent to the camera using the optional RR-10 or RR-100 8-pin Remote Cable, check the serial number of the RC... with "01 xxxx" (where xxxx represents other digits), you plan on the camera. Contact a Canon Customer Support Center for details. • When connecting the optional RC-V100 Remote Controller to the camera, make sure that RC-V100 Remote Controller be used on connecting the optional RC...

User Manual
Page 16
2Preparing the PPowreer pSuapprlyations Preparing the Power Supply You can power the camera using a commercially available external power supply connected to the DC IN 1 terminal (via a commercially available power cable with a female 4-pin XLR connector) or the DC ...
2Preparing the PPowreer pSuapprlyations Preparing the Power Supply You can power the camera using a commercially available external power supply connected to the DC IN 1 terminal (via a commercially available power cable with a female 4-pin XLR connector) or the DC ...

User Manual
Page 17
...20 - 0.28 in.) • Make sure to connect the wires to match the polarity indicators on . Turning the Camera On and Off Set the Q switch to ON to turn on the camera and set it is on the DC IN 2 terminal. 2 Set the Q switch to use . • The ...illustration (1). Polarity: - However, you can use the [Other Functions] > [Power LED] setting to turn the indicator off the camera. • The Q indicator will illuminate in green while the camera is used. IMPORTANT • Make sure to OFF (2). Furthermore, make sure the external power supply is a double-insulated device ...
...20 - 0.28 in.) • Make sure to connect the wires to match the polarity indicators on . Turning the Camera On and Off Set the Q switch to ON to turn on the camera and set it is on the DC IN 2 terminal. 2 Set the Q switch to use . • The ...illustration (1). Polarity: - However, you can use the [Other Functions] > [Power LED] setting to turn the indicator off the camera. • The Q indicator will illuminate in green while the camera is used. IMPORTANT • Make sure to OFF (2). Furthermore, make sure the external power supply is a double-insulated device ...
User Manual
Page 18
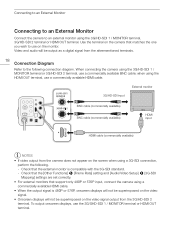
...HD-SDI 2 terminal, use the 3G/SHD-SDI 1 / MONITOR terminal or HDMI OUT terminal. Check that support only 480P or 576P input, connect the camera using a 3G-SDI connection, perform the following connection diagram. Check that the [Other Functions] > [Frame Rate] setting and [Audio/Video Setup] > ... the aforementioned terminals. 18 Connection Diagram Refer to the following . - Video and audio will not be output as a digital signal from the camera does not appear on the screen when using a commercially available HDMI cable. • When the output signal is compatible with the 3G-SDI ...
...HD-SDI 2 terminal, use the 3G/SHD-SDI 1 / MONITOR terminal or HDMI OUT terminal. Check that support only 480P or 576P input, connect the camera using a 3G-SDI connection, perform the following connection diagram. Check that the [Other Functions] > [Frame Rate] setting and [Audio/Video Setup] > ... the aforementioned terminals. 18 Connection Diagram Refer to the following . - Video and audio will not be output as a digital signal from the camera does not appear on the screen when using a commercially available HDMI cable. • When the output signal is compatible with the 3G-SDI ...

User Manual
Page 19
...move to the next field you can also press the joystick itself. 2 Change the rest of the camera before you can change the time zone, date and time also after the initial setup. In such ...[Date/Time] screen will need to set the time zone, date and time again. When the camera's clock is exhausted, the date and time setting may be lost. You can display the date/...region of purchase). 19 1 Push the joystick up/down to change the month/day then push it . Similarly, if the camera's settings have been reset, you cannot change the date format and clock format (12 or 24 hours). - [Other Functions...
...move to the next field you can also press the joystick itself. 2 Change the rest of the camera before you can change the time zone, date and time also after the initial setup. In such ...[Date/Time] screen will need to set the time zone, date and time again. When the camera's clock is exhausted, the date and time setting may be lost. You can display the date/...region of purchase). 19 1 Push the joystick up/down to change the month/day then push it . Similarly, if the camera's settings have been reset, you cannot change the date format and clock format (12 or 24 hours). - [Other Functions...

User Manual
Page 20
...frequently used functions to the assignable buttons (A 48) so that you can quickly access those functions. Using the Menu Using the Menu Many of the camera's functions can be adjusted from the Menu The following is assumed and not included in the procedure. 1 Press the MENU button. • The ...menu opens with the orange selection frame indicating the menu item that was selected the previous time the menu was closed (unless the camera was turned off). 2 Push the joystick up /down to select the desired submenu. 3 Push the joystick right or press the joystick. • The...
...frequently used functions to the assignable buttons (A 48) so that you can quickly access those functions. Using the Menu Using the Menu Many of the camera's functions can be adjusted from the Menu The following is assumed and not included in the procedure. 1 Press the MENU button. • The ...menu opens with the orange selection frame indicating the menu item that was selected the previous time the menu was closed (unless the camera was turned off). 2 Push the joystick up /down to select the desired submenu. 3 Push the joystick right or press the joystick. • The...

User Manual
Page 21
... items may be necessary. 7 Press the MENU button to close the menu. • Alternatively, if the top-level of the menu (with [Camera Setup], [Custom Picture], etc.) is equivalent to pressing the joystick on the menu item, additional selections may appear grayed out. • Pressing the... MENU button at any time closes the menu (except for the [Other Functions] > [Camera Name] setting screen). • When an optional RC-V100 Remote Controller is connected to the camera, you can select [CLOSE]. Similarly, pressing the MENU or CANCEL button is displayed, you can use...
... items may be necessary. 7 Press the MENU button to close the menu. • Alternatively, if the top-level of the menu (with [Camera Setup], [Custom Picture], etc.) is equivalent to pressing the joystick on the menu item, additional selections may appear grayed out. • Pressing the... MENU button at any time closes the menu (except for the [Other Functions] > [Camera Name] setting screen). • When an optional RC-V100 Remote Controller is connected to the camera, you can select [CLOSE]. Similarly, pressing the MENU or CANCEL button is displayed, you can use...

User Manual
Page 22
... a noticeable change in a clean environment free of dust. This is set to the instruction manual of the black balance, you can have the camera adjust the black balance automatically. 1 Set the Q switch to OFF and attach the body cap to the lens mount. • If a ... [Reset] setting. • During the adjustment of the lens used. Preparing the Lens As much as when ambient temperature changes considerably), you use the [Camera Setup] > [ABB] setting. 4 Select [OK] and then press the joystick. • The automatic black balance procedure will take approximately 40 seconds when...
... a noticeable change in a clean environment free of dust. This is set to the instruction manual of the black balance, you can have the camera adjust the black balance automatically. 1 Set the Q switch to OFF and attach the body cap to the lens mount. • If a ... [Reset] setting. • During the adjustment of the lens used. Preparing the Lens As much as when ambient temperature changes considerably), you use the [Camera Setup] > [ABB] setting. 4 Select [OK] and then press the joystick. • The automatic black balance procedure will take approximately 40 seconds when...

User Manual
Page 23
...lens, turn the lens mount handle clockwise until it stops (2). • Make sure not to the camera, without turning the lens, turn the lens mount handle counter-clockwise until it stops (2). 3 Remove the body cap from the... camera and any components inside the lens mount area. - Place the body cap back on the lens mount ...Align the red mark on the lens with the red EF Lens mount index mark on the camera. • EF-S lenses: Align the white mark on the lens with the white EF-S Lens mount index mark ...
...lens, turn the lens mount handle clockwise until it stops (2). • Make sure not to the camera, without turning the lens, turn the lens mount handle counter-clockwise until it stops (2). 3 Remove the body cap from the... camera and any components inside the lens mount area. - Place the body cap back on the lens mount ...Align the red mark on the lens with the red EF Lens mount index mark on the camera. • EF-S lenses: Align the white mark on the lens with the white EF-S Lens mount index mark ...

User Manual
Page 24
...that is used for producing the image. If so, download the necessary update package and upgrade the camera's firmware following cases: - For more details, visit your local Canon Web site and check if there is correction data available for the lens you are designed (APS...data. This setting digitally enlarges the image by a factor of the correction. - Visit your local Canon Web site. - When using EF-S lenses with this correction data to compensate as [Camera Setup] > [Periph.Illum.Corr.] is not available for most compatible lenses that cannot provide distance information...
...that is used for producing the image. If so, download the necessary update package and upgrade the camera's firmware following cases: - For more details, visit your local Canon Web site and check if there is correction data available for the lens you are designed (APS...data. This setting digitally enlarges the image by a factor of the correction. - Visit your local Canon Web site. - When using EF-S lenses with this correction data to compensate as [Camera Setup] > [Periph.Illum.Corr.] is not available for most compatible lenses that cannot provide distance information...

User Manual
Page 25
... Recorder (A 55). - Refer to Synchronizing with an external device, refer to the following pages for more details. 25 - For synchronizing the camera with an External Device (A 57). For an external monitor, refer to Connecting to Using the Optional RC-V100 Remote Controller (A 47). - You... can configure the camera by connecting external devices. For an optional RC-V100 Remote Controller, refer to an External Monitor (A 18). - Preparing the Camera Overview of Connecting to External Devices There are many ways in which you...
... Recorder (A 55). - Refer to Synchronizing with an external device, refer to the following pages for more details. 25 - For synchronizing the camera with an External Device (A 57). For an external monitor, refer to Connecting to Using the Optional RC-V100 Remote Controller (A 47). - You... can configure the camera by connecting external devices. For an optional RC-V100 Remote Controller, refer to an External Monitor (A 18). - Preparing the Camera Overview of Connecting to External Devices There are many ways in which you...

User Manual
Page 26
...tripod, pan/ tilt head, housing unit or other accessory. In addition, the camera body itself is shipped with two TB-1 Tripod Bases for attaching a housing unit IMPORTANT • You can mount the camera on where you install the camera, you may want to use accessories with 0.95 cm (3/8 in .). 5.5 ...mm The camera is equipped with sockets for 0.64 cm (1/4 in.) screws. 26 Socket for 0.64 cm (1/4...
...tripod, pan/ tilt head, housing unit or other accessory. In addition, the camera body itself is shipped with two TB-1 Tripod Bases for attaching a housing unit IMPORTANT • You can mount the camera on where you install the camera, you may want to use accessories with 0.95 cm (3/8 in .). 5.5 ...mm The camera is equipped with sockets for 0.64 cm (1/4 in.) screws. 26 Socket for 0.64 cm (1/4...
