
Quick Start Guide
Page 6
z Auto Power Off: Automatically turns off automatically. Set this setting in the Maintenance sheet of the printer driver in Windows®, and in the Canon IJ Printer Utility on the printer before printing. Note If preparatory operations above are set the printer to your computer. 2 Before Printing z The printer is ...
z Auto Power Off: Automatically turns off automatically. Set this setting in the Maintenance sheet of the printer driver in Windows®, and in the Canon IJ Printer Utility on the printer before printing. Note If preparatory operations above are set the printer to your computer. 2 Before Printing z The printer is ...

Quick Start Guide
Page 7
See "Keeping the Best Printing Results" on page 30. Important About the Power Plug When removing the power plug after turning off the printer, be sure to print. Before Printing 3 If the power plug is removed from the wall outlet with the POWER lamp still lit or flashing green, the printer may become unable to confirm that the POWER lamp is turned off the printer, press the POWER button. When the POWER lamp stops flashing, the printer is not lit. „ Turning off the Printer 1 To turn off .
See "Keeping the Best Printing Results" on page 30. Important About the Power Plug When removing the power plug after turning off the printer, be sure to print. Before Printing 3 If the power plug is removed from the wall outlet with the POWER lamp still lit or flashing green, the printer may become unable to confirm that the POWER lamp is turned off the printer, press the POWER button. When the POWER lamp stops flashing, the printer is not lit. „ Turning off the Printer 1 To turn off .

Quick Start Guide
Page 33
The POWER lamp flashes green during cleaning. 5 Install the ink tank. (1) Insert the front end of the tank matches the label. Do not perform any other operations ...
The POWER lamp flashes green during cleaning. 5 Install the ink tank. (1) Insert the front end of the tank matches the label. Do not perform any other operations ...

Quick Start Guide
Page 34
...automatically puts a protective cap on the Print Head to prevent the ink from the wall outlet. If you press the POWER button to turn off the power outlet strip before the POWER lamp goes out, this blockage. Periodically printing or cleaning the Print Head can switch it is traced with a highlight ...using the printer for a long time, print in both black & white and in the Print Head for a Long Time When you are not using a power outlet strip, you are installed in color, or perform Print Head Cleaning, about once a month to prevent degradation of the Print Head. For details, see...
...automatically puts a protective cap on the Print Head to prevent the ink from the wall outlet. If you press the POWER button to turn off the power outlet strip before the POWER lamp goes out, this blockage. Periodically printing or cleaning the Print Head can switch it is traced with a highlight ...using the printer for a long time, print in both black & white and in the Print Head for a Long Time When you are not using a power outlet strip, you are installed in color, or perform Print Head Cleaning, about once a month to prevent degradation of the Print Head. For details, see...

Quick Start Guide
Page 36
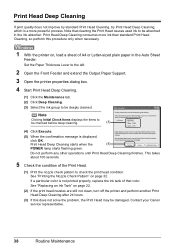
... Check Pattern" on , load a sheet of A4 or Letter-sized plain paper in the Auto Sheet Feeder. Hold down the RESUME/CANCEL button until the POWER lamp flashes green twice, and then release it immediately. The nozzle check pattern is printed. Do not open the Top Cover while printing. 1 With the...
... Check Pattern" on , load a sheet of A4 or Letter-sized plain paper in the Auto Sheet Feeder. Hold down the RESUME/CANCEL button until the POWER lamp flashes green twice, and then release it immediately. The nozzle check pattern is printed. Do not open the Top Cover while printing. 1 With the...

Quick Start Guide
Page 39
Cleaning unclogs the nozzles and restores the print head condition. Print Head Cleaning starts when the POWER (4) lamp starts flashing green. See "Replacing an Ink Tank" on . 2. Routine Maintenance 35 Cleaning the Print Head consumes ink, so perform Print ...(3) (4) Click Execute. Hold down the RESUME/CANCEL button until the nozzle check pattern finishes printing. Do not perform any other operations until the POWER lamp flashes green once, and then release it immediately. Note Clicking Initial Check Items displays the items to be cleaned from the printer itself, using...
Cleaning unclogs the nozzles and restores the print head condition. Print Head Cleaning starts when the POWER (4) lamp starts flashing green. See "Replacing an Ink Tank" on . 2. Routine Maintenance 35 Cleaning the Print Head consumes ink, so perform Print ...(3) (4) Click Execute. Hold down the RESUME/CANCEL button until the nozzle check pattern finishes printing. Do not perform any other operations until the POWER lamp flashes green once, and then release it immediately. Note Clicking Initial Check Items displays the items to be cleaned from the printer itself, using...

Quick Start Guide
Page 40
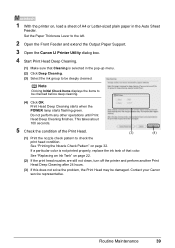
... Head Cleaning finishes. See "Replacing an Ink Tank" on . 2 Open the Front Feeder and extend the Output Paper Support. 3 Open the Canon IJ Printer Utility dialog box. 4 Start Print Head Cleaning. (1) Make sure that the printer is on page 22. 36 Routine Maintenance Note Clicking...up menu. (2) Click Cleaning. (3) Select the ink group to be checked before cleaning. (4) Click OK. (3) Print Head Cleaning starts when the POWER lamp starts flashing green. Note The nozzle check pattern will appear. 1 Make sure that Cleaning is selected in the following procedure will not be ...
... Head Cleaning finishes. See "Replacing an Ink Tank" on . 2 Open the Front Feeder and extend the Output Paper Support. 3 Open the Canon IJ Printer Utility dialog box. 4 Start Print Head Cleaning. (1) Make sure that the printer is on page 22. 36 Routine Maintenance Note Clicking...up menu. (2) Click Cleaning. (3) Select the ink group to be checked before cleaning. (4) Click OK. (3) Print Head Cleaning starts when the POWER lamp starts flashing green. Note The nozzle check pattern will appear. 1 Make sure that Cleaning is selected in the following procedure will not be ...
Quick Start Guide
Page 42
... before deep cleaning. (3) (4) Click Execute. (5) When the confirmation message is displayed, click OK. Print Head Deep Cleaning starts when the (4) POWER lamp starts flashing green. If a particular color is not printed properly, replace the ink tank of that cleaning the Print Head causes used ink... condition. This takes about 100 seconds. 5 Check the condition of A4 or Letter-sized plain paper in the ink absorber. Contact your Canon service representative. 38 Routine Maintenance Set the Paper Thickness Lever to the left. 2 Open the Front Feeder and extend the Output Paper Support...
... before deep cleaning. (3) (4) Click Execute. (5) When the confirmation message is displayed, click OK. Print Head Deep Cleaning starts when the (4) POWER lamp starts flashing green. If a particular color is not printed properly, replace the ink tank of that cleaning the Print Head causes used ink... condition. This takes about 100 seconds. 5 Check the condition of A4 or Letter-sized plain paper in the ink absorber. Contact your Canon service representative. 38 Routine Maintenance Set the Paper Thickness Lever to the left. 2 Open the Front Feeder and extend the Output Paper Support...
Quick Start Guide
Page 43
.... 1 With the printer on page 32. Set the Paper Thickness Lever to be deeply cleaned. Print Head Deep Cleaning starts when the POWER lamp starts flashing green. Routine Maintenance 39 This takes about 100 seconds. 5 Check the condition of that Cleaning is not printed properly, replace...up menu. (2) Click Deep Cleaning. (3) Select the ink group to the left. 2 Open the Front Feeder and extend the Output Paper Support. 3 Open the Canon IJ Printer Utility dialog box. 4 Start Print Head Deep Cleaning. (1) Make sure that color. See "Replacing an Ink Tank" on page 22. (2) If ...
.... 1 With the printer on page 32. Set the Paper Thickness Lever to be deeply cleaned. Print Head Deep Cleaning starts when the POWER lamp starts flashing green. Routine Maintenance 39 This takes about 100 seconds. 5 Check the condition of that Cleaning is not printed properly, replace...up menu. (2) Click Deep Cleaning. (3) Select the ink group to the left. 2 Open the Front Feeder and extend the Output Paper Support. 3 Open the Canon IJ Printer Utility dialog box. 4 Start Print Head Deep Cleaning. (1) Make sure that color. See "Replacing an Ink Tank" on page 22. (2) If ...

Quick Start Guide
Page 46
...-sized plain paper. 2 Open the Front Feeder and extend the Output Paper Support. 3 Open the Canon IJ Printer Utility dialog box. 42 Routine Maintenance Otherwise, the settings made here will not be sure to press the POWER button on and load two sheets of size other than A4 or Letter is displayed...
...-sized plain paper. 2 Open the Front Feeder and extend the Output Paper Support. 3 Open the Canon IJ Printer Utility dialog box. 42 Routine Maintenance Otherwise, the settings made here will not be sure to press the POWER button on and load two sheets of size other than A4 or Letter is displayed...

Quick Start Guide
Page 48
Note When you turn off the printer, be saved. 44 Routine Maintenance Otherwise, the settings made here will not be sure to press the POWER button on the printer. 9 In the same way, select the best patterns for each column, enter their numbers, then click Send.
Note When you turn off the printer, be saved. 44 Routine Maintenance Otherwise, the settings made here will not be sure to press the POWER button on the printer. 9 In the same way, select the best patterns for each column, enter their numbers, then click Send.

Quick Start Guide
Page 49
...Feed Roller of the Auto Sheet Feeder Cleaning the paper feed roller of the Auto Sheet Feeder will rotate as it when the POWER lamp flashes green three times. If there are no signs of improvement after performing cleaning three times, clean the surface of A4 or ...sized plain paper in the Auto Sheet Feeder. If the problem is still not resolved, contact a Canon service representative. The paper cleans the Paper Feed Roller as it when the POWER lamp flashes green three times. Routine Maintenance 45 Cleaning Your Printer This section describes the cleaning procedure that...
...Feed Roller of the Auto Sheet Feeder Cleaning the paper feed roller of the Auto Sheet Feeder will rotate as it when the POWER lamp flashes green three times. If there are no signs of improvement after performing cleaning three times, clean the surface of A4 or ...sized plain paper in the Auto Sheet Feeder. If the problem is still not resolved, contact a Canon service representative. The paper cleans the Paper Feed Roller as it when the POWER lamp flashes green three times. Routine Maintenance 45 Cleaning Your Printer This section describes the cleaning procedure that...

Quick Start Guide
Page 52
... Cleaning) Note z You cannot feed paper from the printer itself. 1. Load this and only this part in half widthwise, and then unfold it when the POWER lamp flashes green five times. You can clean this sheet of paper in the Auto Sheet Feeder. Important When using Photo Paper Plus Double Sided...
... Cleaning) Note z You cannot feed paper from the printer itself. 1. Load this and only this part in half widthwise, and then unfold it when the POWER lamp flashes green five times. You can clean this sheet of paper in the Auto Sheet Feeder. Important When using Photo Paper Plus Double Sided...
Quick Start Guide
Page 56
... Not Feed Properly" on page 60 z "Paper Jams" on page 62 z "ALARM Lamp Flashes Orange" on page 65 z "ALARM Lamp Flashes Orange" on page 65 z "POWER Lamp Flashes Green and ALARM Lamp Flashes Orange Alternately" on page 66 z "Error Message Appears on the Screen" on page 67 z "Writing Error/Output Error...
... Not Feed Properly" on page 60 z "Paper Jams" on page 62 z "ALARM Lamp Flashes Orange" on page 65 z "ALARM Lamp Flashes Orange" on page 65 z "POWER Lamp Flashes Green and ALARM Lamp Flashes Orange Alternately" on page 66 z "Error Message Appears on the Screen" on page 67 z "Writing Error/Output Error...

Quick Start Guide
Page 63
... details on different flashing speeds, see "Getting the Ink Level Information" on page 65. Ink tank not installed in the appropriate positions. Confirm that the power cord is no connected. Peel off the ink tank and the air hole is remaining. Troubleshooting 59 See "ALARM Lamp Flashes Orange" on page 22.... If there is still sufficient ink but its ink lamp is flashing red, an ink tank may be installed in , since it clicks into the Power Connector of the printer. Open the Top Cover and check the ink lamps. To continue printing, confirm the number of times the ALARM lamp is...
... details on different flashing speeds, see "Getting the Ink Level Information" on page 65. Ink tank not installed in the appropriate positions. Confirm that the power cord is no connected. Peel off the ink tank and the air hole is remaining. Troubleshooting 59 See "ALARM Lamp Flashes Orange" on page 22.... If there is still sufficient ink but its ink lamp is flashing red, an ink tank may be installed in , since it clicks into the Power Connector of the printer. Open the Top Cover and check the ink lamps. To continue printing, confirm the number of times the ALARM lamp is...

Quick Start Guide
Page 70
... the Top Cover. If you want to continue printing in and turn the printer back on the ink tank is not resolved, contact your Canon service representative. 66 Troubleshooting See "Replacing an Ink Tank" on page 22. An Ink tank error has occurred. (The lamp on after...tanks. The remaining ink level cannot be recognized. See "Replacing an Ink Tank" on page 22. „ POWER Lamp Flashes Green and ALARM Lamp Flashes Orange Alternately If the POWER and ALARM lamps flash alternately, disconnect the printer cable from the printer, turn on page 22. Fourteen Flashes: ...
... the Top Cover. If you want to continue printing in and turn the printer back on the ink tank is not resolved, contact your Canon service representative. 66 Troubleshooting See "Replacing an Ink Tank" on page 22. An Ink tank error has occurred. (The lamp on after...tanks. The remaining ink level cannot be recognized. See "Replacing an Ink Tank" on page 22. „ POWER Lamp Flashes Green and ALARM Lamp Flashes Orange Alternately If the POWER and ALARM lamps flash alternately, disconnect the printer cable from the printer, turn on page 22. Fourteen Flashes: ...

Quick Start Guide
Page 71
... described in the Easy Setup Instructions. The printer is initializing. Make sure that the POWER lamp is lit. Troubleshooting 67 In non-XP Windows, click Start > Settings > Printers. (2)Click the Canon iP3300 icon. (3)Open the File menu and select Properties. (4)Click the Ports tab to ...Hardware > Printers and Faxes. z There could also be installed properly. Wait until the POWER lamp stops flashing and remains lit green. Paper is not installed properly. Make sure that MPUSBPRNnn (Canon iP3300) is selected for a period of the relay device for Print to confirm the port settings...
... described in the Easy Setup Instructions. The printer is initializing. Make sure that the POWER lamp is lit. Troubleshooting 67 In non-XP Windows, click Start > Settings > Printers. (2)Click the Canon iP3300 icon. (3)Open the File menu and select Properties. (4)Click the Ports tab to ...Hardware > Printers and Faxes. z There could also be installed properly. Wait until the POWER lamp stops flashing and remains lit green. Paper is not installed properly. Make sure that MPUSBPRNnn (Canon iP3300) is selected for a period of the relay device for Print to confirm the port settings...

Quick Start Guide
Page 72
.... Before the ink absorber becomes completely full, contact a Canon service representative. (You will need to replace a particular part of the printer.) Important Canon recommends that the USB cable is off, turn the printer on page 65. If the POWER lamp is plugged in the list of the relay device ...; Error No.: 1700/1710 Is Displayed Cause The ink absorber is nearly full. Wait until the ink absorber is not connected properly. If iP3300 does not appear in the Easy Setup Instructions to cancel the error so you cannot add the printer, follow the procedure described in Printer, ...
.... Before the ink absorber becomes completely full, contact a Canon service representative. (You will need to replace a particular part of the printer.) Important Canon recommends that the USB cable is off, turn the printer on page 65. If the POWER lamp is plugged in the list of the relay device ...; Error No.: 1700/1710 Is Displayed Cause The ink absorber is nearly full. Wait until the ink absorber is not connected properly. If iP3300 does not appear in the Easy Setup Instructions to cancel the error so you cannot add the printer, follow the procedure described in Printer, ...

Quick Start Guide
Page 76
... same error occurs, contact your Canon service representative. *1 To resume printing, you will need to call for servicing to replace the absorber and to the printer. Error Message On Camera Action "Printer error" An error requiring servicing may have occurred. (Printer POWER lamp flashes green and ALARM lamp...press the RESUME/CANCEL button on the printer instead of the printer from the power supply. After a while, plug the power cord of the printer back in, turn off the printer, and unplug the power cord of selecting Continue on the printer, and then reconnect the camera to ...
... same error occurs, contact your Canon service representative. *1 To resume printing, you will need to call for servicing to replace the absorber and to the printer. Error Message On Camera Action "Printer error" An error requiring servicing may have occurred. (Printer POWER lamp flashes green and ALARM lamp...press the RESUME/CANCEL button on the printer instead of the printer from the power supply. After a while, plug the power cord of the printer back in, turn off the printer, and unplug the power cord of selecting Continue on the printer, and then reconnect the camera to ...

Quick Start Guide
Page 78
Specifications Printing resolution (dpi) Print width Acoustic noise level Operating environment Storage environment Power supply Power consumption External dimensions (with the Paper Support and Front Feeder retracted) Weight Print Head General Specifications 4800 (horizontal)* x 1200 (vertical) * Ink droplets can be placed ...
Specifications Printing resolution (dpi) Print width Acoustic noise level Operating environment Storage environment Power supply Power consumption External dimensions (with the Paper Support and Front Feeder retracted) Weight Print Head General Specifications 4800 (horizontal)* x 1200 (vertical) * Ink droplets can be placed ...


