User Guide
Page 2
Contents About Your New Label Maker 5 Product Registration 5 Getting Started 5 Connecting the Power 5 Inserting the Batteries 5 Connecting the Optional Power Adapter 6 Inserting the Tape Cassette 6 Using the Label Maker for the First Time 7 Getting to Know the Label Maker 7 Power ...7 LCD Display ...8 Format ...8 Insert ...8 Settings ...8 CAPS ...
Contents About Your New Label Maker 5 Product Registration 5 Getting Started 5 Connecting the Power 5 Inserting the Batteries 5 Connecting the Optional Power Adapter 6 Inserting the Tape Cassette 6 Using the Label Maker for the First Time 7 Getting to Know the Label Maker 7 Power ...7 LCD Display ...8 Format ...8 Insert ...8 Settings ...8 CAPS ...
User Guide
Page 5
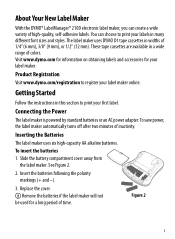
...maker online. Connecting the Power The label maker is powered by standard batteries or an AC power adapter. To insert the batteries 1. You can create a wide variety of time. These tape cassettes ...two minutes of 1/4"(6 mm), 3/8" (9 mm), or 1/2" (12 mm). Figure 2 5 Product Registration Visit www.dymo.com/registration to register your first label. See Figure 2. 2. Getting Started Follow the instructions in many different font sizes...About Your New Label Maker With the DYMO® LabelManager® 210D electronic label maker, you can choose to print your label maker.
...maker online. Connecting the Power The label maker is powered by standard batteries or an AC power adapter. To insert the batteries 1. You can create a wide variety of time. These tape cassettes ...two minutes of 1/4"(6 mm), 3/8" (9 mm), or 1/2" (12 mm). Figure 2 5 Product Registration Visit www.dymo.com/registration to register your first label. See Figure 2. 2. Getting Started Follow the instructions in many different font sizes...About Your New Label Maker With the DYMO® LabelManager® 210D electronic label maker, you can choose to print your label maker.
User Guide
Page 6
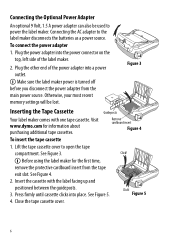
... the label facing up and positioned between the guideposts. 3. Insert the cassette with one tape cassette. Figure 5 4. Connecting the AC adapter to power the label maker. Press firmly until cassette clicks into a power outlet. Ç Make sure the label maker power is ... top, left side of the power adapter into place. See Figure 5. See Figure 3. Connecting the Optional Power Adapter An optional 9 Volt, 1.5 A power adapter can also be lost. Remove cardboard insert Figure 4 To insert the tape cassette 1. Visit www.dymo.com for the first time, remove ...
... the label facing up and positioned between the guideposts. 3. Insert the cassette with one tape cassette. Figure 5 4. Connecting the AC adapter to power the label maker. Press firmly until cassette clicks into a power outlet. Ç Make sure the label maker power is ... top, left side of the power adapter into place. See Figure 5. See Figure 3. Connecting the Optional Power Adapter An optional 9 Volt, 1.5 A power adapter can also be lost. Remove cardboard insert Figure 4 To insert the tape cassette 1. Visit www.dymo.com for the first time, remove ...
User Guide
Page 17
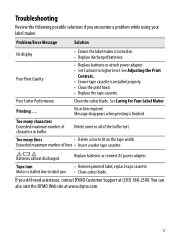
... cassette. Exceeded maximum number of the buffer text. Replace batteries or connect AC power adapter. Motor is turned on the tape width. Troubleshooting Review the following possible solutions if you still need assistance, contact DYMO Customer Support at www.dymo.com. 17 Poor Cutter Performance Clean the cutter blade. No action required. Problem...
... cassette. Exceeded maximum number of the buffer text. Replace batteries or connect AC power adapter. Motor is turned on the tape width. Troubleshooting Review the following possible solutions if you still need assistance, contact DYMO Customer Support at www.dymo.com. 17 Poor Cutter Performance Clean the cutter blade. No action required. Problem...
