
Owners Manual
Page 6
... for Wire Arrangement 12 Stand Installation 15 Attaching the TV to a Wall 17 Swivel Stand 17 Attaching the TV to Original Factory Settings) . 73 PARENTAL CONTROL / RATINGS Set Password & Lock System 74 - Add / Delete Channel (Manual Scan 37 - User Mode 47 Color Tone - User Mode ... SOUND & LANGUAGE CONTROL Auto Volume Leveler (EZ SoundRite 54 Preset Sound Setting (EZ Sound 55 Sound Setting Adjustment - TV Rating Children & General 78 TV Rating English & French 79 APPENDIX Troubleshooting 80 Maintenance 82 Product Specifications 83 Programming the Remote Control 84 Set ID 86...
... for Wire Arrangement 12 Stand Installation 15 Attaching the TV to a Wall 17 Swivel Stand 17 Attaching the TV to Original Factory Settings) . 73 PARENTAL CONTROL / RATINGS Set Password & Lock System 74 - Add / Delete Channel (Manual Scan 37 - User Mode 47 Color Tone - User Mode ... SOUND & LANGUAGE CONTROL Auto Volume Leveler (EZ SoundRite 54 Preset Sound Setting (EZ Sound 55 Sound Setting Adjustment - TV Rating Children & General 78 TV Rating English & French 79 APPENDIX Troubleshooting 80 Maintenance 82 Product Specifications 83 Programming the Remote Control 84 Set ID 86...

Owners Manual
Page 8
PREPARATION PREPARATION LCD TV model only Option Extras x 2 Protective Bracket and Bolt for Power Cord (This feature is not available for all models.) (Refer to P.12-13, 15) M4xL22 Torx plus Star head screw (Refer to p.7, 15) D-sub 15 pin Cable Only 32/37/42LC5DC*, 32/37/42LC50C*, 42LB5DC, 42LB50C models ...(Refer to p.12-13) Cable Holder (Refer to p.12-13) 4-Bolts for stand assembly (Refer to p.16) Only 32/37LC5DC*, 32/37LC50C* models Only 32/37/42LG500H models x4 x4 or Bolts for stand assembly Screw for stand fixing Protection Cover (Refer to P.15) (Refer to P.19) Cable Holder ...
PREPARATION PREPARATION LCD TV model only Option Extras x 2 Protective Bracket and Bolt for Power Cord (This feature is not available for all models.) (Refer to P.12-13, 15) M4xL22 Torx plus Star head screw (Refer to p.7, 15) D-sub 15 pin Cable Only 32/37/42LC5DC*, 32/37/42LC50C*, 42LB5DC, 42LB50C models ...(Refer to p.12-13) Cable Holder (Refer to p.12-13) 4-Bolts for stand assembly (Refer to p.16) Only 32/37LC5DC*, 32/37LC50C* models Only 32/37/42LG500H models x4 x4 or Bolts for stand assembly Screw for stand fixing Protection Cover (Refer to P.15) (Refer to P.19) Cable Holder ...

Owners Manual
Page 9
... green when the TV is in standby mode. ed as parts of the TV) to secure the TV. Tighten the two Torx plus star head screws (provid- FRONT PANEL CONTROLS ■ Here shown may be somewhat different from your TV. 32/37/42LC5DC*,32/37/42LC50C*, 42LB5DC, 42LB50C PREPARATION... Remote Control Sensor Power/Standby Indicator Illuminates red when the TV is switched ...
... green when the TV is in standby mode. ed as parts of the TV) to secure the TV. Tighten the two Torx plus star head screws (provid- FRONT PANEL CONTROLS ■ Here shown may be somewhat different from your TV. 32/37/42LC5DC*,32/37/42LC50C*, 42LB5DC, 42LB50C PREPARATION... Remote Control Sensor Power/Standby Indicator Illuminates red when the TV is switched ...

Owners Manual
Page 10
...Button 8 CH VOL ENTER MENU INPUT ON/OFF ON/OFF Button INPUT Button MENU Button ENTER Button VOLUME Buttons CHANNEL Buttons 32/37/42LG500H CH Intelligent Sensor Adjusts picture according to the surrounding conditions VOL Power/Standby Indicator Illuminates red in standby mode. Illuminates blue ...when the set is switched on . Illuminates green when the TV is switched on . PREPARATION 32LX5DC*, 32LX50C* PREPARATION Remote Control Sensor Power/Standby Indicator Illuminates red when the TV is in standby mode.
...Button 8 CH VOL ENTER MENU INPUT ON/OFF ON/OFF Button INPUT Button MENU Button ENTER Button VOLUME Buttons CHANNEL Buttons 32/37/42LG500H CH Intelligent Sensor Adjusts picture according to the surrounding conditions VOL Power/Standby Indicator Illuminates red in standby mode. Illuminates blue ...when the set is switched on . Illuminates green when the TV is switched on . PREPARATION 32LX5DC*, 32LX50C* PREPARATION Remote Control Sensor Power/Standby Indicator Illuminates red when the TV is in standby mode.

Owners Manual
Page 12
..., 42LB50C, 32LX5DC*, 32LX50C*, 42PX8DC ( ) 2 4 1 HDMI/DVI IN 1(DVI) DIGITAL ( ) AUDIO OUT (OPTICAL) 2 3 M.P.I . S-VIDEO 8 AV IN 2 32/37/42LG500H VIDEO L/MONO AUDIO R AV IN 2 S-VIDEO 8 11 S-VIDEO 8 8 ( ) VIDEO L/MONO AUDIO R R VIDEO L/MONO AUDIO R R 11 ( ) ANTENNA IN ...VIDEO SPEAKER AUDIO OUT IN 8 (RGB, DVI) 7 10 PREPARATION BACK PANEL INFORMATION ■ Here shown may be somewhat different from your TV. 32/37/42LC5DC*,32/37/42LC50C*, 42LB5DC, 42LB50C S-VIDEO 32LX5DC*, 32LX50C* 42PX8DC S-VIDEO R AUDIO L/MONO VIDEO R VIDEO L/MONO AUDIO R PREPARATION 8 11 AV...
..., 42LB50C, 32LX5DC*, 32LX50C*, 42PX8DC ( ) 2 4 1 HDMI/DVI IN 1(DVI) DIGITAL ( ) AUDIO OUT (OPTICAL) 2 3 M.P.I . S-VIDEO 8 AV IN 2 32/37/42LG500H VIDEO L/MONO AUDIO R AV IN 2 S-VIDEO 8 11 S-VIDEO 8 8 ( ) VIDEO L/MONO AUDIO R R VIDEO L/MONO AUDIO R R 11 ( ) ANTENNA IN ...VIDEO SPEAKER AUDIO OUT IN 8 (RGB, DVI) 7 10 PREPARATION BACK PANEL INFORMATION ■ Here shown may be somewhat different from your TV. 32/37/42LC5DC*,32/37/42LC50C*, 42LB5DC, 42LB50C S-VIDEO 32LX5DC*, 32LX50C* 42PX8DC S-VIDEO R AUDIO L/MONO VIDEO R VIDEO L/MONO AUDIO R PREPARATION 8 11 AV...

Owners Manual
Page 13
...RESET/UPDATE/REMOTE CONTROL OUT 5 SERVICE ONLY 6 RGB IN (PC) Connect the output from various types of equipment. Caution: Never attempt to operate the TV on DC power. 12 ANTENNA IN Connect over-the air signals to this jack. 11 PREPARATION 42PG60C, 42PG65C 6 RGB IN RGB(PC) AUDIO (RGB ... OUT 1 4 HDMI IN SERVICE ONLY RESET UPDATE S-VIDEO AV IN 1 2 1 DVI IN COMPONENT IN L R VIDEO 9 AUDIO 5 AUDIO VIDEO L(MONO) R 8 32/37/42LG500H 1 HDMI/DVI IN 1(DVI) 2 RJP INTERFACE 10 4 2 6 RESET UPDATE OPTICAL DIGITAL AUDIO OUT RGB(PC) AUDIO (RGB/DVI) RS-232C IN (SERVICE ONLY) ...
...RESET/UPDATE/REMOTE CONTROL OUT 5 SERVICE ONLY 6 RGB IN (PC) Connect the output from various types of equipment. Caution: Never attempt to operate the TV on DC power. 12 ANTENNA IN Connect over-the air signals to this jack. 11 PREPARATION 42PG60C, 42PG65C 6 RGB IN RGB(PC) AUDIO (RGB ... OUT 1 4 HDMI IN SERVICE ONLY RESET UPDATE S-VIDEO AV IN 1 2 1 DVI IN COMPONENT IN L R VIDEO 9 AUDIO 5 AUDIO VIDEO L(MONO) R 8 32/37/42LG500H 1 HDMI/DVI IN 1(DVI) 2 RJP INTERFACE 10 4 2 6 RESET UPDATE OPTICAL DIGITAL AUDIO OUT RGB(PC) AUDIO (RGB/DVI) RS-232C IN (SERVICE ONLY) ...

Owners Manual
Page 17
... for power code. To connect additional equipment, see the EXTERNAL EQUIPMENT SETUP section. or x 2 x 2 Tighten the two of the TV) to protect the screen from being removed by accident. PROTECTION COVER After removing the stand, install the included protection cover over tighten. ver... bit (not provided as parts of the TV). ! PREPARATION 32/37/42LG500H BACK COVER FOR WIRE ARRANGEMENT 1 Connect the cables as shown. ioned surface to secure the TV. CABLE MANAGEMENT CLIP CABLE HOLDER 3 Put the cables inside the CABLE MANAGEMENT...
... for power code. To connect additional equipment, see the EXTERNAL EQUIPMENT SETUP section. or x 2 x 2 Tighten the two of the TV) to protect the screen from being removed by accident. PROTECTION COVER After removing the stand, install the included protection cover over tighten. ver... bit (not provided as parts of the TV). ! PREPARATION 32/37/42LG500H BACK COVER FOR WIRE ARRANGEMENT 1 Connect the cables as shown. ioned surface to secure the TV. CABLE MANAGEMENT CLIP CABLE HOLDER 3 Put the cables inside the CABLE MANAGEMENT...

Owners Manual
Page 19
... between the wall and the product. SWIVEL STAND 20° (37LC5DC1, 42LC5DC, 42LC50C, 42PX8DC, 42LB5DC, 42LB50C, 42PG65C models) 90° (32LX5DC/S, 32LX50C/S, 32LC5DC/S, 32LC50C/S, 37LC5DC, 37LC50C, 32/37/42LG500H models) The TV can be attached to provide the optimum viewing angle. 17 Caution: Please make sure that you set up the...
... between the wall and the product. SWIVEL STAND 20° (37LC5DC1, 42LC5DC, 42LC50C, 42PX8DC, 42LB5DC, 42LB50C, 42PG65C models) 90° (32LX5DC/S, 32LX50C/S, 32LC5DC/S, 32LC50C/S, 37LC5DC, 37LC50C, 32/37/42LG500H models) The TV can be attached to provide the optimum viewing angle. 17 Caution: Please make sure that you set up the...

Owners Manual
Page 20
... as parts of the product) 42PX8DC 42PG65C 4-Screws (not provided as parts of the product) 2-Screws (not provided as parts of the product) 32/37/42LG500H 4-Screws (not provided as parts of the product) 4-Screws (not provided as parts of the product) 18 Stand Desk Stand Stand Stand Desk Stand... Desk The TV must be attached to a desk so it cannot be somewhat different from your TV. M5 x L (table depth + 8~10 mm) ex) table depth-15mm: Bolts - PREPARATION ATTACHING THE TV TO A DESK ■ Here shown may be pulled in a forward/...
... as parts of the product) 42PX8DC 42PG65C 4-Screws (not provided as parts of the product) 2-Screws (not provided as parts of the product) 32/37/42LG500H 4-Screws (not provided as parts of the product) 4-Screws (not provided as parts of the product) 18 Stand Desk Stand Stand Stand Desk Stand... Desk The TV must be attached to a desk so it cannot be somewhat different from your TV. M5 x L (table depth + 8~10 mm) ex) table depth-15mm: Bolts - PREPARATION ATTACHING THE TV TO A DESK ■ Here shown may be pulled in a forward/...
Owners Manual
Page 21
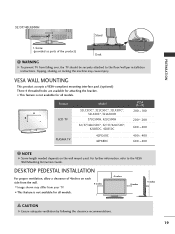
A B Product LCD TV PLASMA TV Model 32LC5DC*, 32LC50C*, 32LX5DC*, 32LX50C*, 32LG500H 37LG500H, 42LG500H 32/37/42LC5DC*, 32/37/42LC50C*, 42LB5DC, 42LB50C 42PG60C 42PX8DC VESA (A * B) 200 * 100 200 * 200 600 * 400 400 * 400 600 * 400 NOTE G Screw length needed ...Wall Mounting Instruction Guide. DESKTOP PEDESTAL INSTALLATION For proper ventilation, allow a clearance of the product) Desk WARNING G To prevent TV from your TV. ■ This feature is not available for all models. 32/37/42LG500H Stand PREPARATION 1-Screw (provided as parts of 4inches on the wall mount used.
A B Product LCD TV PLASMA TV Model 32LC5DC*, 32LC50C*, 32LX5DC*, 32LX50C*, 32LG500H 37LG500H, 42LG500H 32/37/42LC5DC*, 32/37/42LC50C*, 42LB5DC, 42LB50C 42PG60C 42PX8DC VESA (A * B) 200 * 100 200 * 200 600 * 400 400 * 400 600 * 400 NOTE G Screw length needed ...Wall Mounting Instruction Guide. DESKTOP PEDESTAL INSTALLATION For proper ventilation, allow a clearance of the product) Desk WARNING G To prevent TV from your TV. ■ This feature is not available for all models. 32/37/42LG500H Stand PREPARATION 1-Screw (provided as parts of 4inches on the wall mount used.
Owners Manual
Page 23
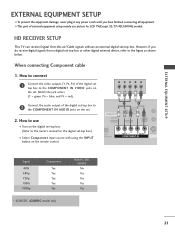
Y PB PR L R Connect the audio output of the digital set-top box to the owner's manual for LCD TV(Except 32/37/42LG500H) models. HD RECEIVER SETUP This TV can receive Digital Over-the-air/Cable signals without an external digital set-top box. How to use picture for the digital set-top box.) &#...
Y PB PR L R Connect the audio output of the digital set-top box to the owner's manual for LCD TV(Except 32/37/42LG500H) models. HD RECEIVER SETUP This TV can receive Digital Over-the-air/Cable signals without an external digital set-top box. How to use picture for the digital set-top box.) &#...

Owners Manual
Page 30
...L/MONO AUDIO R AV IN 2 DIGITAL AUDIO OUTPUT i.e) 32/37/42LC5DC*, 32/37/42LC50C*, 42LB5DC, 42LB50C Send the TV's audio to the digital audio (optical) input on the remote control. ■ If connected to connect 1 Connect the AUDIO/VIDEO jacks between TV and external equipment. Off" in the AUDIO menu. (G p..... 28 How to use ■ Select A V 2 input source with external audio equipments, such as amplifiers or speakers, please turn the TV speakers off. (G p.58) CAUTION G Do not look into the optical output port. See the external audio equipment instruction manual for operation. ...
...L/MONO AUDIO R AV IN 2 DIGITAL AUDIO OUTPUT i.e) 32/37/42LC5DC*, 32/37/42LC50C*, 42LB5DC, 42LB50C Send the TV's audio to the digital audio (optical) input on the remote control. ■ If connected to connect 1 Connect the AUDIO/VIDEO jacks between TV and external equipment. Off" in the AUDIO menu. (G p..... 28 How to use ■ Select A V 2 input source with external audio equipments, such as amplifiers or speakers, please turn the TV speakers off. (G p.58) CAUTION G Do not look into the optical output port. See the external audio equipment instruction manual for operation. ...
Owners Manual
Page 32
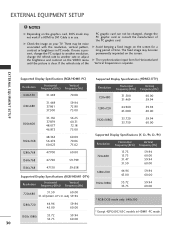
...SETUP Supported Display Specifications (RGB/HDMI1-PC) Resolution Horizontal Vertical Frequency(KHz) Frequency(Hz) 640x350 31.469 70.08 640x480 31.469 37.861 37.500 59.94 72.80 75.00 Supported Display Specifications (HDMI2-DTV) Resolution Horizontal Vertical Frequency(KHz) Frequency(Hz) 720x480 31.500 ...and Vertical frequencies is separate. G Avoid keeping a fixed image on the graphics card, DOS mode may become permanently imprinted on your TV. G The synchronization input form for a long period of time. If noise is present, change the PC output to DVI Cable is in use...
...SETUP Supported Display Specifications (RGB/HDMI1-PC) Resolution Horizontal Vertical Frequency(KHz) Frequency(Hz) 640x350 31.469 70.08 640x480 31.469 37.861 37.500 59.94 72.80 75.00 Supported Display Specifications (HDMI2-DTV) Resolution Horizontal Vertical Frequency(KHz) Frequency(Hz) 720x480 31.500 ...and Vertical frequencies is separate. G Avoid keeping a fixed image on the graphics card, DOS mode may become permanently imprinted on your TV. G The synchronization input form for a long period of time. If noise is present, change the PC output to DVI Cable is in use...

Owners Manual
Page 33
..., 42LB50C Supported Display Specifications (RGB/HDMI1-PC) Resolution 640x350 (RGB only) Horizontal Vertical Frequency(KHz) Frequency(Hz) 31.469 70.08 640x480 31.469 37.861 37.500 59.94 72.80 75.00 Supported Display Specifications (HDMI2-DTV) Resolution Horizontal Vertical Frequency(KHz) Frequency(Hz) 720x480 31.500 31.469 60....00 59.94 1280x720 44.960 45.000 59.94 60.00 800x600 35.156 37.879 48.077 46.875 56.25 60.31 72.18 75.00 1920x1080 33.720 33.750 67.500 59.94 60.00 60...
..., 42LB50C Supported Display Specifications (RGB/HDMI1-PC) Resolution 640x350 (RGB only) Horizontal Vertical Frequency(KHz) Frequency(Hz) 31.469 70.08 640x480 31.469 37.861 37.500 59.94 72.80 75.00 Supported Display Specifications (HDMI2-DTV) Resolution Horizontal Vertical Frequency(KHz) Frequency(Hz) 720x480 31.500 31.469 60....00 59.94 1280x720 44.960 45.000 59.94 60.00 800x600 35.156 37.879 48.077 46.875 56.25 60.31 72.18 75.00 1920x1080 33.720 33.750 67.500 59.94 60.00 60...

Owners Manual
Page 35
... CONTROL (Only 42PG60C, 42PG65C, 32/37/42LG500H models) TV POWER DVD STB VCR RATIO CC INPUT ENTER RETURN MENU INFO i VOL TIMER MUTE 12 P CH A G E 3 456 789 0 FLASHBK MODE Select the remote's operating mode: TV, DVD, VCR (or STB). VOLUME UP Increase/decrease the sound level. /DOWN TIMER Select ...■ Open the battery compartment cover on -screen menus and adjust the system set of screen information to TV viewing RETURN) from one full set - (Up/Down/Left /Right/ENTER) tings to your TV turns off . with -). ■ Install two 1.5V AA batteries(or 1.5V AAA) Don't mix ...
... CONTROL (Only 42PG60C, 42PG65C, 32/37/42LG500H models) TV POWER DVD STB VCR RATIO CC INPUT ENTER RETURN MENU INFO i VOL TIMER MUTE 12 P CH A G E 3 456 789 0 FLASHBK MODE Select the remote's operating mode: TV, DVD, VCR (or STB). VOLUME UP Increase/decrease the sound level. /DOWN TIMER Select ...■ Open the battery compartment cover on -screen menus and adjust the system set of screen information to TV viewing RETURN) from one full set - (Up/Down/Left /Right/ENTER) tings to your TV turns off . with -). ■ Install two 1.5V AA batteries(or 1.5V AAA) Don't mix ...

Owners Manual
Page 39
Add/Delete Channel (Manual Scan) A password is turned on. ous menu. WATCHING TV / CHANNEL CONTROL 1 Press the MENU button and then use D or E or or button to select the SETUP menu. 2 Press the G ...or delete. 5 Press the ENTER button to add or delete the channel. 6 Press the EXIT or RETURN button to return to TV viewing or press MENU button to return to Manual Scan menu if the Lock System is required to gain access to the previ- SETUP... Manual Scan Channel Edit DTV Signal Channel Label 2 Channel Type Number D E ANALOG G 2 ANALOG 2 Press to delete the channel. 345 37
Add/Delete Channel (Manual Scan) A password is turned on. ous menu. WATCHING TV / CHANNEL CONTROL 1 Press the MENU button and then use D or E or or button to select the SETUP menu. 2 Press the G ...or delete. 5 Press the ENTER button to add or delete the channel. 6 Press the EXIT or RETURN button to return to TV viewing or press MENU button to return to Manual Scan menu if the Lock System is required to gain access to the previ- SETUP... Manual Scan Channel Edit DTV Signal Channel Label 2 Channel Type Number D E ANALOG G 2 ANALOG 2 Press to delete the channel. 345 37


