
Specification (English)
Page 1
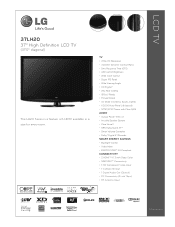
TV • 720p HD Resolution • 30,000:1 Dynamic Contrast Ratio • 5ms Response Time (GTG) • 450 cd/m2 Brightness • Wide Color Gamut • ... • Video Mute • ENERGY STAR® 3.0 Compliant CONNECTIVITY • 2 HDMI™ V.1.3 with Deep Color • SIMPLINK™ Connectivity • 1 HD Component Video Input • 1 Composite Input • 1 Digital Audio Out (Optical) • PC Connectivity (D-sub 15pin) • RF Antenna Input LGusa.com LCD TV 37LH20 37" High Definition LCD TV (37.0" diagonal) The LH20 Series is a feature rich HDTV...
TV • 720p HD Resolution • 30,000:1 Dynamic Contrast Ratio • 5ms Response Time (GTG) • 450 cd/m2 Brightness • Wide Color Gamut • ... • Video Mute • ENERGY STAR® 3.0 Compliant CONNECTIVITY • 2 HDMI™ V.1.3 with Deep Color • SIMPLINK™ Connectivity • 1 HD Component Video Input • 1 Composite Input • 1 Digital Audio Out (Optical) • PC Connectivity (D-sub 15pin) • RF Antenna Input LGusa.com LCD TV 37LH20 37" High Definition LCD TV (37.0" diagonal) The LH20 Series is a feature rich HDTV...
Owner's Manual (English)
Page 2
...may cause harmful interference to the presence of this product in the literature accompanying the appliance. Consult the dealer or an experienced radio/TV technician for a Class B digital device, pursuant to provide reasonable protection against harmful interference in construction of important operating and maintenance (...interference by turning the equipment off and on a circuit different from LG Electronics. WARNING/CAUTION TO REDUCE THE RISK OF FIRE AND ELECTRIC SHOCK, DO NOT EXPOSE THIS PRODUCT TO RAIN OR MOISTURE. Connect the equipment to an outlet on , the user is intended to...
...may cause harmful interference to the presence of this product in the literature accompanying the appliance. Consult the dealer or an experienced radio/TV technician for a Class B digital device, pursuant to provide reasonable protection against harmful interference in construction of important operating and maintenance (...interference by turning the equipment off and on a circuit different from LG Electronics. WARNING/CAUTION TO REDUCE THE RISK OF FIRE AND ELECTRIC SHOCK, DO NOT EXPOSE THIS PRODUCT TO RAIN OR MOISTURE. Connect the equipment to an outlet on , the user is intended to...
Owner's Manual (English)
Page 4
...with wet hands. If grounding methods are dangerous. Protect the power cord from the AC power source even if you connect the earth ground wire to ground the unit by SWITCH. a TV with liquids, such as this could result in . Do not overload wall outlets. Do not install this product ...place objects filled with a three-prong grounded AC plug must remain readily operable. 19 As long as vases, cups, etc. Do not connect too many appliances to unplug the TV. 4 15 WARNING - on the power cord to the same AC power outlet as being twisted, kinked, pinched, closed in fire or...
...with wet hands. If grounding methods are dangerous. Protect the power cord from the AC power source even if you connect the earth ground wire to ground the unit by SWITCH. a TV with liquids, such as this could result in . Do not overload wall outlets. Do not install this product ...place objects filled with a three-prong grounded AC plug must remain readily operable. 19 As long as vases, cups, etc. Do not connect too many appliances to unplug the TV. 4 15 WARNING - on the power cord to the same AC power outlet as being twisted, kinked, pinched, closed in fire or...
Owner's Manual (English)
Page 5
.... 27 For LCD TV If the TV feels cold to the touch, there may be located in the vicinity of overhead power lines or other materials (e.g.) plastic while plugged in wire to an antenna discharge unit, size of grounding conductors, location of antenna discharge unit, connection to provide some... surges and built-up static charges. Do not clean with a soft cloth to the regulations of mercury. Avoid touching the LCD screen or holding your TV where there is nothing wrong with general household waste. Antenna grounding according to the National Electrical Code, ANSI/NFPA 70 Ground...
.... 27 For LCD TV If the TV feels cold to the touch, there may be located in the vicinity of overhead power lines or other materials (e.g.) plastic while plugged in wire to an antenna discharge unit, size of grounding conductors, location of antenna discharge unit, connection to provide some... surges and built-up static charges. Do not clean with a soft cloth to the regulations of mercury. Avoid touching the LCD screen or holding your TV where there is nothing wrong with general household waste. Antenna grounding according to the National Electrical Code, ANSI/NFPA 70 Ground...
Owner's Manual (English)
Page 6
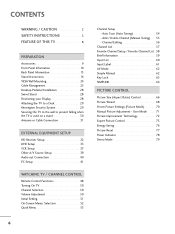
...29 Securing the TV to the wall to prevent falling when the TV is used on a stand 30 Antenna or Cable Connection 31 EXTERNAL EQUIPMENT SETUP HD Receiver Setup 32 DVD Setup 35 VCR Setup 37 Other A/V Source Setup 39 Audio out Connection 40 PC Setup 41 WATCHING TV / CHANNEL CONTROL... Remote Control Functions 48 Turning On TV 50 Channel Selection 50 Volume Adjustment 50 Initial Setting 51 On-Screen Menus Selection ...
...29 Securing the TV to the wall to prevent falling when the TV is used on a stand 30 Antenna or Cable Connection 31 EXTERNAL EQUIPMENT SETUP HD Receiver Setup 32 DVD Setup 35 VCR Setup 37 Other A/V Source Setup 39 Audio out Connection 40 PC Setup 41 WATCHING TV / CHANNEL CONTROL... Remote Control Functions 48 Turning On TV 50 Channel Selection 50 Volume Adjustment 50 Initial Setting 51 On-Screen Menus Selection ...
Owner's Manual (English)
Page 9
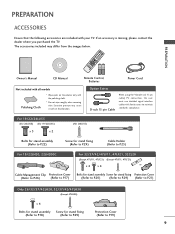
...Control, Batteries Power Cord Not included with all models Polishing Cloth * Wipe spots on the exterior only with your TV. PREPARATION PREPARATION ACCESSORIES Ensure that the following accessories are included with the polishing cloth. * Do not wipe roughly ...37/42/47LH30 (Except 47LH30) x 4 Bolts for stand assembly Screw for stand fixing (Refer to P.18) (Refer to P.29) Protection Cover (Refer to maintain standards compliance. The accessories included may cause scratch or discoloration. Option Extras D-sub 15 pin Cable When using the VGA (D-sub 15 pin cable) PC connection...
...Control, Batteries Power Cord Not included with all models Polishing Cloth * Wipe spots on the exterior only with your TV. PREPARATION PREPARATION ACCESSORIES Ensure that the following accessories are included with the polishing cloth. * Do not wipe roughly ...37/42/47LH30 (Except 47LH30) x 4 Bolts for stand assembly Screw for stand fixing (Refer to P.18) (Refer to P.29) Protection Cover (Refer to maintain standards compliance. The accessories included may cause scratch or discoloration. Option Extras D-sub 15 pin Cable When using the VGA (D-sub 15 pin cable) PC connection...
Owner's Manual (English)
Page 15
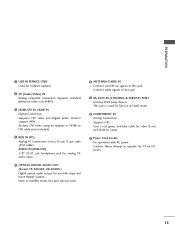
...Used for Service or Hotel mode. 8 COMPONENT IN Analog Connection. Doesn't support 480i. Connect cable signals to DVI cable (not included). 4 RGB IN (PC) Analog PC Connection. This port is used for software updates. 2 AV (Audio/Video) IN Analog composite connection. Uses a red, green, and blue cable for ...systems. Note: In standby mode, this jack. Caution: Never attempt to this port doesn't work. 6 ANTENNA/CABLE IN Connect over-the air signals to operate the TV on DC power. 15 Supports HD. Uses a D-sub 15 pin cable (VGA cable). Supports HD video and Digital audio....
...Used for Service or Hotel mode. 8 COMPONENT IN Analog Connection. Doesn't support 480i. Connect cable signals to DVI cable (not included). 4 RGB IN (PC) Analog PC Connection. This port is used for software updates. 2 AV (Audio/Video) IN Analog composite connection. Uses a red, green, and blue cable for ...systems. Note: In standby mode, this jack. Caution: Never attempt to this port doesn't work. 6 ANTENNA/CABLE IN Connect over-the air signals to operate the TV on DC power. 15 Supports HD. Uses a D-sub 15 pin cable (VGA cable). Supports HD video and Digital audio....
Owner's Manual (English)
Page 25
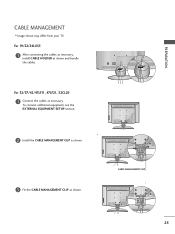
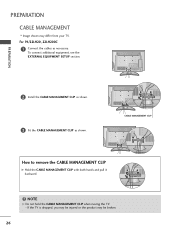
CABLE MANAGEMENT CLIP 25 PREPARATION To connect additional equipment, see the EXTERNAL EQUIPMENT SETUP section. 2 Install the CABLE MANAGEMENT CLIP as shown. 3 Fit the CABLE MANAGEMENT CLIP as shown and bundle the cables. CABLE MANAGEMENT I Image shown may differ from your TV. For 19/22/26LU55 1 After connecting the cables as necessary, install CABLE HOLDER as shown. For 32/37/42/47LF11, 47LF21, 32CL20 1 Connect the cables as necessary.
CABLE MANAGEMENT CLIP 25 PREPARATION To connect additional equipment, see the EXTERNAL EQUIPMENT SETUP section. 2 Install the CABLE MANAGEMENT CLIP as shown. 3 Fit the CABLE MANAGEMENT CLIP as shown and bundle the cables. CABLE MANAGEMENT I Image shown may differ from your TV. For 19/22/26LU55 1 After connecting the cables as necessary, install CABLE HOLDER as shown. For 32/37/42/47LF11, 47LF21, 32CL20 1 Connect the cables as necessary.
Owner's Manual (English)
Page 26
CABLE MANAGEMENT CLIP How to remove the CABLE MANAGEMENT CLIP G Hold the CABLE MANAGEMENT CLIP with both hands and pull it backward. ! If the TV is dropped, you may be broken. 26 For 19/22LH20, 22LH200C 1 Connect the cables as shown. To connect additional equipment, see the EXTERNAL EQUIPMENT SETUP section. PREPARATION 2 Install the CABLE MANAGEMENT CLIP as shown. 3 Fit the CABLE MANAGEMENT CLIP as necessary. NOTE G Do not hold the CABLE MANAGEMENT CLIP when moving the TV. - PREPARATION CABLE MANAGEMENT I Image shown may be injured or the product may differ from your TV.
CABLE MANAGEMENT CLIP How to remove the CABLE MANAGEMENT CLIP G Hold the CABLE MANAGEMENT CLIP with both hands and pull it backward. ! If the TV is dropped, you may be broken. 26 For 19/22LH20, 22LH200C 1 Connect the cables as shown. To connect additional equipment, see the EXTERNAL EQUIPMENT SETUP section. PREPARATION 2 Install the CABLE MANAGEMENT CLIP as shown. 3 Fit the CABLE MANAGEMENT CLIP as necessary. NOTE G Do not hold the CABLE MANAGEMENT CLIP when moving the TV. - PREPARATION CABLE MANAGEMENT I Image shown may be injured or the product may differ from your TV.

Owner's Manual (English)
Page 27
PREPARATION For 26/32/37/42LH20, 32/37/42/47LH30 1 Connect the cables as shown. 3 Put the cables inside the CABLE MANAGEMENT CLIP and snap it closed. To connect additional equipment, see the EXTERNAL EQUIPMENT SETUP section. 2 Install the CABLE MANAGEMENT CLIP as necessary. CABLE MANAGEMENT CLIP 27
PREPARATION For 26/32/37/42LH20, 32/37/42/47LH30 1 Connect the cables as shown. 3 Put the cables inside the CABLE MANAGEMENT CLIP and snap it closed. To connect additional equipment, see the EXTERNAL EQUIPMENT SETUP section. 2 Install the CABLE MANAGEMENT CLIP as necessary. CABLE MANAGEMENT CLIP 27
Owner's Manual (English)
Page 29
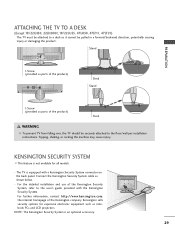
...the product) Desk WARNING G To prevent TV from falling over, the TV should be pulled in a forward/backward direction, potentially causing injury or damaging the product. Connect the Kensington Security System cable as notebook PCs and LCD projectors. For the detailed installation and use... of the Kensington Security System, refer to the floor/wall per installation instructions. The TV is equipped with the Kensington Security...
...the product) Desk WARNING G To prevent TV from falling over, the TV should be pulled in a forward/backward direction, potentially causing injury or damaging the product. Connect the Kensington Security System cable as notebook PCs and LCD projectors. For the detailed installation and use... of the Kensington Security System, refer to the floor/wall per installation instructions. The TV is equipped with the Kensington Security...

Owner's Manual (English)
Page 31
...Be careful not to the power outlet until all connections are made between the devices. Antenna (Analog or Digital) Wall Antenna Socket or Outdoor Antenna without a Cable Box Connections. I Image shown may differ from your dealer for two TV's, install a 2-Way Signal Splitter. I If... the antenna is not installed properly, contact your TV. Cable Cable TV Wall Jack RF Coaxial Wire (75 ohm) ACNATBELNENIAN/ I...
...Be careful not to the power outlet until all connections are made between the devices. Antenna (Analog or Digital) Wall Antenna Socket or Outdoor Antenna without a Cable Box Connections. I Image shown may differ from your dealer for two TV's, install a 2-Way Signal Splitter. I If... the antenna is not installed properly, contact your TV. Cable Cable TV Wall Jack RF Coaxial Wire (75 ohm) ACNATBELNENIAN/ I...
Owner's Manual (English)
Page 32
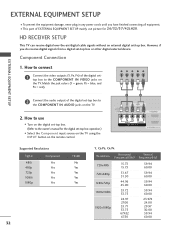
... you do receive digital signals from a digital set-top box or other digital external device. However, if you have finished connecting all equipment. HD RECEIVER SETUP This TV can receive digital over-the-air/digital cable signals without an external digital set -top box to the owner's manual for... 26/32/37/42LH20. How to the COMPONENT IN VIDEO jacks on the TV. Match the jack colors (Y = green, PB = blue, and PR = red). EXTERNAL EQUIPMENT SETUP EXTERNAL EQUIPMENT SETUP I ...
... you do receive digital signals from a digital set-top box or other digital external device. However, if you have finished connecting all equipment. HD RECEIVER SETUP This TV can receive digital over-the-air/digital cable signals without an external digital set -top box to the owner's manual for... 26/32/37/42LH20. How to the COMPONENT IN VIDEO jacks on the TV. Match the jack colors (Y = green, PB = blue, and PR = red). EXTERNAL EQUIPMENT SETUP EXTERNAL EQUIPMENT SETUP I ...
Owner's Manual (English)
Page 33
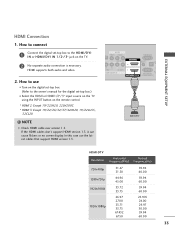
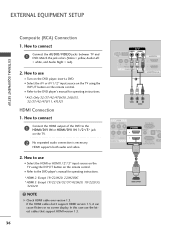
... box to the HDMI/DVI I Select the HDMI or HDMI1/2*/3* input source on the TV using the INPUT button on the TV. 2 No separate audio connection is necessary. AV IN VIDEO AUDIO L(MONO) R 2 DEO L R AUDIO 1 ....976 24.00 29.97 30.00 59.94 60.00 33 EXTERNAL EQUIPMENT SETUP HDMI Connection 1. If the HDMI cables don't support HDMI version 1.3, it can cause flickers or no... HDMI supports both audio and video. 2. How to use the latest cables that support HDMI version 1.3. How to connect 1 Connect the digital set -top box.) I N or HDMI/DVI IN 1/2*/ 3* jack on the remote control. * ...
... box to the HDMI/DVI I Select the HDMI or HDMI1/2*/3* input source on the TV using the INPUT button on the TV. 2 No separate audio connection is necessary. AV IN VIDEO AUDIO L(MONO) R 2 DEO L R AUDIO 1 ....976 24.00 29.97 30.00 59.94 60.00 33 EXTERNAL EQUIPMENT SETUP HDMI Connection 1. If the HDMI cables don't support HDMI version 1.3, it can cause flickers or no... HDMI supports both audio and video. 2. How to use the latest cables that support HDMI version 1.3. How to connect 1 Connect the digital set -top box.) I N or HDMI/DVI IN 1/2*/ 3* jack on the remote control. * ...
Owner's Manual (English)
Page 34
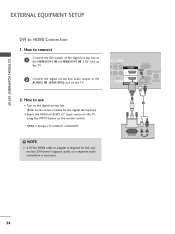
...I Select the HDMI or HDMI1/2* input source on the TV using the INPUT button on the TV. How to connect 1 Connect the DVI output of the digital set-top box to the HDMI/DVI IN or HDMI/DVI IN 1/2* jack on the TV. 2 Connect the digital set -top box. (Refer to HDMI cable... or adapter is necessary. 1 2 DVI OUTPUT L R AUDIO 34 NOTE G A DVI to the owner's manual for this connection. DVI doesn't support audio, so a separate audio connection is required for the digital set-top box.)...
...I Select the HDMI or HDMI1/2* input source on the TV using the INPUT button on the TV. How to connect 1 Connect the DVI output of the digital set-top box to the HDMI/DVI IN or HDMI/DVI IN 1/2* jack on the TV. 2 Connect the digital set -top box. (Refer to HDMI cable... or adapter is necessary. 1 2 DVI OUTPUT L R AUDIO 34 NOTE G A DVI to the owner's manual for this connection. DVI doesn't support audio, so a separate audio connection is required for the digital set-top box.)...
Owner's Manual (English)
Page 35
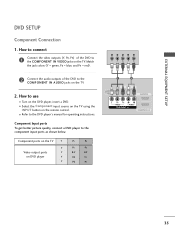
...player, insert a DVD. Y PB PR L R 2 Connect the audio outputs of the DVD to the COMPONENT IN VIDEO jacks on the TV. 2. How to the component input ports as shown below. I Select the Component input source on the TV using the INPUT button on DVD player Y Y PB ...IN A ( /DVI IN 35 I Refer to the COMPONENT IN AUDIO jacks on the TV. EXTERNAL EQUIPMENT SETUP DVD SETUP Component Connection 1. Component ports on the TV Y Y Video output ports Y on the remote control. How to connect 1 Connect the video outputs (Y, PB, PR) of the DVD to the DVD player's manual for...
...player, insert a DVD. Y PB PR L R 2 Connect the audio outputs of the DVD to the COMPONENT IN VIDEO jacks on the TV. 2. How to the component input ports as shown below. I Select the Component input source on the TV using the INPUT button on DVD player Y Y PB ...IN A ( /DVI IN 35 I Refer to the COMPONENT IN AUDIO jacks on the TV. EXTERNAL EQUIPMENT SETUP DVD SETUP Component Connection 1. Component ports on the TV Y Y Video output ports Y on the remote control. How to connect 1 Connect the video outputs (Y, PB, PR) of the DVD to the DVD player's manual for...
Owner's Manual (English)
Page 36
... button on the DVD player, insert a DVD. I Turn on the remote control. How to connect 1 Connect the HDMI output of the DVD to connect 1 Connect the AUDIO/VIDEO jacks between TV and DVD. If the HDMI cables don't support HDMI version 1.3, it can cause flickers or no...&SERVICE) 1 HDMI OUTPUT In this case use I Refer to the DVD player's manual for operating instructions. * AV2: Only 32/37/42/47LH30, 26LU55, 32/37/42/47LF11, 47LF21 HDMI Connection 1. NOTE G Check HDMI cable over version 1.3. I Refer to the DVD player's manual for operating instructions. * HDMI 2: Except...
... button on the DVD player, insert a DVD. I Turn on the remote control. How to connect 1 Connect the HDMI output of the DVD to connect 1 Connect the AUDIO/VIDEO jacks between TV and DVD. If the HDMI cables don't support HDMI version 1.3, it can cause flickers or no...&SERVICE) 1 HDMI OUTPUT In this case use I Refer to the DVD player's manual for operating instructions. * AV2: Only 32/37/42/47LH30, 26LU55, 32/37/42/47LF11, 47LF21 HDMI Connection 1. NOTE G Check HDMI cable over version 1.3. I Refer to the DVD player's manual for operating instructions. * HDMI 2: Except...
Owner's Manual (English)
Page 37
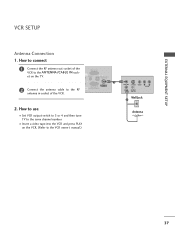
... VCR. (Refer to the VCR owner's manual.) ANT OUT S-VIDEO VIDEO L R AUDIO ANT IN OUTPUT SWITCH Wall Jack 2 Antenna 37 How to use I Insert a video tape into the VCR and press PLAY on the TV. 2 Connect the antenna cable to the same channel number. I Set VCR output switch to 3 or 4 and then tune... TV to the RF antenna in socket of the VCR. RGB IN (PC) AUDIO IN (RGB/DVI) OPTICAL DIGITAL AUDIO OUT...
... VCR. (Refer to the VCR owner's manual.) ANT OUT S-VIDEO VIDEO L R AUDIO ANT IN OUTPUT SWITCH Wall Jack 2 Antenna 37 How to use I Insert a video tape into the VCR and press PLAY on the TV. 2 Connect the antenna cable to the same channel number. I Set VCR output switch to 3 or 4 and then tune... TV to the RF antenna in socket of the VCR. RGB IN (PC) AUDIO IN (RGB/DVI) OPTICAL DIGITAL AUDIO OUT...
Owner's Manual (English)
Page 38
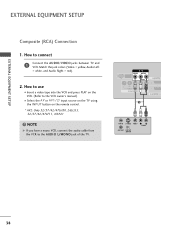
... G If you have a mono VCR, connect the audio cable from the VCR to the VCR owner's manual.) I Select the A V or AV1/2* input source on the TV using the INPUT button on the remote control. * AV2: Only 32/37/42/47LH30, 26LU55, 32/37/42/47LF11, 47LF21 ! Match the jack ...colors (Video = yellow, Audio Left = white, and Audio Right = red). 2. How to connect 1 Connect the AUDIO/VIDEO jacks between TV and VCR. EXTERNAL EQUIPMENT SETUP...
... G If you have a mono VCR, connect the audio cable from the VCR to the VCR owner's manual.) I Select the A V or AV1/2* input source on the TV using the INPUT button on the remote control. * AV2: Only 32/37/42/47LH30, 26LU55, 32/37/42/47LF11, 47LF21 ! Match the jack ...colors (Video = yellow, Audio Left = white, and Audio Right = red). 2. How to connect 1 Connect the AUDIO/VIDEO jacks between TV and VCR. EXTERNAL EQUIPMENT SETUP...
Owner's Manual (English)
Page 39
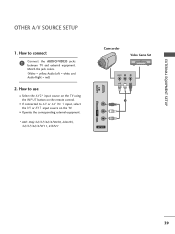
How to use I If connected to connect 1 Connect the AUDIO/VIDEO jacks between TV and external equipment. I Select the A V 2* input source on the TV using the INPUT button on the TV. EXTERNAL EQUIPMENT SETUP OTHER A/V SOURCE SETUP 1. I Operate the corresponding external equipment. * AV2: Only 32/37/42/47LH30, 26LU55, 32/37/42/47LF11, 47LF21 VIDEO L/MONO AUDIO R IN 3 Camcorder...
How to use I If connected to connect 1 Connect the AUDIO/VIDEO jacks between TV and external equipment. I Select the A V 2* input source on the TV using the INPUT button on the TV. EXTERNAL EQUIPMENT SETUP OTHER A/V SOURCE SETUP 1. I Operate the corresponding external equipment. * AV2: Only 32/37/42/47LH30, 26LU55, 32/37/42/47LF11, 47LF21 VIDEO L/MONO AUDIO R IN 3 Camcorder...


