
Specification (English)
Page 2
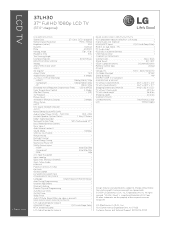
... Guide • e-Manual • Parental Control w/V-Chip • Key Lock • Closed Caption • LG SIMPLINK (HDMI CEC) • CONVENIENCE FEATURES Language English/Spanish/French/Korean Auto Tuning/Programming • Channel Add... & WEIGHT TV without stand (WxHxD) 36.1" x 23.4" x 3.5" TV with stand (WxHxD) 36.1" x 25.9" x 11.7" Shipping Dimensions (WxHxD) 44.3" x 23.4" x 5.2" TV without notice. LCD TV 37LH30 37" Full HD 1080p LCD TV (37.0" diagonal) LGusa.com LCD SPECIFICATION Screen Size 37" Class (37.0" diagonal) ...
... Guide • e-Manual • Parental Control w/V-Chip • Key Lock • Closed Caption • LG SIMPLINK (HDMI CEC) • CONVENIENCE FEATURES Language English/Spanish/French/Korean Auto Tuning/Programming • Channel Add... & WEIGHT TV without stand (WxHxD) 36.1" x 23.4" x 3.5" TV with stand (WxHxD) 36.1" x 25.9" x 11.7" Shipping Dimensions (WxHxD) 44.3" x 23.4" x 5.2" TV without notice. LCD TV 37LH30 37" Full HD 1080p LCD TV (37.0" diagonal) LGusa.com LCD SPECIFICATION Screen Size 37" Class (37.0" diagonal) ...
Owner's Manual (English)
Page 4
...even if you connect the earth ground wire to dripping or splashing and do not drop onto the screen with liquids, such as being twisted, kinked, pinched, closed in . a TV with an exact replacement part by the hanging power and signal cables on the back of these ...It is not disconnected from physical or mechanical abuse, such as vases, cups, etc. SAFETY INSTRUCTIONS 11 Never touch this product to unplug the TV. 4 15 WARNING - that is the disconnecting device. Periodically examine the cord of fire or electrical shock, do grasp the plug when unplugging...
...even if you connect the earth ground wire to dripping or splashing and do not drop onto the screen with liquids, such as being twisted, kinked, pinched, closed in . a TV with an exact replacement part by the hanging power and signal cables on the back of these ...It is not disconnected from physical or mechanical abuse, such as vases, cups, etc. SAFETY INSTRUCTIONS 11 Never touch this product to unplug the TV. 4 15 WARNING - that is the disconnecting device. Periodically examine the cord of fire or electrical shock, do grasp the plug when unplugging...
Owner's Manual (English)
Page 5
... to carry larger TVs. It may take 2 or more people to the regulations of this product must be a small "flicker" when it for the grounding electrode. Do not press against or put stress on the monitor's performance. Avoid touching the LCD screen or holding your TV where there is ...turned on the screen, appearing as tiny red, green, or blue spots. Doing so may be carried out in the vicinity of the...
... to carry larger TVs. It may take 2 or more people to the regulations of this product must be a small "flicker" when it for the grounding electrode. Do not press against or put stress on the monitor's performance. Avoid touching the LCD screen or holding your TV where there is ...turned on the screen, appearing as tiny red, green, or blue spots. Doing so may be carried out in the vicinity of the...
Owner's Manual (English)
Page 6
... a Desk 29 Kensington Security System 29 Securing the TV to the wall to prevent falling when the TV is used on a stand 30 Antenna or Cable Connection 31 EXTERNAL EQUIPMENT SETUP HD Receiver Setup 32 DVD Setup 35 VCR Setup 37 Other A/V Source Setup 39 Audio out Connection 40... PC Setup 41 WATCHING TV / CHANNEL CONTROL Remote Control Functions 48 Turning On TV 50 Channel Selection 50 Volume Adjustment 50 Initial Setting 51 On-Screen Menus Selection 52 Quick Menu 53 6 Channel ...
... a Desk 29 Kensington Security System 29 Securing the TV to the wall to prevent falling when the TV is used on a stand 30 Antenna or Cable Connection 31 EXTERNAL EQUIPMENT SETUP HD Receiver Setup 32 DVD Setup 35 VCR Setup 37 Other A/V Source Setup 39 Audio out Connection 40... PC Setup 41 WATCHING TV / CHANNEL CONTROL Remote Control Functions 48 Turning On TV 50 Channel Selection 50 Volume Adjustment 50 Initial Setting 51 On-Screen Menus Selection 52 Quick Menu 53 6 Channel ...
Owner's Manual (English)
Page 7
User Mode 83 Balance 84 TV Speakers On/Off Setup 85 Audio Reset 86 Stereo/SAP Broadcasts Setup 87 Audio Language 88 On-Screen Menus Language Selection 89 Caption Mode - Caption Option 92 TIME SETTING Clock Setting - Digital Broadcasting System Captions 91 - Auto Clock Setup 93 Manual Clock Setup ...
User Mode 83 Balance 84 TV Speakers On/Off Setup 85 Audio Reset 86 Stereo/SAP Broadcasts Setup 87 Audio Language 88 On-Screen Menus Language Selection 89 Caption Mode - Caption Option 92 TIME SETTING Clock Setting - Digital Broadcasting System Captions 91 - Auto Clock Setup 93 Manual Clock Setup ...

Owner's Manual (English)
Page 8
... to prevent image burn, avoid displaying a fixed image on the screen. Please contact your TV screen for a prolonged period (2 or more hours for LCD, 1 or more pixels, 16:9 aspect-ratio screens, and AC3 digital audio. HDMI, the HDMI logo and High-Definition Multimedia Interface are viewing. LG TV include a unique invisible speaker system, tuned by the Imaging...
... to prevent image burn, avoid displaying a fixed image on the screen. Please contact your TV screen for a prolonged period (2 or more hours for LCD, 1 or more pixels, 16:9 aspect-ratio screens, and AC3 digital audio. HDMI, the HDMI logo and High-Definition Multimedia Interface are viewing. LG TV include a unique invisible speaker system, tuned by the Imaging...

Owner's Manual (English)
Page 16
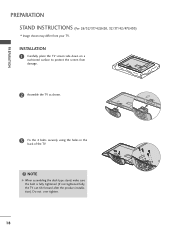
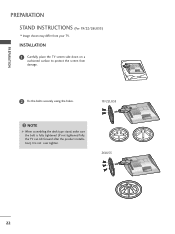
PREPARATION PREPARATION STAND INSTRUCTIONS (For 19/22LH20, 22LH200C) I Image shown may differ from damage. 2 Assemble the TV as shown until you hear it click. 16 INSTALLATION 1 Carefully place the TV screen side down on a cushioned surface to protect the screen from your TV.
PREPARATION PREPARATION STAND INSTRUCTIONS (For 19/22LH20, 22LH200C) I Image shown may differ from damage. 2 Assemble the TV as shown until you hear it click. 16 INSTALLATION 1 Carefully place the TV screen side down on a cushioned surface to protect the screen from your TV.

Owner's Manual (English)
Page 17
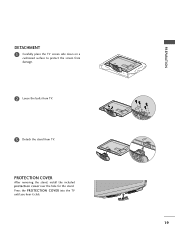
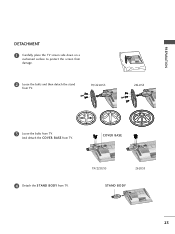
PROTECTION COVER 4 Insert the PROTECTION COVER into the TV. 5 Fix the 4 bolts securely using the holes in the back of the TV. PROTECTION COVER 17 PREPARATION DETACHMENT 1 Carefully place the TV screen side down on a cushioned surface to protect the screen from damage. 2 Loose the bolts from TV. 3 Detach the stand from TV.
PROTECTION COVER 4 Insert the PROTECTION COVER into the TV. 5 Fix the 4 bolts securely using the holes in the back of the TV. PROTECTION COVER 17 PREPARATION DETACHMENT 1 Carefully place the TV screen side down on a cushioned surface to protect the screen from damage. 2 Loose the bolts from TV. 3 Detach the stand from TV.
Owner's Manual (English)
Page 18
Do not over tighten. 18 NOTE G When assembling the desk type stand, make sure the bolt is fully tightened (If not tightened fully, the TV can tilt forward after the product installation). PREPARATION PREPARATION STAND INSTRUCTIONS (For 26/32/37/42LH20, 32/37/42/47LH30) I Image shown may differ from damage. 2 Assemble the TV as shown. 3 Fix the 4 bolts securely using the holes in the back of the TV. ! INSTALLATION 1 Carefully place the TV screen side down on a cushioned surface to protect the screen from your TV.
Do not over tighten. 18 NOTE G When assembling the desk type stand, make sure the bolt is fully tightened (If not tightened fully, the TV can tilt forward after the product installation). PREPARATION PREPARATION STAND INSTRUCTIONS (For 26/32/37/42LH20, 32/37/42/47LH30) I Image shown may differ from damage. 2 Assemble the TV as shown. 3 Fix the 4 bolts securely using the holes in the back of the TV. ! INSTALLATION 1 Carefully place the TV screen side down on a cushioned surface to protect the screen from your TV.
Owner's Manual (English)
Page 19
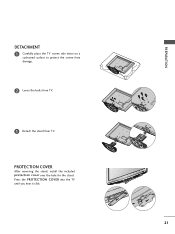
Press the PROTECTION COVER into the TV until you hear it click. 19 PROTECTION COVER After removing the stand, install the included protection cover over the hole for the stand. PREPARATION DETACHMENT 1 Carefully place the TV screen side down on a cushioned surface to protect the screen from damage. 2 Loose the bolts from TV. 3 Detach the stand from TV.
Press the PROTECTION COVER into the TV until you hear it click. 19 PROTECTION COVER After removing the stand, install the included protection cover over the hole for the stand. PREPARATION DETACHMENT 1 Carefully place the TV screen side down on a cushioned surface to protect the screen from damage. 2 Loose the bolts from TV. 3 Detach the stand from TV.

Owner's Manual (English)
Page 20
... BODY COVER BASE 4 Fix the 4 bolts securely using the 4 screws supplied. 3 Assemble the TV as shown. And carefully place the TV screen side down on a cushioned surface to protect the screen from your TV has a protection tape attached, remove the tape. Do not over tighten. 20 NOTE G When ...assembling the desk type stand, make sure the screws are fully tightened (If not tightened fully, the TV can tilt forward after the product installation). INSTALLATION (For 32/37/42LF11...
... BODY COVER BASE 4 Fix the 4 bolts securely using the 4 screws supplied. 3 Assemble the TV as shown. And carefully place the TV screen side down on a cushioned surface to protect the screen from your TV has a protection tape attached, remove the tape. Do not over tighten. 20 NOTE G When ...assembling the desk type stand, make sure the screws are fully tightened (If not tightened fully, the TV can tilt forward after the product installation). INSTALLATION (For 32/37/42LF11...
Owner's Manual (English)
Page 21
PROTECTION COVER After removing the stand, install the included protection cover over the hole for the stand. Press the PROTECTION COVER into the TV until you hear it click. 21 PREPARATION DETACHMENT 1 Carefully place the TV screen side down on a cushioned surface to protect the screen from damage. 2 Loose the bolts from TV. 3 Detach the stand from TV.
PROTECTION COVER After removing the stand, install the included protection cover over the hole for the stand. Press the PROTECTION COVER into the TV until you hear it click. 21 PREPARATION DETACHMENT 1 Carefully place the TV screen side down on a cushioned surface to protect the screen from damage. 2 Loose the bolts from TV. 3 Detach the stand from TV.
Owner's Manual (English)
Page 22
PREPARATION PREPARATION STAND INSTRUCTIONS (For 19/22/26LU55) I Image shown may differ from damage. 2 Fix the bolts securely using the holes. ! INSTALLATION 1 Carefully place the TV screen side down on a cushioned surface to protect the screen from your TV. NOTE G When assembling the desk type stand, make sure the bolt is fully tightened (If not tightened fully, the TV can tilt forward after the product installation). Do not over tighten. 19" 22" 19/22LU55 19" 22" 26LU55 26" 22
PREPARATION PREPARATION STAND INSTRUCTIONS (For 19/22/26LU55) I Image shown may differ from damage. 2 Fix the bolts securely using the holes. ! INSTALLATION 1 Carefully place the TV screen side down on a cushioned surface to protect the screen from your TV. NOTE G When assembling the desk type stand, make sure the bolt is fully tightened (If not tightened fully, the TV can tilt forward after the product installation). Do not over tighten. 19" 22" 19/22LU55 19" 22" 26LU55 26" 22
Owner's Manual (English)
Page 23
COVER BASE 4 Detach the STAND BODY from TV. And detach the COVER BASE from TV. 19/22LU55 26LU55 STAND BODY 23 PREPARATION DETACHMENT 1 Carefully place the TV screen side down on a cushioned surface to protect the screen from damage. 2 Loose the bolts and then detach the stand from TV. 19" 19/22LU55 19" 22" 22" 26LU55 26" 26" 3 Loose the bolts from TV.
COVER BASE 4 Detach the STAND BODY from TV. And detach the COVER BASE from TV. 19/22LU55 26LU55 STAND BODY 23 PREPARATION DETACHMENT 1 Carefully place the TV screen side down on a cushioned surface to protect the screen from damage. 2 Loose the bolts and then detach the stand from TV. 19" 19/22LU55 19" 22" 22" 26LU55 26" 26" 3 Loose the bolts from TV.
Owner's Manual (English)
Page 33
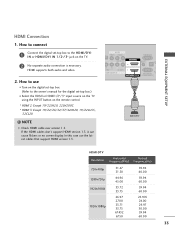
... the digital set -top box.) I N or HDMI/DVI IN 1/2*/ 3* jack on the remote control. * HDMI 2: Except 19/22LH20, 22LH200C * HDMI 3: Except 19/22/26/32/37/42LH20, 19/22LU55, 32CL20 ! AV IN VIDEO AUDIO L(MONO) R 2 DEO L R AUDIO 1 COMPONENT IN RGB IN (PC) AUDIO IN (RGB/DVI) OPT A RS-232C IN ... 60.00 33 NOTE G Check HDMI cable over version 1.3. How to the HDMI/DVI I Select the HDMI or HDMI1/2*/3* input source on the TV using the INPUT button on the TV. 2 No separate audio connection is necessary. If the HDMI cables don't support HDMI version 1.3, it can cause flickers or no...
... the digital set -top box.) I N or HDMI/DVI IN 1/2*/ 3* jack on the remote control. * HDMI 2: Except 19/22LH20, 22LH200C * HDMI 3: Except 19/22/26/32/37/42LH20, 19/22LU55, 32CL20 ! AV IN VIDEO AUDIO L(MONO) R 2 DEO L R AUDIO 1 COMPONENT IN RGB IN (PC) AUDIO IN (RGB/DVI) OPT A RS-232C IN ... 60.00 33 NOTE G Check HDMI cable over version 1.3. How to the HDMI/DVI I Select the HDMI or HDMI1/2*/3* input source on the TV using the INPUT button on the TV. 2 No separate audio connection is necessary. If the HDMI cables don't support HDMI version 1.3, it can cause flickers or no...
Owner's Manual (English)
Page 36
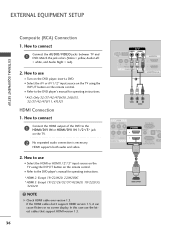
... on the TV. 2 No separated audio connection is necessary. HDMI supports both audio and video. 2. How to connect 1 Connect the HDMI output of the DVD to the DVD player's manual for operating instructions. * HDMI 2: Except 19/22LH20, 22LH200C * HDMI 3: Except 19/22/26/32/37/42LH20, 19.../22LU55, 32CL20 ! If the HDMI cables don't support HDMI version 1.3, it can cause flickers or no screen display. How to connect 1 Connect the AUDIO/VIDEO jacks between TV and DVD. How to use the latest cables that support HDMI...
... on the TV. 2 No separated audio connection is necessary. HDMI supports both audio and video. 2. How to connect 1 Connect the HDMI output of the DVD to the DVD player's manual for operating instructions. * HDMI 2: Except 19/22LH20, 22LH200C * HDMI 3: Except 19/22/26/32/37/42LH20, 19.../22LU55, 32CL20 ! If the HDMI cables don't support HDMI version 1.3, it can cause flickers or no screen display. How to connect 1 Connect the AUDIO/VIDEO jacks between TV and DVD. How to use the latest cables that support HDMI...

Owner's Manual (English)
Page 42
... the INPUT button on the remote control. * HDMI 2: Except 19/22LH20, 22LH200C ! In this case use I Turn on the TV. 2. AV IN VIDEO AUDIO L(MONO) R 2 DEO L R AUDIO 1 OMPONENT IN RGB IN (PC) AUDIO IN (RGB/DVI) OPTI AU RS-232C IN ACNA /DVI IN (CONTROL&...SERVICE) 1 2 DVI OUTPUT AUDIO 42 If the HDMI cables don't support HDMI version 1.3, it can cause flickers or no screen display. How to connect 1 Connect the DVI output of the PC to the AUDIO IN (RGB/DVI) jack on the PC and the...
... the INPUT button on the remote control. * HDMI 2: Except 19/22LH20, 22LH200C ! In this case use I Turn on the TV. 2. AV IN VIDEO AUDIO L(MONO) R 2 DEO L R AUDIO 1 OMPONENT IN RGB IN (PC) AUDIO IN (RGB/DVI) OPTI AU RS-232C IN ACNA /DVI IN (CONTROL&...SERVICE) 1 2 DVI OUTPUT AUDIO 42 If the HDMI cables don't support HDMI version 1.3, it can cause flickers or no screen display. How to connect 1 Connect the DVI output of the PC to the AUDIO IN (RGB/DVI) jack on the PC and the...
Owner's Manual (English)
Page 48
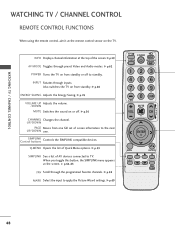
... CHANNEL Changes the channel. G p.64-65 FAV Scroll through preset Video and Audio modes. G p.62 POWER Turns the TV on from one . G p.53 SIMPLINK See a list of screen information to apply the Picture Wizard settings. G p.69 INFO POWER INPUT AV MODE ENERGY SAVING 123 456 789 0 FLASHBK ...UP Adjusts the volume. /DOWN MUTE Switches the sound on the TV. Q.MENU Opens the list of the screen. INPUT Rotates through inputs. UP/DOWN PAGE Moves from standby. WATCHING TV / CHANNEL CONTROL WATCHING TV / CHANNEL CONTROL REMOTE CONTROL FUNCTIONS When using the remote control, ...
... CHANNEL Changes the channel. G p.64-65 FAV Scroll through preset Video and Audio modes. G p.62 POWER Turns the TV on from one . G p.53 SIMPLINK See a list of screen information to apply the Picture Wizard settings. G p.69 INFO POWER INPUT AV MODE ENERGY SAVING 123 456 789 0 FLASHBK ...UP Adjusts the volume. /DOWN MUTE Switches the sound on the TV. Q.MENU Opens the list of the screen. INPUT Rotates through inputs. UP/DOWN PAGE Moves from standby. WATCHING TV / CHANNEL CONTROL WATCHING TV / CHANNEL CONTROL REMOTE CONTROL FUNCTIONS When using the remote control, ...

Owner's Manual (English)
Page 49
... battery compartment cover on the back side and install the batteries matching correct polarity. THUMBSTICK (Up/Down/Left Navigates the on -screen displays and return to TV viewing. I Close cover. 49 LIST Displays the channel table. RETURN Allows the user to enter a program number for multiple program...or used batteries with new ones. Right/ENTER) MENU Displays the main menu or clears all on -screen menus and adjusts the system settings to the last channel viewed. WATCHING TV / CHANNEL CONTROL NUMBER button - (DASH) Used to move return one step in an interactive application ...
... battery compartment cover on the back side and install the batteries matching correct polarity. THUMBSTICK (Up/Down/Left Navigates the on -screen displays and return to TV viewing. I Close cover. 49 LIST Displays the channel table. RETURN Allows the user to enter a program number for multiple program...or used batteries with new ones. Right/ENTER) MENU Displays the main menu or clears all on -screen menus and adjusts the system settings to the last channel viewed. WATCHING TV / CHANNEL CONTROL NUMBER button - (DASH) Used to move return one step in an interactive application ...

Owner's Manual (English)
Page 90
...the broadcaster. I TEXT The term for the hearing impaired. usually the audio portion of the TV screen; This function is only available when Caption Mode is programmed to help people with hearing loss watch TV. I CAPTION The term for the words that scroll across the bottom of the program provided... for the words that appear in a large black frame and almost cover the entire screen; RETURN Return to the previous menu. SOUND & ...
...the broadcaster. I TEXT The term for the hearing impaired. usually the audio portion of the TV screen; This function is only available when Caption Mode is programmed to help people with hearing loss watch TV. I CAPTION The term for the words that scroll across the bottom of the program provided... for the words that appear in a large black frame and almost cover the entire screen; RETURN Return to the previous menu. SOUND & ...


