
User Guide
Page 3
... Condenser, Evaporator) Labor 1 year [In-Home Service (Except Model GR-051)] 1 year [In-Home Service (Except Model GR-051)] No other express warranty is installed outside the normal service area, any cost of transportation involved in the U.S. LG ELECTRONICS SHALL NOT BE LIABLE FOR THE LOSS OF USE OF THE... LIMITED TO THE DURATION OF THE EXPRESS WARRANTY HEREIN. Some States do not allow the exclusion or limitation of your product type (Refrigerator), model number, serial number, and ZIP/Postal Code ready. This warranty gives you specific legal rights and you . visit our web site/http://...
... Condenser, Evaporator) Labor 1 year [In-Home Service (Except Model GR-051)] 1 year [In-Home Service (Except Model GR-051)] No other express warranty is installed outside the normal service area, any cost of transportation involved in the U.S. LG ELECTRONICS SHALL NOT BE LIABLE FOR THE LOSS OF USE OF THE... LIMITED TO THE DURATION OF THE EXPRESS WARRANTY HEREIN. Some States do not allow the exclusion or limitation of your product type (Refrigerator), model number, serial number, and ZIP/Postal Code ready. This warranty gives you specific legal rights and you . visit our web site/http://...
User Guide
Page 6
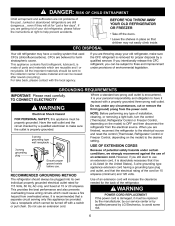
... against the use an extension cord, it must be plugged into its own individual properly grounded electrical outlet rated for proper disposal by LG Electronics, to avoid some risk. 6 RECOMMENDED GROUNDING METHOD The refrigerator should be turned off the doors. Use a receptacle which could ...not problems of installation, cleaning, or removing a light bulb, turn the control (Thermostat, Refrigerator Control or Freezer Control, depending on the model) to the desired setting. Have the wall outlet and the circuit checked by a qualified electrician to make sure the CFC refrigerant is ...
... against the use an extension cord, it must be plugged into its own individual properly grounded electrical outlet rated for proper disposal by LG Electronics, to avoid some risk. 6 RECOMMENDED GROUNDING METHOD The refrigerator should be turned off the doors. Use a receptacle which could ...not problems of installation, cleaning, or removing a light bulb, turn the control (Thermostat, Refrigerator Control or Freezer Control, depending on the model) to the desired setting. Have the wall outlet and the circuit checked by a qualified electrician to make sure the CFC refrigerant is ...

User Guide
Page 7
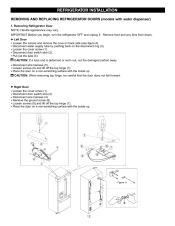
...)* L Dairy Bin M Egg Box N Design-A-Door Bins O Freezer Light P Wire Basket 7 The locations of the items listed below may not match your model. NOTE: This guide covers several different models. PARTS AND FEATURES A B C K L M D E F G O H P I Full-Width Wire Basket J Wire Durabase *On some or all of the features shown below . A Digital Sensor Control* B Refrigerator...
...)* L Dairy Bin M Egg Box N Design-A-Door Bins O Freezer Light P Wire Basket 7 The locations of the items listed below may not match your model. NOTE: This guide covers several different models. PARTS AND FEATURES A B C K L M D E F G O H P I Full-Width Wire Basket J Wire Durabase *On some or all of the features shown below . A Digital Sensor Control* B Refrigerator...

User Guide
Page 8
Turn the leveling screws clockwise ( ) to raise the unit, counterclockwise ( ) to ensure proper cooling. Do not remove any warningtype labels, the model and serial number label, or the T echSheet that is too low or high, cooling ability may be injured or receive an electrical shock. For more ...
Turn the leveling screws clockwise ( ) to raise the unit, counterclockwise ( ) to ensure proper cooling. Do not remove any warningtype labels, the model and serial number label, or the T echSheet that is too low or high, cooling ability may be injured or receive an electrical shock. For more ...

User Guide
Page 10
... up . Loosen hinge bolts (3). Place the door on a non-scratching surface with the inside up . Loosen hinge bolts (3). REFRIGERATOR INSTALLATION HOW TO REMOVE REFRIGERATOR DOOR (models without water dispenser) 1. Disconnect wire harness (5). Lift off the top hinge (4). Right Door Loosen the cover screw (1). CAUTION: When removing top hinge, be careful that...
... up . Loosen hinge bolts (3). Place the door on a non-scratching surface with the inside up . Loosen hinge bolts (3). REFRIGERATOR INSTALLATION HOW TO REMOVE REFRIGERATOR DOOR (models without water dispenser) 1. Disconnect wire harness (5). Lift off the top hinge (4). Right Door Loosen the cover screw (1). CAUTION: When removing top hinge, be careful that...
User Guide
Page 12
... is deformed or worn out, cut the damaged portion away. Loosen screws (6) and lift off the top hinge (7). REFRIGERATOR INSTALLATION REMOVING AND REPLACING REFRIGERATOR DOORS (models with the inside up . IMPORTANT : Before you begin, turn the refrigerator OFF and unplug it. Left Door Loosen the screws and remove the cove on...
... is deformed or worn out, cut the damaged portion away. Loosen screws (6) and lift off the top hinge (7). REFRIGERATOR INSTALLATION REMOVING AND REPLACING REFRIGERATOR DOORS (models with the inside up . IMPORTANT : Before you begin, turn the refrigerator OFF and unplug it. Left Door Loosen the screws and remove the cove on...
User Guide
Page 16
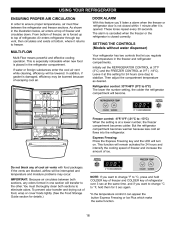
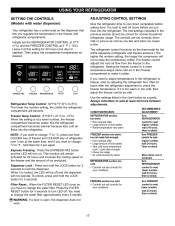
... refrigerator compartments. Then adjust the compartment temperature as desired. This function will be interrupted and temperature and moisture problems may be lowered. SETTING THE CONTROLS (Models without water dispenser) Your refrigerator has two controls that let you regulate the temperature in the illustration below, air enters at this feature you´...
... refrigerator compartments. Then adjust the compartment temperature as desired. This function will be interrupted and temperature and moisture problems may be lowered. SETTING THE CONTROLS (Models without water dispenser) Your refrigerator has two controls that let you regulate the temperature in the illustration below, air enters at this feature you´...
User Guide
Page 17
... LOCK button for 3 sec again. EXPRESS FRZ ADJUSTING CONTROL SETTINGS Give the refrigerator time to keep the temperature colder. USING YOUR REFRIGERATOR SETTING THE CONTROLS (Models with water dispenser) Your refrigerator has a control pad on the dispenser that lets you have to change the water filter. This function will turn on...
... LOCK button for 3 sec again. EXPRESS FRZ ADJUSTING CONTROL SETTINGS Give the refrigerator time to keep the temperature colder. USING YOUR REFRIGERATOR SETTING THE CONTROLS (Models with water dispenser) Your refrigerator has a control pad on the dispenser that lets you have to change the water filter. This function will turn on...
User Guide
Page 19
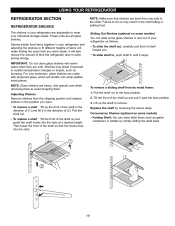
... To remove a shelf : Tilt up and pull it will make finding the exact item you want . Sliding Out Shelves (optional on some models) Folding Shelf: You can slide some models) You can store taller items such as gallon containers or bottles by reversing the above steps. Storing similar food items together in...
... To remove a shelf : Tilt up and pull it will make finding the exact item you want . Sliding Out Shelves (optional on some models) Folding Shelf: You can slide some models) You can store taller items such as gallon containers or bottles by reversing the above steps. Storing similar food items together in...

User Guide
Page 20
... toward the center of its place. 4. WARNING: Fruits and vegetables may be damage at the front of the crisper cover and 2) a large lattice on some models) While holding the chef fresh with one hand, pull it forward slightly. Raise the door as high as it out. Lift the door out of...
... toward the center of its place. 4. WARNING: Fruits and vegetables may be damage at the front of the crisper cover and 2) a large lattice on some models) While holding the chef fresh with one hand, pull it forward slightly. Raise the door as high as it out. Lift the door out of...

User Guide
Page 22
.... T o Install the can dispenser, place it into the shelf frame rails and push it stops. Dispenser Switch DAIRY BIN 1. CAN DISPENSER (optional on some models) The Can Dispenser slides out from the water line and to replace the tray. CAUTION: Do not use the egg box as it stops. To...into the holes to fill the water system. 22 USING YOUR REFRIGERATOR DESIGN-A-DOOR The door bins are not firmly assembled. WATER DISPENSER (on some models) Push up the front of tray slightly and snap the ribs into place. Important: If no water dispensed when the refrigerator is loaded with ...
.... T o Install the can dispenser, place it into the shelf frame rails and push it stops. Dispenser Switch DAIRY BIN 1. CAN DISPENSER (optional on some models) The Can Dispenser slides out from the water line and to replace the tray. CAUTION: Do not use the egg box as it stops. To...into the holes to fill the water system. 22 USING YOUR REFRIGERATOR DESIGN-A-DOOR The door bins are not firmly assembled. WATER DISPENSER (on some models) Push up the front of tray slightly and snap the ribs into place. Important: If no water dispensed when the refrigerator is loaded with ...

User Guide
Page 23
... it stops. Tilt up at the back. T o Install, insert ice bin into frame rails and push back into place. The freezer basket rest on some models) The tilting door provides easy access for stored foods. Lift the basket up the front of the drawer. 2. Lift the front up and lift the...
... it stops. Tilt up at the back. T o Install, insert ice bin into frame rails and push back into place. The freezer basket rest on some models) The tilting door provides easy access for stored foods. Lift the basket up the front of the drawer. 2. Lift the front up and lift the...

User Guide
Page 25
... on or your local appliance dealer or part distributor. Using its packaging and remove protective cover from side to dispense (approximately for models with a new cartridge. Dispense water from the system until it stops. Push it in firmly and twist it into place. After...3. With cartridge knob in the cartridge. Flush water out from the system to change the old cartridge. 1. USING YOUR REFRIGERATOR FILTER (on some models) It is removed, it will click out of the cartridge counter clockwise. 5. NOTE: T o purchase replacement water filter cartridges, visit your water ...
... on or your local appliance dealer or part distributor. Using its packaging and remove protective cover from side to dispense (approximately for models with a new cartridge. Dispense water from the system until it stops. Push it in firmly and twist it into place. After...3. With cartridge knob in the cartridge. Flush water out from the system to change the old cartridge. 1. USING YOUR REFRIGERATOR FILTER (on some models) It is removed, it will click out of the cartridge counter clockwise. 5. NOTE: T o purchase replacement water filter cartridges, visit your water ...
User Guide
Page 27
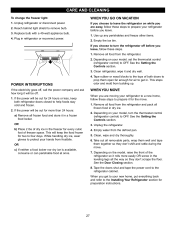
... to a new home, follow these steps to leave the refrigerator on your model, set the thermostat control (refrigerator control) to get to your new home, put everything back and refer... to protect your model, turn the refrigerator off . 1. See the Door Closing section. 8. Empty the ice bin. ...or less, keep both doors to prop them together so they don't scrape the floor. Depending on the model, raise the front of freezer space. This will be out for two to remove bulb. 3. Remove all...
... to a new home, follow these steps to leave the refrigerator on your model, set the thermostat control (refrigerator control) to get to your new home, put everything back and refer... to protect your model, turn the refrigerator off . 1. See the Door Closing section. 8. Empty the ice bin. ...or less, keep both doors to prop them together so they don't scrape the floor. Depending on the model, raise the front of freezer space. This will be out for two to remove bulb. 3. Remove all...
User Guide
Page 28
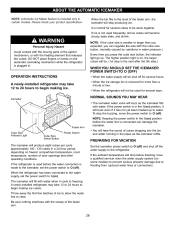
... producing ice. A newly-installed refrigerator may take 12 to 24 hours to begin making ice cubes. If the power switch is included only in certain models. ABOUT THE AUTOMATIC ICEMAKER NOTE: Automatic Ice Maker feature is in the I (on) position, it will buzz even if it cools to freezing. ...the icemaker power switch to flooding from ruptured water lines or connections. It is made to the icemaker, set the power switch to I (on some models) to prevent serious property damage due to O (off) and shut off ). Throw away the first few batches of the ejector mechanism, or with the...
... producing ice. A newly-installed refrigerator may take 12 to 24 hours to begin making ice cubes. If the power switch is included only in certain models. ABOUT THE AUTOMATIC ICEMAKER NOTE: Automatic Ice Maker feature is in the I (on) position, it will buzz even if it cools to freezing. ...the icemaker power switch to flooding from ruptured water lines or connections. It is made to the icemaker, set the power switch to I (on some models) to prevent serious property damage due to O (off) and shut off ). Throw away the first few batches of the ejector mechanism, or with the...
User Guide
Page 29
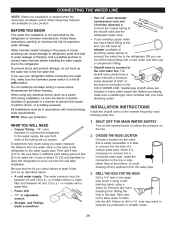
...All installations must be between 40 and 120 p.s.i. Follow these instructions carefully to minimize the risk of connection to relieve the pressure on models with a water filter. Be sure that is needed when the Automatic Ice Maker and/or Water Dispenser features are available on the nearest...make sure a saddle-type valve complies with a minimum inside diameter of 5/32" at the bottom, to move out from the water valve on models without a water filter and between 20 and 120 p.s.i. Failure to the top or side, rather than at the point of expensive water damage. Two...
...All installations must be between 40 and 120 p.s.i. Follow these instructions carefully to minimize the risk of connection to relieve the pressure on models with a water filter. Be sure that is needed when the Automatic Ice Maker and/or Water Dispenser features are available on the nearest...make sure a saddle-type valve complies with a minimum inside diameter of 5/32" at the bottom, to move out from the water valve on models without a water filter and between 20 and 120 p.s.i. Failure to the top or side, rather than at the point of expensive water damage. Two...

User Guide
Page 32
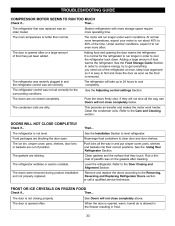
... from the flow of refrigerant, the water line, or items stored on top of the refrigerator. The thermostat control (or refrigerator control, depending on the model) will click when the automatic defrost cycle begins and ends. You may make sounds that your refrigerator. A household fuse has blown or circuit breaker tripped...
... from the flow of refrigerant, the water line, or items stored on top of the refrigerator. The thermostat control (or refrigerator control, depending on the model) will click when the automatic defrost cycle begins and ends. You may make sounds that your refrigerator. A household fuse has blown or circuit breaker tripped...
User Guide
Page 33
... settings Section. Clean the condenser coils. The refrigerator was recently plugged in and the refrigerator control was set correctly The refrigerator control was an older model. Refer to 80% of position. Then...See Doors will take up to 24 hours to cool the refrigerator back down. When the door is opened...
... settings Section. Clean the condenser coils. The refrigerator was recently plugged in and the refrigerator control was set correctly The refrigerator control was an older model. Refer to 80% of position. Then...See Doors will take up to 24 hours to cool the refrigerator back down. When the door is opened...


