
Instruction Manual
Page 3
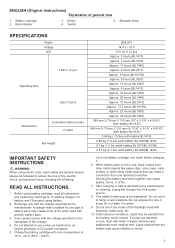
... charger. 4. Do not touch the inside of battery pack may cause irritation or burns. 3 Switch 5. Charge the battery cartridge with tweezers, metal tools, etc. 10. DML801 14.4 V / 18 V 0.51 W X 12 pcs Approx. 3 hours (BL1415) Approx. 7 hours (BL1430) Approx. 11 hours (BL1440) Approx. 4 hours (BL1815) Approx. 5 ...5. A charger that can make a connection from the battery, avoid contact. Do not attempt to another battery pack. 3. This battery holder part is suitable for one terminal to use , keep it . 6. Do not wash it to reduce the risk of general view 1. Liquid ...
... charger. 4. Do not touch the inside of battery pack may cause irritation or burns. 3 Switch 5. Charge the battery cartridge with tweezers, metal tools, etc. 10. DML801 14.4 V / 18 V 0.51 W X 12 pcs Approx. 3 hours (BL1415) Approx. 7 hours (BL1430) Approx. 11 hours (BL1440) Approx. 4 hours (BL1815) Approx. 5 ...5. A charger that can make a connection from the battery, avoid contact. Do not attempt to another battery pack. 3. This battery holder part is suitable for one terminal to use , keep it . 6. Do not wash it to reduce the risk of general view 1. Liquid ...
Instruction Manual
Page 4
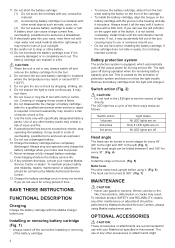
...the right and 180° to a qualified serviceman when service or repair is equipped, which automatically cuts off the tool before using Makita replacement parts. Switch action 1st press 2nd press 3rd press Light status All LED lights are on the upper side of the cartridge. • ...with specifically designated battery packs. Installing or removing battery cartridge (Fig. 1) • Always switch off the output power for use with your nearest Makita Service Center or dealer. Always insert it for every 30°. (Fig. 4) Strap Install the strap on . Install it fully until it...
...the right and 180° to a qualified serviceman when service or repair is equipped, which automatically cuts off the tool before using Makita replacement parts. Switch action 1st press 2nd press 3rd press Light status All LED lights are on the upper side of the cartridge. • ...with specifically designated battery packs. Installing or removing battery cartridge (Fig. 1) • Always switch off the output power for use with your nearest Makita Service Center or dealer. Always insert it for every 30°. (Fig. 4) Strap Install the strap on . Install it fully until it...
