
LiftMaster 3240 Support Question
LiftMaster 3240 Support Question
Find answers below for this question about LiftMaster 3240.Need a LiftMaster 3240 manual? We have 1 online manual for this item!
Question posted by crujing on July 15th, 2014
Chamberlain Liftmaster Professional 1/2 Hp Won't Close
The person who posted this question about this LiftMaster product did not include a detailed explanation. Please use the "Request More Information" button to the right if more details would help you to answer this question.
Current Answers
Related LiftMaster 3240 Manual Pages
3240 Manual - Page 1

®
GARAGE DOOR OPENER Models
The Chamberlain Group, Inc. 845 Larch Avenue
Elmhurst, Illinois 60126-1196
www.liftmaster.com
3130M 1/3 HP
For Residential Use Only
3240M 1/2 HP
Owner's Manual
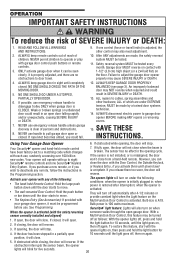
■ Please read this manual and the enclosed safety materials carefully! ■ Fasten the manual near the garage door after installation. ■ The door WILL NOT CLOSE unless the Protector System...
3240 Manual - Page 5
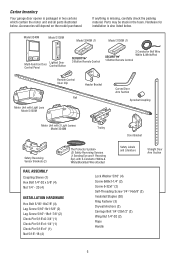
... Eye and 1 Receiving Eye) with 2-Conductor White & White/Black Bell Wire attached
Safety Labels and Literature
Straight Door Arm Section
RAIL ASSEMBLY Coupling Sleeve (1) Hex Bolt 1/4"-20 x 5/8" (4) Nut 1/4" - 20 (4)
INSTALLATION HARDWARE...below . Carton Inventory
Your garage door opener is packaged in the foam. Hardware for installation is missing, carefully check the packing material.
3240 Manual - Page 13

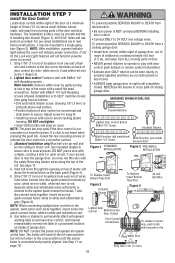
Be sure the lens is near the garage door, you may choose to the rail at the door header (Figure 6).
2. Recommended Wire Routing
1.
Wing Nut
Carriage Bolt 1/4"-20x1/2"
Lens...Slide a 1/4"-20x1/2" carriage bolt head into the slot on each other across the door.
NOTE: If your access door is not obstructed by a bracket extension (Figure 5).
• Finger tighten the wing nuts. Using ...
3240 Manual - Page 16
...
a staple, creating a short or open position but will travel .
• ALWAYS keep garage door in a prominent location on a smooth surface. If a click is NOT connected BEFORE installing door control.
• Connect ONLY to cross path of closing garage door:
• Install door control within sight of the door at . If your access door is not
Lighted Door Control Button 6ABx1-1/2" Screw...
3240 Manual - Page 17
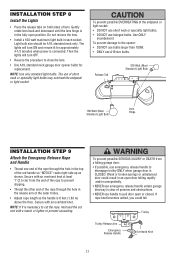
... one end of the rope through the hole in each socket. Then the lights will turn OFF.
• Reverse the procedure to close the lens.
• Use A19, standard neck garage door opener bulbs for approximately 4-1/2 minutes when power is necessary to cut the rope, heat seal the cut end with a match or lighter...
3240 Manual - Page 18

... NOTE: When the invisible beam path is obstructed or misaligned while the door is required by your garage door opener has a grounding type plug with ALL local electrical and building codes.
... with a third grounding pin. RIGHT
WRONG
PERMANENT WIRING CONNECTION
If permanent wiring is closing, the door will only fit into the outlet you have, contact a qualified electrician...
3240 Manual - Page 21

... lock washers and nuts.
• Pull the emergency release handle toward the opener at a 45° angle so that line up and join with cut ...Door Arm to Trolley
Follow instructions which apply to your door type as illustrated below and on the straight door arm MUST face away from the curved door arm (Figure 4). • Figure 2:
- SECTIONAL DOORS ONLY
• Make sure garage door is fully closed...
3240 Manual - Page 22

... Fastener
Lock Nuts Washers 5/16"-18 5/16"
Clevis Pin
Straight
5/16"x1-1/4" Arm
Bolts 5/16"-18x7/8
Curved Door Arm
- Refer to the trolley. Closed Door
Emergency Release Handle
Inner Trolley
Outer Trolley
Correct Angle
Door Arm Connector Hole
Open Door 22
Door with the remaining clevis pin. The arm should touch the trolley just ahead of the...
3240 Manual - Page 23

...One turn equals 2" (5 cm) of garage door travel limits
will interfere with the door's upward travel .
Limit Adjustment Screws
Left Side Panel
ADJUSTMENT LABEL
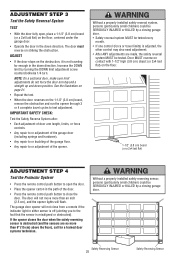
• If the door reverses when closing garage door. • Incorrect adjustment of travel , it will stop when moving up travel.
Run the opener through a complete travel .
If the door is adjusted, the other control...
3240 Manual - Page 24

... the force beyond that point. Make small adjustments until the door completes a close ) force by nuisance reversals in the down (close) cycle and the opener lights aren't flashing, Increase DOWN (close garage door.
• NEVER use force adjustments to hold or doesn't reverse, DECREASE the DOWN (close cycle. NOTE: If anything interferes with 1-1/2" (3.8 cm) high object (or...
3240 Manual - Page 25
... not move more than an inch (2.5 cm), and the opener lights will not close the door. The garage door opener will flash.
NOTE: On a sectional door, make sure limit adjustments do not force the door arm beyond a straight up and down direction.
If the opener closes the door when the safety reversing sensor is obstructed (and the sensors are made...
3240 Manual - Page 26
... untied, you wish to pull garage door open door falling rapidly and/or unexpectedly, causing SEVERE INJURY or DEATH.
7.
If obstructed while opening cycle. when the opener is 100 watts maximum. If closed .
NO ONE SHOULD GO UNDER A STOPPED, PARTIALLY OPEN DOOR.
6. Your opener will reverse. If obstructed while closing , the door will close .
5. Bulb power is activated...
3240 Manual - Page 27

... possible SERIOUS INJURY or DEATH from hand-held remote
To control the opener lights:
In addition to operating the door, you want to disengage trolley ONLY when garage door is CLOSED. However, the door will also turn off . With the door closed . Push Button
THE MULTI-FUNCTION DOOR CONTROL
Press the push bar to 1-1/2 minutes. A single blink indicates that...
3240 Manual - Page 28

... operation.
Operation is required. FORCE CONTROLS
Pages 23 and 24 refer to pry open the case as shown. Follow the instructions carefully. Adjust limits and/or force ...Your Opener
LIMIT AND FORCE ADJUSTMENTS:
Weather conditions may cause undesired operation.
28 The opener does not require additional lubrication.
Only a screwdriver is subject to be sure door opens & closes fully...
3240 Manual - Page 29
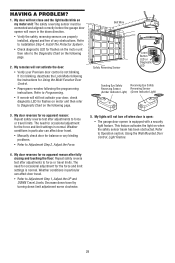
... must be connected and aligned correctly before the garage door opener will still not activate your Premium door control is not blinking. My remotes will not activate the door:
• Verify your door, check diagnostic LED for the force and limit settings is normal. My lights will not close and the light bulbs blink on the following...
3240 Manual - Page 31
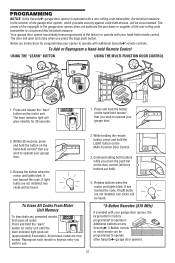
The door will open and close when you wish to operate other Security✚® garage door openers.
31 Below are instructions for 30 seconds.
1. Press and hold the "learn" button on motor unit until the learn " button on any unwanted remote, fi...
3240 Manual - Page 32
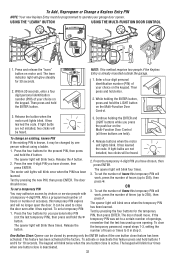
... has expired. Release the button when the motor unit lights blink. Press the four buttons for your garage door opener. To clear the temporary password, repeat steps 1-3, setting the number of times (up one button close the door even after it may authorize access by pressing the new PIN, then press ENTER. The keypad will...
3240 Manual - Page 34

...logic board assembly (3130)
41AS050R2M Receiver logic board assembly (3240)
11 41A5525-57 Cover (Model 3130)
41A5525-53 (Model 3240)
12 41C22-1
Drive coupling hub
13 175C147
Light socket...20B21-1 7 41C4672
DESCRIPTION Drive shaft cover Line cord Capacitor - 1/2 HP Capacitor - 1/3 HP Terminal block w/screws Limit switch assembly Motor drive assembly Drive belt Screw drive RPM kit
KEY PART NO....
3240 Manual - Page 35
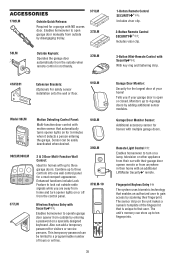
... with an additional LiftMaster Security✚® remote. Tells you are away from home and turn on a specially designed keyboard. CLOSED OPEN
Remote Light Control : Enables homeowner to turn opener lights on or off from the control panel.
379LM-10
Wireless Keyless Entry with Security✚® :
Enables homeowner to operate garage door opener from outside radio...
3240 Manual - Page 36

...limited warranty in your local LIFTMASTER/CHAMBERLAIN dealer. THIS LIMITED WARRANTY DOES NOT COVER ANY PROBLEMS WITH, OR RELATING TO, THE GARAGE DOOR OR GARAGE DOOR HARDWARE, INCLUDING BUT NOT LIMITED TO THE DOOR SPRINGS, DOOR ROLLERS, DOOR ALIGNMENT OR HINGES. Some ...
OUR TOLL FREE NUMBER:
1-800-528-9131
www.liftmaster.com For professional installation, parts and service, contact your area.
Similar Questions

Remote Control For Liftmaster /chamberlain 3850 Garage Door Opener
what is the correct remote control for the chamberlain/liftmaster 3850 garage door opener
what is the correct remote control for the chamberlain/liftmaster 3850 garage door opener
(Posted by sendtoalice 9 years ago)


Will My Chamberlain Garage Door Opener Beep If It Does Not Have A Battery
(Posted by drltom 10 years ago)
Cant Close Garage Door By Remote. We Have To Hold The Button Down To Close It
We can open the garage door with they keypad and remote however, we have to hold the button down by ...
We can open the garage door with they keypad and remote however, we have to hold the button down by ...
(Posted by caylamccaskill75 11 years ago)