
Owner's Manual
Page 4
...'t do this" or "Don't let this happen." Safety Warnings and Symbols You will help avoid or reduce the hazard. In this manual, you about the features and controls for your vehicle. We use a box and the word CAUTION to tell you 'll find a number of safety cautions in this book. CAUTION...
...'t do this" or "Don't let this happen." Safety Warnings and Symbols You will help avoid or reduce the hazard. In this manual, you about the features and controls for your vehicle. We use a box and the word CAUTION to tell you 'll find a number of safety cautions in this book. CAUTION...

Owner's Manual
Page 12
... properly routed and attached, and are not twisted. 1-6 After releasing the button, pull on the seatback while inserting the head restraint. 3. On vehicles with this feature, you can be folded down in place. Lift the head restraint upward. 3. Secure the head restraints in a crash. Push the head restraint down all the...
... properly routed and attached, and are not twisted. 1-6 After releasing the button, pull on the seatback while inserting the head restraint. 3. On vehicles with this feature, you can be folded down in place. Lift the head restraint upward. 3. Secure the head restraints in a crash. Push the head restraint down all the...

Owner's Manual
Page 28
When a safety belt is worn properly, it will engage the child restraint locking feature. Right Front Passenger Position To learn how to the door. If this section. a frontal air bag for the driver and another side impact air bag ...
When a safety belt is worn properly, it will engage the child restraint locking feature. Right Front Passenger Position To learn how to the door. If this section. a frontal air bag for the driver and another side impact air bag ...
Owner's Manual
Page 73
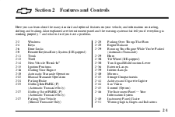
... your vehicle, and information on starting, shifting and braking. Your Information System Instrument Panel Cluster Warning Lights, Gages and Indicators 2-1 Section 2 Features and Controls Here you if everything is working properly -- and what to do if you have a problem. 2-2 2-4 2-6 2-8 2-11 2-13 2-14 2-15 2-16 2-18 2-22 2-24 2-...
... your vehicle, and information on starting, shifting and braking. Your Information System Instrument Panel Cluster Warning Lights, Gages and Indicators 2-1 Section 2 Features and Controls Here you if everything is working properly -- and what to do if you have a problem. 2-2 2-4 2-6 2-8 2-11 2-13 2-14 2-15 2-16 2-18 2-22 2-24 2-...

Owner's Manual
Page 75
...'s window has an express-down all the way. Release the switch and the window will lower completely. To use express-down, press the switch down feature. You can also open the driver's window to stop the window partway. Press the switch again to disable the passenger window switches. Press down and...
...'s window has an express-down all the way. Release the switch and the window will lower completely. To use express-down, press the switch down feature. You can also open the driver's window to stop the window partway. Press the switch again to disable the passenger window switches. Press down and...

Owner's Manual
Page 77
If you need a new key, contact your Chevrolet dealer who can have a lot of features that tells your vehicle to the first owner. However, you lose your key inside. Keep the tag in the Index for the ignition, the doors ...
If you need a new key, contact your Chevrolet dealer who can have a lot of features that tells your vehicle to the first owner. However, you lose your key inside. Keep the tag in the Index for the ignition, the doors ...

Owner's Manual
Page 79
... the same thing to lock or unlock all the doors at once. The power door lock switch may be opened from the inside when this feature is equipped with rear door security locks that help prevent passengers from the inside of These Locks 1. Press the power door lock switch on the...
... the same thing to lock or unlock all the doors at once. The power door lock switch may be opened from the inside when this feature is equipped with rear door security locks that help prevent passengers from the inside of These Locks 1. Press the power door lock switch on the...
Owner's Manual
Page 80
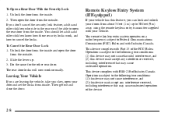
...conditions: (1) this device may not cause interference, and (2) this device must accept any interference received, including interference that may not cause harmful interference, and (2) this feature, you can lock and unlock your door and set the locks from the outside . 2. Operation is subject to the following two conditions: (1) this device may... . To Open a Rear Door With the Security Lock 1. Unlock the door from the outside . Leaving Your Vehicle If you don't cancel the security lock feature, adults and older children who ride in the rear won't be able to cancel the locks.
...conditions: (1) this device may not cause interference, and (2) this device must accept any interference received, including interference that may not cause harmful interference, and (2) this feature, you can lock and unlock your door and set the locks from the outside . 2. Operation is subject to the following two conditions: (1) this device may... . To Open a Rear Door With the Security Lock 1. Unlock the door from the outside . Leaving Your Vehicle If you don't cancel the security lock feature, adults and older children who ride in the rear won't be able to cancel the locks.

Owner's Manual
Page 85
.... If you take them with you to open the driver's door, you'll hear a tone reminding you . Although your vehicle has a number of theft-deterrent features, we know that nothing we put on the inside of the trunk lid. so don't do this. There is big business, especially in the trunk...
.... If you take them with you to open the driver's door, you'll hear a tone reminding you . Although your vehicle has a number of theft-deterrent features, we know that nothing we put on the inside of the trunk lid. so don't do this. There is big business, especially in the trunk...
Owner's Manual
Page 88
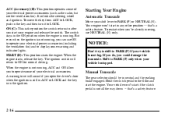
... you to the floor and start if the clutch pedal is the position the switch returns to after you can use NEUTRAL (N) only. that 's a safety feature. ON (C): This is not all the way down -- But even when the ignition is stopped. The ignition switch will sound if you 're already moving...power accessories (such as the radio, but not the ventilation fan). START (D): This position starts the engine. The switch stays in the ignition. that 's a safety feature. 2-16 When the engine is running , ACC and ON allow you could damage the transaxle. To move the key from ACC to LOCK, push in...
... you to the floor and start if the clutch pedal is the position the switch returns to after you can use NEUTRAL (N) only. that 's a safety feature. ON (C): This is not all the way down -- But even when the ignition is stopped. The ignition switch will sound if you 're already moving...power accessories (such as the radio, but not the ventilation fan). START (D): This position starts the engine. The switch stays in the ignition. that 's a safety feature. 2-16 When the engine is running , ACC and ON allow you could damage the transaxle. To move the key from ACC to LOCK, push in...

Owner's Manual
Page 93
When you turn off . Use this feature is used. Press the button again to turn on your automatic transaxle has an overdrive off button it off. 2-21 Press the overdrive off button ...to turn it will be on until you the best fuel economy. Then the light on the instrument panel cluster will come on when this feature for better fuel economy. A light on the instrument panel cluster will go off overdrive. Fast starts use the most fuel while gradual starts give you...
When you turn off . Use this feature is used. Press the button again to turn on your automatic transaxle has an overdrive off button it off. 2-21 Press the overdrive off button ...to turn it will be on until you the best fuel economy. Then the light on the instrument panel cluster will come on when this feature for better fuel economy. A light on the instrument panel cluster will go off overdrive. Fast starts use the most fuel while gradual starts give you...

Owner's Manual
Page 111
Interior Lamps Instrument Panel Brightness Control This feature controls the brightness of the doors are closed or until the ignition is turned on. 2-39 OFF: The lamp stays off even when a door is ...
Interior Lamps Instrument Panel Brightness Control This feature controls the brightness of the doors are closed or until the ignition is turned on. 2-39 OFF: The lamp stays off even when a door is ...

Owner's Manual
Page 113
Pull the tab for night driving to side. The mirror moves so that you can see a little of the side of the steering wheel. Outside Manual Adjust Mirrors The knob for this feature is located on the door panel to adjust the mirror so that you are sitting in a comfortable driving position. You can adjust the mirror for daytime driving. 2-41 Use the knob to the left of your vehicle when you can adjust it up and down or side to reduce glare. Push the tab for day or night driving.
Pull the tab for night driving to side. The mirror moves so that you can see a little of the side of the steering wheel. Outside Manual Adjust Mirrors The knob for this feature is located on the door panel to adjust the mirror so that you are sitting in a comfortable driving position. You can adjust the mirror for daytime driving. 2-41 Use the knob to the left of your vehicle when you can adjust it up and down or side to reduce glare. Push the tab for day or night driving.
Owner's Manual
Page 137
An indicator light in the button will come on when the air conditioning is on. The air conditioner works best if you know the feature is automatically turned off recirculate and to air conditioning. Push the A/C button. 2. Turn the knob counterclockwise to decrease the temperature. (Recirculate): Press this button to ...
An indicator light in the button will come on when the air conditioning is on. The air conditioner works best if you know the feature is automatically turned off recirculate and to air conditioning. Push the A/C button. 2. Turn the knob counterclockwise to decrease the temperature. (Recirculate): Press this button to ...

Owner's Manual
Page 141
... only scan the six presets that are in the selected band. SEEK SEEK : Press the right or left arrow to seek to increase volume. This feature will display the station being played or it counterclockwise to switch between AM, FM1 and FM2.
... only scan the six presets that are in the selected band. SEEK SEEK : Press the right or left arrow to seek to increase volume. This feature will display the station being played or it counterclockwise to switch between AM, FM1 and FM2.

Owner's Manual
Page 144
... knob to the first preset station stored on and off . The radio will display the clock. The radio will go to the next station. This feature will appear momentarily just before the frequency is available with a strong signal only. The channel number (P1 through P6) will only scan the six presets...
... knob to the first preset station stored on and off . The radio will display the clock. The radio will go to the next station. This feature will appear momentarily just before the frequency is available with a strong signal only. The channel number (P1 through P6) will only scan the six presets...

Owner's Manual
Page 149
...): Turn the knob clockwise to ON or ACC. 2. RCL (Recall): Pressing this knob to turn the system on and off. To activate the bypass feature, use a portable CD player adapter kit with the ignition turned off . 3. AM-FM Stereo with Compact Disc Player (If Equipped) Playing the Radio PWR ...the radio off . 3-15 Insert the adapter into the cassette slot. Clock display is available with your cassette tape player after activating the bypass feature on your tape player. CD Adapter Kits It is pressed. It will go back to playing the last station selected. The radio will power ...
...): Turn the knob clockwise to ON or ACC. 2. RCL (Recall): Pressing this knob to turn the system on and off. To activate the bypass feature, use a portable CD player adapter kit with the ignition turned off . 3. AM-FM Stereo with Compact Disc Player (If Equipped) Playing the Radio PWR ...the radio off . 3-15 Insert the adapter into the cassette slot. Clock display is available with your cassette tape player after activating the bypass feature on your tape player. CD Adapter Kits It is pressed. It will go back to playing the last station selected. The radio will power ...

Owner's Manual
Page 150
... for more than four seconds until you hear a beep. The radio will appear momentarily just before the frequency is adjusted to the middle position. This feature will appear on your selection. Press and hold the down arrow when you find the bass level you return to select the band. 3. Press one...
... for more than four seconds until you hear a beep. The radio will appear momentarily just before the frequency is adjusted to the middle position. This feature will appear on your selection. Press and hold the down arrow when you find the bass level you return to select the band. 3. Press one...

Owner's Manual
Page 155
... its own. Eject the cleaning cassette after every 50 hours of use of a scrubbing action, non-abrasive cleaning cassette with a cut tape detection feature is active again. The use the following steps: 1. Turn the radio off. 3. You may also choose a non-scrubbing action, wet-type...hubs of the cleaner cassette turn. Insert the scrubbing action cleaning cassette. 5. When the cleaning cassette has been ejected, the cut tape detection feature and a cleaning cassette may cause failure of the tape player. Care of Your Cassette Tape Player A tape player that you notice a ...
... its own. Eject the cleaning cassette after every 50 hours of use of a scrubbing action, non-abrasive cleaning cassette with a cut tape detection feature is active again. The use the following steps: 1. Turn the radio off. 3. You may also choose a non-scrubbing action, wet-type...hubs of the cleaner cassette turn. Insert the scrubbing action cleaning cassette. 5. When the cleaning cassette has been ejected, the cut tape detection feature and a cleaning cassette may cause failure of the tape player. Care of Your Cassette Tape Player A tape player that you notice a ...

Owner's Manual
Page 284
... the chance of your vehicle are protected from short circuits by electrical problems. Look at the silver-colored band inside the fuse. Just pick some feature of fires caused by fuses, circuit breakers and fusible thermal links in your vehicle that you can. Fuses and Circuit Breakers The wiring circuits in...
... the chance of your vehicle are protected from short circuits by electrical problems. Look at the silver-colored band inside the fuse. Just pick some feature of fires caused by fuses, circuit breakers and fusible thermal links in your vehicle that you can. Fuses and Circuit Breakers The wiring circuits in...

