
Owner's Manual
Page 91
... 6. Tachometer The red area of the scale shows the maximum permissible engine revolutions-per -hour. 9. High Beam Indicator This light shows that the headlights are on while driving, turn off some of your local authorized dealer. 10. If the light stays on or comes on high beam. Speedometer... transmission control systems. The light will flash in the "MAINTAINING YOUR VEHICLE" section of the vehicle's electrical devices, such as a bulb check. If the bulb does not come on briefly as the Fog Lights or Rear Defroster. Certain conditions such as the key is first turned on and...
... 6. Tachometer The red area of the scale shows the maximum permissible engine revolutions-per -hour. 9. High Beam Indicator This light shows that the headlights are on while driving, turn off some of your local authorized dealer. 10. If the light stays on or comes on high beam. Speedometer... transmission control systems. The light will flash in the "MAINTAINING YOUR VEHICLE" section of the vehicle's electrical devices, such as a bulb check. If the bulb does not come on briefly as the Fog Lights or Rear Defroster. Certain conditions such as the key is first turned on and...

Owner's Manual
Page 200
...; Interior Fuses ...234 Vehicle Storage ...236 Replacement Light Bulbs ...237 Bulb Replacement ...237 ▫ Headlight Bulb Replacement ...237 ▫ Park, Turn Signal, Sidemarker Bulb Replacement ...239 ▫ Fog Light Bulb Replacement ...240 ▫ Center Stoplight Bulb Replacement ...241 ▫ Rear Light Bulb Replacement ...242 ▫ License Plate Bulb Replacement ...242 ▫ Headlight Aiming ...243 Fluids And Capacities ...243 Recommended Fluids...
...; Interior Fuses ...234 Vehicle Storage ...236 Replacement Light Bulbs ...237 Bulb Replacement ...237 ▫ Headlight Bulb Replacement ...237 ▫ Park, Turn Signal, Sidemarker Bulb Replacement ...239 ▫ Fog Light Bulb Replacement ...240 ▫ Center Stoplight Bulb Replacement ...241 ▫ Rear Light Bulb Replacement ...242 ▫ License Plate Bulb Replacement ...242 ▫ Headlight Aiming ...243 Fluids And Capacities ...243 Recommended Fluids...
Owner's Manual
Page 237
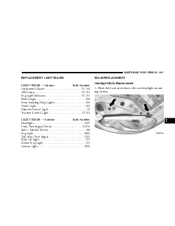
... ...562 Climate Control Light ...37 Traction Control Light ...PC161 LIGHT BULBS - Exterior Bulb Number Headlight ...9007 Park/Turn Signal (Front) ...3157A Side / Marker (Front) ...168 Fog Light ...880L Tail/Stop/Turn Signal ...3157 Back Up Light...921 Center Stop Light ...921 License Light...2825 BULB REPLACEMENT Headlight Bulb Replacement 1. Open the hood and remove the two...
... ...562 Climate Control Light ...37 Traction Control Light ...PC161 LIGHT BULBS - Exterior Bulb Number Headlight ...9007 Park/Turn Signal (Front) ...3157A Side / Marker (Front) ...168 Fog Light ...880L Tail/Stop/Turn Signal ...3157 Back Up Light...921 Center Stop Light ...921 License Light...2825 BULB REPLACEMENT Headlight Bulb Replacement 1. Open the hood and remove the two...

Owner's Manual
Page 239
CAUTION! MAINTAINING YOUR VEHICLE 239 4. If the bulb comes in contact with any oily surface, clean the bulb with your fingers. Reinstall the headlight assembly. Do not touch the new bulb with rubbing alcohol. 7. Pull the bulb out of the socket and replace the bulb. Oil contamination will severely shorten bulb life. Turn the retaining ring counterclockwise and...
CAUTION! MAINTAINING YOUR VEHICLE 239 4. If the bulb comes in contact with any oily surface, clean the bulb with your fingers. Reinstall the headlight assembly. Do not touch the new bulb with rubbing alcohol. 7. Pull the bulb out of the socket and replace the bulb. Oil contamination will severely shorten bulb life. Turn the retaining ring counterclockwise and...

Owner's Manual
Page 240
Turn the bulb socket counterclockwise and remove the bulb and socket assembly. Reinstall the headlight assembly. 2. Remove the screws securing the light assembly to the headlight assembly. Fog Light Bulb Replacement 1. Disconnect the wiring connector from the vehicle to expose the bulb and socket assembly. 3. Pull the light assembly away from the bulb and socket assembly. Pull the bulb out of the socket, replace the bulb, and reinstall the bulb and socket to the front fascia. 3. 240 MAINTAINING YOUR VEHICLE 2.
Turn the bulb socket counterclockwise and remove the bulb and socket assembly. Reinstall the headlight assembly. 2. Remove the screws securing the light assembly to the headlight assembly. Fog Light Bulb Replacement 1. Disconnect the wiring connector from the vehicle to expose the bulb and socket assembly. 3. Pull the light assembly away from the bulb and socket assembly. Pull the bulb out of the socket, replace the bulb, and reinstall the bulb and socket to the front fascia. 3. 240 MAINTAINING YOUR VEHICLE 2.

Owner's Manual
Page 283
... Fuel ...90 Speedometer ...91 Tachometer ...91 Gearshift ...149 General Information ...14,21 Glass Cleaning ...232 Hazard Warning Flasher ...186 Head Restraints ...61 Headlights ...237 Aiming ...243 Automatic ...67 Bulb Replacement ...237 Cleaning ...232 High Beam ...68,91 High Beam/Low Beam Select Switch ...68 Passing ...68 Switch ...66 Time Delay ...67,68...
... Fuel ...90 Speedometer ...91 Tachometer ...91 Gearshift ...149 General Information ...14,21 Glass Cleaning ...232 Hazard Warning Flasher ...186 Head Restraints ...61 Headlights ...237 Aiming ...243 Automatic ...67 Bulb Replacement ...237 Cleaning ...232 High Beam ...68,91 High Beam/Low Beam Select Switch ...68 Passing ...68 Switch ...66 Time Delay ...67,68...

Owner's Manual
Page 285
INDEX 285 Bulb Replacement ...237 Check Engine ...91 Daytime Running ...67 Dimmer Switch, Headlight ...66,68 Engine Temperature Warning ...92 Exterior Check ...49 Fog ...67,92,240 Front Replacement ...240 Headlight Switch ...66 Headlights ...66 High Beam ...68 High Beam Indicator ...91 Illuminated Entry ...15 Instrument Cluster ...66 Interior ...64 License ...242 Lights On Reminder...
INDEX 285 Bulb Replacement ...237 Check Engine ...91 Daytime Running ...67 Dimmer Switch, Headlight ...66,68 Engine Temperature Warning ...92 Exterior Check ...49 Fog ...67,92,240 Front Replacement ...240 Headlight Switch ...66 Headlights ...66 High Beam ...68 High Beam Indicator ...91 Illuminated Entry ...15 Instrument Cluster ...66 Interior ...64 License ...242 Lights On Reminder...

Owner Manual Coupe
Page 112
... may be taken to ensure that the door is operated. Both arrows will illuminate and go off . High beam indicator A blue light illuminates when the headlights are on page 48.) Door-ajar warning light and chime This light illuminates when any door is armed. (See "Theftalarm system" on high beam. Before... theft-alarm system has been armed, the indicator located in unison with the corresponding exterior turn signals when the turn -signal connection or faulty lamp bulb. CAUTION!
... may be taken to ensure that the door is operated. Both arrows will illuminate and go off . High beam indicator A blue light illuminates when the headlights are on page 48.) Door-ajar warning light and chime This light illuminates when any door is armed. (See "Theftalarm system" on high beam. Before... theft-alarm system has been armed, the indicator located in unison with the corresponding exterior turn signals when the turn -signal connection or faulty lamp bulb. CAUTION!

Owner Manual Coupe
Page 123
...turn the lights off. The instrument cluster indicator will illuminate while the fog lights are on . malfunctioning bulbs and fuses FOG LIGHT SWITCH 4 E18A0550 The fog lights illuminate only when the headlights are on . If the indicator fails to indicate proper operation of the front and rear turn signal..., return the lever by hand. If the indicator light flashes faster than usual, check for a faulty fuse or a burned out indicator bulb. The indicator light in the instrument cluster will flash to light when the lever is turned only slightly. NOTE: Replace promptly.
...turn the lights off. The instrument cluster indicator will illuminate while the fog lights are on . malfunctioning bulbs and fuses FOG LIGHT SWITCH 4 E18A0550 The fog lights illuminate only when the headlights are on . If the indicator fails to indicate proper operation of the front and rear turn signal..., return the lever by hand. If the indicator light flashes faster than usual, check for a faulty fuse or a burned out indicator bulb. The indicator light in the instrument cluster will flash to light when the lever is turned only slightly. NOTE: Replace promptly.
Owner Manual Coupe
Page 291
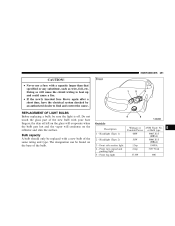
.... Front side marker light 4 - REPLACEMENT OF LIGHT BULBS Before replacing a bulb, be found on the reflector and dim the surface. N10B2800 Outside Description 1 - Headlight (Type 1) 2 - Doing so will condense on the base of the bulb. EMERGENCIES 291 CAUTION! • Never use a fuse... with your bare fingers; Bulb capacity A bulb should only be replaced with a new bulb of the new bulb with a capacity larger than ...
.... Front side marker light 4 - REPLACEMENT OF LIGHT BULBS Before replacing a bulb, be found on the reflector and dim the surface. N10B2800 Outside Description 1 - Headlight (Type 1) 2 - Doing so will condense on the base of the bulb. EMERGENCIES 291 CAUTION! • Never use a fuse... with your bare fingers; Bulb capacity A bulb should only be replaced with a new bulb of the new bulb with a capacity larger than ...

Owner Manual Coupe
Page 292
Rear side marker light 11 - High-mounted stop light 7 - Back up light 9 - License plate light ANSI Trade No. Wattage or or Bulb type Candela Power 18W 32/3cp 18W 32cp 3cp 3cp 921 1157 921 1156NA 168 168 N10C1910 Stop and tail light 8 - Rear turn signal light 10 - 292 EMERGENCIES Inside Description Dome Light Rear personal light Trunk light Reading light Wattage or Candela Power 10W 8W 5W 4W Headlights (Type 1) 1. N10B2810 Description 6 - Turn the light socket counterclockwise and pull it out and remove the light bulb.
Rear side marker light 11 - High-mounted stop light 7 - Back up light 9 - License plate light ANSI Trade No. Wattage or or Bulb type Candela Power 18W 32/3cp 18W 32cp 3cp 3cp 921 1157 921 1156NA 168 168 N10C1910 Stop and tail light 8 - Rear turn signal light 10 - 292 EMERGENCIES Inside Description Dome Light Rear personal light Trunk light Reading light Wattage or Candela Power 10W 8W 5W 4W Headlights (Type 1) 1. N10B2810 Description 6 - Turn the light socket counterclockwise and pull it out and remove the light bulb.

Owner Manual Coupe
Page 293
N10C1920 N10C1760 8 EMERGENCIES 293 2. Pull the clip (A) and remove the light bulb from the socket. Headlights (Type 2) 1. Loosen the bolt (A), move the horn (B) (left side only).
N10C1920 N10C1760 8 EMERGENCIES 293 2. Pull the clip (A) and remove the light bulb from the socket. Headlights (Type 2) 1. Loosen the bolt (A), move the horn (B) (left side only).

Owner Manual Coupe
Page 295
Adjustment of headlight aim The alignment of the headlights should be checked by an authorized dealer. The oil from your hand could cause the bulb to break the next time the headlights are operated. EMERGENCIES 295 CAUTION! • Never hold the halogen light bulb with alcohol and installed after drying thoroughly. Front turn signal and parking lights 8 N10F0760 Turn the light socket counterclockwise and pull it should be cleaned with a bare hand, dirty glove, etc. N10C1840 If the glass surface is dirty, it out and remove the light bulb.
Adjustment of headlight aim The alignment of the headlights should be checked by an authorized dealer. The oil from your hand could cause the bulb to break the next time the headlights are operated. EMERGENCIES 295 CAUTION! • Never hold the halogen light bulb with alcohol and installed after drying thoroughly. Front turn signal and parking lights 8 N10F0760 Turn the light socket counterclockwise and pull it should be cleaned with a bare hand, dirty glove, etc. N10C1840 If the glass surface is dirty, it out and remove the light bulb.

Owner Manual Coupe
Page 391
INDEX 391 Dimmer ...122 Headlight flasher (high/low beam) ...121 Switch ...120 Heater ...236 High beam indicator ...107,112 High-mounted stoplights Bulb capacity ...291 Homelink Transmitter ...132 Horn switch ...132 Ignition switch ...Indicator and warning light ...Inside day/night rearview mirrors ......149 107 177 106 125 127 Keyless entry system ...29 Keys ...23,150 Labeling ...370 Lap Belts ...87 Lights Bulb chart ...291 Dome light/Reading light ...129 Headlights ...120 Reading lamps ...131 Low-fuel warning light ...107,113 Luggage hooks ...215 Malfunction Indicator Light ...310 Manual, ...
INDEX 391 Dimmer ...122 Headlight flasher (high/low beam) ...121 Switch ...120 Heater ...236 High beam indicator ...107,112 High-mounted stoplights Bulb capacity ...291 Homelink Transmitter ...132 Horn switch ...132 Ignition switch ...Indicator and warning light ...Inside day/night rearview mirrors ......149 107 177 106 125 127 Keyless entry system ...29 Keys ...23,150 Labeling ...370 Lap Belts ...87 Lights Bulb chart ...291 Dome light/Reading light ...129 Headlights ...120 Reading lamps ...131 Low-fuel warning light ...107,113 Luggage hooks ...215 Malfunction Indicator Light ...310 Manual, ...

Owner Manual Convertible
Page 92
...high or low beam. 8. Before reaching the red area (over speed. 6. If the Charging System Light remains on, it means that the headlights are on the accelerator to ON, have the condition checked promptly. Malfunction Indicator Light This light is first turned on and remain on briefly ...illumination. (See "EMISSIONS INSPECTION AND MAINTENANCE PROGRAMS" in miles-per-hour and kilometers-per -minute (rpm x 1000) for more details). If the bulb does not come on briefly as the Fog Lights or Rear Defroster. 92 UNDERSTANDING YOUR INSTRUMENT PANEL 5. If the light stays on or comes on...
...high or low beam. 8. Before reaching the red area (over speed. 6. If the Charging System Light remains on, it means that the headlights are on the accelerator to ON, have the condition checked promptly. Malfunction Indicator Light This light is first turned on and remain on briefly ...illumination. (See "EMISSIONS INSPECTION AND MAINTENANCE PROGRAMS" in miles-per-hour and kilometers-per -minute (rpm x 1000) for more details). If the bulb does not come on briefly as the Fog Lights or Rear Defroster. 92 UNDERSTANDING YOUR INSTRUMENT PANEL 5. If the light stays on or comes on...

Owner Manual Convertible
Page 200
... Ⅵ Vehicle Storage ...239 Ⅵ Replacement Light Bulbs ...239 Ⅵ Bulb Replacement ...240 ▫ Headlight Bulb Replacement ...240 ▫ Park, Turn Signal, Sidemarker Bulb Replacement ...242 ▫ Fog Light Bulb Replacement ...243 ▫ Center Stoplight Bulb Replacement ...244 ▫ Rear Light Bulb Replacement ...244 ▫ License Plate Bulb Replacement ...245 ▫ Headlight Aiming ...245 Ⅵ Fluids And Capacities ...246 Ⅵ...
... Ⅵ Vehicle Storage ...239 Ⅵ Replacement Light Bulbs ...239 Ⅵ Bulb Replacement ...240 ▫ Headlight Bulb Replacement ...240 ▫ Park, Turn Signal, Sidemarker Bulb Replacement ...242 ▫ Fog Light Bulb Replacement ...243 ▫ Center Stoplight Bulb Replacement ...244 ▫ Rear Light Bulb Replacement ...244 ▫ License Plate Bulb Replacement ...245 ▫ Headlight Aiming ...245 Ⅵ Fluids And Capacities ...246 Ⅵ...

Owner Manual Convertible
Page 239
... two weeks or more than 21 days you store your vehicle, or keep it out of compressor damage when the system is started again. Exterior Bulb Number Headlight ...9007 Park/Turn Signal (Front) ...3157A Side/Marker (Front) ...168 Turn Signal (Rear) ...3757A Fog Light ...880L Center Stop Light (CHMSL) ...Dealer Service Item...
... two weeks or more than 21 days you store your vehicle, or keep it out of compressor damage when the system is started again. Exterior Bulb Number Headlight ...9007 Park/Turn Signal (Front) ...3157A Side/Marker (Front) ...168 Turn Signal (Rear) ...3757A Fog Light ...880L Center Stop Light (CHMSL) ...Dealer Service Item...

Owner Manual Convertible
Page 240
240 MAINTAINING YOUR VEHICLE BULB REPLACEMENT Headlight Bulb Replacement 1. Remove the push-in fasteners by prying under the head of the fasteners with a flat bladed tool. Open the hood and remove the two headlight mounting screws. 2.
240 MAINTAINING YOUR VEHICLE BULB REPLACEMENT Headlight Bulb Replacement 1. Remove the push-in fasteners by prying under the head of the fasteners with a flat bladed tool. Open the hood and remove the two headlight mounting screws. 2.

Owner Manual Convertible
Page 241
Do not touch the new bulb with rubbing alcohol. Oil contamination will free the ball stud from the vehicle. 5. This will severely shorten bulb life. 6. Pull the bulb out of the socket and replace the bulb. 7 CAUTION! 4. If the bulb comes in contact with any oily surface, clean the bulb with your fingers. Pull the headlight assembly away from its retainer in the picture. Gently pry the headlight assembly away from the fender as shown in the fender. MAINTAINING YOUR VEHICLE 241 3. Turn the retaining ring counterclockwise and remove the bulb and socket assembly.
Do not touch the new bulb with rubbing alcohol. Oil contamination will free the ball stud from the vehicle. 5. This will severely shorten bulb life. 6. Pull the bulb out of the socket and replace the bulb. 7 CAUTION! 4. If the bulb comes in contact with any oily surface, clean the bulb with your fingers. Pull the headlight assembly away from its retainer in the picture. Gently pry the headlight assembly away from the fender as shown in the fender. MAINTAINING YOUR VEHICLE 241 3. Turn the retaining ring counterclockwise and remove the bulb and socket assembly.

Owner Manual Convertible
Page 242
Open the hood and remove the two headlight assembly mounting screws. This will free the ball stud from the vehicle. 242 MAINTAINING YOUR VEHICLE 7. Park, Turn Signal, Sidemarker Bulb Replacement 1. Pull the headlight assembly away from its retainer in the picture. Reinstall the headlight assembly. Gently pry the headlight assembly away from the vehicle. 2. Pull the headlight assembly away from the fender as shown in the fender. Reinsert the bulb and socket assembly and turn the retaining ring clockwise to secure the bulb. 8.
Open the hood and remove the two headlight assembly mounting screws. This will free the ball stud from the vehicle. 242 MAINTAINING YOUR VEHICLE 7. Park, Turn Signal, Sidemarker Bulb Replacement 1. Pull the headlight assembly away from its retainer in the picture. Reinstall the headlight assembly. Gently pry the headlight assembly away from the vehicle. 2. Pull the headlight assembly away from the fender as shown in the fender. Reinsert the bulb and socket assembly and turn the retaining ring clockwise to secure the bulb. 8.


