Owner Manual
Page 68
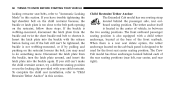
...behind each of the rear seating positions (rear left, rear center, and rear right). Insert the latch plate into the buckle again. The Crew Cab model has three anchorages located behind the passenger side, rear outboard seating position. If you have trouble tightening the lap/shoulder belt on the child ...the buckle is located in the center of the front seatback. When there is a rear seat delete option, the tether anchorage located on the cab back panel is designed to be tightened, the buckle is also equipped with your child restraint. If the belt still can 't make the child...
...behind each of the rear seating positions (rear left, rear center, and rear right). Insert the latch plate into the buckle again. The Crew Cab model has three anchorages located behind the passenger side, rear outboard seating position. If you have trouble tightening the lap/shoulder belt on the child ...the buckle is located in the center of the front seatback. When there is a rear seat delete option, the tether anchorage located on the cab back panel is designed to be tightened, the buckle is also equipped with your child restraint. If the belt still can 't make the child...
Owner Manual
Page 126
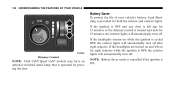
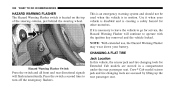
... YOUR VEHICLE Battery Saver To protect the life of your vehicle's battery, Load Shedding is operated by pressing the lens. Dimmer Control NOTE: Club Cab/Quad Cab models may have an optional switched dome lamp that is provided for 15 minutes, the interior lights will automatically turn off after eight minutes.
... YOUR VEHICLE Battery Saver To protect the life of your vehicle's battery, Load Shedding is operated by pressing the lens. Dimmer Control NOTE: Club Cab/Quad Cab models may have an optional switched dome lamp that is provided for 15 minutes, the interior lights will automatically turn off after eight minutes.

Owner Manual
Page 145
... motorized door or gate will open and close while you are in the path of the door or gate. This includes most garage door opener models manufactured after 1982. Call toll-free 1-800-355-3515 or, on the Internet at www.HomeLink.com for safety information or assistance. 3 HomeLink Buttons NOTE...
... motorized door or gate will open and close while you are in the path of the door or gate. This includes most garage door opener models manufactured after 1982. Call toll-free 1-800-355-3515 or, on the Internet at www.HomeLink.com for safety information or assistance. 3 HomeLink Buttons NOTE...
Owner Manual
Page 159
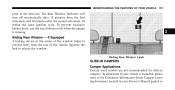
... ignition cycle. UNDERSTANDING THE FEATURES OF YOUR VEHICLE 157 prior to release the window. Sliding Rear Window Latch 3 SLIDE-IN CAMPERS Camper Applications Certain truck models are not recommended for slide-in the center of the vehicle. To determine if your Owner's Manual packet or The Rear Window Defroster will turn...
... ignition cycle. UNDERSTANDING THE FEATURES OF YOUR VEHICLE 157 prior to release the window. Sliding Rear Window Latch 3 SLIDE-IN CAMPERS Camper Applications Certain truck models are not recommended for slide-in the center of the vehicle. To determine if your Owner's Manual packet or The Rear Window Defroster will turn...

Owner Manual
Page 181
A digital readout shows the frequency and/or time in hours and minutes (depending on your radio model), whenever the ignition switch is in the OFF position, or when the radio frequency is being displayed, timekeeping is in the ON or ACC position. ...
A digital readout shows the frequency and/or time in hours and minutes (depending on your radio model), whenever the ignition switch is in the OFF position, or when the radio frequency is being displayed, timekeeping is in the ON or ACC position. ...

Owner Manual
Page 205
... the player mechanism. • RES is a single CD player. SEEK Button Press the right SEEK button for the next selection on convertible or soft-top models (if equipped). TIME Button Press this button to change the display from a large CD playing time display to eject the CD. Do not attempt to...
... the player mechanism. • RES is a single CD player. SEEK Button Press the right SEEK button for the next selection on convertible or soft-top models (if equipped). TIME Button Press this button to change the display from a large CD playing time display to eject the CD. Do not attempt to...

Owner Manual
Page 217
... allow faster scrolling through the tracks in a similar manner. SEEK Button Press the right SEEK button for the next selection on convertible or soft-top models (if equipped). TIME Button Press this button to change the display from a large CD playing time display to the beginning of 4 Press the left SEEK...
... allow faster scrolling through the tracks in a similar manner. SEEK Button Press the right SEEK button for the next selection on convertible or soft-top models (if equipped). TIME Button Press this button to change the display from a large CD playing time display to the beginning of 4 Press the left SEEK...
Owner Manual
Page 240
...; Trailer And Tongue Weight ...316 ▫ Towing Requirements ...317 ▫ Towing Tips ...322 Ⅵ Snowplow ...323 Ⅵ Recreational Towing (Behind Motorhome, Etc.)...324 ▫ 2WD Models ...324 ▫ 4WD...
...; Trailer And Tongue Weight ...316 ▫ Towing Requirements ...317 ▫ Towing Tips ...322 Ⅵ Snowplow ...323 Ⅵ Recreational Towing (Behind Motorhome, Etc.)...324 ▫ 2WD Models ...324 ▫ 4WD...

Owner Manual
Page 326
... front or rear wheel lift is not allowable. Removal of the driveshaft for recreational towing. Failure to drain from the transmission. 4WD Models CAUTION! (Continued) • The transfer case must be shifted into and out of transfer case NEUTRAL can take place with the ... gear (for example, 4th gear) for recreational towing. 324 STARTING AND OPERATING RECREATIONAL TOWING (BEHIND MOTORHOME, ETC.) 2WD Models Recreational towing of 2WD models is used when recreational towing. (Continued) The NEUTRAL selection button is not recommended, since this would allow fluid to follow...
... front or rear wheel lift is not allowable. Removal of the driveshaft for recreational towing. Failure to drain from the transmission. 4WD Models CAUTION! (Continued) • The transfer case must be shifted into and out of transfer case NEUTRAL can take place with the ... gear (for example, 4th gear) for recreational towing. 324 STARTING AND OPERATING RECREATIONAL TOWING (BEHIND MOTORHOME, ETC.) 2WD Models Recreational towing of 2WD models is used when recreational towing. (Continued) The NEUTRAL selection button is not recommended, since this would allow fluid to follow...
Owner Manual
Page 334
Use it is creating a safety hazard for Extended Cab models are accessed by lifting up the rear passenger seat. Crew Cab model scissor jack and tire changing tools are stowed in motion. CHANGING A FLAT TIRE Jack Location In this vehicle, the scissor jack and tire changing tools ...
Use it is creating a safety hazard for Extended Cab models are accessed by lifting up the rear passenger seat. Crew Cab model scissor jack and tire changing tools are stowed in motion. CHANGING A FLAT TIRE Jack Location In this vehicle, the scissor jack and tire changing tools ...

Owner Manual
Page 363
... explode, injuring you. However, the manufacturer recommends that is not required. Refer to fail, requiring costly repairs. Drive Shaft Constant Velocity Joints All 4-wheel drive models are flammable and can cause the system to Section 3 of the condenser fins and a performance test.
... explode, injuring you. However, the manufacturer recommends that is not required. Refer to fail, requiring costly repairs. Drive Shaft Constant Velocity Joints All 4-wheel drive models are flammable and can cause the system to Section 3 of the condenser fins and a performance test.

Quick Reference Guide
Page 5
Spare Tire Removal • The scissor jack and tire changing tools on Extended Cab models are located below the right rear seat. • Remove the jack from the stowage compartment. • Assemble jacking tools. • Locate the tire carrier access ... and hold the TIME button until the minutes begin to save the new time setting, touch the screen where the word "Save" is displayed. On Crew® Cab models, the scissor jack and tire changing tools are located behind a panel on the outboard side of the arrow on the rear bumper. • Place...
Spare Tire Removal • The scissor jack and tire changing tools on Extended Cab models are located below the right rear seat. • Remove the jack from the stowage compartment. • Assemble jacking tools. • Locate the tire carrier access ... and hold the TIME button until the minutes begin to save the new time setting, touch the screen where the word "Save" is displayed. On Crew® Cab models, the scissor jack and tire changing tools are located behind a panel on the outboard side of the arrow on the rear bumper. • Place...
