

Owner Manual
Page 401
White 3. Video In - Yellow 2. jacks: NOTE: Certain high-end video games, such as Playstation3 and XBox360 will exceed the power limit of the center console. Refer to follow the standard ... Connect the video game console to the Auxiliary RCA sure to the Power Inverter section in your vehicle's Owner's Manual for the VES™ input jacks located on Channel 1. 4 1. Right Audio In - Red Left Audio In - Ensure the Remote Control and Headphone switch is on the back of the vehicle's Power Inverter...
White 3. Video In - Yellow 2. jacks: NOTE: Certain high-end video games, such as Playstation3 and XBox360 will exceed the power limit of the center console. Refer to follow the standard ... Connect the video game console to the Auxiliary RCA sure to the Power Inverter section in your vehicle's Owner's Manual for the VES™ input jacks located on Channel 1. 4 1. Right Audio In - Red Left Audio In - Ensure the Remote Control and Headphone switch is on the back of the vehicle's Power Inverter...

Owner Manual
Page 589
... Warning Flashers ...589 Ⅵ Jump-Starting ...607 Ⅵ If Your Engine Overheats ...590 Ⅵ Jacking And Tire Changing ...592 ▫ Jack Location ...593 ▫ Spare Tire Stowage ...594 ▫ Spare Tire Removal ...595 ▫ Preparations For Jacking ...598 ▫ Jacking Instructions ...598 ▫ Road Tire Installation ...606 ▫ Preparations For Jump-Start ...608 ▫ Jump...
... Warning Flashers ...589 Ⅵ Jump-Starting ...607 Ⅵ If Your Engine Overheats ...590 Ⅵ Jacking And Tire Changing ...592 ▫ Jack Location ...593 ▫ Spare Tire Stowage ...594 ▫ Spare Tire Removal ...595 ▫ Preparations For Jacking ...598 ▫ Jacking Instructions ...598 ▫ Road Tire Installation ...606 ▫ Preparations For Jump-Start ...608 ▫ Jump...

Owner Manual
Page 595
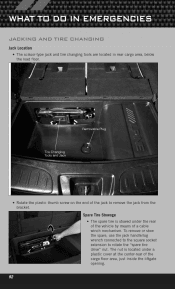
in rear cargo area, below the load floor. 6 Thumb Screw Location Jack Storage Location WHAT TO DO IN EMERGENCIES 593 Rotate the thumb screw on the jack to loosen the assemJack Location The scissor-type jack and tire changing tools are located bly and remove the jack from the bracket.
in rear cargo area, below the load floor. 6 Thumb Screw Location Jack Storage Location WHAT TO DO IN EMERGENCIES 593 Rotate the thumb screw on the jack to loosen the assemJack Location The scissor-type jack and tire changing tools are located bly and remove the jack from the bracket.

Owner Manual
Page 596
The nut is stowed under a plastic cover at the center-rear of a cable winch mechanism. Do not use the jack handle/lug wrench connected to the square socket extension to winch the tire up or down. 594 WHAT TO DO IN EMERGENCIES Spare Tire Stowage The spare tire is located under the rear of the vehicle by means of the cargo floor area, just inside the liftgate opening. Spare Tire Location CAUTION! To remove or stow the spare, use power tools to rotate the "spare tire drive" nut. Impact type tools can damage the winch mechanism.
The nut is stowed under a plastic cover at the center-rear of a cable winch mechanism. Do not use the jack handle/lug wrench connected to the square socket extension to winch the tire up or down. 594 WHAT TO DO IN EMERGENCIES Spare Tire Stowage The spare tire is located under the rear of the vehicle by means of the cargo floor area, just inside the liftgate opening. Spare Tire Location CAUTION! To remove or stow the spare, use power tools to rotate the "spare tire drive" nut. Impact type tools can damage the winch mechanism.

Owner Manual
Page 601
...sit in the vehicle when it is on a jack. • Do not get under the vehicle when it is on a jack. • Only use the jack in the Jacking Instructions for lifting this vehicle during a tire change. • If working on locations other than those indicated in the positions indicated ...and for this vehicle. 6 Do not attempt to raise the vehicle by jacking on or near a roadway...
...sit in the vehicle when it is on a jack. • Do not get under the vehicle when it is on a jack. • Only use the jack in the Jacking Instructions for lifting this vehicle during a tire change. • If working on locations other than those indicated in the positions indicated ...and for this vehicle. 6 Do not attempt to raise the vehicle by jacking on or near a roadway...

Owner Manual
Page 603
For a rear tire, place the jack in the slot on the rear tie-down bracket, just forward of the rear tire (as indicated by the triangular lift point symbol on the sill molding). Do not raise the vehicle until you are sure the jack is fully engaged. 6 Front Jacking Location Lift Point Symbol On Sill Molding WHAT TO DO IN EMERGENCIES 601 4.
For a rear tire, place the jack in the slot on the rear tie-down bracket, just forward of the rear tire (as indicated by the triangular lift point symbol on the sill molding). Do not raise the vehicle until you are sure the jack is fully engaged. 6 Front Jacking Location Lift Point Symbol On Sill Molding WHAT TO DO IN EMERGENCIES 601 4.

Owner Manual
Page 604
It could slip off the jack and hurt someone near it. Lightly tighten the nuts. Rear Jacking Location 7. Raise the vehicle by turning the jack screw clockwise. Raise the vehicle just enough to remove the tire. 6. WARNING! 602 WHAT TO DO IN EMERGENCIES 5. Raise the vehicle only enough to remove the flat tire. Raising the vehicle higher than necessary can make the vehicle less stable. Remove the lug nuts and wheel. Install the spare wheel/tire on the vehicle and install the lug nuts with the cone-shaped end toward the wheel.
It could slip off the jack and hurt someone near it. Lightly tighten the nuts. Rear Jacking Location 7. Raise the vehicle by turning the jack screw clockwise. Raise the vehicle just enough to remove the tire. 6. WARNING! 602 WHAT TO DO IN EMERGENCIES 5. Raise the vehicle only enough to remove the flat tire. Raising the vehicle higher than necessary can make the vehicle less stable. Remove the lug nuts and wheel. Install the spare wheel/tire on the vehicle and install the lug nuts with the cone-shaped end toward the wheel.
Owner Manual
Page 607
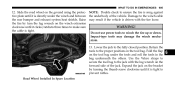
... the tire up or down. clockwise until it clicks/ratchets three times to the jack with the tire loose. Use the Velcro straps to secure the tool bag to ...use power tools to the winch cable the rear bumper and exhaust system heat shields. Road Wheel Installed In Spare Location 6 Raise may damage the winch mechanism. 13. Impact-type tools may result if the vehicle is tight to...road wheel on the forward side of the vehicle. Lower the jack to ensure the tire is snug against tive plate until it is tight. Expand the jack on the bracket by turn the lug wrench on the tool bag...
... the tire up or down. clockwise until it clicks/ratchets three times to the jack with the tire loose. Use the Velcro straps to secure the tool bag to ...use power tools to the winch cable the rear bumper and exhaust system heat shields. Road Wheel Installed In Spare Location 6 Raise may damage the winch mechanism. 13. Impact-type tools may result if the vehicle is tight to...road wheel on the forward side of the vehicle. Lower the jack to ensure the tire is snug against tive plate until it is tight. Expand the jack on the bracket by turn the lug wrench on the tool bag...
User Guide
Page 3
... Motorhome, Etc.) ...83 84 85 85 WHAT TO DO IN EMERGENCIES 24-Hour Towing Assistance ...Instrument Cluster Warning Lights If Your Engine Overheats ...Jacking And Tire Changing ...Battery Location ...Jump-Starting ...Emergency Tow Hooks ...Shift Lever Override ...Towing A Disabled Vehicle ...Event Data Recorder (EDR) ...87 . 87 . 90 . 92 101 101 103 104...
... Motorhome, Etc.) ...83 84 85 85 WHAT TO DO IN EMERGENCIES 24-Hour Towing Assistance ...Instrument Cluster Warning Lights If Your Engine Overheats ...Jacking And Tire Changing ...Battery Location ...Jump-Starting ...Emergency Tow Hooks ...Shift Lever Override ...Towing A Disabled Vehicle ...Event Data Recorder (EDR) ...87 . 87 . 90 . 92 101 101 103 104...

User Guide
Page 75
... automatically, follow these steps: • Press the MENU hard-key, then touch the Rear VES™ soft-key. All modes except video modes are located on the rear of the center console. • Connect the video game or other external media devices to the channel selected on the DVD for... VES™ jacks. • Using either channel by the disc drive. Use the remote control arrow buttons to scroll through the available modes, then press ENTER to ...
... automatically, follow these steps: • Press the MENU hard-key, then touch the Rear VES™ soft-key. All modes except video modes are located on the rear of the center console. • Connect the video game or other external media devices to the channel selected on the DVD for... VES™ jacks. • Using either channel by the disc drive. Use the remote control arrow buttons to scroll through the available modes, then press ENTER to ...
User Guide
Page 94
.... The nut is stowed under a plastic cover at the center-rear of the jack to rotate the "spare tire drive" nut. WHAT TO DO IN EMERGENCIES JACKING AND TIRE CHANGING Jack Location • The scissor-type jack and tire changing tools are located in rear cargo area, below the load floor. • Rotate the plastic thumb...
.... The nut is stowed under a plastic cover at the center-rear of the jack to rotate the "spare tire drive" nut. WHAT TO DO IN EMERGENCIES JACKING AND TIRE CHANGING Jack Location • The scissor-type jack and tire changing tools are located in rear cargo area, below the load floor. • Rotate the plastic thumb...

User Guide
Page 97
... nuts on the road wheel one turn while still on a firm level surface, away from traffic for your safety. 2. Determine the jacking location on the side of the jacking position. Attach the jack tool with the hook, the extension and the lug wrench to set the parking brake, and activate the Hazard Warning flashers... and rear of the wheel diagonally opposite of the vehicle. Turn the engine off, place the transmission in the vehicle when the vehicle is being jacked. Jack Warning Label 95 NOTE: Passengers should not remain in PARK, fully depress the pedal to the floor to the...
... nuts on the road wheel one turn while still on a firm level surface, away from traffic for your safety. 2. Determine the jacking location on the side of the jacking position. Attach the jack tool with the hook, the extension and the lug wrench to set the parking brake, and activate the Hazard Warning flashers... and rear of the wheel diagonally opposite of the vehicle. Turn the engine off, place the transmission in the vehicle when the vehicle is being jacked. Jack Warning Label 95 NOTE: Passengers should not remain in PARK, fully depress the pedal to the floor to the...

User Guide
Page 101
...winch mechanism. • Do not attempt to the ground by your authorized dealer or service station. 5. NOTE: The plastic thumb screw being on locations other than those indicated in doubt about the correct tightness, have them checked with the valve stem facing outward. Lightly tighten the lug nuts. 3.... Road Tire Installation 1. CAUTION! • Do not use power tools to mount the spare tire with a torque wrench by turning the jack handle counterclockwise. 4. Mount the road tire on the wrench while at the end of the cargo area. Tighten the lug nuts in the rear ...
...winch mechanism. • Do not attempt to the ground by your authorized dealer or service station. 5. NOTE: The plastic thumb screw being on locations other than those indicated in doubt about the correct tightness, have them checked with the valve stem facing outward. Lightly tighten the lug nuts. 3.... Road Tire Installation 1. CAUTION! • Do not use power tools to mount the spare tire with a torque wrench by turning the jack handle counterclockwise. 4. Mount the road tire on the wrench while at the end of the cargo area. Tighten the lug nuts in the rear ...

User Guide
Page 127
... (Fuses) . . 117 Intermittent Wipers (Delay Wipers) . . 27 Introduction ...2 Inverter Outlet (115V) ...78 Inverter, Power ...78 iPod®/USB/MP3 Control ...66 Bluetooth Streaming Audio ...72 Jack Location ...Jack Operation ...Jacking Instructions ...Jump Starting ...Key Fob ...Keyless Enter-N-Go Lock/Unlock ...Starting/Stopping ...92 92,95 . . 95 . 101 ...8 . . 11 11,12 . . 13 Lane Change Assist...
... (Fuses) . . 117 Intermittent Wipers (Delay Wipers) . . 27 Introduction ...2 Inverter Outlet (115V) ...78 Inverter, Power ...78 iPod®/USB/MP3 Control ...66 Bluetooth Streaming Audio ...72 Jack Location ...Jack Operation ...Jacking Instructions ...Jump Starting ...Key Fob ...Keyless Enter-N-Go Lock/Unlock ...Starting/Stopping ...92 92,95 . . 95 . 101 ...8 . . 11 11,12 . . 13 Lane Change Assist...
User Guide
Page 130
...pg. 81 UTILITY • How do I know how much I pair my cell phone via Bluetooth® with my Dodge Durango? pg. 113 • What should I do if my TPMS warning light is blinking? pg. 16 • How...44, 53 • How do I change my engine's oil? pg. 87 • How do I activate the Audio Jack? pg. 92 • How do I set at? pg. 119 128 pg. 19 OPERATING YOUR VEHICLE • How does...I use ? pg. 32 ELECTRONICS • Which radio is my Fuse Block located? pg. 116 • What type of oil do I can tow with the UConnect™ Hands-Free Voice Activation System?...
...pg. 81 UTILITY • How do I know how much I pair my cell phone via Bluetooth® with my Dodge Durango? pg. 113 • What should I do if my TPMS warning light is blinking? pg. 16 • How...44, 53 • How do I change my engine's oil? pg. 87 • How do I activate the Audio Jack? pg. 92 • How do I set at? pg. 119 128 pg. 19 OPERATING YOUR VEHICLE • How does...I use ? pg. 32 ELECTRONICS • Which radio is my Fuse Block located? pg. 116 • What type of oil do I can tow with the UConnect™ Hands-Free Voice Activation System?...

