Owner's Manual
Page 1
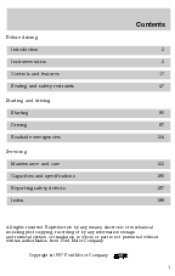
... and features Seating and safety restraints Starting and driving Starting Driving Roadside emergencies Servicing Maintenance and care Capacities and specifications Reporting safety defects Index 123 180 187 188 80 87 104 2 3 17 47 All rights reserved. Copyright 1997 Ford Motor Company Elemental Chlorine Free 1 Reproduction by any means, electronic or mechanical including...
... and features Seating and safety restraints Starting and driving Starting Driving Roadside emergencies Servicing Maintenance and care Capacities and specifications Reporting safety defects Index 123 180 187 188 80 87 104 2 3 17 47 All rights reserved. Copyright 1997 Ford Motor Company Elemental Chlorine Free 1 Reproduction by any means, electronic or mechanical including...
Owner's Manual
Page 10
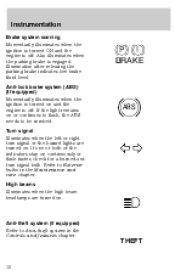
... the left or right turn signal bulb. P ! If the light remains on or continues to flash, the ABS needs to Anti-theft system in the Maintenance and care chapter.
... the left or right turn signal bulb. P ! If the light remains on or continues to flash, the ABS needs to Anti-theft system in the Maintenance and care chapter.
Owner's Manual
Page 11
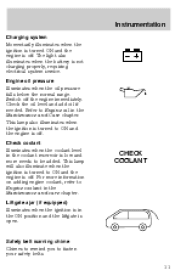
...in the coolant reservoir is low and more information on adding engine coolant, refer to be added. For more needs to Engine coolant in the Maintenance and care chapter. This lamp also illuminates when the ignition is turned to ON and the engine is off . This lamp will also illuminate... when the ignition is turned to ON and the engine is off . Liftgate ajar (if equipped) Illuminates when the ignition is in the Maintenance and Care chapter. Check the oil level and add oil if needed. Instrumentation Charging system Momentarily illuminates when the ignition is turned ON and the...
...in the coolant reservoir is low and more information on adding engine coolant, refer to be added. For more needs to Engine coolant in the Maintenance and care chapter. This lamp also illuminates when the ignition is turned to ON and the engine is off . This lamp will also illuminate... when the ignition is turned to ON and the engine is off . Liftgate ajar (if equipped) Illuminates when the ignition is in the Maintenance and Care chapter. Check the oil level and add oil if needed. Instrumentation Charging system Momentarily illuminates when the ignition is turned ON and the...
Owner's Manual
Page 14
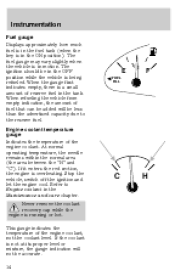
... mixture, the gauge indication will be accurate. 14 E FUEL FILL 12 / F C H When refueling the vehicle from empty indication, the amount of reserve fuel in the Maintenance and care chapter. Refer to the reserve fuel. This gauge indicates the temperature of the engine coolant. If the coolant is in the ON position...
... mixture, the gauge indication will be accurate. 14 E FUEL FILL 12 / F C H When refueling the vehicle from empty indication, the amount of reserve fuel in the Maintenance and care chapter. Refer to the reserve fuel. This gauge indicates the temperature of the engine coolant. If the coolant is in the ON position...
Owner's Manual
Page 57
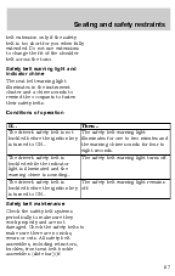
... light is illuminated and the warning chime is sounding...The safety belt warning light remains The driver's safety belt is turned to ON...Safety belt maintenance Check the safety belt systems periodically to fasten their safety belts.
... light is illuminated and the warning chime is sounding...The safety belt warning light remains The driver's safety belt is turned to ON...Safety belt maintenance Check the safety belt systems periodically to fasten their safety belts.
Owner's Manual
Page 58
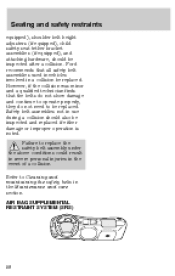
... be inspected after a collision. Refer to replace the safety belt assembly under the above conditions could result in severe personal injuries in the Maintenance and care section. AIR BAG SUPPLEMENTAL RESTRAINT SYSTEM (SRS) 58 Failure to Cleaning and maintaining the safety belts in the event of a ... bracket assemblies (if equipped), and attaching hardware, should also be inspected and replaced if either damage or improper operation is noted. Ford recommends that the belts do not show damage and continue to operate properly, they do not need to be replaced. Safety belt assemblies...
... be inspected after a collision. Refer to replace the safety belt assembly under the above conditions could result in severe personal injuries in the Maintenance and care section. AIR BAG SUPPLEMENTAL RESTRAINT SYSTEM (SRS) 58 Failure to Cleaning and maintaining the safety belts in the event of a ... bracket assemblies (if equipped), and attaching hardware, should also be inspected and replaced if either damage or improper operation is noted. Ford recommends that the belts do not show damage and continue to operate properly, they do not need to be replaced. Safety belt assemblies...

Owner's Manual
Page 62
... (including the impact sensors), the system wiring, the air bag system readiness light, the air bag back up power and the air bag ignitors. Routine maintenance of : • driver and passenger air bag modules (which include the inflators and air bags), • one or more impact and safing sensors, • a readiness...
... (including the impact sensors), the system wiring, the air bag system readiness light, the air bag back up power and the air bag ignitors. Routine maintenance of : • driver and passenger air bag modules (which include the inflators and air bags), • one or more impact and safing sensors, • a readiness...
Owner's Manual
Page 87
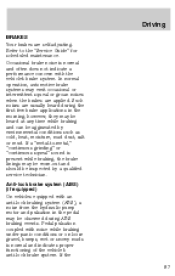
If a "metal-to the "Service Guide" for scheduled maintenance. If the 87 Refer to -metal," "continuous grinding" or "continuous squeal" sound is present while braking, the brake linings may be worn-out and should ...
If a "metal-to the "Service Guide" for scheduled maintenance. If the 87 Refer to -metal," "continuous grinding" or "continuous squeal" sound is present while braking, the brake linings may be worn-out and should ...
Owner's Manual
Page 103
... hot weather, place the gearshift in P (Park) and increase idle speed. FUEL CONSUMPTION Fuel economy can be improved by avoiding: • lack of regular, scheduled maintenance • excessive speed • rapid acceleration • extended idle 103 This aids engine cooling and air conditioner efficiency. • Vehicles with trailers should be 10...
... hot weather, place the gearshift in P (Park) and increase idle speed. FUEL CONSUMPTION Fuel economy can be improved by avoiding: • lack of regular, scheduled maintenance • excessive speed • rapid acceleration • extended idle 103 This aids engine cooling and air conditioner efficiency. • Vehicles with trailers should be 10...
Owner's Manual
Page 123
.... Always disconnect the negative terminal of the battery before working near the fan. • When the engine is automatic and may come on a hot engine. Maintenance and care SERVICE RECOMMENDATIONS To help you service your vehicle: • We highlight do-it-yourself items in the engine compartment for easy location. •...
.... Always disconnect the negative terminal of the battery before working near the fan. • When the engine is automatic and may come on a hot engine. Maintenance and care SERVICE RECOMMENDATIONS To help you service your vehicle: • We highlight do-it-yourself items in the engine compartment for easy location. •...
Owner's Manual
Page 124
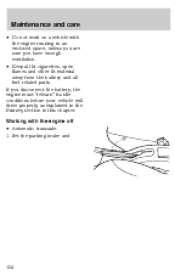
Set the parking brake and 124 If you have enough ventilation. • Keep all lit cigarettes, open flames and other lit material away from the battery and all fuel related parts. Maintenance and care • Do not work on a vehicle with the engine off • Automatic transaxle: 1. Working with the engine running in an enclosed space, unless you are sure you disconnect the battery, the engine must "relearn" its idle conditions before your vehicle will drive properly, as explained in the Battery section in this chapter.
Set the parking brake and 124 If you have enough ventilation. • Keep all lit cigarettes, open flames and other lit material away from the battery and all fuel related parts. Maintenance and care • Do not work on a vehicle with the engine off • Automatic transaxle: 1. Working with the engine running in an enclosed space, unless you are sure you disconnect the battery, the engine must "relearn" its idle conditions before your vehicle will drive properly, as explained in the Battery section in this chapter.
Owner's Manual
Page 125
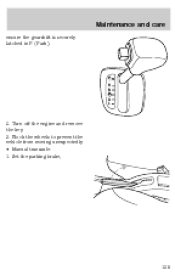
Set the parking brake, 125 Maintenance and care ensure the gearshift is securely latched in P (Park). Block the wheels to prevent the vehicle from moving unexpectedly. • Manual transaxle: 1. P R N D D L 2. Turn off the engine and remove the key. 3.
Set the parking brake, 125 Maintenance and care ensure the gearshift is securely latched in P (Park). Block the wheels to prevent the vehicle from moving unexpectedly. • Manual transaxle: 1. P R N D D L 2. Turn off the engine and remove the key. 3.

Owner's Manual
Page 126
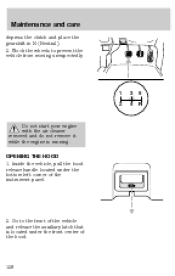
Turn off the engine and remove the key. 3. Working with the engine on • Automatic transaxle: 1. Set the parking brake and 126 Block the wheels to prevent the vehicle from moving unexpectedly. Maintenance and care depress the clutch and place the gearshift in 1 (First). 1 2 3 4 5 R 2.
Turn off the engine and remove the key. 3. Working with the engine on • Automatic transaxle: 1. Set the parking brake and 126 Block the wheels to prevent the vehicle from moving unexpectedly. Maintenance and care depress the clutch and place the gearshift in 1 (First). 1 2 3 4 5 R 2.

Owner's Manual
Page 127
Block the wheels to prevent the vehicle from moving unexpectedly. Set the parking brake, 127 Maintenance and care ensure the gearshift is running. • Manual transaxle: 1. P R N D D L 2. Do not start your engine with the air cleaner removed and do not remove it while the engine is securely latched in P (Park).
Block the wheels to prevent the vehicle from moving unexpectedly. Set the parking brake, 127 Maintenance and care ensure the gearshift is running. • Manual transaxle: 1. P R N D D L 2. Do not start your engine with the air cleaner removed and do not remove it while the engine is securely latched in P (Park).
Owner's Manual
Page 128
Inside the vehicle, pull the hood release handle located under the front center of the instrument panel. 2. OPENING THE HOOD 1. Go to prevent the vehicle from moving unexpectedly. 1 2 3 4 5 R Do not start your engine with the air cleaner removed and do not remove it while the engine is located under the bottom left corner of the hood. 128 Block the wheels to the front of the vehicle and release the auxiliary latch that is running. Maintenance and care depress the clutch and place the gearshift in N (Neutral). 2.
Inside the vehicle, pull the hood release handle located under the front center of the instrument panel. 2. OPENING THE HOOD 1. Go to prevent the vehicle from moving unexpectedly. 1 2 3 4 5 R Do not start your engine with the air cleaner removed and do not remove it while the engine is located under the bottom left corner of the hood. 128 Block the wheels to the front of the vehicle and release the auxiliary latch that is running. Maintenance and care depress the clutch and place the gearshift in N (Neutral). 2.
Owner's Manual
Page 129
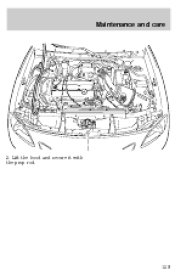
Lift the hood and secure it with the prop rod. 129 Maintenance and care 3.
Lift the hood and secure it with the prop rod. 129 Maintenance and care 3.
Owner's Manual
Page 130
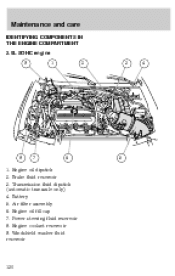
Brake fluid reservoir 3. Engine oil fill cap 7. Transmission fluid dipstick (automatic transaxle only) 4. Engine coolant reservoir 9. Air filter assembly 6. Windshield washer fluid reservoir 130 Maintenance and care IDENTIFYING COMPONENTS IN THE ENGINE COMPARTMENT 2.0L SOHC engine 9 1 2 3 4 8 7 6 5 1. Battery 5. Power steering fluid reservoir 8. Engine oil dipstick 2.
Brake fluid reservoir 3. Engine oil fill cap 7. Transmission fluid dipstick (automatic transaxle only) 4. Engine coolant reservoir 9. Air filter assembly 6. Windshield washer fluid reservoir 130 Maintenance and care IDENTIFYING COMPONENTS IN THE ENGINE COMPARTMENT 2.0L SOHC engine 9 1 2 3 4 8 7 6 5 1. Battery 5. Power steering fluid reservoir 8. Engine oil dipstick 2.

Owner's Manual
Page 131
Engine oil fill cap 5. Air filter assembly 4. Windshield washer fluid reservoir 9. Engine oil dipstick 6. Brake fluid reservoir 131 Engine coolant reservoir 8. Power steering fluid reservoir 7. Battery 3. Transmission fluid dipstick (automatic transaxle only) 2. Maintenance and care 2.0L DOHC Zetec engine 7 8 9 1 2 3 6 5 4 1.
Engine oil fill cap 5. Air filter assembly 4. Windshield washer fluid reservoir 9. Engine oil dipstick 6. Brake fluid reservoir 131 Engine coolant reservoir 8. Power steering fluid reservoir 7. Battery 3. Transmission fluid dipstick (automatic transaxle only) 2. Maintenance and care 2.0L DOHC Zetec engine 7 8 9 1 2 3 6 5 4 1.
Owner's Manual
Page 132
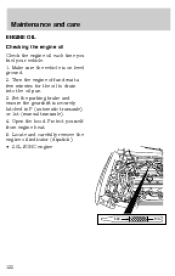
Open the hood. Set the parking brake and ensure the gearshift is on level ground. 2. Locate and carefully remove the engine oil indicator (dipstick). • 2.0L SOHC engine ADD FULL 132 Protect yourself from engine heat. 5. Turn the engine off and wait a few minutes for the oil to drain into the oil pan. 3. Maintenance and care ENGINE OIL Checking the engine oil Check the engine oil each time you fuel your vehicle. 1. Make sure the vehicle is securely latched in P (automatic transaxle) or 1st (manual transaxle). 4.
Open the hood. Set the parking brake and ensure the gearshift is on level ground. 2. Locate and carefully remove the engine oil indicator (dipstick). • 2.0L SOHC engine ADD FULL 132 Protect yourself from engine heat. 5. Turn the engine off and wait a few minutes for the oil to drain into the oil pan. 3. Maintenance and care ENGINE OIL Checking the engine oil Check the engine oil each time you fuel your vehicle. 1. Make sure the vehicle is securely latched in P (automatic transaxle) or 1st (manual transaxle). 4.
Owner's Manual
Page 133
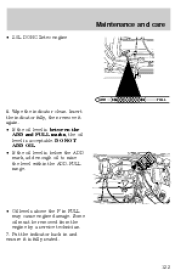
Wipe the indicator clean. DO NOT ADD OIL. • If the oil level is acceptable. Some oil must be removed from the engine by a service technician. 7. Insert the indicator fully, then remove it again. • If the oil level is between the ADD and FULL marks, the oil level is below the ADD mark, add enough oil to raise the level within the ADD-FULL range. • Oil levels above the F in and ensure it is fully seated. 133 Put the indicator back in FULL may cause engine damage. Maintenance and care • 2.0L DOHC Zetec engine ADD FULL 6.
Wipe the indicator clean. DO NOT ADD OIL. • If the oil level is acceptable. Some oil must be removed from the engine by a service technician. 7. Insert the indicator fully, then remove it again. • If the oil level is between the ADD and FULL marks, the oil level is below the ADD mark, add enough oil to raise the level within the ADD-FULL range. • Oil levels above the F in and ensure it is fully seated. 133 Put the indicator back in FULL may cause engine damage. Maintenance and care • 2.0L DOHC Zetec engine ADD FULL 6.