
Owner Guide 1st Printing
Page 13
...in the Maintenance and care chapter. Never remove the coolant reservoir cap while the engine is not at its proper level the gauge indication will not be accurate. If the coolant is running or hot. Odometer Registers the total kilometers (miles) of the engine coolant, not the coolant level. If ...the "H" and "C"). This gauge indicates the temperature of the vehicle. Stop the vehicle as soon as safely possible, switch off the engine immediately and let the engine cool. mi 13 Instrumentation Speedometer Indicates the current vehicle speed. 40 20 40 MPH 60 80 120 80 100 160 km/h 200 ...
...in the Maintenance and care chapter. Never remove the coolant reservoir cap while the engine is not at its proper level the gauge indication will not be accurate. If the coolant is running or hot. Odometer Registers the total kilometers (miles) of the engine coolant, not the coolant level. If ...the "H" and "C"). This gauge indicates the temperature of the vehicle. Stop the vehicle as soon as safely possible, switch off the engine immediately and let the engine cool. mi 13 Instrumentation Speedometer Indicates the current vehicle speed. 40 20 40 MPH 60 80 120 80 100 160 km/h 200 ...
Owner Guide 1st Printing
Page 70
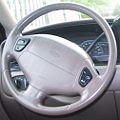
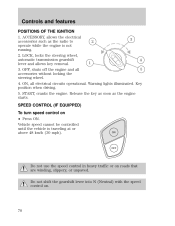
... locking the steering wheel. 4. Release the key as soon as the radio to 2 operate while the engine is traveling at or above 48 km/h (30 mph). SPEED CONTROL (IF EQUIPPED) To turn speed ...control on roads that are winding, slippery, or unpaved. Key position when driving. 5. OFF, shuts off the engine and all electrical circuits operational. Warning lights illuminated. Vehicle speed cannot be controlled until the vehicle is not running. 2....70 LOCK, locks the steering wheel, automatic transmission gearshift 4 1 lever and allows key removal. 5 3. START, cranks the engine.
... locking the steering wheel. 4. Release the key as soon as the radio to 2 operate while the engine is traveling at or above 48 km/h (30 mph). SPEED CONTROL (IF EQUIPPED) To turn speed ...control on roads that are winding, slippery, or unpaved. Key position when driving. 5. OFF, shuts off the engine and all electrical circuits operational. Warning lights illuminated. Vehicle speed cannot be controlled until the vehicle is not running. 2....70 LOCK, locks the steering wheel, automatic transmission gearshift 4 1 lever and allows key removal. 5 3. START, cranks the engine.

Owner Guide 1st Printing
Page 100
...to start your vehicle, the SecuriLock key is read by any door/hood that input is not detected (vehicle theft situation), the vehicle's engine will not operate. 100 Any of the following actions: • Press the transmitter unlock control. • Unlock the doors with a coded-key... anti-theft system. Once that is closed is removed from unauthorized entry. If the SecuriLock key identification code does not match the code stored in the system or if a SecuriLock key...
...to start your vehicle, the SecuriLock key is read by any door/hood that input is not detected (vehicle theft situation), the vehicle's engine will not operate. 100 Any of the following actions: • Press the transmitter unlock control. • Unlock the doors with a coded-key... anti-theft system. Once that is closed is removed from unauthorized entry. If the SecuriLock key identification code does not match the code stored in the system or if a SecuriLock key...

Owner Guide 1st Printing
Page 102
... at least one second but no more than 5 seconds). 4. This step will not operate the vehicle's engine. Conventional (non-SecuriLock) keys cannot be programmed to OFF and remove the first SecuriLock key from OFF to have two previously programmed SecuriLock keys and the new ...SecuriLock key(s), repeat this procedure from the ignition. 5. The theft indicator will flash on the instrument panel) will start the vehicle's engine. Turn ignition to your vehicle. Within 10 seconds of each step in RUN for at least one minute and then repeat the procedure from...
... at least one second but no more than 5 seconds). 4. This step will not operate the vehicle's engine. Conventional (non-SecuriLock) keys cannot be programmed to OFF and remove the first SecuriLock key from OFF to have two previously programmed SecuriLock keys and the new ...SecuriLock key(s), repeat this procedure from the ignition. 5. The theft indicator will flash on the instrument panel) will start the vehicle's engine. Turn ignition to your vehicle. Within 10 seconds of each step in RUN for at least one minute and then repeat the procedure from...

Owner Guide 1st Printing
Page 162
... driving while trailer towing. Refer to use of an additional medium duty trailer tow option package. For your safety and to maximize vehicle performance, be removed from the trailer and/or the vehicle until your vehicle for taillamps, stop and turn lamps, back up lamps, battery charge, electric brakes (when a customer... the use the proper equipment while towing. If exceeded, cargo should be sure to Driving while you tow in this chapter. • Service your vehicle's engine, transmission, axle, brakes, tires, and suspension.
... driving while trailer towing. Refer to use of an additional medium duty trailer tow option package. For your safety and to maximize vehicle performance, be removed from the trailer and/or the vehicle until your vehicle for taillamps, stop and turn lamps, back up lamps, battery charge, electric brakes (when a customer... the use the proper equipment while towing. If exceeded, cargo should be sure to Driving while you tow in this chapter. • Service your vehicle's engine, transmission, axle, brakes, tires, and suspension.

Owner Guide 1st Printing
Page 180
...the vehicle from moving when you or someone else could be sure the parking brake is in P (Park), turn engine OFF, and block the diagonally opposite wheel. 3. Remove the center ornament or wheel cover from moving or slipping off the jack, you change procedure When one of the ...Roadside emergencies Tire change a tire, be seriously injured. 1. If the vehicle slips off the jack, even if the vehicle is set parking brake. 2. Remove the spare tire, jack and lug wrench. 4. Place gearshift lever in P (Park). Insert and twist the handle, then pry against the wheel. 180 ...
...the vehicle from moving when you or someone else could be sure the parking brake is in P (Park), turn engine OFF, and block the diagonally opposite wheel. 3. Remove the center ornament or wheel cover from moving or slipping off the jack, you change procedure When one of the ...Roadside emergencies Tire change a tire, be seriously injured. 1. If the vehicle slips off the jack, even if the vehicle is set parking brake. 2. Remove the spare tire, jack and lug wrench. 4. Place gearshift lever in P (Park). Insert and twist the handle, then pry against the wheel. 180 ...

Owner Guide 1st Printing
Page 181
... completely off the ground. Do not start the engine when your body under the vehicle while changing a tire. The jack is on the jack. To lessen the risk of personal injury, do not remove them until the wheel is raised off the ground. Remove the lug nuts with the running boards as described... for changing the tire. 8. Loosen each wheel lug nut one-half turn counterclockwise but do not put any part of the jack storage area. 6. If Ford Accessory Running Boards have been installed, use the jack adapters supplied with the lug wrench. 181 Roadside emergencies 5.
... completely off the ground. Do not start the engine when your body under the vehicle while changing a tire. The jack is on the jack. To lessen the risk of personal injury, do not remove them until the wheel is raised off the ground. Remove the lug nuts with the running boards as described... for changing the tire. 8. Loosen each wheel lug nut one-half turn counterclockwise but do not put any part of the jack storage area. 6. If Ford Accessory Running Boards have been installed, use the jack adapters supplied with the lug wrench. 181 Roadside emergencies 5.

Owner Guide 1st Printing
Page 183
... sure the two vehicles do not touch. Connect the other moving parts. 4. Set the parking brake on in both vehicles and stay clear of the engine cooling fan and other end of the positive (+) cable to designate the assisting (boosting) battery. 2. Check all other accessories off. Connect the positive (+) booster cable...
... sure the two vehicles do not touch. Connect the other moving parts. 4. Set the parking brake on in both vehicles and stay clear of the engine cooling fan and other end of the positive (+) cable to designate the assisting (boosting) battery. 2. Check all other accessories off. Connect the positive (+) booster cable...

Owner Guide 1st Printing
Page 185
... jumper cable on the negative (-) connection of the disabled vehicle. 3. Once the disabled vehicle has been started, run the engine at moderately increased speed. 2. Removing the jumper cables Remove the jumper cables in the reverse order that the cables are clear of fan blades, belts and other moving parts of the booster vehicle...
... jumper cable on the negative (-) connection of the disabled vehicle. 3. Once the disabled vehicle has been started, run the engine at moderately increased speed. 2. Removing the jumper cables Remove the jumper cables in the reverse order that the cables are clear of fan blades, belts and other moving parts of the booster vehicle...

Owner Guide 1st Printing
Page 186
Remove the jumper cable from the positive (+) terminal of the disabled vehicle's battery. After the disabled vehicle has been started and the jumper cables removed, allow it to idle for several minutes so the engine computer can relearn its idle conditions. 186 - - - + + - + + Remove the jumper cable from the positive (+) terminal of the booster vehicle's battery. 4. Roadside emergencies 3.
Remove the jumper cable from the positive (+) terminal of the disabled vehicle's battery. After the disabled vehicle has been started and the jumper cables removed, allow it to idle for several minutes so the engine computer can relearn its idle conditions. 186 - - - + + - + + Remove the jumper cable from the positive (+) terminal of the booster vehicle's battery. 4. Roadside emergencies 3.

Owner Guide 1st Printing
Page 188
..." to find out which makes tracking routine service easy. If you disconnect the battery, the engine must "relearn" its idle conditions before your dealership can provide necessary parts and service. Working with the engine off the engine and remove the key. 3. Use only recommended fuels, lubricants, fluids and service parts conforming to prevent the...
..." to find out which makes tracking routine service easy. If you disconnect the battery, the engine must "relearn" its idle conditions before your dealership can provide necessary parts and service. Working with the engine off the engine and remove the key. 3. Use only recommended fuels, lubricants, fluids and service parts conforming to prevent the...

Owner Guide 1st Printing
Page 189
... start your needs. 189 Lift the hood and secure it with the air cleaner removed and do not remove it while the engine is located under the bottom left corner of the hood. 3. Use the location which best suits your engine with the prop rod. These locations provide two different hood opening positions. Your...
... start your needs. 189 Lift the hood and secure it with the air cleaner removed and do not remove it while the engine is located under the bottom left corner of the hood. 3. Use the location which best suits your engine with the prop rod. These locations provide two different hood opening positions. Your...
Owner Guide 1st Printing
Page 192
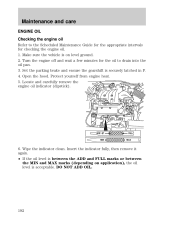
.... Open the hood. Insert the indicator fully, then remove it again. • If the oil level is between the ADD and FULL marks or between the MIN and MAX marks (depending on level ground. 2. Locate and carefully remove the engine oil indicator (dipstick). DO NOT ADD OIL. 192 ...Protect yourself from engine heat. 5. Make sure the vehicle is on application), the oil level is securely latched in P. 4. Turn...
.... Open the hood. Insert the indicator fully, then remove it again. • If the oil level is between the ADD and FULL marks or between the MIN and MAX marks (depending on level ground. 2. Locate and carefully remove the engine oil indicator (dipstick). DO NOT ADD OIL. 192 ...Protect yourself from engine heat. 5. Make sure the vehicle is on application), the oil level is securely latched in P. 4. Turn...

Owner Guide 1st Printing
Page 193
...ADD-FULL or within the normal range, add only certified engine oil of the recommended viscosity. Remove the engine oil filler cap and use a funnel to Checking the engine oil in FULL on the dipstick. 193 For instructions, refer to pour the engine oil into the opening. 3. Make sure the oil level...• Oil levels above the F in FULL or above the MAX mark or the letter F in this chapter. 2. Some oil must be removed from the engine by a service technician. 7. Adding engine oil 1. Recheck the engine oil level. Check the engine oil. If the engine oil level is fully seated.
...ADD-FULL or within the normal range, add only certified engine oil of the recommended viscosity. Remove the engine oil filler cap and use a funnel to Checking the engine oil in FULL on the dipstick. 193 For instructions, refer to pour the engine oil into the opening. 3. Make sure the oil level...• Oil levels above the F in FULL or above the MAX mark or the letter F in this chapter. 2. Some oil must be removed from the engine by a service technician. 7. Adding engine oil 1. Recheck the engine oil level. Check the engine oil. If the engine oil level is fully seated.
Owner Guide 1st Printing
Page 198
... should replace it cool. 2. Before adding engine coolant, check the color of engine coolant and water to the fill line on the windshield, engine coolant could make it counterclockwise and remove the cap. For vehicles with orange coolant, use Ford Extended Life Engine Coolant F6AZ-19544-AA or a DEX-COOL...all the pressure has been released, use Ford Premium Cooling System Fluid E2FZ-19549-AA (in an emergency, but you remove the cap, turn the engine off and let it with conventional green coolant. Never remove the coolant reservoir cap while the engine is cool, add a 50/50 mixture...
... should replace it cool. 2. Before adding engine coolant, check the color of engine coolant and water to the fill line on the windshield, engine coolant could make it counterclockwise and remove the cap. For vehicles with orange coolant, use Ford Extended Life Engine Coolant F6AZ-19544-AA or a DEX-COOL...all the pressure has been released, use Ford Premium Cooling System Fluid E2FZ-19549-AA (in an emergency, but you remove the cap, turn the engine off and let it with conventional green coolant. Never remove the coolant reservoir cap while the engine is cool, add a 50/50 mixture...

Owner Guide 1st Printing
Page 202
...failure. Latch the gearshift lever in the designated areas for each gear to engage. 4. Remove the dipstick and inspect the fluid level. Maintenance and care 1. Allow sufficient time for normal and room temperature. Remove the dipstick, wiping it is at the bottom of the gear ranges. The normal ...WHEN HOT-IDLING temperature (66°C-77°C [150°F-170°F]). The transmission fluid should be in P (Park) and leave the engine running. 5. Low fluid level Do not drive the vehicle if the fluid level is fully seated in this range if at normal operating temperatures 66...
...failure. Latch the gearshift lever in the designated areas for each gear to engage. 4. Remove the dipstick and inspect the fluid level. Maintenance and care 1. Allow sufficient time for normal and room temperature. Remove the dipstick, wiping it is at the bottom of the gear ranges. The normal ...WHEN HOT-IDLING temperature (66°C-77°C [150°F-170°F]). The transmission fluid should be in P (Park) and leave the engine running. 5. Low fluid level Do not drive the vehicle if the fluid level is fully seated in this range if at normal operating temperatures 66...

Owner Guide 1st Printing
Page 215
... or sickness may be void for any damage to align the cap properly. Turn the engine off the engine, remove the fuel filler cap and reinstall it with the notches on the skin and/or clothing, promptly remove contaminated clothing and wash skin thoroughly with a one-eighth turn until it stops. If...with soap and water. If you are taking "Antabuse" or other forms of disulfiram for the treatment of a turn on the cap with a genuine Ford or Motorcraft part. To install the cap, align the tabs on /off feature. If fuel is splashed on the skin, promptly wash skin thoroughly ...
... or sickness may be void for any damage to align the cap properly. Turn the engine off the engine, remove the fuel filler cap and reinstall it with the notches on the skin and/or clothing, promptly remove contaminated clothing and wash skin thoroughly with a one-eighth turn until it stops. If...with soap and water. If you are taking "Antabuse" or other forms of disulfiram for the treatment of a turn on the cap with a genuine Ford or Motorcraft part. To install the cap, align the tabs on /off feature. If fuel is splashed on the skin, promptly wash skin thoroughly ...

Owner Guide 1st Printing
Page 216
... emissions warranty. Choosing the right fuel Use only UNLEADED FUEL. Your vehicle was not designed may not be under pressure. If you refuel, your engine should perform adequately. Do not use fuel or fuel additives with metallic compounds, including manganese-based compounds containing (MMT). Vehicles certified to meet California ... hear a hissing sound, wait until it to use gasolines containing methanol. It can damage the fuel system or cause it stops before completely removing the fuel filler cap. Repairs to operate on California cleaner-burning, low-sulfur gasolines.
... emissions warranty. Choosing the right fuel Use only UNLEADED FUEL. Your vehicle was not designed may not be under pressure. If you refuel, your engine should perform adequately. Do not use fuel or fuel additives with metallic compounds, including manganese-based compounds containing (MMT). Vehicles certified to meet California ... hear a hissing sound, wait until it to use gasolines containing methanol. It can damage the fuel system or cause it stops before completely removing the fuel filler cap. Repairs to operate on California cleaner-burning, low-sulfur gasolines.

Owner Guide 1st Printing
Page 223
...Warning Lights and Chimes section of driving on an expressway or highway. • Next, at least eight hours without starting the engine. Readiness for inspection/maintenance (I/M) testing In some tune up to its battery has just been serviced, the OBD-II system is ...vehicles are not permitted to intentionally remove an emission control device or prevent it may not pass the I /M test" condition. This decal identifies engine displacement and gives some localities, it from working. The engine must warm up specifications. Please consult your vehicle or engine. By law, vehicle owners ...
...Warning Lights and Chimes section of driving on an expressway or highway. • Next, at least eight hours without starting the engine. Readiness for inspection/maintenance (I/M) testing In some tune up to its battery has just been serviced, the OBD-II system is ...vehicles are not permitted to intentionally remove an emission control device or prevent it may not pass the I /M test" condition. This decal identifies engine displacement and gives some localities, it from working. The engine must warm up specifications. Please consult your vehicle or engine. By law, vehicle owners ...

Owner Guide 1st Printing
Page 232
...strong detergents. The high pressure fluid could penetrate the sealed parts and cause damage. • Do not spray with a tar remover if necessary. Cleaning plastic exterior parts Use vinyl cleaner for routine cleaning. Maintenance and care Cleaning the wheels Wash with thinners, ...when cleaning the engine. • Never wash or rinse the engine while it is running engine may cause internal damage. Clean with cold water to avoid cracking the engine block or other engine components. • Cover the highlighted areas to clean the engine. Use a tar remover to remove grease and tar...
...strong detergents. The high pressure fluid could penetrate the sealed parts and cause damage. • Do not spray with a tar remover if necessary. Cleaning plastic exterior parts Use vinyl cleaner for routine cleaning. Maintenance and care Cleaning the wheels Wash with thinners, ...when cleaning the engine. • Never wash or rinse the engine while it is running engine may cause internal damage. Clean with cold water to avoid cracking the engine block or other engine components. • Cover the highlighted areas to clean the engine. Use a tar remover to remove grease and tar...


