

Owner's Manual
Page 24
The power point is located on the instrument panel. Do not plug optional electrical accessories into the cigarette lighter. A second auxiliary power point is accessible from the rear seats. 24 Use the power point. Controls and features AUXILIARY POWER POINT The auxiliary power point is located on the left rear side of the console (behind the driver seat).
The power point is located on the instrument panel. Do not plug optional electrical accessories into the cigarette lighter. A second auxiliary power point is accessible from the rear seats. 24 Use the power point. Controls and features AUXILIARY POWER POINT The auxiliary power point is located on the left rear side of the console (behind the driver seat).

Owner's Manual
Page 47
Slide the door to remove a CD tray from the magazine. 47 Pull the lever to access the CD changer magazine. Controls and features CD changer (if equipped) Your CD changer is located in the center console. Press to eject the magazine. 1.
Slide the door to remove a CD tray from the magazine. 47 Pull the lever to access the CD changer magazine. Controls and features CD changer (if equipped) Your CD changer is located in the center console. Press to eject the magazine. 1.

Owner's Manual
Page 60
Your auxiliary A/C controls may be located in the floor console. Besides the driver's control panel for the front seat occupants, the second row auxiliary A/C-heater controls allow the rear passengers to quickly heat or cool the vehicle. Controls and features Auxiliary A/C-heater controls (if equipped) The auxiliary A/C-heater feature provides increased capacity to control the temperature in the rear of the vehicle through a second control panel above the second row, or in the floor console, R OO FL L NE PA F OF AR RE HI RM WA OL CO 60
Your auxiliary A/C controls may be located in the floor console. Besides the driver's control panel for the front seat occupants, the second row auxiliary A/C-heater controls allow the rear passengers to quickly heat or cool the vehicle. Controls and features Auxiliary A/C-heater controls (if equipped) The auxiliary A/C-heater feature provides increased capacity to control the temperature in the rear of the vehicle through a second control panel above the second row, or in the floor console, R OO FL L NE PA F OF AR RE HI RM WA OL CO 60

Owner's Manual
Page 61
... is set to operate. In order for the auxiliary A/C-heater to PANEL, airflow occurs from the third row seat floor vent located in the overhead console. OFF REAR HI COOL WARM PANEL FLOOR LO PANEL OFF PANEL & FLOOR FLOOR FLR & DEF DEF A/C MAX A/C HI COOL WARM When the auxiliary A/C-heater control...
... is set to operate. In order for the auxiliary A/C-heater to PANEL, airflow occurs from the third row seat floor vent located in the overhead console. OFF REAR HI COOL WARM PANEL FLOOR LO PANEL OFF PANEL & FLOOR FLOOR FLR & DEF DEF A/C MAX A/C HI COOL WARM When the auxiliary A/C-heater control...

Owner's Manual
Page 69
... option package. The transmission will (Overdrive) mode. When you shut off and re-start your vehicle's overhead console will vary according to OVERDRIVE OFF normal overdrive mode, press the Transmission Control Switch again. OVERHEAD CONSOLE The appearance of OVERDRIVE the gearshift lever. automatically return to normal For additional information about the gearshift...
... option package. The transmission will (Overdrive) mode. When you shut off and re-start your vehicle's overhead console will vary according to OVERDRIVE OFF normal overdrive mode, press the Transmission Control Switch again. OVERHEAD CONSOLE The appearance of OVERDRIVE the gearshift lever. automatically return to normal For additional information about the gearshift...

Owner's Manual
Page 80
This provides an additional warning to other drivers that your vehicle is about to turn signal is activated, the outer portion of console features. Controls and features Signal mirrors (if equipped) When the turn . Fold-away mirrors Pull the side mirrors in the cupholder. These include: • Utility ...) Use only soft cups in carefully when driving through a narrow space, like an automatic car wash. Hard objects can injure you in a collision. 80 CENTER CONSOLE Your vehicle may be equipped with a variety of the appropriate mirror housing will blink red.
This provides an additional warning to other drivers that your vehicle is about to turn signal is activated, the outer portion of console features. Controls and features Signal mirrors (if equipped) When the turn . Fold-away mirrors Pull the side mirrors in the cupholder. These include: • Utility ...) Use only soft cups in carefully when driving through a narrow space, like an automatic car wash. Hard objects can injure you in a collision. 80 CENTER CONSOLE Your vehicle may be equipped with a variety of the appropriate mirror housing will blink red.
Owner's Manual
Page 81
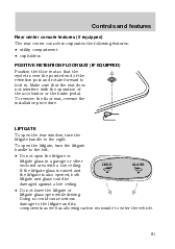
... open the rear window, turn the liftgate handle to the left. • Do not open while driving. Controls and features Rear center console features (if equipped) The rear center console incorporates the following features: • utility compartment • cupholders POSITIVE RETENTION FLOOR MAT (IF EQUIPPED) Position the floor mat so that the...
... open the rear window, turn the liftgate handle to the left. • Do not open while driving. Controls and features Rear center console features (if equipped) The rear center console incorporates the following features: • utility compartment • cupholders POSITIVE RETENTION FLOOR MAT (IF EQUIPPED) Position the floor mat so that the...

Owner's Manual
Page 165
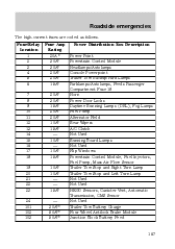
... Mode Switch (Blower Relay), EATC, EATC Blower Relay, Feeds Fuse 7 10A Aux A/C, Heated Seats, Trailer Tow Battery Charge, Turn/Hazard Flasher, 4x4 Clutch Relay, Overhead Console, E/C Mirror, 4 Wheel Anti-Lock Brake System (4WABS) Module - Not Used - Not Used 10A Right Side Low Beam Headlamp 5A Foglamp Relay and Foglamp Indicator 10A...
... Mode Switch (Blower Relay), EATC, EATC Blower Relay, Feeds Fuse 7 10A Aux A/C, Heated Seats, Trailer Tow Battery Charge, Turn/Hazard Flasher, 4x4 Clutch Relay, Overhead Console, E/C Mirror, 4 Wheel Anti-Lock Brake System (4WABS) Module - Not Used - Not Used 10A Right Side Low Beam Headlamp 5A Foglamp Relay and Foglamp Indicator 10A...
Owner's Manual
Page 167
...* 15A* 20A* 20A* 10A* 15A* - 10A* - 10A* 15A* 10A* 10A* - - 15A* - 30A** 50A** 50A** Power Distribution Box Description Power Point Powertrain Control Module Headlamps/Autolamps Console Powerpoint Trailer Tow Backup/Park Lamps Parklamps/Autolamps, Feeds Passenger Compartment Fuse 18 Horn Power Door Locks Daytime Running Lamps (DRL), Fog Lamps Fuel Pump...
...* 15A* 20A* 20A* 10A* 15A* - 10A* - 10A* 15A* 10A* 10A* - - 15A* - 30A** 50A** 50A** Power Distribution Box Description Power Point Powertrain Control Module Headlamps/Autolamps Console Powerpoint Trailer Tow Backup/Park Lamps Parklamps/Autolamps, Feeds Passenger Compartment Fuse 18 Horn Power Door Locks Daytime Running Lamps (DRL), Fog Lamps Fuel Pump...

Owner's Manual
Page 224
The dull finish in this area helps protect the driver from your Ford Dealer. Avoid cleaner or polish that increases the gloss of the upper portion of the console. These agents can stain and discolor the fabric. Dry with a dry cloth. Do not use a soft cloth dampened with water...) To clean, simply use household or glass cleaners. Avoid cleaner or polish that increases the gloss of the instrument panel. Cleaning the overhead console Clean with a damp cloth, then wipe dry with a soft cloth. Remove fresh spots immediately. Clean the outside of the air bag system...
The dull finish in this area helps protect the driver from your Ford Dealer. Avoid cleaner or polish that increases the gloss of the upper portion of the console. These agents can stain and discolor the fabric. Dry with a dry cloth. Do not use a soft cloth dampened with water...) To clean, simply use household or glass cleaners. Avoid cleaner or polish that increases the gloss of the instrument panel. Cleaning the overhead console Clean with a damp cloth, then wipe dry with a soft cloth. Remove fresh spots immediately. Clean the outside of the air bag system...

Owner's Manual
Page 249
... blades ...223 Climate control (see Air conditioning or Heating) ...51 Clock ...35,44 Compass, electronic ...71 calibration ...73 set zone adjustment ...72 Console ...80 overhead ...69,74 rear ...81 Controls power seat ...94 Coolant checking and adding ...187 refill capacities ...191,226 specifications ...229,232 Cruise ...The Dispute Settlement Board ...238 Utilizing the Mediation/ Arbitration Program ...241 Daytime running lamps (see Speed control) ...63 Customer Assistance ...159 Ford accessories for your vehicle ...242 Ford Extended Service Plan ...235 Getting assistance outside the U.S.
... blades ...223 Climate control (see Air conditioning or Heating) ...51 Clock ...35,44 Compass, electronic ...71 calibration ...73 set zone adjustment ...72 Console ...80 overhead ...69,74 rear ...81 Controls power seat ...94 Coolant checking and adding ...187 refill capacities ...191,226 specifications ...229,232 Cruise ...The Dispute Settlement Board ...238 Utilizing the Mediation/ Arbitration Program ...241 Daytime running lamps (see Speed control) ...63 Customer Assistance ...159 Ford accessories for your vehicle ...242 Ford Extended Service Plan ...235 Getting assistance outside the U.S.

Rear Seat Entertainment System Supplement 1st Printing
Page 4
...safety information. It also allows you to service, repair or modify the rear seat entertainment system. Do not attempt to watch movie rentals and your Ford or Lincoln-Mercury dealer. The front glass on the liquid crystal display may break when hit with a hard surface. Driver should never operate any function... the liquid crystal display to operate the VCP functions without distracting the driver. 2 SAFETY INFORMATION Read all of the VCP mounted in the Floor Console when the vehicle is included in a safe place to driving and the road. See your favorite home videocassettes.
...safety information. It also allows you to service, repair or modify the rear seat entertainment system. Do not attempt to watch movie rentals and your Ford or Lincoln-Mercury dealer. The front glass on the liquid crystal display may break when hit with a hard surface. Driver should never operate any function... the liquid crystal display to operate the VCP functions without distracting the driver. 2 SAFETY INFORMATION Read all of the VCP mounted in the Floor Console when the vehicle is included in a safe place to driving and the road. See your favorite home videocassettes.

Rear Seat Entertainment System Supplement 1st Printing
Page 19
... Driver should never operate any function of the VCP mounted in the correct position. • Once the cassette is completely inserted, close the console cover. If this condition is encountered, the passenger should wait a few seconds and insert the cassette again in the Floor...the cassette because the machine attempts to hold the cassette firmly to operate the VCP functions without distracting the driver. • Open the RSES floor console cover, and slide a videocassette into the VCP automatically turns the power ON (the RED power indicator lamp will illuminate) and the tape will ...
... Driver should never operate any function of the VCP mounted in the correct position. • Once the cassette is completely inserted, close the console cover. If this condition is encountered, the passenger should wait a few seconds and insert the cassette again in the Floor...the cassette because the machine attempts to hold the cassette firmly to operate the VCP functions without distracting the driver. • Open the RSES floor console cover, and slide a videocassette into the VCP automatically turns the power ON (the RED power indicator lamp will illuminate) and the tape will ...

Rear Seat Entertainment System Supplement 1st Printing
Page 20
... on the VCP. 5. The tape will eject. Press the power button on the RSES control panel to switch from AV2 to AV1 mode. 4. Open the console cover, and press the STOP/EJECT button once. 2. Press the STOP/EJECT button to remove the cassette. 18 POWER DEW STOP/ EJECT REW PLAY FF...
... on the VCP. 5. The tape will eject. Press the power button on the RSES control panel to switch from AV2 to AV1 mode. 4. Open the console cover, and press the STOP/EJECT button once. 2. Press the STOP/EJECT button to remove the cassette. 18 POWER DEW STOP/ EJECT REW PLAY FF...


