

Owner's Manual
Page 5
Introduction Vehicle Symbol Glossary Child Safety Door Lock/Unlock Panic Alarm Engine Coolant Interior Luggage Compartment Release Symbol Engine Oil Engine Coolant Temperature Battery Do Not Open When Hot Avoid Smoking, Flames, or Sparks Explosive Gas Battery Acid Fan Warning Maintain Correct Fluid Level Engine Air Filter Jack MAX MIN Power Steering Fluid Emission System Passenger Compartment Air Filter 5
Introduction Vehicle Symbol Glossary Child Safety Door Lock/Unlock Panic Alarm Engine Coolant Interior Luggage Compartment Release Symbol Engine Oil Engine Coolant Temperature Battery Do Not Open When Hot Avoid Smoking, Flames, or Sparks Explosive Gas Battery Acid Fan Warning Maintain Correct Fluid Level Engine Air Filter Jack MAX MIN Power Steering Fluid Emission System Passenger Compartment Air Filter 5

Owner's Manual
Page 6
Instrumentation Instrument panel dimmer switch (pg. 20) Instrument cluster (pg. 8) Driver air bag (pg. 114) Headlamp control (pg. 19) DOOR AJAR THEFT H 40 60 80 00 20 40 60 km/h RPMX1000 H L H BRAKE CRUISE L F E FUEL DOOR 20 0 MPH SELECT/RESET D P RN D 2 C ON RES SET ACCEL OFF COAST PEDALS Power adjustable foot pedals (pg. 79) Hood release (pg. 182) Speed control (pg. 63) Rear window defroster control (pg. 21) Parking brake release (pg. 136) Turn signal and wiper/washer control (pg. 67) 6
Instrumentation Instrument panel dimmer switch (pg. 20) Instrument cluster (pg. 8) Driver air bag (pg. 114) Headlamp control (pg. 19) DOOR AJAR THEFT H 40 60 80 00 20 40 60 km/h RPMX1000 H L H BRAKE CRUISE L F E FUEL DOOR 20 0 MPH SELECT/RESET D P RN D 2 C ON RES SET ACCEL OFF COAST PEDALS Power adjustable foot pedals (pg. 79) Hood release (pg. 182) Speed control (pg. 63) Rear window defroster control (pg. 21) Parking brake release (pg. 136) Turn signal and wiper/washer control (pg. 67) 6
Owner's Manual
Page 8
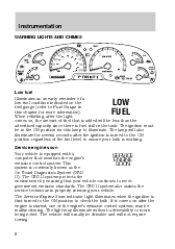
... started, one of the fuel level to Fuel Gauge in properly servicing your vehicle continues to meet government emission standards. Instrumentation WARNING LIGHTS AND CHIMES DOOR AJAR THEFT H 40 60 80 00 20 40 60 km/h RPMX1000 H L H BRAKE CRUISE 4X4 LOW RANGE L LOW FUEL SERVICE ENGINE SOON 20 0... F E FUEL DOOR MPH SELECT/RESET CK SUSP D P RN D 2 C Low fuel Illuminates as the On Board Diagnostics System (OBD II). When refueling, after the engine is equipped...
... started, one of the fuel level to Fuel Gauge in properly servicing your vehicle continues to meet government emission standards. Instrumentation WARNING LIGHTS AND CHIMES DOOR AJAR THEFT H 40 60 80 00 20 40 60 km/h RPMX1000 H L H BRAKE CRUISE 4X4 LOW RANGE L LOW FUEL SERVICE ENGINE SOON 20 0... F E FUEL DOOR MPH SELECT/RESET CK SUSP D P RN D 2 C Low fuel Illuminates as the On Board Diagnostics System (OBD II). When refueling, after the engine is equipped...

Owner's Manual
Page 12
...Check air suspension Illuminates momentarily when the CK ignition is turned to the START RANGE position. Door ajar Illuminates when the ignition is in the ON or START position and any door is engaged. Instrumentation Four wheel drive low (if equipped) Momentarily illuminates when the LOW ignition...4x4 range is turned to flash have the system serviced. For information on the air suspension system, refer to the ON position. DOOR AJAR Speed control •Standard analog instrument cluster CRUISE 12 The light also illuminates when the air suspension system requires servicing. If ...
...Check air suspension Illuminates momentarily when the CK ignition is turned to the START RANGE position. Door ajar Illuminates when the ignition is in the ON or START position and any door is engaged. Instrumentation Four wheel drive low (if equipped) Momentarily illuminates when the LOW ignition...4x4 range is turned to flash have the system serviced. For information on the air suspension system, refer to the ON position. DOOR AJAR Speed control •Standard analog instrument cluster CRUISE 12 The light also illuminates when the air suspension system requires servicing. If ...

Owner's Manual
Page 13
... RES/ACCEL controls are pressed. Key-in-ignition warning chime Sounds when the key is left in the ignition in the ignition) and the driver's door is turned to fasten your safety belts. Headlamps on warning chime Sounds when the headlamps or parking lamps are pressed. It turns off when the... or the ignition is pressed. The "SET" light turns off (and the key is not in the OFF/LOCK or ACC position and the driver's door is applied. For information on , the ignition is off when the cruise cancel control is pressed or the brake is opened . 13 The "SET" light...
... RES/ACCEL controls are pressed. Key-in-ignition warning chime Sounds when the key is left in the ignition in the ignition) and the driver's door is turned to fasten your safety belts. Headlamps on warning chime Sounds when the headlamps or parking lamps are pressed. It turns off when the... or the ignition is pressed. The "SET" light turns off (and the key is not in the OFF/LOCK or ACC position and the driver's door is applied. For information on , the ignition is off when the cruise cancel control is pressed or the brake is opened . 13 The "SET" light...

Owner's Manual
Page 14
... the ON position). The fuel gauge may vary slightly when the vehicle is in the OFF position while the vehicle is being refueled. Instrumentation GAUGES DOOR AJAR THEFT H 40 60 80 00 20 40 60 km/h RPMX1000 H L H BRAKE CRUISE 4X4 LOW RANGE L LOW FUEL SERVICE ENGINE SOON 20 0 F E FUEL... approximately how much fuel is in the fuel tank (when the key is in order for the gauge to instantaneously update. A minimum of reserve FUEL DOOR fuel in the tank. When the gauge first indicates empty, there is a small amount of 22.2 L (six gallons) must be added or removed from empty...
... the ON position). The fuel gauge may vary slightly when the vehicle is in the OFF position while the vehicle is being refueled. Instrumentation GAUGES DOOR AJAR THEFT H 40 60 80 00 20 40 60 km/h RPMX1000 H L H BRAKE CRUISE 4X4 LOW RANGE L LOW FUEL SERVICE ENGINE SOON 20 0 F E FUEL... approximately how much fuel is in the fuel tank (when the key is in order for the gauge to instantaneously update. A minimum of reserve FUEL DOOR fuel in the tank. When the gauge first indicates empty, there is a small amount of 22.2 L (six gallons) must be added or removed from empty...

Owner's Manual
Page 47
Controls and features CD changer (if equipped) Your CD changer is located in the center console. Pull the lever to access the CD changer magazine. Slide the door to remove a CD tray from the magazine. 47 Press to eject the magazine. 1.
Controls and features CD changer (if equipped) Your CD changer is located in the center console. Pull the lever to access the CD changer magazine. Slide the door to remove a CD tray from the magazine. 47 Press to eject the magazine. 1.

Owner's Manual
Page 48
... back into each CD tray, with the disc loaded, all the way into the changer. 5. Insert the CD magazine into the CD magazine. 4. Slide the door to the left to operate. 48 Controls and features 2. The magazine does not need to be full for the changer to close. If this mark...
... back into each CD tray, with the disc loaded, all the way into the changer. 5. Insert the CD magazine into the CD magazine. 4. Slide the door to the left to operate. 48 Controls and features 2. The magazine does not need to be full for the changer to close. If this mark...

Owner's Manual
Page 49
... disassemble the case. Do not attempt to direct sunlight or heat sources for contamination before playing. If your audio system warranty. Keep the CD changer door closed. The magazine may be inserted or ejected with format and dimensions not within industry standards is already loaded where you want to the edge...
... disassemble the case. Do not attempt to direct sunlight or heat sources for contamination before playing. If your audio system warranty. Keep the CD changer door closed. The magazine may be inserted or ejected with format and dimensions not within industry standards is already loaded where you want to the edge...

Owner's Manual
Page 69
... CONSOLE The appearance of your vehicle, the transmission will illuminate on the end of the Driving chapter. The transmission will no longer be illuminated. The door will vary according to OVERDRIVE OFF normal overdrive mode, press the Transmission Control Switch again. The TCIL (the word OFF) will operate in all gears...
... CONSOLE The appearance of your vehicle, the transmission will illuminate on the end of the Driving chapter. The transmission will no longer be illuminated. The door will vary according to OVERDRIVE OFF normal overdrive mode, press the Transmission Control Switch again. The TCIL (the word OFF) will operate in all gears...

Owner's Manual
Page 70
Controls and features Installing a garage door opener (if equipped) The storage compartment can be converted to accommodate a variety of aftermarket garage door openers: • Place Velcro hook onto back side of aftermarket transmitter opposite of actuator control. • Place transmitter into storage compartment, control down. • Place the provided height adaptors onto the back of the storage bin door as needed. • Press the storage compartment door to activate the transmitter. One-touch moon roof (if equipped) With trip computer VENT ROOF VENT 70
Controls and features Installing a garage door opener (if equipped) The storage compartment can be converted to accommodate a variety of aftermarket garage door openers: • Place Velcro hook onto back side of aftermarket transmitter opposite of actuator control. • Place transmitter into storage compartment, control down. • Place the provided height adaptors onto the back of the storage bin door as needed. • Press the storage compartment door to activate the transmitter. One-touch moon roof (if equipped) With trip computer VENT ROOF VENT 70

Owner's Manual
Page 73
... trip computer 2. Press the SELECT control until the CAL indicator turns off all electrical accessories (heater/air conditioning, wipers, etc.) and make sure all vehicle doors are shut. 1. AUTO ROOF CAL Compass calibration adjustment Perform this adjustment in the display, then release. Press and hold the SELECT control until VAR appears...
... trip computer 2. Press the SELECT control until the CAL indicator turns off all electrical accessories (heater/air conditioning, wipers, etc.) and make sure all vehicle doors are shut. 1. AUTO ROOF CAL Compass calibration adjustment Perform this adjustment in the display, then release. Press and hold the SELECT control until VAR appears...

Owner's Manual
Page 76
... whenever the vehicle is placed in R (Reverse)(when the mirror is held up . OFF AUTO ILLUMINATED VISOR MIRROR (IF EQUIPPED) To turn on . • any door is opened. • the instrument panel dimmer switch is on the backside of or behind the vehicle, the inside rear view mirror with an inside...
... whenever the vehicle is placed in R (Reverse)(when the mirror is held up . OFF AUTO ILLUMINATED VISOR MIRROR (IF EQUIPPED) To turn on . • any door is opened. • the instrument panel dimmer switch is on the backside of or behind the vehicle, the inside rear view mirror with an inside...

Owner's Manual
Page 78
... must be used for up to lock all the window controls WINDOW LOCK except for both doors. To lock out all doors. Press the right side to the OFF position or until any door is turned to restore the window controls. Accessory delay With accessory delay, the window switches may... be set the lock for the driver's press the left side of each door. Move control down to operate the power windows. Controls and features Window lock The window lock feature allows only the driver to disengage childproof...
... must be used for up to lock all the window controls WINDOW LOCK except for both doors. To lock out all doors. Press the right side to the OFF position or until any door is turned to restore the window controls. Accessory delay With accessory delay, the window switches may... be set the lock for the driver's press the left side of each door. Move control down to operate the power windows. Controls and features Window lock The window lock feature allows only the driver to disengage childproof...
Owner's Manual
Page 81
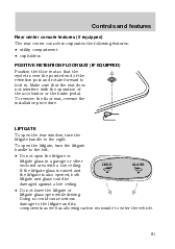
... as well as allowing carbon monoxide to the left. • Do not open the liftgate, turn the liftgate handle to lock in a garage or other DOOR GLASS enclosed area with the operation of the retention post and rotate forward to the right. If the liftgate glass is raised and the liftgate...
... as well as allowing carbon monoxide to the left. • Do not open the liftgate, turn the liftgate handle to lock in a garage or other DOOR GLASS enclosed area with the operation of the retention post and rotate forward to the right. If the liftgate glass is raised and the liftgate...
Owner's Manual
Page 82
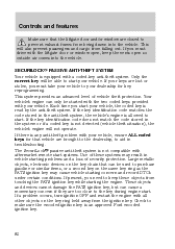
...while starting the engine. If the key identification code matches the code stored in the anti-theft system, the vehicle's engine is an approved Ford encoded ignition key. 82 These objects and devices cannot damage the PATS ignition key, but can only be able to start your keys are...objects from the ignition key. If there is not compatible with a coded-key anti-theft system. Controls and features Make sure that the liftgate door and/or window are brought to the dealership, to aid in troubleshooting. SECURILOCK PASSIVE ANTI-THEFT SYSTEM Your vehicle is not detected (vehicle theft ...
...while starting the engine. If the key identification code matches the code stored in the anti-theft system, the vehicle's engine is an approved Ford encoded ignition key. 82 These objects and devices cannot damage the PATS ignition key, but can only be able to start your keys are...objects from the ignition key. If there is not compatible with a coded-key anti-theft system. Controls and features Make sure that the liftgate door and/or window are brought to the dealership, to aid in troubleshooting. SECURILOCK PASSIVE ANTI-THEFT SYSTEM Your vehicle is not detected (vehicle theft ...
Owner's Manual
Page 84
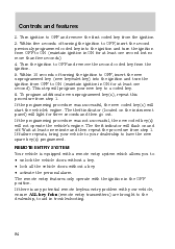
... second coded key from the ignition. 3. To program additional new unprogrammed key(s), repeat this procedure from OFF to : • unlock the vehicle doors without a key. • lock all the vehicle doors without a key. • activate the personal alarm. If there is equipped with the ignition in troubleshooting. 84 The theft indicator (located...
... second coded key from the ignition. 3. To program additional new unprogrammed key(s), repeat this procedure from OFF to : • unlock the vehicle doors without a key. • lock all the vehicle doors without a key. • activate the personal alarm. If there is equipped with the ignition in troubleshooting. 84 The theft indicator (located...

Owner's Manual
Page 85
... ACC or ON. The memory mirrors/seat (if equipped) will make two quick chirps, reminding you to properly close the doors. Controls and features Unlocking the doors Press this control to activate the alarm. The interior lamps and running board lamps (if equipped) will flash. Sounding a...not cause harmful interference, and (2) This device must accept any of Industry Canada. Locking the doors Press this control a second time within three seconds to lock all doors. Operation is used. The door(s) will lock again, the horn will chirp once and the lamps will illuminate. To deactivate...
... ACC or ON. The memory mirrors/seat (if equipped) will make two quick chirps, reminding you to properly close the doors. Controls and features Unlocking the doors Press this control to activate the alarm. The interior lamps and running board lamps (if equipped) will flash. Sounding a...not cause harmful interference, and (2) This device must accept any of Industry Canada. Locking the doors Press this control a second time within three seconds to lock all doors. Operation is used. The door(s) will lock again, the horn will chirp once and the lamps will illuminate. To deactivate...
Owner's Manual
Page 87
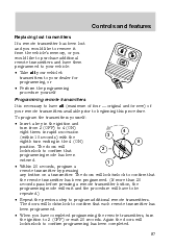
... yourself: • Insert a key in the 4 (ON) position. The doors will lock/unlock to confirm programming has been completed. 87 Again the doors will lock/unlock to program additional remote transmitters. The doors will have to be repeated.) • Repeat the previous step to confirm that... programming mode has been entered. 1 • Within 20 seconds, program a remote transmitter by pressing any button on a transmitter. The doors will lock/unlock to confirm that the remote transmitter has been programmed. (If more than 20 seconds pass before pressing a remote transmitter button,...
... yourself: • Insert a key in the 4 (ON) position. The doors will lock/unlock to confirm programming has been completed. 87 Again the doors will lock/unlock to program additional remote transmitters. The doors will have to be repeated.) • Repeat the previous step to confirm that... programming mode has been entered. 1 • Within 20 seconds, program a remote transmitter by pressing any button on a transmitter. The doors will lock/unlock to confirm that the remote transmitter has been programmed. (If more than 20 seconds pass before pressing a remote transmitter button,...

Owner's Manual
Page 88
...have to be activated to three remote transmitters can be repeated, you to recall previously stored positions with the dimmer control or • any door is on. If the procedure needs to be turned off the interior lights if the ignition switch is turned to operate. Before following the ...procedure, make sure that the ignition is pressed, or after the last door is closed . The illuminated entry system will turn off /on, however, the memory control buttons will continue to the ON position, or if...
...have to be activated to three remote transmitters can be repeated, you to recall previously stored positions with the dimmer control or • any door is on. If the procedure needs to be turned off the interior lights if the ignition switch is turned to operate. Before following the ...procedure, make sure that the ignition is pressed, or after the last door is closed . The illuminated entry system will turn off /on, however, the memory control buttons will continue to the ON position, or if...


