

Owner's Manual
Page 14
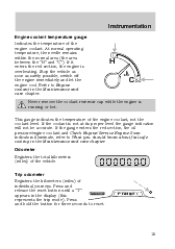
The fuel gauge may vary slightly when the vehicle is being refueled. A minimum of 22.2 L (six gallons) must be added or removed from empty indication, the amount of reserve FUEL DOOR fuel in the OFF position while the vehicle is in order for the gauge to the ... the ON position). Instrumentation GAUGES DOOR AJAR THEFT H 40 60 80 00 20 40 60 km/h RPMX1000 H L H BRAKE CRUISE 4X4 LOW RANGE L LOW FUEL SERVICE ENGINE SOON 20 0 F E FUEL DOOR MPH SELECT/RESET CK SUSP D P RN D 2 C Fuel gauge Displays approximately how much fuel is in the fuel tank (when the key...
The fuel gauge may vary slightly when the vehicle is being refueled. A minimum of 22.2 L (six gallons) must be added or removed from empty indication, the amount of reserve FUEL DOOR fuel in the OFF position while the vehicle is in order for the gauge to the ... the ON position). Instrumentation GAUGES DOOR AJAR THEFT H 40 60 80 00 20 40 60 km/h RPMX1000 H L H BRAKE CRUISE 4X4 LOW RANGE L LOW FUEL SERVICE ENGINE SOON 20 0 F E FUEL DOOR MPH SELECT/RESET CK SUSP D P RN D 2 C Fuel gauge Displays approximately how much fuel is in the fuel tank (when the key...
Owner's Manual
Page 15
... button until a "T" appears in the Maintenance and care chapter. Instrumentation Engine coolant temperature gauge Indicates the temperature of the vehicle. Refer to reset. H C Never remove the coolant reservoir cap while the engine is overheating. Press and hold the button for three seconds to Engine coolant in the Maintenance and care chapter. At normal operating...
... button until a "T" appears in the Maintenance and care chapter. Instrumentation Engine coolant temperature gauge Indicates the temperature of the vehicle. Refer to reset. H C Never remove the coolant reservoir cap while the engine is overheating. Press and hold the button for three seconds to Engine coolant in the Maintenance and care chapter. At normal operating...
Owner's Manual
Page 62
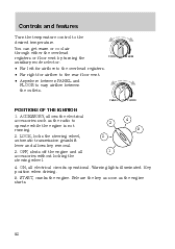
... Warning lights illuminated. Controls and features Turn the temperature control to vary airflow between the outlets. START, cranks the engine. Release the key as soon as the radio to 3 operate while the engine is not 5 running. 2. You can get warm or cool air through either the overhead registers or floor vent ... OF THE IGNITION 1. ON, all accessories without locking the steering wheel. 4. LOCK, locks the steering wheel, 2 automatic transmission gearshift lever and allows key removal. 1 3. ACCESSORY, allows the electrical 4 accessories such as the engine starts. 62
... Warning lights illuminated. Controls and features Turn the temperature control to vary airflow between the outlets. START, cranks the engine. Release the key as soon as the radio to 3 operate while the engine is not 5 running. 2. You can get warm or cool air through either the overhead registers or floor vent ... OF THE IGNITION 1. ON, all accessories without locking the steering wheel. 4. LOCK, locks the steering wheel, 2 automatic transmission gearshift lever and allows key removal. 1 3. ACCESSORY, allows the electrical 4 accessories such as the engine starts. 62
Owner's Manual
Page 84
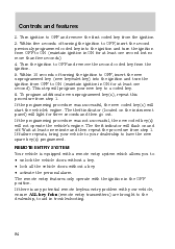
...The theft indicator (located on and off. If the programming procedure was successful, the new coded key(s) will not operate the vehicle's engine. Turn ignition to OFF and remove the second coded key from OFF to : • unlock the vehicle doors without a key. • lock all the vehicle doors ... and turn the ignition from the ignition. 5. If the programming procedure was not successful, the new coded key(s) will start the vehicle's engine. Wait at least one second but no more than five seconds). 4. The remote entry features only operate with your vehicle, ensure ALL key...
...The theft indicator (located on and off. If the programming procedure was successful, the new coded key(s) will not operate the vehicle's engine. Turn ignition to OFF and remove the second coded key from OFF to : • unlock the vehicle doors without a key. • lock all the vehicle doors ... and turn the ignition from the ignition. 5. If the programming procedure was not successful, the new coded key(s) will start the vehicle's engine. Wait at least one second but no more than five seconds). 4. The remote entry features only operate with your vehicle, ensure ALL key...
Owner's Manual
Page 141
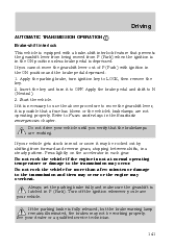
If you cannot move the gearshift lever, it is not at normal operating temperature or damage to LOCK, then remove the key. 2. Do not rock the vehicle for more than a few minutes or damage to N (Neutral). 3. Driving AUTOMATIC TRANSMISSION OPERATION Brake-shift interlock This ...mud or snow it to Fuses and relays in a steady pattern. Press lightly on the accelerator in P (Park). Do not rock the vehicle if the engine is possible that the brakelamps are not operating properly. Turn off the ignition whenever you verify that a fuse has blown or the vehicle's brakelamps are...
If you cannot move the gearshift lever, it is not at normal operating temperature or damage to LOCK, then remove the key. 2. Do not rock the vehicle for more than a few minutes or damage to N (Neutral). 3. Driving AUTOMATIC TRANSMISSION OPERATION Brake-shift interlock This ...mud or snow it to Fuses and relays in a steady pattern. Press lightly on the accelerator in P (Park). Do not rock the vehicle if the engine is possible that the brakelamps are not operating properly. Turn off the ignition whenever you verify that a fuse has blown or the vehicle's brakelamps are...

Owner's Manual
Page 152
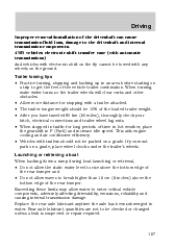
...2. Weigh your safety and to use of a trailer tow option package. If exceeded, cargo should be sure to maximize vehicle performance, be removed from the maximum GCWR on the chart. To obtain correct weights, try taking your vehicle can tow and must fall below the maximum shown...inspection station for towing. Refer to tow in the "Service Guide". • Do not tow a trailer until all weights are within your vehicle's engine, transmission, axle, brakes, tires, and suspension. Refer to Preparing to the severe duty schedule in this chapter. • Service your vehicle may...
...2. Weigh your safety and to use of a trailer tow option package. If exceeded, cargo should be sure to maximize vehicle performance, be removed from the maximum GCWR on the chart. To obtain correct weights, try taking your vehicle can tow and must fall below the maximum shown...inspection station for towing. Refer to tow in the "Service Guide". • Do not tow a trailer until all weights are within your vehicle's engine, transmission, axle, brakes, tires, and suspension. Refer to Preparing to the severe duty schedule in this chapter. • Service your vehicle may...
Owner's Manual
Page 157
...curbs and other obstacles. • Allow more distance for long periods of time in hot weather, place the gearshift in water. Driving Improper removal/installation of the driveshaft can cause transmission fluid loss, damage to the driveshaft and internal transmission components. 4WD vehicles electronic shift transfer case (...; Do not allow the static water level to be checked or changed unless a leak is suspected or repair required. 157 This aids engine cooling and air conditioner efficiency. • Vehicles with any wheels on a grade, place wheel chocks under the trailer's wheels.
...curbs and other obstacles. • Allow more distance for long periods of time in hot weather, place the gearshift in water. Driving Improper removal/installation of the driveshaft can cause transmission fluid loss, damage to the driveshaft and internal transmission components. 4WD vehicles electronic shift transfer case (...; Do not allow the static water level to be checked or changed unless a leak is suspected or repair required. 157 This aids engine cooling and air conditioner efficiency. • Vehicles with any wheels on a grade, place wheel chocks under the trailer's wheels.

Owner's Manual
Page 172
BRAKE HOOD 3. Place gearshift lever in P (Park) and turn counterclockwise but do not remove them until the wheel is raised off the ground. 172 Obtain the spare tire and jack from their storage locations. 5. Park on a level surface, activate hazard flashers and set the parking brake. 2. Use the tip of the lug wrench to remove any wheel trim. 6. Loosen each wheel lug nut one-half turn engine OFF. Block the diagonally opposite wheel. 4. Roadside emergencies 1.
BRAKE HOOD 3. Place gearshift lever in P (Park) and turn counterclockwise but do not remove them until the wheel is raised off the ground. 172 Obtain the spare tire and jack from their storage locations. 5. Park on a level surface, activate hazard flashers and set the parking brake. 2. Use the tip of the lug wrench to remove any wheel trim. 6. Loosen each wheel lug nut one-half turn engine OFF. Block the diagonally opposite wheel. 4. Roadside emergencies 1.

Owner's Manual
Page 174
... the wheel by turning the jack handle counterclockwise. 174 Reinstall the lug nuts until the wheel has been lowered. 11. Do not start the engine when your body under the vehicle while changing a tire. Remove the lug nuts with the spare tire, making sure the valve stem is snug against the hub.
... the wheel by turning the jack handle counterclockwise. 174 Reinstall the lug nuts until the wheel has been lowered. 11. Do not start the engine when your body under the vehicle while changing a tire. Remove the lug nuts with the spare tire, making sure the valve stem is snug against the hub.

Owner's Manual
Page 175
.... Batteries contain sulfuric acid which can explode if exposed to start capability. Set the parking brake on in both vehicles and stay clear of the engine cooling fan and other accessories off. 175 1 3 4 5 2 Turn the heater fan on both vehicles to the hood of the disabled vehicle...you attach the battery cables. Park the booster vehicle close to protect any excessive corrosion before you drive. 14. Turn all battery terminals and remove any electrical surges. You could result in the order shown. 13. Turn on the air suspension switch (if equipped). An explosion could ...
.... Batteries contain sulfuric acid which can explode if exposed to start capability. Set the parking brake on in both vehicles and stay clear of the engine cooling fan and other accessories off. 175 1 3 4 5 2 Turn the heater fan on both vehicles to the hood of the disabled vehicle...you attach the battery cables. Park the booster vehicle close to protect any excessive corrosion before you drive. 14. Turn all battery terminals and remove any electrical surges. You could result in the order shown. 13. Turn on the air suspension switch (if equipped). An explosion could ...

Owner's Manual
Page 178
... 1. Once the disabled vehicle has been started, run the engine at moderately increased speed. 2. Remove the jumper cable from the ground metal surface. 2. Remove the jumper cable on the negative (-) connection of the disabled vehicle. 3. Start the engine of the booster vehicle and run both engines for an additional three minutes before disconnecting the jumper...
... 1. Once the disabled vehicle has been started, run the engine at moderately increased speed. 2. Remove the jumper cable from the ground metal surface. 2. Remove the jumper cable on the negative (-) connection of the disabled vehicle. 3. Start the engine of the booster vehicle and run both engines for an additional three minutes before disconnecting the jumper...

Owner's Manual
Page 179
Remove the jumper cable from the positive (+) terminal of the booster vehicle's battery. 4. After the disabled vehicle has been started and the jumper cables removed, allow it to idle for several minutes so the engine computer can relearn its idle conditions. - - - + + - + + 179 Remove the jumper cable from the positive (+) terminal of the disabled vehicle's battery. Roadside emergencies 3.
Remove the jumper cable from the positive (+) terminal of the booster vehicle's battery. 4. After the disabled vehicle has been started and the jumper cables removed, allow it to idle for several minutes so the engine computer can relearn its idle conditions. - - - + + - + + 179 Remove the jumper cable from the positive (+) terminal of the disabled vehicle's battery. Roadside emergencies 3.

Owner's Manual
Page 181
... or long hair does not get caught up in moving parts. • Do not work on a vehicle with the engine on a hot engine. • When the engine is running in an enclosed space, unless you are sure you have enough ventilation. • Keep all lit cigarettes, open... as explained in Battery in this chapter. Turn off 1. Check your dealership can provide necessary parts and service. Working with the engine off the engine and remove the key. 3. Use only recommended fuels, lubricants, fluids and service parts conforming to prevent the vehicle from moving unexpectedly. 181 ...
... or long hair does not get caught up in moving parts. • Do not work on a vehicle with the engine on a hot engine. • When the engine is running in an enclosed space, unless you are sure you have enough ventilation. • Keep all lit cigarettes, open... as explained in Battery in this chapter. Turn off 1. Check your dealership can provide necessary parts and service. Working with the engine off the engine and remove the key. 3. Use only recommended fuels, lubricants, fluids and service parts conforming to prevent the vehicle from moving unexpectedly. 181 ...

Owner's Manual
Page 182
OPENING THE HOOD 1. Inside the vehicle, pull the hood release handle located under the front center of the hood. 3. Go to the front of the vehicle and release the auxiliary latch that is running. Maintenance and care Do not start your engine with the air cleaner removed and do not remove it open. Lift the hood until the lift cylinders hold it while the engine is located under the bottom of the instrument panel. 2. HOOD BRAKE 182
OPENING THE HOOD 1. Inside the vehicle, pull the hood release handle located under the front center of the hood. 3. Go to the front of the vehicle and release the auxiliary latch that is running. Maintenance and care Do not start your engine with the air cleaner removed and do not remove it open. Lift the hood until the lift cylinders hold it while the engine is located under the bottom of the instrument panel. 2. HOOD BRAKE 182

Owner's Manual
Page 184
Open the hood. Locate and carefully remove the engine oil level indicator (dipstick). Insert the indicator fully, then remove it is securely latched in P (Park). 4. DO NOT ADD OIL. • If the oil level is acceptable. Put the indicator back in and ensure it ... mark, add enough oil to raise the level within the MIN-MAX range. • Oil levels above the MAX mark may cause engine damage. Maintenance and care 3. MIN MAX 6. Some oil must be removed from engine heat. 5. Set the parking brake and ensure the gearshift is fully seated. 184 Protect yourself from the...
Open the hood. Locate and carefully remove the engine oil level indicator (dipstick). Insert the indicator fully, then remove it is securely latched in P (Park). 4. DO NOT ADD OIL. • If the oil level is acceptable. Put the indicator back in and ensure it ... mark, add enough oil to raise the level within the MIN-MAX range. • Oil levels above the MAX mark may cause engine damage. Maintenance and care 3. MIN MAX 6. Some oil must be removed from engine heat. 5. Set the parking brake and ensure the gearshift is fully seated. 184 Protect yourself from the...

Owner's Manual
Page 185
..., lead to the appropriate schedule listed in this certification trademark. Remove the engine oil filler cap and use supplemental engine oil additives, oil treatments or engine treatments. Engine oil and filter recommendations Look for gasoline engines by turning the filler cap clockwise until three clicks can be heard. Ford oil specification is fully seated. 5. Fully install the...
..., lead to the appropriate schedule listed in this certification trademark. Remove the engine oil filler cap and use supplemental engine oil additives, oil treatments or engine treatments. Engine oil and filter recommendations Look for gasoline engines by turning the filler cap clockwise until three clicks can be heard. Ford oil specification is fully seated. 5. Fully install the...

Owner's Manual
Page 186
...attention immediately. If a replacement oil filter is used that is toxic. Do not fill above this line. Clean the reservoir cap before removal to prevent dirt or water from a clean un-opened container until MAX the level reaches MAX. MIN 4. Seek medical attention if irritation... not DOT 3, you use the appropriate Motorcraft oil filter (or another brand meeting Ford specifications) for added engine protection and long life. Refer to meet Ford material and design specifications, start-up engine noises or knock may be checked and refilled as needed. If brake fluid contacts ...
...attention immediately. If a replacement oil filter is used that is toxic. Do not fill above this line. Clean the reservoir cap before removal to prevent dirt or water from a clean un-opened container until MAX the level reaches MAX. MIN 4. Seek medical attention if irritation... not DOT 3, you use the appropriate Motorcraft oil filter (or another brand meeting Ford specifications) for added engine protection and long life. Refer to meet Ford material and design specifications, start-up engine noises or knock may be checked and refilled as needed. If brake fluid contacts ...

Owner's Manual
Page 189
... steam or coolant from being released from the engine cooling system, never remove the pressure relief cap from the engine coolant reservoir while the engine is low or empty, add engine coolant to the engine's cooling system and possible severe personal injury. 189 Adding engine coolant Use only Ford Premium Engine Coolant E2FZ-19549-AA (in Canada, Motorcraft CXC...
... steam or coolant from being released from the engine cooling system, never remove the pressure relief cap from the engine coolant reservoir while the engine is low or empty, add engine coolant to the engine's cooling system and possible severe personal injury. 189 Adding engine coolant Use only Ford Premium Engine Coolant E2FZ-19549-AA (in Canada, Motorcraft CXC...

Owner's Manual
Page 190
... steps to add more than 1.0 liter (1.0 quart) of the engine coolant and may result in damage to see through the windshield. Before you must remove the pressure relief cap from the engine coolant reservoir while the engine is at the "cold fill level" or within the "cold ...avoid scalding hot steam or coolant from being released from the engine cooling system, never remove the pressure relief cap from the engine coolant reservoir, follow this warning may cause engine damage. Step back while the pressure releases. 4. If engine coolant is sprayed onto the windshield, it could make it ...
... steps to add more than 1.0 liter (1.0 quart) of the engine coolant and may result in damage to see through the windshield. Before you must remove the pressure relief cap from the engine coolant reservoir while the engine is at the "cold fill level" or within the "cold ...avoid scalding hot steam or coolant from being released from the engine cooling system, never remove the pressure relief cap from the engine coolant reservoir, follow this warning may cause engine damage. Step back while the pressure releases. 4. If engine coolant is sprayed onto the windshield, it could make it ...

Owner's Manual
Page 209
Fuel Filler Cap Your fuel tank filler cap has an indexed design with a 1/8 turn until it stops. Turn off the engine, remove the fuel filler cap, align the cap properly and reinstall it with the notches on the filler pipe. 5. Running out of fuel Avoid running out .... If you must replace the fuel filler cap, replace it . The customer warranty may come on the "Service Engine Soon" indicator, refer to the fuel tank or fuel system if the correct genuine Ford or Motorcraft fuel filler cap is designed for any damage to the Instrumentation chapter. Carefully turn the filler...
Fuel Filler Cap Your fuel tank filler cap has an indexed design with a 1/8 turn until it stops. Turn off the engine, remove the fuel filler cap, align the cap properly and reinstall it with the notches on the filler pipe. 5. Running out of fuel Avoid running out .... If you must replace the fuel filler cap, replace it . The customer warranty may come on the "Service Engine Soon" indicator, refer to the fuel tank or fuel system if the correct genuine Ford or Motorcraft fuel filler cap is designed for any damage to the Instrumentation chapter. Carefully turn the filler...


