
Owner's Manual
Page 16
When the gauge first indicates empty, there is a small amount of 22.2 L (six gallons) must be added or removed from empty indication, the amount of fuel that can be added will take between five to twenty minutes to instantaneously update. When refueling the vehicle ...
When the gauge first indicates empty, there is a small amount of 22.2 L (six gallons) must be added or removed from empty indication, the amount of fuel that can be added will take between five to twenty minutes to instantaneously update. When refueling the vehicle ...
Owner's Manual
Page 17
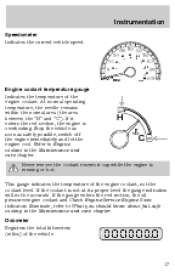
... gauge Indicates the temperature of the engine coolant. At normal operating temperature, the needle remains within the normal area (the area between the "H" and "C"). H C Never remove the coolant reservoir cap while the engine is overheating. If the coolant is not at its proper level the gauge indication will not be accurate.
... gauge Indicates the temperature of the engine coolant. At normal operating temperature, the needle remains within the normal area (the area between the "H" and "C"). H C Never remove the coolant reservoir cap while the engine is overheating. If the coolant is not at its proper level the gauge indication will not be accurate.
Owner's Manual
Page 42
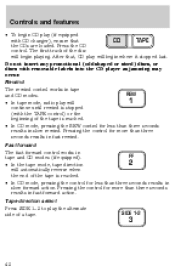
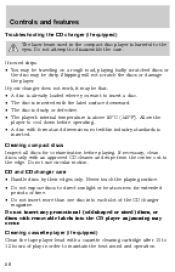
... Press SIDE 1-2 to play (if equipped with CD changer), ensure that , CD play will automatically reverse when the end of the tape is stopped (with removable labels into the CD player as jamming may occur. The first track of the disc will begin where it stopped last. Rewind The rewind control...
... Press SIDE 1-2 to play (if equipped with CD changer), ensure that , CD play will automatically reverse when the end of the tape is stopped (with removable labels into the CD player as jamming may occur. The first track of the disc will begin where it stopped last. Rewind The rewind control...

Owner's Manual
Page 48
... seek function control works in radio or CD changer mode (if equipped). Do not insert any promotional (odd shaped or sized) discs, or discs with removable labels into the CD player as jamming may occur. Seek function in radio mode • Press to move to the next TUNE frequency down the...
... seek function control works in radio or CD changer mode (if equipped). Do not insert any promotional (odd shaped or sized) discs, or discs with removable labels into the CD player as jamming may occur. Seek function in radio mode • Press to move to the next TUNE frequency down the...
Owner's Manual
Page 57
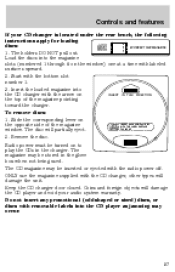
Load the discs into the magazine slots (numbered 1 through 6 on to play the CDs in the glove box when not being used. To remove discs: 1. Remove the disc. ONLY use the magazine supplied with the bottom slot number 1. 3. Start with the CD changer, other types will damage the unit. The ... SURFACE FACING UP 57 Coins and foreign objects will partially eject. 2. Do not insert any promotional (odd shaped or sized) discs, or discs with removable labels into the CD changer with labeled surfaces upward. 2. The disc will damage the CD player and void your CD changer is located under the...
Load the discs into the magazine slots (numbered 1 through 6 on to play the CDs in the glove box when not being used. To remove discs: 1. Remove the disc. ONLY use the magazine supplied with the bottom slot number 1. 3. Start with the CD changer, other types will damage the unit. The ... SURFACE FACING UP 57 Coins and foreign objects will partially eject. 2. Do not insert any promotional (odd shaped or sized) discs, or discs with removable labels into the CD changer with labeled surfaces upward. 2. The disc will damage the CD player and void your CD changer is located under the...
Owner's Manual
Page 58
... or sized) discs, or discs with the label surface downward. • The disc is dusty or defective. • The player's internal temperature is inserted with removable labels into each slot of play in the compact disc player is inserted. If sound skips: • You may be traveling on a rough road, playing...
... or sized) discs, or discs with the label surface downward. • The disc is dusty or defective. • The player's internal temperature is inserted with removable labels into each slot of play in the compact disc player is inserted. If sound skips: • You may be traveling on a rough road, playing...

Owner's Manual
Page 59
... temperatures to reach a moderate temperature before playing. • Tighten very loose tapes by inserting a finger or pencil into the hole and turning the hub. • Remove loose labels before inserting tapes. • Do not leave tapes in a given area. The listenable range of its "shadow") returns your vehicle's antenna and the...
... temperatures to reach a moderate temperature before playing. • Tighten very loose tapes by inserting a finger or pencil into the hole and turning the hub. • Remove loose labels before inserting tapes. • Do not leave tapes in a given area. The listenable range of its "shadow") returns your vehicle's antenna and the...
Owner's Manual
Page 61
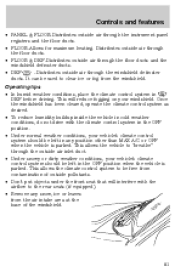
... control system to be left in the OFF position when the vehicle is parked. This allows the vehicle to the rear seats (if equipped). • Remove any position other than MAX A/C or OFF when the vehicle is parked. It can be left in DEF before driving. Once the windshield has been...
... control system to be left in the OFF position when the vehicle is parked. This allows the vehicle to the rear seats (if equipped). • Remove any position other than MAX A/C or OFF when the vehicle is parked. It can be left in DEF before driving. Once the windshield has been...
Owner's Manual
Page 63
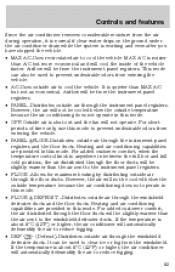
... automatically dehumidify the air to reduce fogging. 63 It is shut out and the fan will not operate. Controls and features Since the air conditioner removes considerable moisture from the air during operation, it is normal if clear water drips on the ground under the air conditioner drain while the system...
... automatically dehumidify the air to reduce fogging. 63 It is shut out and the fan will not operate. Controls and features Since the air conditioner removes considerable moisture from the air during operation, it is normal if clear water drips on the ground under the air conditioner drain while the system...
Owner's Manual
Page 64
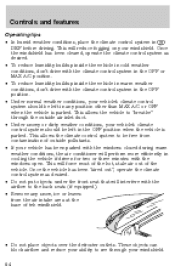
... objects under the front seat that will interfere with the windows open. This allows the climate control system to the back seats (if equipped). • Remove any snow, ice or leaves from contamination of teh windhsield. • Do not place objects over the defroster outlets. Controls and features Operating tips •...
... objects under the front seat that will interfere with the windows open. This allows the climate control system to the back seats (if equipped). • Remove any snow, ice or leaves from contamination of teh windhsield. • Do not place objects over the defroster outlets. Controls and features Operating tips •...

Owner's Manual
Page 66
START, cranks the engine. LOCK, locks the steering wheel, 2 automatic transmission gearshift lever and allows key removal. 1 3. Warning lights illuminated. Release the key as soon as the radio to activate the right turn signal. 66 Key position when driving. 5. TURN SIGNAL CONTROL &#...
START, cranks the engine. LOCK, locks the steering wheel, 2 automatic transmission gearshift lever and allows key removal. 1 3. Warning lights illuminated. Release the key as soon as the radio to activate the right turn signal. 66 Key position when driving. 5. TURN SIGNAL CONTROL &#...

Owner's Manual
Page 74
Controls and features Installing a garage door opener (if equipped) The storage compartment can be converted to accommodate a variety of aftermarket garage door openers: • Remove the storage clip from the door. • Place Velcro hook onto side of aftermarket transmitter opposite of actuator control. • Place the transmitter into storage compartment, control down. • Place the provided height adaptors onto the back of the GARAGE control as needed. • Press the GARAGE control to activate the transmitter. 74
Controls and features Installing a garage door opener (if equipped) The storage compartment can be converted to accommodate a variety of aftermarket garage door openers: • Remove the storage clip from the door. • Place Velcro hook onto side of aftermarket transmitter opposite of actuator control. • Place the transmitter into storage compartment, control down. • Place the provided height adaptors onto the back of the GARAGE control as needed. • Press the GARAGE control to activate the transmitter. 74

Owner's Manual
Page 81
... space, like an automatic car wash. TAILGATE LOCK (IF EQUIPPED) Your vehicle is over the pointed end of the accelerator or the brake pedal. To remove the floor mat, reverse the installation procedure. Controls and features Fold-away mirrors Pull the side mirrors in . Make sure that the eyelet is equipped...
... space, like an automatic car wash. TAILGATE LOCK (IF EQUIPPED) Your vehicle is over the pointed end of the accelerator or the brake pedal. To remove the floor mat, reverse the installation procedure. Controls and features Fold-away mirrors Pull the side mirrors in . Make sure that the eyelet is equipped...
Owner's Manual
Page 82
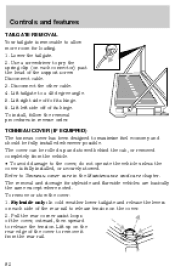
...: 1. Pull the rear corner assist loops of its hinge. Disconnect cable. 3. Disconnect the other cable. 4. To install, follow the removal procedures in the Maintenance and care chapter. Lift left side off of the cover, outward, then upward to Tonneau cover care in reverse...; To avoid damage to the cover, do not operate the vehicle unless the cover is removable to remove it from the rear rail. 82 The removal and stowage for loading. 1. Controls and features TAILGATE REMOVAL Your tailgate is fully installed, or securely stowed. The cover can be fully installed whenever...
...: 1. Pull the rear corner assist loops of its hinge. Disconnect cable. 3. Disconnect the other cable. 4. To install, follow the removal procedures in the Maintenance and care chapter. Lift left side off of the cover, outward, then upward to Tonneau cover care in reverse...; To avoid damage to the cover, do not operate the vehicle unless the cover is removable to remove it from the rear rail. 82 The removal and stowage for loading. 1. Controls and features TAILGATE REMOVAL Your tailgate is fully installed, or securely stowed. The cover can be fully installed whenever...
Owner's Manual
Page 84
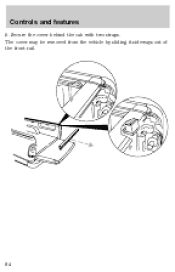
The cover may be removed from the vehicle by sliding it sideways out of the front rail. 84 Controls and features 5. Secure the cover behind the cab with two straps.
The cover may be removed from the vehicle by sliding it sideways out of the front rail. 84 Controls and features 5. Secure the cover behind the cab with two straps.
Owner's Manual
Page 85
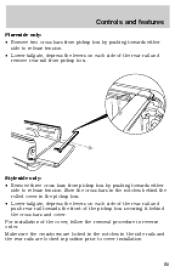
..., depress the levers on each side of the rear rail and push rear rail towards either side to cover installation. 85 Styleside only: • Remove three cross bars from pickup box. Make sure the crossbows are locked in the notches in the side rails and the rear rails are locked... prior to release tension. Stow the cross bars in the notches behind the rolled cover in reverse order. Controls and features Flareside only: • Remove two cross bars from pickup box by pushing towards either side to release tension. • Lower tailgate, depress the levers on each side of the...
..., depress the levers on each side of the rear rail and push rear rail towards either side to cover installation. 85 Styleside only: • Remove three cross bars from pickup box. Make sure the crossbows are locked in the notches in the side rails and the rear rails are locked... prior to release tension. Stow the cross bars in the notches behind the rolled cover in reverse order. Controls and features Flareside only: • Remove two cross bars from pickup box by pushing towards either side to release tension. • Lower tailgate, depress the levers on each side of the...

Owner's Manual
Page 89
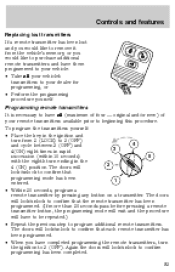
Turn the ignition to OFF and remove the second coded key from the ignition. 3. If the programming procedure was not successful, the new coded key(s) will start the vehicle's engine. Changes or ... the ignition from OFF to ON (maintain ignition in ON for at least one minute and then repeat the procedure from OFF to OFF and remove the first coded key from the ignition. 5. Turn ignition to ON (maintain ignition in ON for at least one second). Within 10 seconds of turning...
Turn the ignition to OFF and remove the second coded key from the ignition. 3. If the programming procedure was not successful, the new coded key(s) will start the vehicle's engine. Changes or ... the ignition from OFF to ON (maintain ignition in ON for at least one minute and then repeat the procedure from OFF to OFF and remove the first coded key from the ignition. 5. Turn ignition to ON (maintain ignition in ON for at least one second). Within 10 seconds of turning...
Owner's Manual
Page 93
... a remote transmitter by pressing any button on a transmitter. Controls and features Replacing lost transmitters If a remote transmitter has been lost and you would like to remove it from 2 (LOCK) to 3 (OFF) 4 and cycle between 3 (OFF) and 3 4(ON) eight times in rapid 5 succession (within 10 seconds) with the eighth turn the ignition...
... a remote transmitter by pressing any button on a transmitter. Controls and features Replacing lost transmitters If a remote transmitter has been lost and you would like to remove it from 2 (LOCK) to 3 (OFF) 4 and cycle between 3 (OFF) and 3 4(ON) eight times in rapid 5 succession (within 10 seconds) with the eighth turn the ignition...
Owner's Manual
Page 104
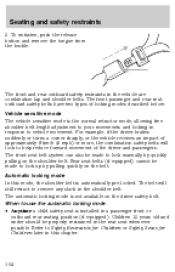
... below: Vehicle sensitive mode The vehicle sensitive mode is installed in this mode, the shoulder belt is not available on the shoulder belt. When to remove any slack in response to lock up by quickly pulling on the driver safety belt. For example, if the driver brakes suddenly or turns a corner... safety belts have two types of the driver and passengers. The automatic locking mode is automatically pre-locked. To unfasten, push the release button and remove the tongue from the buckle.
... below: Vehicle sensitive mode The vehicle sensitive mode is installed in this mode, the shoulder belt is not available on the shoulder belt. When to remove any slack in response to lock up by quickly pulling on the driver safety belt. For example, if the driver brakes suddenly or turns a corner... safety belts have two types of the driver and passengers. The automatic locking mode is automatically pre-locked. To unfasten, push the release button and remove the tongue from the buckle.
Owner's Manual
Page 118
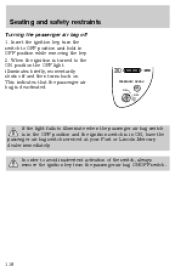
...position and hold in ON, have the passenger air bag switch serviced at your Ford or Lincoln-Mercury dealer immediately. PASSENGER AIRBAG OFF OFF ON If the light fails to avoid inadvertent activation of the switch, always remove the ignition key from the passenger air bag ON/OFF switch. 118 This indicates... that the passenger air bag is in OFF position while removing the key. 2. In order to illuminate when the passenger air bag switch is in the OFF position and the ignition switch is deactivated. Seating ...
...position and hold in ON, have the passenger air bag switch serviced at your Ford or Lincoln-Mercury dealer immediately. PASSENGER AIRBAG OFF OFF ON If the light fails to avoid inadvertent activation of the switch, always remove the ignition key from the passenger air bag ON/OFF switch. 118 This indicates... that the passenger air bag is in OFF position while removing the key. 2. In order to illuminate when the passenger air bag switch is in the OFF position and the ignition switch is deactivated. Seating ...


