

Owner's Manual
Page 25
Read these labels carefully and don't remove them. RADIATOR CAP BATTERY Driver and Passenger Safety If a label comes off or becomes hard to read, contact your Honda dealer for a replacement. They warn you of potential hazards that could cause serious injury. Safety Labels These labels are in the locations shown.
Read these labels carefully and don't remove them. RADIATOR CAP BATTERY Driver and Passenger Safety If a label comes off or becomes hard to read, contact your Honda dealer for a replacement. They warn you of potential hazards that could cause serious injury. Safety Labels These labels are in the locations shown.

Owner's Manual
Page 78
... it is near or below the MIN line, see page 106 for information on checking other items in the radiator reserve tank. Engine Coolant Check Look at the coolant level in your Honda. If it is below the lower mark, see Adding Engine Coolant on page 109 for information on the proper...
... it is near or below the MIN line, see page 106 for information on checking other items in the radiator reserve tank. Engine Coolant Check Look at the coolant level in your Honda. If it is below the lower mark, see Adding Engine Coolant on page 109 for information on the proper...

Owner's Manual
Page 101
See page 78. Check the radiator reserve tank every time you are unsure of the headlights, parking lights, taillights, high-mount brake light, turn to the page given. See page 109. ...
See page 78. Check the radiator reserve tank every time you are unsure of the headlights, parking lights, taillights, high-mount brake light, turn to the page given. See page 109. ...

Owner's Manual
Page 106
...safe for a description of the engine coolant by looking at or below the MIN line, Always use Genuine Honda Antifreeze/Coolant. Always let the engine and radiator cool down before removing the radiator cap. 1. Adding Engine Coolant Check the level of severe driving conditions. Under severe driving conditions, they ...it up to the air cleaner element box. This coolant should also check the coolant level in a sealed container and take it in the radiator. Engine Oil, Cooling System NOTICE If you change your own oil, please dispose of 50% antifreeze and 50% water. If the level ...
...safe for a description of the engine coolant by looking at or below the MIN line, Always use Genuine Honda Antifreeze/Coolant. Always let the engine and radiator cool down before removing the radiator cap. 1. Adding Engine Coolant Check the level of severe driving conditions. Under severe driving conditions, they ...it up to the air cleaner element box. This coolant should also check the coolant level in a sealed container and take it in the radiator. Engine Oil, Cooling System NOTICE If you change your own oil, please dispose of 50% antifreeze and 50% water. If the level ...

Owner's Manual
Page 107
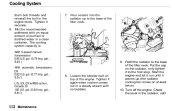
... The cooling system should be completely drained and refilled with the coolant or engine components. Only use the recommended antifreeze. Remove the radiator cap by a skilled mechanic. 1. Fill it stops. Cooling System 2. The coolant level should have this maintenance done by pushing down...maintenance schedule. This relieves any rust inhibitors or other additives to the underside of the filler neck. RESERVE TANK 3. Turn the radiator cap counterclockwise, without pressing down and turning counterclockwise. 5. Tighten it is low. Put the cap back on the reserve tank...
... The cooling system should be completely drained and refilled with the coolant or engine components. Only use the recommended antifreeze. Remove the radiator cap by a skilled mechanic. 1. Fill it stops. Cooling System 2. The coolant level should have this maintenance done by pushing down...maintenance schedule. This relieves any rust inhibitors or other additives to the underside of the filler neck. RESERVE TANK 3. Turn the radiator cap counterclockwise, without pressing down and turning counterclockwise. 5. Tighten it is low. Put the cap back on the reserve tank...

Owner's Manual
Page 108
drain bolt from its holder. Loosen the drain plug in the bottom of the radiator. Apply non-hardening sealant to the touch. 2. Remove the radiator cap. Open the hood. The coolant will drain through the splash guard. Cooling System heat. RESERVE TANK RESERVE TANK CAP HOLDER 3. Remove... the 5. When the coolant stops draining, tighten the drain plug in the bottom of the radiator. Make sure the engine and radiator are cool to the Maintenance Remove the reserve tank from the engine block. 4. Drain the coolant, then put the tank back...
drain bolt from its holder. Loosen the drain plug in the bottom of the radiator. Apply non-hardening sealant to the touch. 2. Remove the radiator cap. Open the hood. The coolant will drain through the splash guard. Cooling System heat. RESERVE TANK RESERVE TANK CAP HOLDER 3. Remove... the 5. When the coolant stops draining, tighten the drain plug in the bottom of the radiator. Make sure the engine and radiator are cool to the Maintenance Remove the reserve tank from the engine block. 4. Drain the coolant, then put the tank back...
Owner's Manual
Page 109
.... gal. (0.77 Imp. Start the engine and let it run until it to the first stop. gal. (0.79 Imp. Loosen the bleeder bolt on the radiator, only tighten it warms up to the base of purified or distilled water in a steady stream with an equal amount of the filler neck. gal... transmission: 0.95 U.S. gal., 3.8 ) 7. Tighten it again when coolant comes out in a clean container. gal. (0.84 Imp. Mix the recommended antifreeze with no bubbles. 9. Refill the radiator to the base of the engine. Cooling System drain bolt threads and reinstall the bolt in the...
.... gal. (0.77 Imp. Start the engine and let it run until it to the first stop. gal. (0.79 Imp. Loosen the bleeder bolt on the radiator, only tighten it warms up to the base of purified or distilled water in a steady stream with an equal amount of the filler neck. gal... transmission: 0.95 U.S. gal., 3.8 ) 7. Tighten it again when coolant comes out in a clean container. gal. (0.84 Imp. Mix the recommended antifreeze with no bubbles. 9. Refill the radiator to the base of the engine. Cooling System drain bolt threads and reinstall the bolt in the...

Owner's Manual
Page 110
... bad weather, when you stop for gas. Antifreeze can damage your car's paint, while a vinegar/water solution can damage the windshield washer pump. Install the radiator cap, tighten it fully. 11. WINDSHIELD WASHER RESERVOIR reservoir's fluid level by removing the cap and looking at least monthly during normal usage. NOTICE Do...
... bad weather, when you stop for gas. Antifreeze can damage your car's paint, while a vinegar/water solution can damage the windshield washer pump. Install the radiator cap, tighten it fully. 11. WINDSHIELD WASHER RESERVOIR reservoir's fluid level by removing the cap and looking at least monthly during normal usage. NOTICE Do...

Owner's Manual
Page 120
... circulates the lubricating oil contained in place. 7. RETAINERS 5. Run the air conditioning at normal operating temperature. Periodically check the engine's radiator and air conditioning condenser for at least 10 minutes while you can do to make sure the air conditioning works efficiently. NOTICE The ...condenser and radiator fins bend easily. Slide the new blade assembly onto the wiper arm. Any major maintenance, such as recharging, should be done ...
... circulates the lubricating oil contained in place. 7. RETAINERS 5. Run the air conditioning at normal operating temperature. Periodically check the engine's radiator and air conditioning condenser for at least 10 minutes while you can do to make sure the air conditioning works efficiently. NOTICE The ...condenser and radiator fins bend easily. Slide the new blade assembly onto the wiper arm. Any major maintenance, such as recharging, should be done ...

Owner's Manual
Page 149
... the red mark, the engine needs repair. (See Towing on the cap, and turn the radiator cap counterclockwise, without pushing down, to the radiator. Run the engine and watch the temperature gauge. Removing the radiator cap while the engine is hot can . 11. If you . Add coolant to the... out, seriously scalding you don't find a leak, it must be repaired before checking the radiator. Remember to halfway between the MIN and MAX marks. 8. Look for any remaining pressure in the radiator reserve tank. Using gloves or a large heavy cloth, turn it until the pointer reaches the...
... the red mark, the engine needs repair. (See Towing on the cap, and turn the radiator cap counterclockwise, without pushing down, to the radiator. Run the engine and watch the temperature gauge. Removing the radiator cap while the engine is hot can . 11. If you . Add coolant to the... out, seriously scalding you don't find a leak, it must be repaired before checking the radiator. Remember to halfway between the MIN and MAX marks. 8. Look for any remaining pressure in the radiator reserve tank. Using gloves or a large heavy cloth, turn it until the pointer reaches the...

Owner's Manual
Page 172
.... See Anti-Lock Brakes ACCESSORY, (Ignition Key Position) ...41 Adding Automatic Transmission Fluid ...Brake Fluid ...Clutch Fluid ...Engine Oil ...Manual Transmission Fluid ...Power Steering Fluid ...Radiator Coolant ...Windshield Washer Fluid...Additional Safety Information ...Door Locks ...Driving With Pets ...Seat-Back Position ...Storing Cargo Safely ...107 Anti-Lock Brakes Indicator Light ...29...
.... See Anti-Lock Brakes ACCESSORY, (Ignition Key Position) ...41 Adding Automatic Transmission Fluid ...Brake Fluid ...Clutch Fluid ...Engine Oil ...Manual Transmission Fluid ...Power Steering Fluid ...Radiator Coolant ...Windshield Washer Fluid...Additional Safety Information ...Door Locks ...Driving With Pets ...Seat-Back Position ...Storing Cargo Safely ...107 Anti-Lock Brakes Indicator Light ...29...

Owner's Manual
Page 174
Index Checking Automatic Transmission Fluid ...Battery Condition ...Brake Fluid ...Clutch Fluid ...Drive Belts ...Fuses ...Manual Transmission Fluid ...Power Steering Fluid ...Radiator Coolant ...Tire Pressure ...Windshield Wipers ...Cigarette Lighter ...52 114 120 115 115 124 158 114 117 109 125 122 17 18 18 17 CLEAN Indicator ......
Index Checking Automatic Transmission Fluid ...Battery Condition ...Brake Fluid ...Clutch Fluid ...Drive Belts ...Fuses ...Manual Transmission Fluid ...Power Steering Fluid ...Radiator Coolant ...Tire Pressure ...Windshield Wipers ...Cigarette Lighter ...52 114 120 115 115 124 158 114 117 109 125 122 17 18 18 17 CLEAN Indicator ......

Owner's Manual
Page 180
... ...28 R e p l a c e m e n t ...10 System Components ...5 Tether Attachment Points ...21 Use During Pregnancy ...9 Wearing a Lap/Shoulder Belt ...7 Wearing the Lap B e l t ...8 Seats, Adjusting the ...43 Serial Number ...164 Radiator Overheating ... 152 Radio/Cassette Sound System ...62 Rear End Towing ...162 Rear Lights, Bulb Replacement ...132 Rear Seat, Folding ...45 Rear View Mirror ...48 Rear...
... ...28 R e p l a c e m e n t ...10 System Components ...5 Tether Attachment Points ...21 Use During Pregnancy ...9 Wearing a Lap/Shoulder Belt ...7 Wearing the Lap B e l t ...8 Seats, Adjusting the ...43 Serial Number ...164 Radiator Overheating ... 152 Radio/Cassette Sound System ...62 Rear End Towing ...162 Rear Lights, Bulb Replacement ...132 Rear Seat, Folding ...45 Rear View Mirror ...48 Rear...