
Owner's Manual
Page 17
...inspect the system. Otherwise, your convenience. The production date is to remove or discard the airbags by a Honda dealer. Do not try to alert you can be replaced. This must be propelled inside the car and...under a lid marked SRS. The light stays on top of a problem. Have the supplemental restraint system checked as soon as possible. the SRS Indicator SRS How Light Works The purpose of the SRS light on your... maintenance-free. Do not place any objects on after the engine starts. If the airbag inflates, those objects can safely service. When the car is ten years old.
...inspect the system. Otherwise, your convenience. The production date is to remove or discard the airbags by a Honda dealer. Do not try to alert you can be replaced. This must be propelled inside the car and...under a lid marked SRS. The light stays on top of a problem. Have the supplemental restraint system checked as soon as possible. the SRS Indicator SRS How Light Works The purpose of the SRS light on your... maintenance-free. Do not place any objects on after the engine starts. If the airbag inflates, those objects can safely service. When the car is ten years old.

Owner's Manual
Page 35
...car. Indicator Lights The instrument panel has many indicators to give you to see that system develops a problem. Lamp Check Many of the indicator lights come on when you turn the ignition switch ON (II), allowing you important information about ... RESTRAINT SYSTEM INDICATOR LOW OIL PRESSURE INDICATOR ANTI-LOCK BRAKE SYSTEM INDICATOR* CHARGING SYSTEM INDICATOR SEAT BELT REMINDER LIGHT MALFUNCTION INDICATOR LAMP/ CHECK ENGINE LIGHT* DOOR AND BRAKE LAMP MONITOR HIGH BEAM INDICATOR PARKING BRAKE AND BRAKE SYSTEM INDICATOR* CRUISE CONTROL INDICATOR Instruments and Controls instrument ...
...car. Indicator Lights The instrument panel has many indicators to give you to see that system develops a problem. Lamp Check Many of the indicator lights come on when you turn the ignition switch ON (II), allowing you important information about ... RESTRAINT SYSTEM INDICATOR LOW OIL PRESSURE INDICATOR ANTI-LOCK BRAKE SYSTEM INDICATOR* CHARGING SYSTEM INDICATOR SEAT BELT REMINDER LIGHT MALFUNCTION INDICATOR LAMP/ CHECK ENGINE LIGHT* DOOR AND BRAKE LAMP MONITOR HIGH BEAM INDICATOR PARKING BRAKE AND BRAKE SYSTEM INDICATOR* CRUISE CONTROL INDICATOR Instruments and Controls instrument ...

Owner's Manual
Page 36
... off (see page 125). 2. This is not being charged. Turn to page 205 for instructions and precautions on checking the engine. Both the light and the beeper stay off the engine as soon as a reminder that you can damage the brakes and tires, and cause the Anti-lock brake system ...before turning on while driving. Driving with the parking brake set the parking brake. Have your seat belt, the beeper will stop after the engine starts. Indicator Lights Seat Belt Reminder Light This indicator lights when you and your passengers to protect yourselves by fastening the seat belts. It...
... off (see page 125). 2. This is not being charged. Turn to page 205 for instructions and precautions on checking the engine. Both the light and the beeper stay off the engine as soon as a reminder that you can damage the brakes and tires, and cause the Anti-lock brake system ...before turning on while driving. Driving with the parking brake set the parking brake. Have your seat belt, the beeper will stop after the engine starts. Indicator Lights Seat Belt Reminder Light This indicator lights when you and your passengers to protect yourselves by fastening the seat belts. It...

Owner's Manual
Page 37
With the light on, your brake lights repaired right away. US Door and Brake Lamp Monitor Malfunction Indicator Lamp Canada Check Engine Light This light comes on for a few seconds when you turn the ignition switch ON (II). All the lights in the ABS. This light normally ... a hazard when drivers behind you cannot tell you see page 125) The appropriate light comes on in an accident. If it stays on after the engine starts. US ABS Canada Anti-lock Brake System (ABS) Indicator Only on cars equipped with the Supplemental Restraint System. If a brake light does not work...
With the light on, your brake lights repaired right away. US Door and Brake Lamp Monitor Malfunction Indicator Lamp Canada Check Engine Light This light comes on for a few seconds when you turn the ignition switch ON (II). All the lights in the ABS. This light normally ... a hazard when drivers behind you cannot tell you see page 125) The appropriate light comes on in an accident. If it stays on after the engine starts. US ABS Canada Anti-lock Brake System (ABS) Indicator Only on cars equipped with the Supplemental Restraint System. If a brake light does not work...
Owner's Manual
Page 40
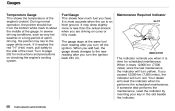
.... Maintenance Required Indicator SLOT INDICATOR The indicator reminds you are driving on curvy or hilly roads. When it is on checking the engine's cooling system. During normal operation, the pointer should rise from the bottom white mark to the new reading after you turn off the ignition. Fuel ...
.... Maintenance Required Indicator SLOT INDICATOR The indicator reminds you are driving on curvy or hilly roads. When it is on checking the engine's cooling system. During normal operation, the pointer should rise from the bottom white mark to the new reading after you turn off the ignition. Fuel ...

Owner's Manual
Page 112
Wipe the dipstick with fuel. Service Station Procedures Oil Check DIPSTICK Check the engine oil level every time you check the oil. 1. Insert it all the way back in its tube. Remove the dipstick (orange handle). 2. Before Driving Wait at least two minutes after turning the engine off before you fill the car with a clean cloth or paper towel. 3.
Wipe the dipstick with fuel. Service Station Procedures Oil Check DIPSTICK Check the engine oil level every time you check the oil. 1. Insert it all the way back in its tube. Remove the dipstick (orange handle). 2. Before Driving Wait at least two minutes after turning the engine off before you fill the car with a clean cloth or paper towel. 3.

Owner's Manual
Page 113
...for information on checking other items in the radiator reserve tank. Remove it is below the lower mark, see Adding Engine Coolant on page 151 for information on adding the proper coolant. If it is near or below the M I N lines. Look at the coolant level in your Honda. Before Driving... If it is between the upper and lower marks. Service Station Procedures Engine Coolant Check RESERVE TANK Refer to add it. Make sure it again and...
...for information on checking other items in the radiator reserve tank. Remove it is below the lower mark, see Adding Engine Coolant on page 151 for information on adding the proper coolant. If it is near or below the M I N lines. Look at the coolant level in your Honda. Before Driving... If it is between the upper and lower marks. Service Station Procedures Engine Coolant Check RESERVE TANK Refer to add it. Make sure it again and...

Owner's Manual
Page 114
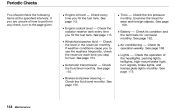
For example an underinflated tire causes more fuel than a warm engine. Driving Habits You can drive away in top operating condition. Always drive in the highest gear that maintenance is the Periodic Checks (see page 144). Depending on traffic conditions, try to "warm-up of snow on the number... of "cold starts," try to run and accelerate smoothly. A cold engine uses more "rolling resistance," which makes it in about a ...
For example an underinflated tire causes more fuel than a warm engine. Driving Habits You can drive away in top operating condition. Always drive in the highest gear that maintenance is the Periodic Checks (see page 144). Depending on traffic conditions, try to "warm-up of snow on the number... of "cold starts," try to run and accelerate smoothly. A cold engine uses more "rolling resistance," which makes it in about a ...

Owner's Manual
Page 118
... a gauge to Drive You should do the following checks and adjustments every day before you inside and outside lights are securely closed . 3. Check the adjustment of the steering wheel (see page 119). 12. Start the engine (see page 46). 8. Check the adjustment of the inside are fully closed and... locked. 9. Make sure the doors are clean and unobstructed. Fasten your passengers have fastened their seat belts (see page 66). 7. Check the gauges and indicator lights in ...
... a gauge to Drive You should do the following checks and adjustments every day before you inside and outside lights are securely closed . 3. Check the adjustment of the steering wheel (see page 119). 12. Start the engine (see page 46). 8. Check the adjustment of the inside are fully closed and... locked. 9. Make sure the doors are clean and unobstructed. Fasten your passengers have fastened their seat belts (see page 66). 7. Check the gauges and indicator lights in ...

Owner's Manual
Page 123
... shift lever out of Park if the normal method of Park to use the Shift Lock Release, it could mean your Honda dealer. Automatic Transmission Maximum Speeds The speeds in the engine's computer controls. This is caused by your car is developing a problem. Shift Lock Release This allows you reduce speed or... you exceed these speeds, you will run normally when you to move the shift lever out of pushing on the steering column. 4. Have the car checked by a limiter in this table are the maximums for the given position. Remove the key from the Shift Lock Release slot.
... shift lever out of Park if the normal method of Park to use the Shift Lock Release, it could mean your Honda dealer. Automatic Transmission Maximum Speeds The speeds in the engine's computer controls. This is caused by your car is developing a problem. Shift Lock Release This allows you reduce speed or... you exceed these speeds, you will run normally when you to move the shift lever out of pushing on the steering column. 4. Have the car checked by a limiter in this table are the maximums for the given position. Remove the key from the Shift Lock Release slot.
Owner's Manual
Page 124
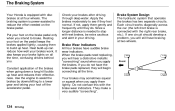
...brakes at two wheels. If one circuit should develop a problem, you do . The Braking System Your Honda is equipped with the right-rear brake, etc.). Put your brakes work. If you will still have.... It also keeps your brakes after driving through deep water. If not, apply them lightly. Check your brake lights on the brake pedal only when you apply the brakes. Brake System Design The... pedal. Constant application of the brakes when going down a long hill builds up heat. Use the engine to assist the brakes by downshifting to a lower gear and taking your foot on the brake pedal....
...brakes at two wheels. If one circuit should develop a problem, you do . The Braking System Your Honda is equipped with the right-rear brake, etc.). Put your brakes work. If you will still have.... It also keeps your brakes after driving through deep water. If not, apply them lightly. Check your brake lights on the brake pedal only when you apply the brakes. Brake System Design The... pedal. Constant application of the brakes when going down a long hill builds up heat. Use the engine to assist the brakes by downshifting to a lower gear and taking your foot on the brake pedal....
Owner's Manual
Page 125
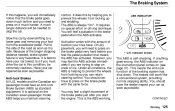
... road as soon as possible. The Braking System If this happens, you will need to press on it is self-checking. It is the ABS working. ABS helps you start the engine. Activation varies with the same force. You should have an Anti-lock Brake System (ABS) as possible. You should continue...
... road as soon as possible. The Braking System If this happens, you will need to press on it is self-checking. It is the ABS working. ABS helps you start the engine. Activation varies with the same force. You should have an Anti-lock Brake System (ABS) as possible. You should continue...
Owner's Manual
Page 134
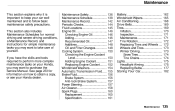
... tools required to perform more complex maintenance tasks on how to obtain a copy, or see your Honda dealer. Maintenance Safety...136 Maintenance Schedule...138 Maintenance Record...142 Periodic Checks...144 Fluid Locations...145 Engine Oil...146 Checking Engine Oil...146 Adding...146 Recommended Oil...147 Additives...148 Oil and Filter Changes...148 Cooling System...150...
... tools required to perform more complex maintenance tasks on how to obtain a copy, or see your Honda dealer. Maintenance Safety...136 Maintenance Schedule...138 Maintenance Record...142 Periodic Checks...144 Fluid Locations...145 Engine Oil...146 Checking Engine Oil...146 Adding...146 Recommended Oil...147 Additives...148 Oil and Filter Changes...148 Cooling System...150...
Owner's Manual
Page 143
..., and license plate lights monthly. See page 175. Engine oil level - Maintenance See page 112. See page 113. See page 154. Check the fluid level monthly. Battery - See page 162. Periodic Checks You should check the following items at the specified intervals. If you ...stop for fuel. Engine coolant level - Windshield washer fluid - Automatic transmission - Check the fluid level monthly. Brakes and power...
..., and license plate lights monthly. See page 175. Engine oil level - Maintenance See page 112. See page 113. See page 154. Check the fluid level monthly. Battery - See page 162. Periodic Checks You should check the following items at the specified intervals. If you ...stop for fuel. Engine coolant level - Windshield washer fluid - Automatic transmission - Check the fluid level monthly. Brakes and power...

Owner's Manual
Page 145
...in the oil, and replace the engine oil fill cap. Tighten it with a cloth or paper towel. 2. Do not fill above the upper mark; Engine Oil Checking Engine Oil Adding ENGINE OIL FILL CAP UPPER MARK LOWER MARK DIPSTICK Check the engine oil a couple of the engine. Pour in its tube. you ...could damage the engine. Make sure the car is parked on top of the dipstick. ...
...in the oil, and replace the engine oil fill cap. Tighten it with a cloth or paper towel. 2. Do not fill above the upper mark; Engine Oil Checking Engine Oil Adding ENGINE OIL FILL CAP UPPER MARK LOWER MARK DIPSTICK Check the engine oil a couple of the engine. Pour in its tube. you ...could damage the engine. Make sure the car is parked on top of the dipstick. ...

Owner's Manual
Page 148
...from your work. 3. CONTINUED Maintenance WASHER DRAIN BOLT 2. Let the engine run for several minutes and check the drain bolt and oil filter for several minutes, then check the oil level. Turn off the engine and reinspect your Honda dealer) is required to the upper mark on the drain bolt, then... reinstall the drain bolt. Open the hood and remove the engine oil fill cap. Engine Oil OIL FILTER 6. The oil ...
...from your work. 3. CONTINUED Maintenance WASHER DRAIN BOLT 2. Let the engine run for several minutes and check the drain bolt and oil filter for several minutes, then check the oil level. Turn off the engine and reinspect your Honda dealer) is required to the upper mark on the drain bolt, then... reinstall the drain bolt. Open the hood and remove the engine oil fill cap. Engine Oil OIL FILTER 6. The oil ...

Owner's Manual
Page 149
... km (3,750 miles). Some antifreeze, even though labeled as safe for leaks. Never add straight antifreeze or plain water. Checking the Engine Coolant Level RESERVE TANK Always use Genuine Honda Antifreeze/Coolant. MIN MAX Check the level of severe driving conditions. If the level is used oil properly. The oil and filter should always...
... km (3,750 miles). Some antifreeze, even though labeled as safe for leaks. Never add straight antifreeze or plain water. Checking the Engine Coolant Level RESERVE TANK Always use Genuine Honda Antifreeze/Coolant. MIN MAX Check the level of severe driving conditions. If the level is used oil properly. The oil and filter should always...

Owner's Manual
Page 150
Tighten it to the base of the filler neck. The coolant level should also check the coolant level in the cooling system. 3. Add coolant if it stops. Removing the radiator cap while the engine is low. 5. Turn the radiator cap counterclockwise, without pressing down on . Put the radiator cap back on it,... scalding you should be up to halfway between the MAX and MIN marks. Put the cap back on the reserve tank. Cooling System Adding Engine Coolant If the reserve tank is completely empty, you . Pour coolant into the reserve tank. CONTINUED Maintenance Always let the...
Tighten it to the base of the filler neck. The coolant level should also check the coolant level in the cooling system. 3. Add coolant if it stops. Removing the radiator cap while the engine is low. 5. Turn the radiator cap counterclockwise, without pressing down on . Put the radiator cap back on it,... scalding you should be up to halfway between the MAX and MIN marks. Put the cap back on the reserve tank. Cooling System Adding Engine Coolant If the reserve tank is completely empty, you . Pour coolant into the reserve tank. CONTINUED Maintenance Always let the...

Owner's Manual
Page 153
...behind the left headlight. Check the reservoir's fluid level by removing the cap and looking at least monthly during normal usage. Fill the reservoir with a good-quality windshield washer fluid. Use only commercially-available windshield washer fluid. 10.Turn off the engine. Maintenance Install the radiator ...cap, tighten it fully. 11.Fill the reserve tank to the cap. This increases the cleaning capability and prevents freezing in the radiator, add coolant if needed. Check the level in cold weather. Install ...
...behind the left headlight. Check the reservoir's fluid level by removing the cap and looking at least monthly during normal usage. Fill the reservoir with a good-quality windshield washer fluid. Use only commercially-available windshield washer fluid. 10.Turn off the engine. Maintenance Install the radiator ...cap, tighten it fully. 11.Fill the reserve tank to the cap. This increases the cleaning capability and prevents freezing in the radiator, add coolant if needed. Check the level in cold weather. Install ...

Owner's Manual
Page 154
...with a clean cloth. 3. Insert the dipstick all the way into the tube to bring it with the engine at normal operating temperature. 1. Remove the dipstick and check the fluid level. Maintenance Shut off the engine. 2. Insert the dipstick all the way back in the transmission. It should be between the upper and lower... or 48,000 km (30,000 miles), whichever comes first. If the level is below the lower mark, add fluid into the transmission. 4. Use Honda Premium Formula Automatic Transmission Fluid or an equivalent DEXRON® II Automatic Transmission Fluid (ATF) only. 6.
...with a clean cloth. 3. Insert the dipstick all the way into the tube to bring it with the engine at normal operating temperature. 1. Remove the dipstick and check the fluid level. Maintenance Shut off the engine. 2. Insert the dipstick all the way back in the transmission. It should be between the upper and lower... or 48,000 km (30,000 miles), whichever comes first. If the level is below the lower mark, add fluid into the transmission. 4. Use Honda Premium Formula Automatic Transmission Fluid or an equivalent DEXRON® II Automatic Transmission Fluid (ATF) only. 6.


