
Owner's Manual
Page 17
...must have the system serviced by an authorized Honda dealer: If your airbags might not inflate when you need them. This must be replaced. The production date is on when you turn the ignition ON (II). Have the system checked if: The light does not come on the driver's doorjamb for... is virtually maintenance-free. Do not place any objects on after the engine starts. Otherwise, your airbags ever inflate, the airbags and control unit must be propelled inside the car and possibly hurt someone. The light stays on top of this lid. System Service Your supplemental restraint system ...
...must have the system serviced by an authorized Honda dealer: If your airbags might not inflate when you need them. This must be replaced. The production date is on when you turn the ignition ON (II). Have the system checked if: The light does not come on the driver's doorjamb for... is virtually maintenance-free. Do not place any objects on after the engine starts. Otherwise, your airbags ever inflate, the airbags and control unit must be propelled inside the car and possibly hurt someone. The light stays on top of this lid. System Service Your supplemental restraint system ...

Owner's Manual
Page 35
... car. LOW FUEL INDICATOR SUPPLEMENTAL RESTRAINT SYSTEM INDICATOR LOW OIL PRESSURE INDICATOR ANTI-LOCK BRAKE SYSTEM INDICATOR* CHARGING SYSTEM INDICATOR SEAT BELT REMINDER LIGHT MALFUNCTION INDICATOR LAMP/ CHECK ENGINE LIGHT* DOOR AND BRAKE LAMP MONITOR HIGH BEAM INDICATOR PARKING BRAKE AND BRAKE SYSTEM INDICATOR* CRUISE CONTROL INDICATOR Instruments and Controls instrument panel is shown...
... car. LOW FUEL INDICATOR SUPPLEMENTAL RESTRAINT SYSTEM INDICATOR LOW OIL PRESSURE INDICATOR ANTI-LOCK BRAKE SYSTEM INDICATOR* CHARGING SYSTEM INDICATOR SEAT BELT REMINDER LIGHT MALFUNCTION INDICATOR LAMP/ CHECK ENGINE LIGHT* DOOR AND BRAKE LAMP MONITOR HIGH BEAM INDICATOR PARKING BRAKE AND BRAKE SYSTEM INDICATOR* CRUISE CONTROL INDICATOR Instruments and Controls instrument panel is shown...

Owner's Manual
Page 36
...the parking brake. It should light when the ignition is not being charged. It is ON (II), and go out after a few seconds but the light stays on checking the engine. Low Oil Pressure Indicator This indicator lights when the oil pressure in the engine drops low enough to worn ...brake pads. Charging System Indicator This light indicates the battery is normally due to cause damage.
...the parking brake. It should light when the ignition is not being charged. It is ON (II), and go out after a few seconds but the light stays on checking the engine. Low Oil Pressure Indicator This indicator lights when the oil pressure in the engine drops low enough to worn ...brake pads. Charging System Indicator This light indicates the battery is normally due to cause damage.

Owner's Manual
Page 37
... come on for a few seconds when you turn the ignition switch ON (II). With the light on, your dealer to do. US Door and Brake Lamp Monitor Malfunction Indicator Lamp Canada Check Engine Light This light comes on for a few seconds when you turn the ignition switch ON (II). If you ...see page 125) The appropriate light comes on in an accident. If a brake light does not work when needed in this happens, fake ...
... come on for a few seconds when you turn the ignition switch ON (II). With the light on, your dealer to do. US Door and Brake Lamp Monitor Malfunction Indicator Lamp Canada Check Engine Light This light comes on for a few seconds when you turn the ignition switch ON (II). If you ...see page 125) The appropriate light comes on in an accident. If a brake light does not work when needed in this happens, fake ...

Owner's Manual
Page 118
...119). 12. Check the indicator lights in the instrument panel (see page 46). 8. Visually check the tires. Check that your car. 1. Driving Make sure all windows, mirrors, and outside mirrors (see page 7). 10. Check the adjustment of the steering wheel (see page 35). Start the engine (see page ...56). 6. Make sure the doors are fully closed and locked. 9. Turn the ignition ON (II). Check the adjustment of the inside are clean and unobstructed. Check the gauges and indicator lights in the instrument panel. 11. ...
...119). 12. Check the indicator lights in the instrument panel (see page 46). 8. Visually check the tires. Check that your car. 1. Driving Make sure all windows, mirrors, and outside mirrors (see page 7). 10. Check the adjustment of the steering wheel (see page 35). Start the engine (see page ...56). 6. Make sure the doors are fully closed and locked. 9. Turn the ignition ON (II). Check the adjustment of the inside are clean and unobstructed. Check the gauges and indicator lights in the instrument panel. 11. ...
Owner's Manual
Page 124
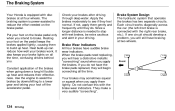
The Braking System Your Honda is connected with the right-rear brake, etc.). It also keeps your brakes after driving through deep water. Check your brake lights on all the time, confusing drivers behind you intend to see if they do not have audible brake wear indicators. Your brakes may...Do not confuse this with wet brakes, be extra cautious and alert in your driving. Front Driving Use the engine to assist the brakes by downshifting to stop with the brake wear indicators. If not, apply them lightly. The braking system is needed on the brake pedal only when you .
The Braking System Your Honda is connected with the right-rear brake, etc.). It also keeps your brakes after driving through deep water. Check your brake lights on all the time, confusing drivers behind you intend to see if they do not have audible brake wear indicators. Your brakes may...Do not confuse this with wet brakes, be extra cautious and alert in your driving. Front Driving Use the engine to assist the brakes by downshifting to stop with the brake wear indicators. If not, apply them lightly. The braking system is needed on the brake pedal only when you .
Owner's Manual
Page 134
...simple maintenance tasks you may want to obtain a copy, or see your Honda dealer. Maintenance Safety...136 Maintenance Schedule...138 Maintenance Record...142 Periodic Checks...144 Fluid Locations...145 Engine Oil...146 Checking Engine Oil...146 Adding...146 Recommended Oil...147 Additives...148 Oil and Filter Changes...148...Tire Rotation...172 Replacing Tires and Wheels ...172 Wheels and Tires...173 Winter Driving...173 Snow Tires...174 Tire Chains...174 Lights...175 Headlight Aiming...175 Replacing Bulbs...177 Storing Your Car...182 Maintenance If you have the skills and tools required to...
...simple maintenance tasks you may want to obtain a copy, or see your Honda dealer. Maintenance Safety...136 Maintenance Schedule...138 Maintenance Record...142 Periodic Checks...144 Fluid Locations...145 Engine Oil...146 Checking Engine Oil...146 Adding...146 Recommended Oil...147 Additives...148 Oil and Filter Changes...148...Tire Rotation...172 Replacing Tires and Wheels ...172 Wheels and Tires...173 Winter Driving...173 Snow Tires...174 Tire Chains...174 Lights...175 Headlight Aiming...175 Replacing Bulbs...177 Storing Your Car...182 Maintenance If you have the skills and tools required to...
Owner's Manual
Page 143
... the specified intervals. If you are unsure of the headlights, parking lights, taillights, high-mount brake light, turn to use the washers frequently, check the reservoir each time you to the page given. Engine coolant level - Automatic transmission - Check the fluid level monthly. Lights - Check the level in the reservoir monthly. Examine the tread for corrosion monthly...
... the specified intervals. If you are unsure of the headlights, parking lights, taillights, high-mount brake light, turn to use the washers frequently, check the reservoir each time you to the page given. Engine coolant level - Automatic transmission - Check the fluid level monthly. Lights - Check the level in the reservoir monthly. Examine the tread for corrosion monthly...

Owner's Manual
Page 148
...Engine Oil OIL FILTER 6. Start the engine. Tighten it to instructions that come with the recommended oil. If necessary, add oil to bring the level to remove the filter. 4. Engine oil change capacity (including filter): 3.8 (4.0 US qt, 3.3 Imp qt) 7. The oil pressure indicator light... should go out within five seconds. A special wrench (available from the bottom of the engine. Open the hood and remove the engine oil fill cap. Replace the engine... oil into an appropriate container. Turn off the engine and reinspect your Honda dealer) is required to the upper mark on ...
...Engine Oil OIL FILTER 6. Start the engine. Tighten it to instructions that come with the recommended oil. If necessary, add oil to bring the level to remove the filter. 4. Engine oil change capacity (including filter): 3.8 (4.0 US qt, 3.3 Imp qt) 7. The oil pressure indicator light... should go out within five seconds. A special wrench (available from the bottom of the engine. Open the hood and remove the engine oil fill cap. Replace the engine... oil into an appropriate container. Turn off the engine and reinspect your Honda dealer) is required to the upper mark on ...

Owner's Manual
Page 167
.... refrigerant for at least ten minutes while you are a couple of things you have your dealer check the system. Releasing refrigerant into the atmosphere can do to clean them . Periodically check the engine's radiator and air conditioning condenser for leaves, insects, and dirt stuck to remove them . Run...make sure the service facility uses a refrigerant recycling system. This circulates the lubricating oil contained in the refrigerant. Use a light spray from a hose or a soft brush to the front surface. Run it for reuse. Maintenance Recharge the system with the...
.... refrigerant for at least ten minutes while you are a couple of things you have your dealer check the system. Releasing refrigerant into the atmosphere can do to clean them . Periodically check the engine's radiator and air conditioning condenser for leaves, insects, and dirt stuck to remove them . Run...make sure the service facility uses a refrigerant recycling system. This circulates the lubricating oil contained in the refrigerant. Use a light spray from a hose or a soft brush to the front surface. Run it for reuse. Maintenance Recharge the system with the...

Owner's Manual
Page 190
...'t Start...199 Nothing Happens...199 The Starter Operates Normally...200 Jump Starting...200 If Your Engine Overheats...202 Low Oil Pressure...204 Charging System Indication...205 Malfunction Indicator Lamp/ Check Engine Light...206 Closing the Sunroof...207 Fuses...208 Checking and Replacing...209 Towing...213 Taking Care of the Unexpected This section covers the morecommon...
...'t Start...199 Nothing Happens...199 The Starter Operates Normally...200 Jump Starting...200 If Your Engine Overheats...202 Low Oil Pressure...204 Charging System Indication...205 Malfunction Indicator Lamp/ Check Engine Light...206 Closing the Sunroof...207 Fuses...208 Checking and Replacing...209 Towing...213 Taking Care of the Unexpected This section covers the morecommon...

Owner's Manual
Page 198
... battery (see page 162 ). See Jump Starting on the headlights and check their brightness. If the fuses are OK, there is discharged or the connections are very dim or don't light at all , the battery is discharged. The engine's starter motor does not operate at all , or operates very slowly.... You can then try to start the engine, either the battery is probably something wrong with the electrical circuit...
... battery (see page 162 ). See Jump Starting on the headlights and check their brightness. If the fuses are OK, there is discharged or the connections are very dim or don't light at all , the battery is discharged. The engine's starter motor does not operate at all , or operates very slowly.... You can then try to start the engine, either the battery is probably something wrong with the electrical circuit...

Owner's Manual
Page 199
... a Honda by using the proper starting until it seems slushy or like a simple procedure, there are several precautions you should take. There may be able to find the problem. Taking Care of the Unexpected Jump Starting If your car: 1. Follow the directions closely. Open the hood and check the ...Refer to lump start your car's battery has run . Turn the ignition switch to the fuel pump. Attempting to Starting the Engine on page 213. The low fuel level warning light may be an electrical problem, such as no power to ON (II) for a minute and watch the fuel gauge. Turn...
... a Honda by using the proper starting until it seems slushy or like a simple procedure, there are several precautions you should take. There may be able to find the problem. Taking Care of the Unexpected Jump Starting If your car: 1. Follow the directions closely. Open the hood and check the ...Refer to lump start your car's battery has run . Turn the ignition switch to the fuel pump. Attempting to Starting the Engine on page 213. The low fuel level warning light may be an electrical problem, such as no power to ON (II) for a minute and watch the fuel gauge. Turn...

Owner's Manual
Page 203
...4. There is a mechanical problem that is running , take immediate action. 3. Taking Care of the Unexpected Open the hood and check the oil level (see page 146 ). If this light flashes or stays on oil can continue driving. (See Towing on page 213 .) The low oil pressure indicator should never come... on the dipstick (see page 146 ). Although oil level and oil pressure are not directly connected, an engine that needs to the full mark on when the engine is very low on with low oil pressure can safely get the car stopped. NOTICE Running the...
...4. There is a mechanical problem that is running , take immediate action. 3. Taking Care of the Unexpected Open the hood and check the oil level (see page 146 ). If this light flashes or stays on oil can continue driving. (See Towing on page 213 .) The low oil pressure indicator should never come... on the dipstick (see page 146 ). Although oil level and oil pressure are not directly connected, an engine that needs to the full mark on when the engine is very low on with low oil pressure can safely get the car stopped. NOTICE Running the...

Owner's Manual
Page 205
.... Even though you may feel no difference in your car's performance, it goes off the engine. Restart the engine and watch the indicator light. Malfunction Indicator Lamp/Check Engine Light If this indicator comes on while driving, there is a problem with the malfunction indicator lamp/check engine light on, you follow the above procedure. Those repairs may cause serious...
.... Even though you may feel no difference in your car's performance, it goes off the engine. Restart the engine and watch the indicator light. Malfunction Indicator Lamp/Check Engine Light If this indicator comes on while driving, there is a problem with the malfunction indicator lamp/check engine light on, you follow the above procedure. Those repairs may cause serious...

Owner's Manual
Page 232
... .. 52 Appearance Care...183 Ashtray...72 Audio System...84 Automatic Speed Control...48 Automatic Transmission...120 Capacity, Fluid...218 Checking Fluid Level...155 Shifting...120 Shift Lever Positions...120 Shift Lock Release...123 Accessories Installation...115 ACCESSORY (Ignition Key Position...Restraint Position...18 Seat-back Position...18 Storing Cargo Safely...19 Additives, Engine Oil...148 Adjustments Mirrors...67 Head Restraints...58 Seats...56 Steering Wheel...46 Battery Charging System Light...36 Jump Starting...200 Maintenance...162 Specifications...219 Before Driving...107 Belts,...
... .. 52 Appearance Care...183 Ashtray...72 Audio System...84 Automatic Speed Control...48 Automatic Transmission...120 Capacity, Fluid...218 Checking Fluid Level...155 Shifting...120 Shift Lever Positions...120 Shift Lock Release...123 Accessories Installation...115 ACCESSORY (Ignition Key Position...Restraint Position...18 Seat-back Position...18 Storing Cargo Safely...19 Additives, Engine Oil...148 Adjustments Mirrors...67 Head Restraints...58 Seats...56 Steering Wheel...46 Battery Charging System Light...36 Jump Starting...200 Maintenance...162 Specifications...219 Before Driving...107 Belts,...
Owner's Manual
Page 233
... Change Oil How to...148 When to...140 Changing a Flat Tire ...193 Changing Engine Coolant...152 Charging System Indicator ...36, 205 Check Engine Light...37 Checking Automatic Transmission Fluid...155 Battery Condition...162 Brake Fluid...156 Drive Belts...169 Engine Coolant...150 Engine Oil...146 Fuses...209 Power Steering Fluid...157 Checklist, Before Driving...118 Child Safety...
... Change Oil How to...148 When to...140 Changing a Flat Tire ...193 Changing Engine Coolant...152 Charging System Indicator ...36, 205 Check Engine Light...37 Checking Automatic Transmission Fluid...155 Battery Condition...162 Brake Fluid...156 Drive Belts...169 Engine Coolant...150 Engine Oil...146 Fuses...209 Power Steering Fluid...157 Checklist, Before Driving...118 Child Safety...
Owner's Manual
Page 234
... Starting...200 Changing a Flat Tire...193 Charging System Indicator...205 Check Engine Light...206 Checking the Fuses...209 Low Oil Pressure Indicator...204 Malfunction Indicator Lamp ...206 Manually Closing Sunroof...207 Overheated Engine...202 Emergency Brake...68 Emergency Flashers...43 Emission Controls...224 Engine Belts...169 Check Light...37, 206 Fabric, Cleaning...187 Fan, Interior...78 Features, Comfort...
... Starting...200 Changing a Flat Tire...193 Charging System Indicator...205 Check Engine Light...206 Checking the Fuses...209 Low Oil Pressure Indicator...204 Malfunction Indicator Lamp ...206 Manually Closing Sunroof...207 Overheated Engine...202 Emergency Brake...68 Emergency Flashers...43 Emission Controls...224 Engine Belts...169 Check Light...37, 206 Fabric, Cleaning...187 Fan, Interior...78 Features, Comfort...

Owner's Manual
Page 235
...Cap...110 Gauge...40 Octane Requirement...108 Oxygenated...108 Tank, Filling the...110 Fuses, Checking the...209 Reminder Chime...42 Replacing Halogen Bulbs ...177 Turning on...42 Head Restraints...58... Gauge...40 Octane Requirement...108 Tank, Filling the...110 Gas Station Procedures...110 Gauges Engine Coolant Temperature ...40 Fuel...40 Gearshift Lever Positions...120 Glass Cleaning...188 Glove Box......55 Halogen Headlight Bulbs...177 Hazard Warning Flashers...45 Headlights...42 Aiming...175 Daytime Running Lights...42 High Beam Indicator...38 High Beams, Turning on...42 Low Beams, Turning on...
...Cap...110 Gauge...40 Octane Requirement...108 Oxygenated...108 Tank, Filling the...110 Fuses, Checking the...209 Reminder Chime...42 Replacing Halogen Bulbs ...177 Turning on...42 Head Restraints...58... Gauge...40 Octane Requirement...108 Tank, Filling the...110 Gas Station Procedures...110 Gauges Engine Coolant Temperature ...40 Fuel...40 Gearshift Lever Positions...120 Glass Cleaning...188 Glove Box......55 Halogen Headlight Bulbs...177 Hazard Warning Flashers...45 Headlights...42 Aiming...175 Daytime Running Lights...42 High Beam Indicator...38 High Beams, Turning on...42 Low Beams, Turning on...
Owner's Manual
Page 236
Index Instrument Panel...34 Instrument Panel Brightness...43 Interior Cleaning...187 Interior Lights...73 Introduction...i Bulb Replacement...177 Indicator...35 Parking...42 Turn Signal...43 Loading Cargo...116 LOCK (Ignition Key Position)...52 ... Lights Headlight Aiming...175 Maintenance...135 Periodic Items...144 Record...142 - 143 Required Indicator...40 Safety...136 Schedule...138 - 141 Malfunction Indicator Lamp .. 37, 206 Occupant Protection System...4 Octane Requirement, Gasoline...108 Odometer...39 Odometer, Trip...39 Oil Change, How to ...148 Change, When to...140 Checking Engine......
Index Instrument Panel...34 Instrument Panel Brightness...43 Interior Cleaning...187 Interior Lights...73 Introduction...i Bulb Replacement...177 Indicator...35 Parking...42 Turn Signal...43 Loading Cargo...116 LOCK (Ignition Key Position)...52 ... Lights Headlight Aiming...175 Maintenance...135 Periodic Items...144 Record...142 - 143 Required Indicator...40 Safety...136 Schedule...138 - 141 Malfunction Indicator Lamp .. 37, 206 Occupant Protection System...4 Octane Requirement, Gasoline...108 Odometer...39 Odometer, Trip...39 Oil Change, How to ...148 Change, When to...140 Checking Engine......


