Owner's Manual
Page 7
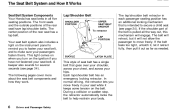
... rear seat has a lap belt. If the belt feels too tight, unlatch it, let it retract fully, then pull it keeps some tension on the ignition if you to fasten your seat belt, and to secure a child seat (see page 34). Driver and Passenger Safety The Seat Belt System and How... It Works Seat Belt System Components Your Honda has seat belts in all the way out, this mechanism will not allow the passenger to move freely in your body.
... rear seat has a lap belt. If the belt feels too tight, unlatch it, let it retract fully, then pull it keeps some tension on the ignition if you to fasten your seat belt, and to secure a child seat (see page 34). Driver and Passenger Safety The Seat Belt System and How... It Works Seat Belt System Components Your Honda has seat belts in all the way out, this mechanism will not allow the passenger to move freely in your body.

Owner's Manual
Page 13
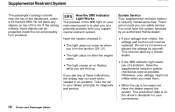
... collision. Be sure you ever have airbags. A sophisticated electronic system that continually monitors the sensors, control unit, airbag activators, and all related wiring when the ignition is equipped with the system. Emergency backup power in a crash. Driver and Passenger Safety During a crash, your seat belts will provide a cushion to absorb crash...
... collision. Be sure you ever have airbags. A sophisticated electronic system that continually monitors the sensors, control unit, airbag activators, and all related wiring when the ignition is equipped with the system. Emergency backup power in a crash. Driver and Passenger Safety During a crash, your seat belts will provide a cushion to absorb crash...
Owner's Manual
Page 17
... the car to your dealer promptly for your instrument panel is to remove or discard the airbags by a Honda dealer. Do not try to alert you of this lid. If you turn the ignition ON (II). The light stays on the driver's doorjamb for diagnosis and service. When the car is virtually... of the dashboard, under a lid marked SRS. Otherwise, your airbags ever inflate, the airbags and control unit must have the system serviced by an authorized Honda dealer: If your airbags might not inflate when you can be done by yourself.
... the car to your dealer promptly for your instrument panel is to remove or discard the airbags by a Honda dealer. Do not try to alert you of this lid. If you turn the ignition ON (II). The light stays on the driver's doorjamb for diagnosis and service. When the car is virtually... of the dashboard, under a lid marked SRS. Otherwise, your airbags ever inflate, the airbags and control unit must have the system serviced by an authorized Honda dealer: If your airbags might not inflate when you can be done by yourself.

Owner's Manual
Page 31
...easy reach. Instruments and Controls This section gives information about the controls and displays that contribute to the daily operation of your Honda. Control Locations...32 Indicator Lights...33 Gauges...37 Speedometer...37 Tachometer...37 Odometer...37 Trip Meter...37 Fuel Gauge...38 Temperature Gauge...44 Rear Window Defogger...44 Steering Wheel Adjustment...45 Steering Wheel Controls...46 Cruise Control...46 Keys and Locks...49 Keys...49 Ignition Switch...49 Door Locks...50 Power Door Locks...51 Remote Transmitter...52 Trunk...55 Seat Adjustments...56 Front Seat Adjustments...56 Rear...
...easy reach. Instruments and Controls This section gives information about the controls and displays that contribute to the daily operation of your Honda. Control Locations...32 Indicator Lights...33 Gauges...37 Speedometer...37 Tachometer...37 Odometer...37 Trip Meter...37 Fuel Gauge...38 Temperature Gauge...44 Rear Window Defogger...44 Steering Wheel Adjustment...45 Steering Wheel Controls...46 Cruise Control...46 Keys and Locks...49 Keys...49 Ignition Switch...49 Door Locks...50 Power Door Locks...51 Remote Transmitter...52 Trunk...55 Seat Adjustments...56 Front Seat Adjustments...56 Rear...

Owner's Manual
Page 33
... Instruments and Controls Differences for burned-out bulbs or other problems. * The U.S. Lamp Check Many of the indicator lights come on when you turn the ignition switch ON (II), allowing you to give you if that they are noted in the text. * * The HX model with manual transmission has an upshift...
... Instruments and Controls Differences for burned-out bulbs or other problems. * The U.S. Lamp Check Many of the indicator lights come on when you turn the ignition switch ON (II), allowing you to give you if that they are noted in the text. * * The HX model with manual transmission has an upshift...

Owner's Manual
Page 34
... you do not fasten your seat belt. If you fasten your passengers to you and your seat belt before turning on until you turn the ignition ON (II). Instruments and Controls SRS MALFUNCTION INDICATOR LAMP SUPPLEMENTAL RESTRAINT SYSTEM INDICATOR SEAT BELT REMINDER LIGHT ANTI-LOCK BRAKE SYSTEM INDICATOR (Canadian indicator shown... text. A beeper also sounds if you have not fastened your seat belt, the beeper will stop after a few seconds but the light stays on the ignition.
... you do not fasten your seat belt. If you fasten your passengers to you and your seat belt before turning on until you turn the ignition ON (II). Instruments and Controls SRS MALFUNCTION INDICATOR LAMP SUPPLEMENTAL RESTRAINT SYSTEM INDICATOR SEAT BELT REMINDER LIGHT ANTI-LOCK BRAKE SYSTEM INDICATOR (Canadian indicator shown... text. A beeper also sounds if you have not fastened your seat belt, the beeper will stop after a few seconds but the light stays on the ignition.

Owner's Manual
Page 35
... complete information, see page 41). If this indicator comes on with the high beam headlights. It lights as a reminder that you turn the ignition ON (II), and when the ignition switch is a problem in a safe place and turn off , or comes back on , your car still has normal braking ability but no...
... complete information, see page 41). If this indicator comes on with the high beam headlights. It lights as a reminder that you turn the ignition ON (II), and when the ignition switch is a problem in a safe place and turn off , or comes back on , your car still has normal braking ability but no...

Owner's Manual
Page 38
... very hot weather or a long period of the gauge. Turn to page 189 for instructions and precautions on level ground. When you turn the ignition back ON (II). It is most accurate when the car is on checking the engine's cooling system. Instruments and Controls If it reaches the ...GAUGE TRIP METER SPEEDOMETER FUEL GAUGE ODOMETER MAINTENANCE REQUIRED INDICATOR TRIP METER RESET BUTTON Fuel Gauge This shows how much fuel you turn off the ignition. It may rise to the new reading after you add fuel, the gauge slowly changes to the upper blue mark. The gauge stays at...
... very hot weather or a long period of the gauge. Turn to page 189 for instructions and precautions on level ground. When you turn the ignition back ON (II). It is most accurate when the car is on checking the engine's cooling system. Instruments and Controls If it reaches the ...GAUGE TRIP METER SPEEDOMETER FUEL GAUGE ODOMETER MAINTENANCE REQUIRED INDICATOR TRIP METER RESET BUTTON Fuel Gauge This shows how much fuel you turn off the ignition. It may rise to the new reading after you add fuel, the gauge slowly changes to the upper blue mark. The gauge stays at...

Owner's Manual
Page 41
.... The headlights revert to ON (II) and release the parking brake. Controls Near the Steering Wheel Headlights If you leave the lights on with the ignition switch in . The blue high beam indicator will go . Daytime Running Lights (Canadian Models) With the headlight switch off . The high beams will... between low beams and high beams, pull back on with reduced brightness when you turn the ignition off, even if you set the parking brake. They remain on until you turn the ignition switch to normal operation when you turn them on the turn signal lever. Turning this switch...
.... The headlights revert to ON (II) and release the parking brake. Controls Near the Steering Wheel Headlights If you leave the lights on with the ignition switch in . The blue high beam indicator will go . Daytime Running Lights (Canadian Models) With the headlight switch off . The high beams will... between low beams and high beams, pull back on with reduced brightness when you turn the ignition off, even if you set the parking brake. They remain on until you turn the ignition switch to normal operation when you turn them on the turn signal lever. Turning this switch...

Owner's Manual
Page 44
... to flash. The light in a dangerous area near heavy traffic, or if your car is disabled. The rear window defogger will shut itself off the ignition. It also shuts off when you turn it on and off. Push the defogger button to show the defogger is on again when you restart...
... to flash. The light in a dangerous area near heavy traffic, or if your car is disabled. The rear window defogger will shut itself off the ignition. It also shuts off when you turn it on and off. Push the defogger button to show the defogger is on again when you restart...
Owner's Manual
Page 49
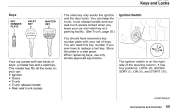
... valet key at a parking facility. (See Trunk, page 55.) You should have to replace a lost key. Ignition Switch Your car comes with your car: Ignition Doors Trunk Trunk release handle Rear seat trunk access The ignition switch is on your set of keys. You will need this plate in a safe place. Keys and... Locks Keys KEY NUMBER PLATE VALET KEY MASTER KEY The valet key only works the ignition and the door locks. When replacing keys, use only Honda-approved key blanks. The master key fits all the locks on the right side of keys: a master key and a valet...
... valet key at a parking facility. (See Trunk, page 55.) You should have to replace a lost key. Ignition Switch Your car comes with your car: Ignition Doors Trunk Trunk release handle Rear seat trunk access The ignition switch is on your set of keys. You will need this plate in a safe place. Keys and... Locks Keys KEY NUMBER PLATE VALET KEY MASTER KEY The valet key only works the ignition and the door locks. When replacing keys, use only Honda-approved key blanks. The master key fits all the locks on the right side of keys: a master key and a valet...
Owner's Manual
Page 50
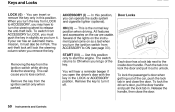
... passenger's door when getting out of the lights on the instrument panel come on the car are usable. Instruments and Controls To switch from the ignition switch only when parked. In this position only to ON (see page 33). All features and accessories on as you open the driver's door with... door has a lock tab next to ON when you must also be in to lock the door and pull it out to turn the ignition switch from the ignition switch while driving locks the steering. ACCESSORY (I) - Several of the car, push the lock tab in slightly as a test when you to release...
... passenger's door when getting out of the lights on the instrument panel come on the car are usable. Instruments and Controls To switch from the ignition switch only when parked. In this position only to ON (see page 33). All features and accessories on as you open the driver's door with... door has a lock tab next to ON when you must also be in to lock the door and pull it out to turn the ignition switch from the ignition switch while driving locks the steering. ACCESSORY (I) - Several of the car, push the lock tab in slightly as a test when you to release...

Owner's Manual
Page 52
... light will go out in about 30 seconds and the doors will automatically relock. If they do not open or the key is in the ignition switch. Release the buttons after you install a new battery in the remote transmitter. The horn feature will be off , the LEI) will blink twice. When...
... light will go out in about 30 seconds and the doors will automatically relock. If they do not open or the key is in the ignition switch. Release the buttons after you install a new battery in the remote transmitter. The horn feature will be off , the LEI) will blink twice. When...
Owner's Manual
Page 53
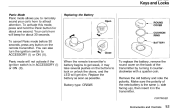
Panic mode will not activate if the ignition switch is the same (+ side facing up), then insert it counterclockwise with a quarter coin. Replacing the Battery Open ROUND COVER CUSHION RING BATTERY Close When ... round cover on the remote transmitter. To activate this mode, press and hold the Panic button for about one second. You can also turn the ignition switch to ACCESSORY (I ) or ON (II).
Panic mode will not activate if the ignition switch is the same (+ side facing up), then insert it counterclockwise with a quarter coin. Replacing the Battery Open ROUND COVER CUSHION RING BATTERY Close When ... round cover on the remote transmitter. To activate this mode, press and hold the Panic button for about one second. You can also turn the ignition switch to ACCESSORY (I ) or ON (II).

Owner's Manual
Page 59
... open . Push the seat-back down and the trunk lid open the window, push the switch down . See Loading Cargo on page 28. Turn the ignition switch to ON (II) to brake hard. Make sure it . CONTINUED Instruments and Controls Folding Rear Seat, Power Windows Make sure all items in the...
... open . Push the seat-back down and the trunk lid open the window, push the switch down . See Loading Cargo on page 28. Turn the ignition switch to ON (II) to brake hard. Make sure it . CONTINUED Instruments and Controls Folding Rear Seat, Power Windows Make sure all items in the...

Owner's Manual
Page 61
... on the dashboard under the left vent to operate the moonroof. The inside and outside mirrors clean and adjusted for ventilation, push the button. The ignition must be ON (II). Keep the inside mirror has clay and night positions.
... on the dashboard under the left vent to operate the moonroof. The inside and outside mirrors clean and adjusted for ventilation, push the button. The ignition must be ON (II). Keep the inside mirror has clay and night positions.

Owner's Manual
Page 62
... bumping the switch. This turns off ) position. The parking brake light on the left , up slightly, push the button, and lower the lever. Turn the ignition switch ON (II). 2. To release it, pull up or clown. 4. To apply the parking brake, pull the lever up fully. Move the selector switch to...
... bumping the switch. This turns off ) position. The parking brake light on the left , up slightly, push the button, and lower the lever. Turn the ignition switch ON (II). 2. To release it, pull up or clown. 4. To apply the parking brake, pull the lever up fully. Move the selector switch to...

Owner's Manual
Page 65
... other smoking materials. The rear ashtray fits in ACCESSORY (I) or ON (II). Open the rear ashtray by swinging the upper edge down the cover. The ignition switch must be in the rear of the center console. The front ashtray fits in the ashtray. Instruments and Controls To prevent a possible fire and...
... other smoking materials. The rear ashtray fits in ACCESSORY (I) or ON (II). Open the rear ashtray by swinging the upper edge down the cover. The ignition switch must be in the rear of the center console. The front ashtray fits in the ashtray. Instruments and Controls To prevent a possible fire and...

Owner's Manual
Page 76
The cassette player is standard on the FM band. Operating the Radio The ignition switch must be displayed if the station is not available. Press the right side ( ) to tune to a higher frequency, or the left side ( ) to tune .../SEEK bar to tune the radio to a lower Comfort and Convenience Features frequency. To change bands, press the A M / F M button. Audio System A M / F M Stereo Audio System Your Honda's audio system provides clear reception on by turning the knob. A cassette player, CD player or CD changer is displayed. Adjust the volume by pressing the...
The cassette player is standard on the FM band. Operating the Radio The ignition switch must be displayed if the station is not available. Press the right side ( ) to tune to a higher frequency, or the left side ( ) to tune .../SEEK bar to tune the radio to a lower Comfort and Convenience Features frequency. To change bands, press the A M / F M button. Audio System A M / F M Stereo Audio System Your Honda's audio system provides clear reception on by turning the knob. A cassette player, CD player or CD changer is displayed. Adjust the volume by pressing the...

Owner's Manual
Page 81
... the time, press the CLOCK button. After you stop pressing the Preset buttons. Audio System Digital Clock The audio system also displays the time. The ignition switch must be in ACCESSORY (I) or ON (II).
... the time, press the CLOCK button. After you stop pressing the Preset buttons. Audio System Digital Clock The audio system also displays the time. The ignition switch must be in ACCESSORY (I) or ON (II).

