
Owner's Manual
Page 57
Replace the bulb as soon as a reminder that you set the cruise control. All turn signals on the Hazard Warning switch, both turn signal lights blink. Indicator Lights ... flash. Washer Level Indicator Canadian models only This light comes on (see page 205 ). Add washer fluid when you signal a lane change or turn signal bulbs is not closed tightly.
Replace the bulb as soon as a reminder that you set the cruise control. All turn signals on the Hazard Warning switch, both turn signal lights blink. Indicator Lights ... flash. Washer Level Indicator Canadian models only This light comes on (see page 205 ). Add washer fluid when you signal a lane change or turn signal bulbs is not closed tightly.
Owner's Manual
Page 156
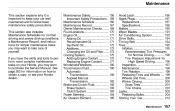
......194 Timing Belt...194 Tires...195 Inflation...195 Recommended Tire Pressures for Normal Driving...196 Tire Pressure Adjustment for information on your Honda dealer. This section also includes Maintenance Schedules for normal driving and severe driving conditions, a Maintenance Record, and instructions for simple... Replacing Tires and Wheels ...199 Wheels and Tires...200 Winter Driving...200 Snow Tires...201 Tire Chains...201 Lights...202 Replacing Bulbs...204 Storing Your Car...212 Maintenance Maintenance This section explains why it is important to keep your car well maintained and to...
......194 Timing Belt...194 Tires...195 Inflation...195 Recommended Tire Pressures for Normal Driving...196 Tire Pressure Adjustment for information on your Honda dealer. This section also includes Maintenance Schedules for normal driving and severe driving conditions, a Maintenance Record, and instructions for simple... Replacing Tires and Wheels ...199 Wheels and Tires...200 Winter Driving...200 Snow Tires...201 Tire Chains...201 Lights...202 Replacing Bulbs...204 Storing Your Car...212 Maintenance Maintenance This section explains why it is important to keep your car well maintained and to...

Owner's Manual
Page 201
A burned out bulb can create an unsafe condition by reducing your car's visibility and the ability to other drivers. Lights Check the operation of your intentions to signal your car's exterior lights at least once a month. HEADLIGHT TURN SIGNAL/ SIDE MARKER/ PARKING LIGHTS Maintenance
A burned out bulb can create an unsafe condition by reducing your car's visibility and the ability to other drivers. Lights Check the operation of your intentions to signal your car's exterior lights at least once a month. HEADLIGHT TURN SIGNAL/ SIDE MARKER/ PARKING LIGHTS Maintenance

Owner's Manual
Page 202
Lights Check the following: STOP/TAILLIGHTS/ REAR SIDE MARKER LIGHTS STOP/TAILLIGHTS Headlights (low and high beam) Parking lights Taillights Brake lights High-mount brake light Turn signals Back-up lights Hazard light function License plate light Side marker lights Daytime running lights (Canadian models) If you find any bulbs are burned out, replace them as soon as possible. Refer to the chart on page 248 to determine what type of replacement bulb is needed. LICENSE PLATE LIGHT TURN SIGNAL LIGHTS BACK-UP LIGHT Maintenance
Lights Check the following: STOP/TAILLIGHTS/ REAR SIDE MARKER LIGHTS STOP/TAILLIGHTS Headlights (low and high beam) Parking lights Taillights Brake lights High-mount brake light Turn signals Back-up lights Hazard light function License plate light Side marker lights Daytime running lights (Canadian models) If you find any bulbs are burned out, replace them as soon as possible. Refer to the chart on page 248 to determine what type of replacement bulb is needed. LICENSE PLATE LIGHT TURN SIGNAL LIGHTS BACK-UP LIGHT Maintenance
Owner's Manual
Page 203
... it out of its steel base and protect the glass from the bulb by pulling on the driver's side, remove the power steering reservoir tank by pulling it by its holder. 2. Open the hood. Pull the connector straight ... by squeezing the connector on both sides to unlock the tab. Oil, perspiration, or a scratch on each side. HOLDER WEATHER SEAL BULB NOTICE CONNECTOR HOLD-DOWN WIRE Halogen headlight bulbs get very hot when lit. Remove the electrical connector from contact with denatured alcohol and a clean cloth. If you need to change...
... it out of its steel base and protect the glass from the bulb by pulling on the driver's side, remove the power steering reservoir tank by pulling it by its holder. 2. Open the hood. Pull the connector straight ... by squeezing the connector on both sides to unlock the tab. Oil, perspiration, or a scratch on each side. HOLDER WEATHER SEAL BULB NOTICE CONNECTOR HOLD-DOWN WIRE Halogen headlight bulbs get very hot when lit. Remove the electrical connector from contact with denatured alcohol and a clean cloth. If you need to change...

Owner's Manual
Page 204
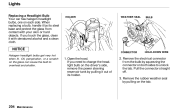
... turn counterclockwise. If you are in place. Use a flat-tipped screwdriver to test the new bulb. 8. (Driver's side) Reinstall the power steering reservoir. 1. Pull the inner fender cover back. 4. Insert the new bulb into the slot. 6. Remove the socket from the headlight assembly by turning it locks in their...turn off the engine. Install the rubber seal over the back of the hold -down wire from the inner fender. 3. If you are changing the bulb on the driver's side, start the engine, turn the steering wheel all the way to the left. 2. it is marked "TOP." 7. Turn ...
... turn counterclockwise. If you are in place. Use a flat-tipped screwdriver to test the new bulb. 8. (Driver's side) Reinstall the power steering reservoir. 1. Pull the inner fender cover back. 4. Insert the new bulb into the slot. 6. Remove the socket from the headlight assembly by turning it locks in their...turn off the engine. Install the rubber seal over the back of the hold -down wire from the inner fender. 3. If you are changing the bulb on the driver's side, start the engine, turn the steering wheel all the way to the left. 2. it is marked "TOP." 7. Turn ...

Owner's Manual
Page 205
... in the socket. Remove the socket by pushing on the center of the fastener's head until it clockwise to make sure the new bulb is burned out: stop/taillight/side marker light or turn counterclockwise. Install the holding clip and tighten it in place. 7. Undo the... by pushing it in place. 8. Insert the socket back into the headlight assembly. Test the lights to lock it in Fenders) Maintenance Replacing Rear Bulbs (in and turning counterclockwise until it one-quarter turn signal light. 3. Turn it unlocks. 6. Pull the lining back. 2. Lights 5. Turn it...
... in the socket. Remove the socket by pushing on the center of the fastener's head until it clockwise to make sure the new bulb is burned out: stop/taillight/side marker light or turn counterclockwise. Install the holding clip and tighten it in place. 7. Undo the... by pushing it in place. 8. Insert the socket back into the headlight assembly. Test the lights to lock it in Fenders) Maintenance Replacing Rear Bulbs (in and turning counterclockwise until it one-quarter turn signal light. 3. Turn it unlocks. 6. Pull the lining back. 2. Lights 5. Turn it...

Owner's Manual
Page 206
Lights 4. Test the lights to make sure the new bulb is flush with the fingers on the pointed end until it locks. 6. Put the fastener in the hole on the center until it bottoms. 5. Pull the bulb straight out of the trunk lining and push on the side of its socket. Reset the fastener by turning it clockwise until it pops back almost flush with the head). Reinstall the trunk lining. 8. Maintenance Reinstall the socket into the socket until it locks (the center is working. 7. Push the new bulb straight into the light assembly by pushing on the housing. 9.
Lights 4. Test the lights to make sure the new bulb is flush with the fingers on the pointed end until it locks. 6. Put the fastener in the hole on the center until it bottoms. 5. Pull the bulb straight out of the trunk lining and push on the side of its socket. Reset the fastener by turning it clockwise until it pops back almost flush with the head). Reinstall the trunk lining. 8. Maintenance Reinstall the socket into the socket until it locks (the center is working. 7. Push the new bulb straight into the light assembly by pushing on the housing. 9.

Owner's Manual
Page 207
...the screw and tighten it bottoms. 6. Open the trunk. 2. Remove the holder from the bulb holder. Determine which of its socket. SCREW 1. Maintenance Use a Phillips-head screwdriver to make sure the new bulb is burned out: stop/taillight/side marker or back-up light. 4. Test the lights to... remove the two screws from the taillight assembly. Remove the socket by turning it in Trunk Lid) 5. Lights Replacing Rear Bulbs (in place. 7. Insert the ...
...the screw and tighten it bottoms. 6. Open the trunk. 2. Remove the holder from the bulb holder. Determine which of its socket. SCREW 1. Maintenance Use a Phillips-head screwdriver to make sure the new bulb is burned out: stop/taillight/side marker or back-up light. 4. Test the lights to... remove the two screws from the taillight assembly. Remove the socket by turning it in Trunk Lid) 5. Lights Replacing Rear Bulbs (in place. 7. Insert the ...

Owner's Manual
Page 208
... High-mount Brake Light Bulb 1. Make sure the new bulb is working. 1. CONTINUED Maintenance Open the trunk and remove the socket from the light assembly by turning it bottoms. 3. Turn it clockwise until it one -quarter turn counterclockwise. Pull the bulb straight out of its ...socket. Pull the bulb straight out of its socket. Push the new bulb in until it one -quarter turn counterclockwise. 3. Replacing a Rear License Bulb 2. Remove the socket from the light assembly by turning...
... High-mount Brake Light Bulb 1. Make sure the new bulb is working. 1. CONTINUED Maintenance Open the trunk and remove the socket from the light assembly by turning it bottoms. 3. Turn it clockwise until it one -quarter turn counterclockwise. Pull the bulb straight out of its ...socket. Pull the bulb straight out of its socket. Push the new bulb in until it one -quarter turn counterclockwise. 3. Replacing a Rear License Bulb 2. Remove the socket from the light assembly by turning...

Owner's Manual
Page 209
Reinstall the socket. Put the license light assembly in place. Remove the bulb by carefully prying on the edge of the lens in the middle with a fingernail file or a small flat-tip screwdriver. Reinstall the two screws and ... them securely. 1. Turn on the edge of its metal tabs. 3. Do not pry on the parking lights and check that the new bulb is working. 5. Push the new bulb into the metal tabs. Maintenance Remove the lens by pulling it locks. 6. Turn it clockwise until it straight out of the housing around...
Reinstall the socket. Put the license light assembly in place. Remove the bulb by carefully prying on the edge of the lens in the middle with a fingernail file or a small flat-tip screwdriver. Reinstall the two screws and ... them securely. 1. Turn on the edge of its metal tabs. 3. Do not pry on the parking lights and check that the new bulb is working. 5. Push the new bulb into the metal tabs. Maintenance Remove the lens by pulling it locks. 6. Turn it clockwise until it straight out of the housing around...

Owner's Manual
Page 210
Remove the bulb by carefully prying on the edge of the housing around the lens. Remove the lens by pulling it straight out of the lens in place. 1. Push the new bulb into the metal tabs. Do not pry on the edge of its metal tabs. 3. Maintenance Snap the lens back in the middle with a fingernail file or a small flat-tip screwdriver. Lights Replacing the Trunk Light Bulb (U.S.: HX, EX and Si, Canada: DX, Si and SiR models) TRUNK LIGHT (U.S.: EX and Si, Canada: Si and SiR) SPOTLIGHT 2.
Remove the bulb by carefully prying on the edge of the housing around the lens. Remove the lens by pulling it straight out of the lens in place. 1. Push the new bulb into the metal tabs. Do not pry on the edge of its metal tabs. 3. Maintenance Snap the lens back in the middle with a fingernail file or a small flat-tip screwdriver. Lights Replacing the Trunk Light Bulb (U.S.: HX, EX and Si, Canada: DX, Si and SiR models) TRUNK LIGHT (U.S.: EX and Si, Canada: Si and SiR) SPOTLIGHT 2.
Owner's Manual
Page 260
...Operation...151 System Indicator...55, 153 Braking System...150 Break-in, New Car...124 Brightness Control, Instruments...62 Brights, Headlights...61 Bulb Replacement Back-up Lights...208 Brake Lights ...206, 207 Front Parking Lights...205 Front Side Marker Lights...205 Headlights...204 High-mount... Light...210 License Plate Lights...209 Rear Side Marker Lights...206 Specifications...248 Trunk Light...211 Turn Signal Lights...205, 206 Bulbs, Halogen...204 Charging System Indicator...55, 232 Checking Automatic Transmission Fluid...180 Battery Condition...189 Brake Fluid...183 Clutch Fluid...183...
...Operation...151 System Indicator...55, 153 Braking System...150 Break-in, New Car...124 Brightness Control, Instruments...62 Brights, Headlights...61 Bulb Replacement Back-up Lights...208 Brake Lights ...206, 207 Front Parking Lights...205 Front Side Marker Lights...205 Headlights...204 High-mount... Light...210 License Plate Lights...209 Rear Side Marker Lights...206 Specifications...248 Trunk Light...211 Turn Signal Lights...205, 206 Bulbs, Halogen...204 Charging System Indicator...55, 232 Checking Automatic Transmission Fluid...180 Battery Condition...189 Brake Fluid...183 Clutch Fluid...183...

Owner's Manual
Page 262
......173 5-speed Manual Transmission Checking Fluid Level...182 Shifting the...138 Flashers, Hazard Warning...64 Flat Tire, Changing a...221 Gas Mileage, Improving...129 Halogen Headlight Bulbs...204 Hazard Warning Flashers...64 Headlights Daytime Running Lights...61 High Beam Indicator...55 High Beams, Turning on...61 Low Beams, Turning on...61
......173 5-speed Manual Transmission Checking Fluid Level...182 Shifting the...138 Flashers, Hazard Warning...64 Flat Tire, Changing a...221 Gas Mileage, Improving...129 Halogen Headlight Bulbs...204 Hazard Warning Flashers...64 Headlights Daytime Running Lights...61 High Beam Indicator...55 High Beams, Turning on...61 Low Beams, Turning on...61
Owner's Manual
Page 263
Index Reminder Beeper...61 Replacing Halogen Bulbs ...204 Turning on...61 Head Restraints...77 Heating and Cooling...88 High Altitude, Starting at...137 High-Low Beam Switch ...61 High-mount Brake Light...... Instrument Panel...52 Instrument Panel Brightness...62 Interior Cleaning...216 Interior Light...86 Introduction...i Lap/Shoulder Belts...42 Leaking of Exhaust into Car...49 Lights Bulb Replacement...204 Indicator...53 Parking...64 Turn Signal...62 LOCK (Ignition Key Position)...70 Locks Anti-theft Steering Column...70 Fuel Fill Door...125 Power...
Index Reminder Beeper...61 Replacing Halogen Bulbs ...204 Turning on...61 Head Restraints...77 Heating and Cooling...88 High Altitude, Starting at...137 High-Low Beam Switch ...61 High-mount Brake Light...... Instrument Panel...52 Instrument Panel Brightness...62 Interior Cleaning...216 Interior Light...86 Introduction...i Lap/Shoulder Belts...42 Leaking of Exhaust into Car...49 Lights Bulb Replacement...204 Indicator...53 Parking...64 Turn Signal...62 LOCK (Ignition Key Position)...70 Locks Anti-theft Steering Column...70 Fuel Fill Door...125 Power...

Owner's Manual
Page 264
... that Burn...254 PGM-FI System...254 Polishing and Waxing...214 Radiator Overheating...229 Radio/Cassette Sound System...96 Rear End Towing...241 Rear Lights, Bulb Replacement...206 Rear Seat, Folding...78 Rear View Mirror...81 Rear Window Defogger...64
... that Burn...254 PGM-FI System...254 Polishing and Waxing...214 Radiator Overheating...229 Radio/Cassette Sound System...96 Rear End Towing...241 Rear Lights, Bulb Replacement...206 Rear Seat, Folding...78 Rear View Mirror...81 Rear Window Defogger...64
Owner's Manual
Page 265
...Reminder Lights...53 Remote Transmitter...72 Replacement Information Air Cleaner Element...185 Coolant...177 Engine Oil and Filter...173 Fuses...236 Light Bulbs...202 Schedule...160 Spark Plugs...187 Timing Belt...194 Tires...195 Wiper Blades...191 Replacing Seat Belts After a Crash...44 ... Automatic Transmission.. 140 The 5-speed Manual Transmission...138 Shift Lever Position Indicator...141 Shift Lock Release...144 Side Marker Lights, Bulb Replacement in...205 Signaling Turns...62 Snow Tires...201 Solvent-type Cleaners...214 Sound System...96 Spare Tire Inflating...195 Specifications...248...
...Reminder Lights...53 Remote Transmitter...72 Replacement Information Air Cleaner Element...185 Coolant...177 Engine Oil and Filter...173 Fuses...236 Light Bulbs...202 Schedule...160 Spark Plugs...187 Timing Belt...194 Tires...195 Wiper Blades...191 Replacing Seat Belts After a Crash...44 ... Automatic Transmission.. 140 The 5-speed Manual Transmission...138 Shift Lever Position Indicator...141 Shift Lock Release...144 Side Marker Lights, Bulb Replacement in...205 Signaling Turns...62 Snow Tires...201 Solvent-type Cleaners...214 Sound System...96 Spare Tire Inflating...195 Specifications...248...

Owner's Manual
Page 266
......140 Shifting the Manual...138 Treadwear...249 Trip Meter...57 Trunk...75 Opening...75 Open Monitor Light...56 Turn Signals...62 Tachometer...57 Taillights, Changing Bulbs in...206 Taking Care of the Unexpected .. 219 Tape Player...115 Technical Descriptions Driving in Foreign Countries...252 Emissions Control Systems...253 Oxygenated Fuels...251...
......140 Shifting the Manual...138 Treadwear...249 Trip Meter...57 Trunk...75 Opening...75 Open Monitor Light...56 Turn Signals...62 Tachometer...57 Taillights, Changing Bulbs in...206 Taking Care of the Unexpected .. 219 Tape Player...115 Technical Descriptions Driving in Foreign Countries...252 Emissions Control Systems...253 Oxygenated Fuels...251...
