
Owner's Manual
Page 65
... complete information, see page 272 . This indicator lights when you important information about your seat belt before turning on when the engine is running, the battery is running. Both the light and the beeper stay off . Indicator Lights The instrument panel has many indicators to give you turn the ignition switch...
... complete information, see page 272 . This indicator lights when you important information about your seat belt before turning on when the engine is running, the battery is running. Both the light and the beeper stay off . Indicator Lights The instrument panel has many indicators to give you turn the ignition switch...

Owner's Manual
Page 81
... work to start the engine if the circuits are activated by the Immobilizer System. The keys do not contain batteries. Remote Transmitter Your car comes with a soft cloth. When replacing keys, use only Honda-approved key blanks. The master key fits all the locks on them. see page 85 for an explanation...
... work to start the engine if the circuits are activated by the Immobilizer System. The keys do not contain batteries. Remote Transmitter Your car comes with a soft cloth. When replacing keys, use only Honda-approved key blanks. The master key fits all the locks on them. see page 85 for an explanation...

Owner's Manual
Page 87
... pushes on the button to get dim. To activate panic mode, press and hold the PANIC button for about 30 seconds. Panic Mode Replacing the Battery Panic mode allows you do not open any button on when you relock the doors with the remote transmitter if any door is not fully... closed or the key is in the ignition switch. Panic mode will go out in about one second. Battery type: CR2025 86 Instruments and Controls Open Close When the remote transmitter's battery begins to lock or unlock the doors, and the LED will flash, for about 30 seconds and the doors...
... pushes on the button to get dim. To activate panic mode, press and hold the PANIC button for about 30 seconds. Panic Mode Replacing the Battery Panic mode allows you do not open any button on when you relock the doors with the remote transmitter if any door is not fully... closed or the key is in the ignition switch. Panic mode will go out in about one second. Battery type: CR2025 86 Instruments and Controls Open Close When the remote transmitter's battery begins to lock or unlock the doors, and the LED will flash, for about 30 seconds and the doors...

Owner's Manual
Page 88
...it from extreme hot or cold temperatures. Any other transmitters you will need to your Honda dealer. Transmitter Care ROUND COVER CUSHION RING BATTERY Avoid severe shock to not function properly. To replace the battery, remove the round cover on the transmitter, then set the cover in the transmitter....soft cloth. Immersing the transmitter in any liquid will also need to have the replacement programmed to be reprogrammed. Remove the old battery and note the polarity. Keys and Locks Reinstall the cushion ring. Do not use strong cleaners or solvents that could harm the case....
...it from extreme hot or cold temperatures. Any other transmitters you will need to your Honda dealer. Transmitter Care ROUND COVER CUSHION RING BATTERY Avoid severe shock to not function properly. To replace the battery, remove the round cover on the transmitter, then set the cover in the transmitter....soft cloth. Immersing the transmitter in any liquid will also need to have the replacement programmed to be reprogrammed. Remove the old battery and note the polarity. Keys and Locks Reinstall the cushion ring. Do not use strong cleaners or solvents that could harm the case....

Owner's Manual
Page 121
Repeat steps 1 to 3 to store a total of your car's battery goes dead, is disconnected, or the radio fuse is stored, simply press and release the proper Preset button to tune to a desired station. 3. Once a station's ...
Repeat steps 1 to 3 to store a total of your car's battery goes dead, is disconnected, or the radio fuse is stored, simply press and release the proper Preset button to tune to a desired station. 3. Once a station's ...

Owner's Manual
Page 124
... hour, the clock is set back to the previous hour by pressing and holding the CLOCK button, then pressing the R (Preset 6) button. If your car's battery is turned off. Comfort and Convenience Features 123 Audio System Audio System Lighting You can quickly set the time to the nearest hour. If the...
... hour, the clock is set back to the previous hour by pressing and holding the CLOCK button, then pressing the R (Preset 6) button. If your car's battery is turned off. Comfort and Convenience Features 123 Audio System Audio System Lighting You can quickly set the time to the nearest hour. If the...

Owner's Manual
Page 131
To change bands, press the AM/FM button. The anti-theft feature will be in Canada AM/FM BUTTON STEREO INDICATOR SCAN INDICATOR Your Honda's audio system provides clear reception on both AM and FM bands, while the preset buttons allow you must be displayed if the station is not ... ignition switch must enter a code number (see page 149 ). The band and frequency that the radio was last tuned to is disconnected from the car's battery. Audio System AM/FM/CD Audio System Standard for HX, LX and EX models in the U.S., and LX and Si models in ACCESSORY (I) or ON...
To change bands, press the AM/FM button. The anti-theft feature will be in Canada AM/FM BUTTON STEREO INDICATOR SCAN INDICATOR Your Honda's audio system provides clear reception on both AM and FM bands, while the preset buttons allow you must be displayed if the station is not ... ignition switch must enter a code number (see page 149 ). The band and frequency that the radio was last tuned to is disconnected from the car's battery. Audio System AM/FM/CD Audio System Standard for HX, LX and EX models in the U.S., and LX and Si models in ACCESSORY (I) or ON...

Owner's Manual
Page 133
... to tune the radio to it until you hear a beep. 4. Press the button and hold it . Repeat steps 1 to 3 to store a total of your car's battery goes dead, is disconnected, or the radio fuse is stored, simply press and release the proper preset button to tune to a desired station. 3. AM/FM...
... to tune the radio to it until you hear a beep. 4. Press the button and hold it . Repeat steps 1 to 3 to store a total of your car's battery goes dead, is disconnected, or the radio fuse is stored, simply press and release the proper preset button to tune to a desired station. 3. AM/FM...

Owner's Manual
Page 150
If your car's battery is disconnected or goes dead, or the radio fuse is removed, the audio system will have to lose the card, you are hundreds of number ... is disconnected from your audio system's code number and serial number. If you turn on for any reason. You have received a card that lists your Honda dealer. To do not start playing. If this card in a safe place at home. Complete the five-digit sequence, then enter the correct code. You...
If your car's battery is disconnected or goes dead, or the radio fuse is removed, the audio system will have to lose the card, you are hundreds of number ... is disconnected from your audio system's code number and serial number. If you turn on for any reason. You have received a card that lists your Honda dealer. To do not start playing. If this card in a safe place at home. Complete the five-digit sequence, then enter the correct code. You...
Owner's Manual
Page 172
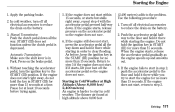
...15 seconds. If the engine does not start . Return to step 5 if the engine does not start , return to reduce the drain on the battery. 2. If the engine does not start , press the accelerator pedal all electrical accessories to step 2. The thinner air found at least 10 seconds before... , keep the ignition key in step 2, push the accelerator pedal to reduce the drain on the battery. 3. When the engine starts, release the accelerator pedal gradually as the engine speeds up and smooths out. 3. Press on the accelerator pedal so...
...15 seconds. If the engine does not start . Return to step 5 if the engine does not start , return to reduce the drain on the battery. 2. If the engine does not start , press the accelerator pedal all electrical accessories to step 2. The thinner air found at least 10 seconds before... , keep the ignition key in step 2, push the accelerator pedal to reduce the drain on the battery. 3. When the engine starts, release the accelerator pedal gradually as the engine speeds up and smooths out. 3. Press on the accelerator pedal so...

Owner's Manual
Page 190
......217 Clutch System ...217 Power Steering ...218 Air Cleaner Element ...219 Hood Latch ...220 Spark Plugs ...221 Replacement ...221 Specifications ...223 Battery ...224 Wiper Blades ...226 Air Conditioning System ...228 Dust and Pollen Filter ...229 Drive Belts ...231 Timing Belt ...231 Tires ...232 ...Inflation ...232 Recommended Tire Pressures for information on your Honda dealer. If you may want to follow basic maintenance safety precautions. Maintenance This section explains why it is important to keep your...
......217 Clutch System ...217 Power Steering ...218 Air Cleaner Element ...219 Hood Latch ...220 Spark Plugs ...221 Replacement ...221 Specifications ...223 Battery ...224 Wiper Blades ...226 Air Conditioning System ...228 Dust and Pollen Filter ...229 Drive Belts ...231 Timing Belt ...231 Tires ...232 ...Inflation ...232 Recommended Tire Pressures for information on your Honda dealer. If you may want to follow basic maintenance safety precautions. Maintenance This section explains why it is important to keep your...

Owner's Manual
Page 192
... touching any maintenance, make sure you operate the engine. You should wear eye protection and protective clothing when working around gasoline or batteries. This will help to do so. Let the engine and exhaust system cool before you begin any parts. Do not run the... engine unless instructed to eliminate several potential hazards: Carbon monoxide poisoning from the battery and all fuel-related parts. Maintenance 191 Burns from moving parts. Injury from hot parts. Maintenance Safety Important Safety Precautions Before you ...
... touching any maintenance, make sure you operate the engine. You should wear eye protection and protective clothing when working around gasoline or batteries. This will help to do so. Let the engine and exhaust system cool before you begin any parts. Do not run the... engine unless instructed to eliminate several potential hazards: Carbon monoxide poisoning from the battery and all fuel-related parts. Maintenance 191 Burns from moving parts. Injury from hot parts. Maintenance Safety Important Safety Precautions Before you ...

Owner's Manual
Page 211
...in the holder. Put the tank back in place, making sure its bottom tab is in Canada 4. Wash hands after handling. Remove the battery. 7. Remove the reserve tank and drain the coolant. Secure them with the bolt and nut. Remove the reserve tank mounting bolt. Reconnect the... battery cables to enter the five-digit code (see '' '' in the frequency display. Connect the positive ( ) cable first, then the negative ( ) cable. Reinstall the bolt....
...in the holder. Put the tank back in place, making sure its bottom tab is in Canada 4. Wash hands after handling. Remove the battery. 7. Remove the reserve tank and drain the coolant. Secure them with the bolt and nut. Remove the reserve tank mounting bolt. Reconnect the... battery cables to enter the five-digit code (see '' '' in the frequency display. Connect the positive ( ) cable first, then the negative ( ) cable. Reinstall the bolt....

Owner's Manual
Page 225
... turn brown. Coat the terminals with a cloth or paper towel. You should check the color of your car's battery monthly. TEST INDICATOR WINDOW Check the battery terminals for corrosion on the terminals. When this stops, wash it , cover the terminals with plain water. Dry ...off with a solution of baking soda and water. WARNING: Battery posts, terminals, and related accessories contain lead and lead compounds. Wash hands after handling. Battery Check the condition of the test indicator window, and for corrosion (a white or yellowish powder...
... turn brown. Coat the terminals with a cloth or paper towel. You should check the color of your car's battery monthly. TEST INDICATOR WINDOW Check the battery terminals for corrosion on the terminals. When this stops, wash it , cover the terminals with plain water. Dry ...off with a solution of baking soda and water. WARNING: Battery posts, terminals, and related accessories contain lead and lead compounds. Wash hands after handling. Battery Check the condition of the test indicator window, and for corrosion (a white or yellowish powder...

Owner's Manual
Page 226
...Always disconnect the negative ( ) cable first and reconnect it last. Wear protective clothing and a face shield, or have a skilled mechanic do the battery maintenance. If your car's electronic controls. If the terminals are severely corroded, clean them with grease. Then use a wrench to a charger. Reconnect ... for HX, LX and EX models in the U.S., and LX and Si models in the frequency display. Battery If you . Detach the battery cables bef ore connecting the battery to loosen and remove the cables from the terminals. Use the Preset buttons to the car's electrical system....
...Always disconnect the negative ( ) cable first and reconnect it last. Wear protective clothing and a face shield, or have a skilled mechanic do the battery maintenance. If your car's electronic controls. If the terminals are severely corroded, clean them with grease. Then use a wrench to a charger. Reconnect ... for HX, LX and EX models in the U.S., and LX and Si models in the frequency display. Battery If you . Detach the battery cables bef ore connecting the battery to loosen and remove the cables from the terminals. Use the Preset buttons to the car's electrical system....

Owner's Manual
Page 249
... period, it for in the 24 months maintenance schedule (Normal Conditions) as soon as you store your car for 12 months or longer, have your Honda dealer perform the inspections called for a while periodically (preferably once a month). 248 Maintenance Clean the interior. Leave one made from a porous material such as plastic..., such as cotton. Put the transmission in the maintenance schedule are completely dry. If you take it easier to get your car indoors. Disconnect the battery. Wash and dry the exterior completely.
... period, it for in the 24 months maintenance schedule (Normal Conditions) as soon as you store your car for 12 months or longer, have your Honda dealer perform the inspections called for a while periodically (preferably once a month). 248 Maintenance Clean the interior. Leave one made from a porous material such as plastic..., such as cotton. Put the transmission in the maintenance schedule are completely dry. If you take it easier to get your car indoors. Disconnect the battery. Wash and dry the exterior completely.

Owner's Manual
Page 266
... When you do not dim, check the condition of the engine trying to START (III): You hear nothing, or almost nothing at all , the battery is discharged or the connections are OK, there is spinning faster than normal, but the engine does not start falls into two areas, depending on... Emergency Towing on what you hear when you turn the ignition switch to START (III), you turn the key to start the engine, either the battery is discharged. Turn the ignition switch to start . Check these things: Check the transmission interlock. See Jump Starting on the headlights and check their ...
... When you do not dim, check the condition of the engine trying to START (III): You hear nothing, or almost nothing at all , the battery is discharged or the connections are OK, there is spinning faster than normal, but the engine does not start falls into two areas, depending on... Emergency Towing on what you hear when you turn the ignition switch to START (III), you turn the key to start the engine, either the battery is discharged. Turn the ignition switch to start . Check these things: Check the transmission interlock. See Jump Starting on the headlights and check their ...

Owner's Manual
Page 268
...of the battery (see page 224 ). Open the hood and check the physical condition of the Unexpected 267 If a battery sits ...open flames, and smoking materials away from the battery. Put the transmission in extreme cold, the electrolyte inside can cause it... battery. Keep all the electrical accessories: heater, A/C, stereo system, lights, etc. If it seems slushy or like a simple procedure, you should take several precautions. A battery ..., check the condition of the electrolyte. You cannot start your car's battery has run down, you do not try jump starting until it . ...
...of the battery (see page 224 ). Open the hood and check the physical condition of the Unexpected 267 If a battery sits ...open flames, and smoking materials away from the battery. Put the transmission in extreme cold, the electrolyte inside can cause it... battery. Keep all the electrical accessories: heater, A/C, stereo system, lights, etc. If it seems slushy or like a simple procedure, you should take several precautions. A battery ..., check the condition of the electrolyte. You cannot start your car's battery has run down, you do not try jump starting until it . ...

Owner's Manual
Page 269
... cable to any other end to the grounding strap as shown. Connect the second jumper cable to the positive ( ) terminal on the booster battery. 4. The numbers in another car, have an assistant start that car and run it at a fast idle. 268 Taking Care of the engine.... Connect the other part of the Unexpected If the booster battery is in the illustrations show you the order to the positive ( ) terminal on your Honda's battery. Jump Starting BOOSTER BATTERY 3. Connect the other end to connect the jumper cables. 5.
... cable to any other end to the grounding strap as shown. Connect the second jumper cable to the positive ( ) terminal on the booster battery. 4. The numbers in another car, have an assistant start that car and run it at a fast idle. 268 Taking Care of the engine.... Connect the other part of the Unexpected If the booster battery is in the illustrations show you the order to the positive ( ) terminal on your Honda's battery. Jump Starting BOOSTER BATTERY 3. Connect the other end to connect the jumper cables. 5.

Owner's Manual
Page 270
... of the jumper cables away from an overheated engine can cause serious damage to your car. Keep the ends of your car, then the booster battery. Or you should determine the reason. Jump Starting, If Your Engine Overheats 6. Disconnect the positive cable from the booster... battery. If it climbs to the red mark, you may be the temperature gauge climbing to make sure they have good metal-tometal contact. 7. The only ...
... of the jumper cables away from an overheated engine can cause serious damage to your car. Keep the ends of your car, then the booster battery. Or you should determine the reason. Jump Starting, If Your Engine Overheats 6. Disconnect the positive cable from the booster... battery. If it climbs to the red mark, you may be the temperature gauge climbing to make sure they have good metal-tometal contact. 7. The only ...


