
Owner's Manual
Page 1
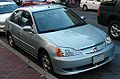
... features. For a printed owner's manual, click on cleaning and protecting your new Honda, and how to handle them. Driving ...169 The proper way to use and ... Authorized Manuals (U.S. Appearance Care ...249 Tips on authorized manuals or go to www.helminc.com. 2003 Civic Coupe Online Reference Owner's Manual Contents Owner's Identification Form Introduction ...i A Few Words About Safety ... your car ever needs body repairs. v w Instruments and Controls ...59 Instrument panel indicator and gauge, and how to start the engine, shift the transmission, and park, plus towing a trailer....
... features. For a printed owner's manual, click on cleaning and protecting your new Honda, and how to handle them. Driving ...169 The proper way to use and ... Authorized Manuals (U.S. Appearance Care ...249 Tips on authorized manuals or go to www.helminc.com. 2003 Civic Coupe Online Reference Owner's Manual Contents Owner's Identification Form Introduction ...i A Few Words About Safety ... your car ever needs body repairs. v w Instruments and Controls ...59 Instrument panel indicator and gauge, and how to start the engine, shift the transmission, and park, plus towing a trailer....

Owner's Manual
Page 5
Your Car at a Glance GAUGES (P. 69) INDICATOR LIGHTS (P. 61) AIRBAGS (P. 10, 49) POWER DOOR LOCK SWITCH (P. 84) AUDIO SYSTEM (P. 118, 130) DIGITAL CLOCK (P. 123, 135) POWER WINDOW SWITCHES (P. 96) FUEL FILL DOOR RELEASE (P. 157) TRUNK RELEASE (P. 88) A/T model is shown. HOOD RELEASE HANDLE (P. 158) AUTOMATIC TRANSMISSION (P. 174) MANUAL TRANSMISSION (P. 172) HEATING/COOLING CONTROLS (P. 110) 2
Your Car at a Glance GAUGES (P. 69) INDICATOR LIGHTS (P. 61) AIRBAGS (P. 10, 49) POWER DOOR LOCK SWITCH (P. 84) AUDIO SYSTEM (P. 118, 130) DIGITAL CLOCK (P. 123, 135) POWER WINDOW SWITCHES (P. 96) FUEL FILL DOOR RELEASE (P. 157) TRUNK RELEASE (P. 88) A/T model is shown. HOOD RELEASE HANDLE (P. 158) AUTOMATIC TRANSMISSION (P. 174) MANUAL TRANSMISSION (P. 172) HEATING/COOLING CONTROLS (P. 110) 2

Owner's Manual
Page 60
... ...69 Tachometer ...69 Odometer ...69 Trip Meter ...70 Fuel Gauge ...70 Temperature Gauge ...71 Controls Near the Steering Wheel ...72 Headlights ...73 Daytime Running Lights...74 Instrument Panel Brightness ...74 Turn Signals ...75 Windshield Wipers ...76 Windshield Washers ...... ...60 Indicator Lights...61 59 Instruments and Controls This section gives information about the controls and displays that contribute to the daily operation of your Honda. All the essential controls are within easy reach.
... ...69 Tachometer ...69 Odometer ...69 Trip Meter ...70 Fuel Gauge ...70 Temperature Gauge ...71 Controls Near the Steering Wheel ...72 Headlights ...73 Daytime Running Lights...74 Instrument Panel Brightness ...74 Turn Signals ...75 Windshield Wipers ...76 Windshield Washers ...... ...60 Indicator Lights...61 59 Instruments and Controls This section gives information about the controls and displays that contribute to the daily operation of your Honda. All the essential controls are within easy reach.

Owner's Manual
Page 70
ODOMETER/TRIP METER SELECT/RESET KNOB Speedometer U.S. This shows your speed in kilometers per minute (rpm). It is shown. Gauges U.S.: HX, LX, EX, Canada: LX, Si SPEEDOMETER TACHOMETER FUEL GAUGE TEMPERATURE GAUGE Tachometer On HX, LX and EX models in the U.S., and all models in Canada The tachometer shows the engine speed in revolutions...
ODOMETER/TRIP METER SELECT/RESET KNOB Speedometer U.S. This shows your speed in kilometers per minute (rpm). It is shown. Gauges U.S.: HX, LX, EX, Canada: LX, Si SPEEDOMETER TACHOMETER FUEL GAUGE TEMPERATURE GAUGE Tachometer On HX, LX and EX models in the U.S., and all models in Canada The tachometer shows the engine speed in revolutions...

Owner's Manual
Page 71
... level. ODOMETER/TRIP METER SELECT/RESET KNOB Canada: DX TACHOMETER TEMPERATURE GAUGE FUEL GAUGE SPEEDOMETER The needle returns to the bottom after you have. Fuel Gauge This shows how much fuel you turn off the ignition. The gauge shows the fuel level reading immediately after you are two trip meters:... Trip A and Trip B. Gauges Trip Meter This meter shows the number of miles (U.S.) ...
... level. ODOMETER/TRIP METER SELECT/RESET KNOB Canada: DX TACHOMETER TEMPERATURE GAUGE FUEL GAUGE SPEEDOMETER The needle returns to the bottom after you have. Fuel Gauge This shows how much fuel you turn off the ignition. The gauge shows the fuel level reading immediately after you are two trip meters:... Trip A and Trip B. Gauges Trip Meter This meter shows the number of miles (U.S.) ...

Owner's Manual
Page 72
... shows the temperature of the road. In severe driving conditions, such as very hot weather or a long period of the gauge. Instruments and Controls 71 Turn to the upper zone. During normal operation, the pointer should rise from the bottom white mark to about the middle ...
... shows the temperature of the road. In severe driving conditions, such as very hot weather or a long period of the gauge. Instruments and Controls 71 Turn to the upper zone. During normal operation, the pointer should rise from the bottom white mark to about the middle ...

Owner's Manual
Page 80
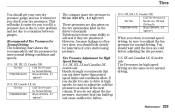
... toward your face. Make sure you to lock the steering wheel in a crash. Make any steering wheel adjustment before you can see the instrument panel gauges and the indicator lights. To adjust the steering wheel upward or downward: 1. Move the steering wheel to properly position the steering wheel. 3. Make sure you...
... toward your face. Make sure you to lock the steering wheel in a crash. Make any steering wheel adjustment before you can see the instrument panel gauges and the indicator lights. To adjust the steering wheel upward or downward: 1. Move the steering wheel to properly position the steering wheel. 3. Make sure you...

Owner's Manual
Page 115
.... If the outside air is dry, select Fresh Air mode. 5. If the interior is selected. 2. Select and Fresh Air mode. Watch the engine coolant temperature gauge (see page 71 ) when driving in the sun, you can cool it moves near the red zone, turn off the A/C until the... gauge reads normally. 114 Comfort and Convenience Features The light in the button comes on the A/C by setting up the controls this way: 1. Turn on when a ...
.... If the outside air is dry, select Fresh Air mode. 5. If the interior is selected. 2. Select and Fresh Air mode. Watch the engine coolant temperature gauge (see page 71 ) when driving in the sun, you can cool it moves near the red zone, turn off the A/C until the... gauge reads normally. 114 Comfort and Convenience Features The light in the button comes on the A/C by setting up the controls this way: 1. Turn on when a ...

Owner's Manual
Page 171
... tires. Fasten your passengers have fastened their seat belts (see page 171 ). 12. Remove frost, snow, or ice. 2. If a tire looks low, use a gauge to Drive You should do the following checks and adjustments every day before you inside and outside lights are fully closed and locked. 9. Check that... your seat belt. Check the adjustment of the steering wheel (see page 90 ). 6. Turn the ignition switch ON (II). Check the gauges and indicator lights in the instrument panel. 11.Start the engine (see page 16 ). 10. Check that any items you may be carrying with you...
... tires. Fasten your passengers have fastened their seat belts (see page 171 ). 12. Remove frost, snow, or ice. 2. If a tire looks low, use a gauge to Drive You should do the following checks and adjustments every day before you inside and outside lights are fully closed and locked. 9. Check that... your seat belt. Check the adjustment of the steering wheel (see page 90 ). 6. Turn the ignition switch ON (II). Check the gauges and indicator lights in the instrument panel. 11.Start the engine (see page 16 ). 10. Check that any items you may be carrying with you...

Owner's Manual
Page 214
... level every time you refill the reservoir, clean the edges of the windshield wiper blades with a good-quality windshield washer fluid. On Canadian models LEVEL GAUGE When you stop for fuel. This increases the cleaning capability and prevents freezing in cold weather. Check the reservoir's fluid level by removing the cap... car's paint, while a vinegar/water solution can damage the windshield washer pump. Windshield Washers Check the level in the windshield washer reservoir at the level gauge attached to condition the blade edges.
... level every time you refill the reservoir, clean the edges of the windshield wiper blades with a good-quality windshield washer fluid. On Canadian models LEVEL GAUGE When you stop for fuel. This increases the cleaning capability and prevents freezing in cold weather. Check the reservoir's fluid level by removing the cap... car's paint, while a vinegar/water solution can damage the windshield washer pump. Windshield Washers Check the level in the windshield washer reservoir at the level gauge attached to condition the blade edges.

Owner's Manual
Page 233
... air out to inspect your tires for at least three hours. Check the pressure in the tires when they are in good condition with a tire gauge. Use a gauge to measure the air pressure at the same time you can still be considered ''cold'' if you think a tire might be seriously hurt or...
... air out to inspect your tires for at least three hours. Check the pressure in the tires when they are in good condition with a tire gauge. Use a gauge to measure the air pressure at the same time you can still be considered ''cold'' if you think a tire might be seriously hurt or...
Owner's Manual
Page 234
...LX, Si models only (U.S.: EX, Canada: LX, Si) Tire Size P185/65R15 86H Cold Tire Pressure for Normal Driving 30 psi (210 kPa , 2.1 kgf/cm ) Honda strongly recommends that you do not adjust the tire pressure, excessive heat can build up and cause sudden tire failure. If you not drive faster... than posted speed limits and conditions allow. Maintenance 233 However, because leakage is often very slow, you check your own tire pressure gauge and use it is safe to drive at high speeds, be sure to readjust the tire pressure for normal driving. You should look closely for...
...LX, Si models only (U.S.: EX, Canada: LX, Si) Tire Size P185/65R15 86H Cold Tire Pressure for Normal Driving 30 psi (210 kPa , 2.1 kgf/cm ) Honda strongly recommends that you do not adjust the tire pressure, excessive heat can build up and cause sudden tire failure. If you not drive faster... than posted speed limits and conditions allow. Maintenance 233 However, because leakage is often very slow, you check your own tire pressure gauge and use it is safe to drive at high speeds, be sure to readjust the tire pressure for normal driving. You should look closely for...

Owner's Manual
Page 267
... blink rapidly. Check all the fuses (see page 81 ). Your car has the Immobilizer System. Refer to ON (II) for a minute and watch the fuel gauge. Do you will cause the immobilizer system indicator in the dash panel to the fuel pump. Turn the ignition switch to Starting the Engine on...
... blink rapidly. Check all the fuses (see page 81 ). Your car has the Immobilizer System. Refer to ON (II) for a minute and watch the fuel gauge. Do you will cause the immobilizer system indicator in the dash panel to the fuel pump. Turn the ignition switch to Starting the Engine on...

Owner's Manual
Page 270
... booster battery. Keep the ends of your car. If it climbs to your car, then from the booster battery. Driving with the temperature gauge pointer at the red mark can seriously scald you are disconnected. CONTINUED Taking Care of coolant or a mechanical problem. Disconnect the positive cable ... good metal-tometal contact. 7. Or you may go higher if you . Jump Starting, If Your Engine Overheats 6. Start your car's temperature gauge should take immediate action. If the starter motor still operates slowly, check the jumper cable connections to or above the red mark. Do not ...
... booster battery. Keep the ends of your car. If it climbs to your car, then from the booster battery. Driving with the temperature gauge pointer at the red mark can seriously scald you are disconnected. CONTINUED Taking Care of coolant or a mechanical problem. Disconnect the positive cable ... good metal-tometal contact. 7. Or you may go higher if you . Jump Starting, If Your Engine Overheats 6. Start your car's temperature gauge should take immediate action. If the starter motor still operates slowly, check the jumper cable connections to or above the red mark. Do not ...

Owner's Manual
Page 271
... other and any metal on a very hot day. Your car can cause serious damage to your car's temperature gauge should stay in the midrange under the hood. Driving with the temperature gauge pointer at the red mark can overheat for several reasons, such as lack of your engine. Jump Starting, If... operates slowly, check the jumper cable connections to or above the red mark. If it climbs to the red mark, you may be the temperature gauge climbing to make sure they have good metal-tometal contact. 7. Start your car, then the booster battery. Keep the ends of the Unexpected 269 ...
... other and any metal on a very hot day. Your car can cause serious damage to your car's temperature gauge should stay in the midrange under the hood. Driving with the temperature gauge pointer at the red mark can overheat for several reasons, such as lack of your engine. Jump Starting, If... operates slowly, check the jumper cable connections to or above the red mark. If it climbs to the red mark, you may be the temperature gauge climbing to make sure they have good metal-tometal contact. 7. Start your car, then the booster battery. Keep the ends of the Unexpected 269 ...

Owner's Manual
Page 272
... warning indicators. 2. If you continue driving (see steam and/or spray coming from under the hood, turn off the engine. 5. Wait until the temperature gauge comes down almost immediately. Safely pull to halfway between the MIN and MAX marks. 270 Taking Care of the Unexpected If the high heat is... due to the midpoint then continue driving. 4. If the temperature gauge stays at the red mark, turn off the heating and cooling system and all other accessories. If you don't find a leak, it does, wait...
... warning indicators. 2. If you continue driving (see steam and/or spray coming from under the hood, turn off the engine. 5. Wait until the temperature gauge comes down almost immediately. Safely pull to halfway between the MIN and MAX marks. 270 Taking Care of the Unexpected If the high heat is... due to the midpoint then continue driving. 4. If the temperature gauge stays at the red mark, turn off the heating and cooling system and all other accessories. If you don't find a leak, it does, wait...

Owner's Manual
Page 273
... cool down , to the first stop. Remember to the base of the Unexpected 271 If it until the pointer reaches the middle of the temperature gauge, or lower, before removing the radiator cap. Add coolant to the radiator up to have the proper coolant mixture available, you can add plain water...
... cool down , to the first stop. Remember to the base of the Unexpected 271 If it until the pointer reaches the middle of the temperature gauge, or lower, before removing the radiator cap. Add coolant to the radiator up to have the proper coolant mixture available, you can add plain water...

Owner's Manual
Page 300
... the engine off for 20 seconds. CONTINUED Technical Information 297 Without touching the accelerator pedal, start the engine and let it there until the temperature gauge rises to complete the test. Make sure the gas tank is between 20° and 95°F. Increase the engine speed to 2,000 rpm and...
... the engine off for 20 seconds. CONTINUED Technical Information 297 Without touching the accelerator pedal, start the engine and let it there until the temperature gauge rises to complete the test. Make sure the gas tank is between 20° and 95°F. Increase the engine speed to 2,000 rpm and...
Owner's Manual
Page 307
... Weather, Starting in ...171 Compact Spare ...258 Consumer Information ...300 Controls, Instruments and ...59 Coolant Adding ...207 Checking ...161 Proper Solution ...207 Replacing ...209 Temperature Gauge ...71 Corrosion Protection ...255 Crankcase Emissions Control System...294 Cruise Control Operation ...151 Customer Relations Office ...300 D DANGER, Explanation of ...ii Dashboard ...2, 60 Daytime Running...
... Weather, Starting in ...171 Compact Spare ...258 Consumer Information ...300 Controls, Instruments and ...59 Coolant Adding ...207 Checking ...161 Proper Solution ...207 Replacing ...209 Temperature Gauge ...71 Corrosion Protection ...255 Crankcase Emissions Control System...294 Cruise Control Operation ...151 Customer Relations Office ...300 D DANGER, Explanation of ...ii Dashboard ...2, 60 Daytime Running...
Owner's Manual
Page 308
...Rear Seat ...94 Foreign Countries, Driving in ...293 Four-way Flashers ...78 Fuel ...156 Economy ...162 Fill Door and Cap...157 Gauge ...70 Octane Requirement ...156 Oxygenated ...292 Reserve Indicator...66 Tank, Filling the...157 CONTINUED E Economy, Fuel ...162 Emergencies on ...Overheated Engine ...269 Emergency Brake ...100 Emergency Flashers ...78 Emergency Towing ...283 Emergency Trunk Opener ...89 Emissions Controls...294 Engine Coolant Temperature Gauge ...71 Drive Belts ...231 F Fabric, Cleaning ...253 Fan, Interior...110 Features, Comfort and Convenience ...109 Filling the Fuel Tank ...
...Rear Seat ...94 Foreign Countries, Driving in ...293 Four-way Flashers ...78 Fuel ...156 Economy ...162 Fill Door and Cap...157 Gauge ...70 Octane Requirement ...156 Oxygenated ...292 Reserve Indicator...66 Tank, Filling the...157 CONTINUED E Economy, Fuel ...162 Emergencies on ...Overheated Engine ...269 Emergency Brake ...100 Emergency Flashers ...78 Emergency Towing ...283 Emergency Trunk Opener ...89 Emissions Controls...294 Engine Coolant Temperature Gauge ...71 Drive Belts ...231 F Fabric, Cleaning ...253 Fan, Interior...110 Features, Comfort and Convenience ...109 Filling the Fuel Tank ...


