
Owner's Manual
Page 7
...Information About Your Seat Belts ...45 Seat Belt System Components ...45 Lap/Shoulder Belt ...45 Automatic Seat Belt Tensioners ...46 Seat Belt Maintenance ...47 Additional Information About Your Airbags ...49 SRS Components ...49 How Your Front Airbags Work...49 How Your Side Airbags Work...51 How... the SRS Indicator Light Works ...52 How The Passenger Airbag Cutoff Indicator Light Works ...53 Airbag Service ...54 Additional Safety Precautions ...54 Carbon Monoxide Hazard ...55 Safety Labels ...56 Driver ...
...Information About Your Seat Belts ...45 Seat Belt System Components ...45 Lap/Shoulder Belt ...45 Automatic Seat Belt Tensioners ...46 Seat Belt Maintenance ...47 Additional Information About Your Airbags ...49 SRS Components ...49 How Your Front Airbags Work...49 How Your Side Airbags Work...51 How... the SRS Indicator Light Works ...52 How The Passenger Airbag Cutoff Indicator Light Works ...53 Airbag Service ...54 Additional Safety Precautions ...54 Carbon Monoxide Hazard ...55 Safety Labels ...56 Driver ...

Owner's Manual
Page 49
...will repair or replace any problem corrected as soon as possible. Honda will not provide good protection and should check the condition of your Honda Warranty Information booklet for frays, cuts, burns, and wear. Seat Belt Maintenance For safety, you should be replaced as soon as possible....Honda provides a lifetime warranty on if there is a problem with your seat belts regularly and have any seat belt component that the lap/shoulder belts retract easily. Please see page 52 ). Check your automatic seat belt tensioners (see your seat belts regularly. The SRS indicator light...
...will repair or replace any problem corrected as soon as possible. Honda will not provide good protection and should check the condition of your Honda Warranty Information booklet for frays, cuts, burns, and wear. Seat Belt Maintenance For safety, you should be replaced as soon as possible....Honda provides a lifetime warranty on if there is a problem with your seat belts regularly and have any seat belt component that the lap/shoulder belts retract easily. Please see page 52 ). Check your automatic seat belt tensioners (see your seat belts regularly. The SRS indicator light...

Owner's Manual
Page 56
...wiring for further information and precautions relating to deactivate your side airbags from working properly. The SRS indicator light alerts you must have your airbags. authorized Honda dealer as soon as possible. Take your car to an Additional Safety Precautions Do not attempt to ... can safely service. Additional Information About Your Airbags Airbag Service Your front airbag system and side airbag system (if equipped) are virtually maintenance-free, and there are no parts you can prevent the side airbag system from inflating during a collision. Together, airbags and Do ...
...wiring for further information and precautions relating to deactivate your side airbags from working properly. The SRS indicator light alerts you must have your airbags. authorized Honda dealer as soon as possible. Take your car to an Additional Safety Precautions Do not attempt to ... can safely service. Additional Information About Your Airbags Airbag Service Your front airbag system and side airbag system (if equipped) are virtually maintenance-free, and there are no parts you can prevent the side airbag system from inflating during a collision. Together, airbags and Do ...

Owner's Manual
Page 62
... Canadian models are noted in the text. Indicator Lights U.S.: HX, LX, EX, Canada: LX, Si SEAT BELT REMINDER LIGHT (P. 64) CRUISE CONTROL INDICATOR (P. 66) ANTI-LOCK BRAKE SYSTEM INDICATOR (P. 65) HIGH BEAM INDICATOR (P. 66) PARKING BRAKE AND BRAKE SYSTEM INDICATOR (P. 65) TRUNK-OPEN INDICATOR (P. 66) MAINTENANCE REQUIRED INDICATOR (P. 67) LOW FUEL INDICATOR (P. 66...
... Canadian models are noted in the text. Indicator Lights U.S.: HX, LX, EX, Canada: LX, Si SEAT BELT REMINDER LIGHT (P. 64) CRUISE CONTROL INDICATOR (P. 66) ANTI-LOCK BRAKE SYSTEM INDICATOR (P. 65) HIGH BEAM INDICATOR (P. 66) PARKING BRAKE AND BRAKE SYSTEM INDICATOR (P. 65) TRUNK-OPEN INDICATOR (P. 66) MAINTENANCE REQUIRED INDICATOR (P. 67) LOW FUEL INDICATOR (P. 66...

Owner's Manual
Page 63
Indicator Lights Canada: DX SUPPLEMENTAL RESTRAINT SYSTEM INDICATOR (P. 64) TRUNK-OPEN INDICATOR (P. 66) PASSENGER AIRBAG CUTOFF INDICATOR (P. 64) DAYTIME RUNNING LIGHTS INDICATOR (P. 65) WASHER LEVEL INDICATOR (P. 66) IMMOBILIZER SYSTEM INDICATOR (P. 67) LOW OIL PRESSURE INDICATOR (P. 64, 272) LOW FUEL INDICATOR (P. 66) CHARGING SYSTEM INDICATOR (P. 64, 273) MALFUNCTION INDICATOR LAMP (P. 274) HIGH BEAM INDICATOR (P. 66) MAINTENANCE REQUIRED INDICATOR (P. 67) PARKING BRAKE AND BRAKE SYSTEM INDICATOR (P. 65) SEAT BELT REMINDER LIGHT (P. 64) 62 Instruments and Controls
Indicator Lights Canada: DX SUPPLEMENTAL RESTRAINT SYSTEM INDICATOR (P. 64) TRUNK-OPEN INDICATOR (P. 66) PASSENGER AIRBAG CUTOFF INDICATOR (P. 64) DAYTIME RUNNING LIGHTS INDICATOR (P. 65) WASHER LEVEL INDICATOR (P. 66) IMMOBILIZER SYSTEM INDICATOR (P. 67) LOW OIL PRESSURE INDICATOR (P. 64, 272) LOW FUEL INDICATOR (P. 66) CHARGING SYSTEM INDICATOR (P. 64, 273) MALFUNCTION INDICATOR LAMP (P. 274) HIGH BEAM INDICATOR (P. 66) MAINTENANCE REQUIRED INDICATOR (P. 67) PARKING BRAKE AND BRAKE SYSTEM INDICATOR (P. 65) SEAT BELT REMINDER LIGHT (P. 64) 62 Instruments and Controls

Owner's Manual
Page 64
Indicator Lights U.S.: DX SUPPLEMENTAL RESTRAINT SYSTEM INDICATOR (P. 64) TRUNK-OPEN INDICATOR (P. 66) PASSENGER AIRBAG CUTOFF INDICATOR (P. 64) IMMOBILIZER SYSTEM INDICATOR (P. 67) LOW OIL PRESSURE INDICATOR (P. 64, 272) LOW FUEL INDICATOR (P. 66) PARKING BRAKE AND BRAKE SYSTEM INDICATOR (P. 65) CHARGING SYSTEM INDICATOR (P. 64, 273) MALFUNCTION INDICATOR LAMP (P. 274) HIGH BEAM INDICATOR (P. 66) SEAT BELT REMINDER LIGHT (P. 64) MAINTENANCE REQUIRED INDICATOR (P. 67) Instruments and Controls 63
Indicator Lights U.S.: DX SUPPLEMENTAL RESTRAINT SYSTEM INDICATOR (P. 64) TRUNK-OPEN INDICATOR (P. 66) PASSENGER AIRBAG CUTOFF INDICATOR (P. 64) IMMOBILIZER SYSTEM INDICATOR (P. 67) LOW OIL PRESSURE INDICATOR (P. 64, 272) LOW FUEL INDICATOR (P. 66) PARKING BRAKE AND BRAKE SYSTEM INDICATOR (P. 65) CHARGING SYSTEM INDICATOR (P. 64, 273) MALFUNCTION INDICATOR LAMP (P. 274) HIGH BEAM INDICATOR (P. 66) SEAT BELT REMINDER LIGHT (P. 64) MAINTENANCE REQUIRED INDICATOR (P. 67) Instruments and Controls 63

Owner's Manual
Page 68
... from ON (II) to ACCESSORY (I) or LOCK (0). Maintenance Required Indicator This indicator reminds you have inserted a properly-coded ignition key. Between 8,000 miles (12,800 km) and 10,000 miles (16,000 km) this indicator will light for ten seconds. CONTINUED Instruments and Controls 67 If you... first turn the ignition switch to ON (II), and then flash for two seconds when you exceed 10,000 miles (16,000 km) without having the scheduled maintenance performed, this indicator will ...
... from ON (II) to ACCESSORY (I) or LOCK (0). Maintenance Required Indicator This indicator reminds you have inserted a properly-coded ignition key. Between 8,000 miles (12,800 km) and 10,000 miles (16,000 km) this indicator will light for ten seconds. CONTINUED Instruments and Controls 67 If you... first turn the ignition switch to ON (II), and then flash for two seconds when you exceed 10,000 miles (16,000 km) without having the scheduled maintenance performed, this indicator will ...

Owner's Manual
Page 69
Hold the knob until the indicator resets (approximately ten seconds). 68 Instruments and Controls Turn off the engine. 2. Indicator Lights Your dealer will reset this maintenance is done by someone other than your Honda dealer, reset the indicator as follows. 1. Press and hold the Select/Reset knob in the instrument panel, then turn the ignition switch ON (II). 3. If this indicator after completing the scheduled maintenance.
Hold the knob until the indicator resets (approximately ten seconds). 68 Instruments and Controls Turn off the engine. 2. Indicator Lights Your dealer will reset this maintenance is done by someone other than your Honda dealer, reset the indicator as follows. 1. Press and hold the Select/Reset knob in the instrument panel, then turn the ignition switch ON (II). 3. If this indicator after completing the scheduled maintenance.

Owner's Manual
Page 190
... ...237 Snow Tires ...237 Traction Devices...238 Lights ...239 Headlight Aiming ...241 Replacing Bulbs ...241 Storing Your Car ...248 Maintenance 189 Maintenance Safety ...190 Important Safety Precautions .. 191 Maintenance Schedule ...192 Required Maintenance Record ...199 Owner Maintenance Checks ...201 Fluid Locations...202 Engine Oil ...203...car well maintained and how to obtain a copy, or see your Honda, you have the skills and tools to perform more complex maintenance tasks on how to follow basic maintenance safety precautions. If you may want to take care of yourself. See...
... ...237 Snow Tires ...237 Traction Devices...238 Lights ...239 Headlight Aiming ...241 Replacing Bulbs ...241 Storing Your Car ...248 Maintenance 189 Maintenance Safety ...190 Important Safety Precautions .. 191 Maintenance Schedule ...192 Required Maintenance Record ...199 Owner Maintenance Checks ...201 Fluid Locations...202 Engine Oil ...203...car well maintained and how to obtain a copy, or see your Honda, you have the skills and tools to perform more complex maintenance tasks on how to follow basic maintenance safety precautions. If you may want to take care of yourself. See...

Owner's Manual
Page 197
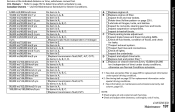
...16 12 20 32 30 48 40 64 50 80 60 96 70 112 80 128 90 144 100 160 110 176 72 120 192 Maintenance Schedule for replacement information under special driving conditions. : See information on page 231 for Severe Conditions Replace engine oil Rotate tires (Check tire... inspect the following items: Brake hoses and lines (including ABS) All fluid levels and condition of fluids Exhaust system, Fuel lines and connections Lights and controls, Vehicle underbody Check parking brake adjustment Inspect and adjust drive belts Replace dust and pollen filter 1 Replace transmission fluid 24 36 48...
...16 12 20 32 30 48 40 64 50 80 60 96 70 112 80 128 90 144 100 160 110 176 72 120 192 Maintenance Schedule for replacement information under special driving conditions. : See information on page 231 for Severe Conditions Replace engine oil Rotate tires (Check tire... inspect the following items: Brake hoses and lines (including ABS) All fluid levels and condition of fluids Exhaust system, Fuel lines and connections Lights and controls, Vehicle underbody Check parking brake adjustment Inspect and adjust drive belts Replace dust and pollen filter 1 Replace transmission fluid 24 36 48...
Owner's Manual
Page 198
... (CVT). Inspect front and rear brakes. U.S. Do items in E. Do items in A. A B Replace engine oil. Check all lights. Inspect and adjust drive belts. Maintenance Schedule for Severe Conditions (listed by distance/time) C D E 1 : See dust and pollen filter on page 229 for replacement ... Check parking brake adjustment. NOTE: Check engine oil and coolant at the indicated distance or time, whichever comes first. Use the Maintenance Schedule for leaks. Check all fluid levels, condition of mileage) Do item in A, B. Inspect suspension components. Do items in ...
... (CVT). Inspect front and rear brakes. U.S. Do items in E. Do items in A. A B Replace engine oil. Check all lights. Inspect and adjust drive belts. Maintenance Schedule for Severe Conditions (listed by distance/time) C D E 1 : See dust and pollen filter on page 229 for replacement ... Check parking brake adjustment. NOTE: Check engine oil and coolant at the indicated distance or time, whichever comes first. Use the Maintenance Schedule for leaks. Check all fluid levels, condition of mileage) Do item in A, B. Inspect suspension components. Do items in ...

Owner's Manual
Page 202
... fluid level monthly. See page 217 . Lights Check the operation of how to the page given. If you stop for wear and foreign objects. See page 161 . Windshield washer fluid Check the level in the reservoir monthly. See page 214 . See page 239 . Owner Maintenance Checks You should check the following items... at the specified intervals. See page 213 . Brakes Check the fluid level monthly. Maintenance 201 Engine oil level Check every time you fill the fuel tank. Engine coolant level Check the radiator reserve tank every time you fill the ...
... fluid level monthly. See page 217 . Lights Check the operation of how to the page given. If you stop for wear and foreign objects. See page 161 . Windshield washer fluid Check the level in the reservoir monthly. See page 214 . See page 239 . Owner Maintenance Checks You should check the following items... at the specified intervals. See page 213 . Brakes Check the fluid level monthly. Maintenance 201 Engine oil level Check every time you fill the fuel tank. Engine coolant level Check the radiator reserve tank every time you fill the ...

Owner's Manual
Page 207
Tighten it on the drain bolt, then reinstall the drain bolt. Start the engine. The oil pressure indicator light should go out within five seconds. Turn off the engine and reinspect your own oil, please dispose of engine oil can be harmf ul to a ... several minutes, then check the drain bolt and oil filter for several minutes, then check the oil level. Put a new washer on the ground. 206 Maintenance Replace the engine oil fill cap. Improper disposal of the used oil properly. Refill the engine with the recommended oil. If necessary, add oil to...
Tighten it on the drain bolt, then reinstall the drain bolt. Start the engine. The oil pressure indicator light should go out within five seconds. Turn off the engine and reinspect your own oil, please dispose of engine oil can be harmf ul to a ... several minutes, then check the drain bolt and oil filter for several minutes, then check the oil level. Put a new washer on the ground. 206 Maintenance Replace the engine oil fill cap. Improper disposal of the used oil properly. Refill the engine with the recommended oil. If necessary, add oil to...

Owner's Manual
Page 214
... windshield washer reservoir is low (see page 66 ). Check the reservoir's fluid level by removing the cap and looking at least monthly during normal usage. Maintenance 213 Windshield Washers Check the level in the windshield washer reservoir at the level gauge attached to condition the blade edges. This will...
... windshield washer reservoir is low (see page 66 ). Check the reservoir's fluid level by removing the cap and looking at least monthly during normal usage. Maintenance 213 Windshield Washers Check the level in the windshield washer reservoir at the level gauge attached to condition the blade edges. This will...
Owner's Manual
Page 229
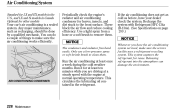
... Whenever you are driving at least ten minutes while you have your dealer check the system. Any major maintenance, such as before, have the air conditioning system serviced, make sure the air conditioning works efficiently. You... at normal operating temperature. This system captures the ref rigerant f or reuse. AIR CONDITIONING CONDENSER 228 Maintenance Recharge the system with the engine at least once a week during the cold weather months. This circulates... block the air flow and reduce cooling efficiency. Use a light spray from a hose or a soft brush to the front surface.
... Whenever you are driving at least ten minutes while you have your dealer check the system. Any major maintenance, such as before, have the air conditioning system serviced, make sure the air conditioning works efficiently. You... at normal operating temperature. This system captures the ref rigerant f or reuse. AIR CONDITIONING CONDENSER 228 Maintenance Recharge the system with the engine at least once a week during the cold weather months. This circulates... block the air flow and reduce cooling efficiency. Use a light spray from a hose or a soft brush to the front surface.

Owner's Manual
Page 240
A burned out bulb can create an unsafe condition by reducing your car's visibility and the ability to other drivers. Lights Check the operation of your intentions to signal your car's exterior lights at least once a month. TURN SIGNAL/SIDE MARKER LIGHT HEADLIGHT PARKING LIGHT CONTINUED Maintenance 239
A burned out bulb can create an unsafe condition by reducing your car's visibility and the ability to other drivers. Lights Check the operation of your intentions to signal your car's exterior lights at least once a month. TURN SIGNAL/SIDE MARKER LIGHT HEADLIGHT PARKING LIGHT CONTINUED Maintenance 239

Owner's Manual
Page 241
Lights Check the following: SIDE MARKER LIGHT TURN SIGNAL LIGHT HIGH-MOUNT BRAKE LIGHT Headlights (low and high beam) Parking lights Taillights Brake lights High-mount brake light Turn signals Back-up lights Hazard light function License plate light Side marker lights Daytime running lights (Canadian models) If you find any bulbs are burned out, replace them as soon as possible. LICENSE PLATE LIGHTS BRAKE/TAILLIGHT BACK-UP LIGHT 240 Maintenance Refer to the chart on page 289 to determine what type of replacement bulb is needed.
Lights Check the following: SIDE MARKER LIGHT TURN SIGNAL LIGHT HIGH-MOUNT BRAKE LIGHT Headlights (low and high beam) Parking lights Taillights Brake lights High-mount brake light Turn signals Back-up lights Hazard light function License plate light Side marker lights Daytime running lights (Canadian models) If you find any bulbs are burned out, replace them as soon as possible. LICENSE PLATE LIGHTS BRAKE/TAILLIGHT BACK-UP LIGHT 240 Maintenance Refer to the chart on page 289 to determine what type of replacement bulb is needed.

Owner's Manual
Page 242
... a bulb, handle it by a Honda technician or other qualified mechanic. Oil, perspiration, or a scratch on each side. If you regularly carry heavy items in the trunk, readjustment may be performed by its holder. HOLDER Halogen headlight bulbs get very hot when lit. Open the hood. CONTINUED Maintenance 241 Adjustment of its steel... your car was new. If you touch the glass, clean it out of the headlights should be required. If you need to overheat and shatter. 1. Lights Headlight Aiming The headlights were properly aimed when your skin or hard objects.
... a bulb, handle it by a Honda technician or other qualified mechanic. Oil, perspiration, or a scratch on each side. If you regularly carry heavy items in the trunk, readjustment may be performed by its holder. HOLDER Halogen headlight bulbs get very hot when lit. Open the hood. CONTINUED Maintenance 241 Adjustment of its steel... your car was new. If you touch the glass, clean it out of the headlights should be required. If you need to overheat and shatter. 1. Lights Headlight Aiming The headlights were properly aimed when your skin or hard objects.

Owner's Manual
Page 243
...the electrical connector onto the tabs of the headlight assembly. Make sure it is marked ''TOP.'' Replacing the Front Side Marker/ Turn Signal and Parking Light Bulb 1. it out of the hold -down wire from the bulb by pulling on the passenger's side, turn off . 3. CONNECTOR HOLD-DOWN ...sure the tabs are changing the bulb on both sides to test the new bulb. 8. (Driver's side) Reinstall the power steering reservoir. 242 Maintenance Insert the new bulb into the slot. 6. Pull the connector straight off the engine. Install the rubber seal over the back of the new ...
...the electrical connector onto the tabs of the headlight assembly. Make sure it is marked ''TOP.'' Replacing the Front Side Marker/ Turn Signal and Parking Light Bulb 1. it out of the hold -down wire from the bulb by pulling on the passenger's side, turn off . 3. CONNECTOR HOLD-DOWN ...sure the tabs are changing the bulb on both sides to test the new bulb. 8. (Driver's side) Reinstall the power steering reservoir. 242 Maintenance Insert the new bulb into the slot. 6. Pull the connector straight off the engine. Install the rubber seal over the back of the new ...

Owner's Manual
Page 244
... lock it one-quarter turn counterclockwise. 5. SOCKETS 2. Pull the inner fender cover back. 4. Lights HOLDING CLIP BULBS 6. Use a flat-tipped screwdriver to remove the holding clip. Put the inner fender cover in place. 7. Remove the socket from the inner ... out of its socket. Lock it in place by turning it in place. Push the new bulb straight into the headlight assembly. Turn it bottoms. Maintenance 243 Install the holding clip from the headlight assembly by pushing on the center. Insert the socket back into the socket until it clockwise to...
... lock it one-quarter turn counterclockwise. 5. SOCKETS 2. Pull the inner fender cover back. 4. Lights HOLDING CLIP BULBS 6. Use a flat-tipped screwdriver to remove the holding clip. Put the inner fender cover in place. 7. Remove the socket from the inner ... out of its socket. Lock it in place by turning it in place. Push the new bulb straight into the headlight assembly. Turn it bottoms. Maintenance 243 Install the holding clip from the headlight assembly by pushing on the center. Insert the socket back into the socket until it clockwise to...


