

Owner's Manual
Page 25
...properly installed in all recommended seating positions in the passenger's seat. meet safety standards. Protecting Children Selecting a Child Seat 2. However, Honda is too large for the manufacturer's statement of compliance on protecting small children. CONTINUED Driver and Passenger Safety 23 The child seat should...) or Canadian Motor Vehicle Safety Standard 213 (CMVSS 213). Look for a rear-facing child seat, and who is confident that parents test the child seat to fit the child. 3. Small Children: A child who can fit and be restrained in all child seats will ...
...properly installed in all recommended seating positions in the passenger's seat. meet safety standards. Protecting Children Selecting a Child Seat 2. However, Honda is too large for the manufacturer's statement of compliance on protecting small children. CONTINUED Driver and Passenger Safety 23 The child seat should...) or Canadian Motor Vehicle Safety Standard 213 (CMVSS 213). Look for a rear-facing child seat, and who is confident that parents test the child seat to fit the child. 3. Small Children: A child who can fit and be restrained in all child seats will ...

Owner's Manual
Page 62
... the beeper. Remove the key to ON. The engine can operate the audio system and the accessory power socket. All features and accessories on as a test when you can be started with the key in the LOCK (0) or ACCESSORY (I ) In this position by pressing the engine START button (see page 59...
... the beeper. Remove the key to ON. The engine can operate the audio system and the accessory power socket. All features and accessories on as a test when you can be started with the key in the LOCK (0) or ACCESSORY (I ) In this position by pressing the engine START button (see page 59...

Owner's Manual
Page 178
...compounds. CONTINUED Maintenance 181 Dry off with a solution of baking soda and water. TEST INDICATOR WINDOW Check the battery condition by looking at the test indicator window on the battery explains the test indicator's colors. To remove it off the battery with grease to help prevent future ...up and turn brown. The label on the battery. Coat the terminals with a cloth or paper towel. Battery Check the condition of the test indicator window, and for corrosion (a white or yellowish powder). When this stops, wash it , cover the terminals with plain water. Wash ...
...compounds. CONTINUED Maintenance 181 Dry off with a solution of baking soda and water. TEST INDICATOR WINDOW Check the battery condition by looking at the test indicator window on the battery explains the test indicator's colors. To remove it off the battery with grease to help prevent future ...up and turn brown. The label on the battery. Coat the terminals with a cloth or paper towel. Battery Check the condition of the test indicator window, and for corrosion (a white or yellowish powder). When this stops, wash it , cover the terminals with plain water. Wash ...

Owner's Manual
Page 196
... of the bulb should fit in the holes in place and clip the end into the headlight assembly. it straight up ; If you need to test the new bulb. 9. (Left side) Reinstall the radiator reserve tank. 1. Unclip the end of the headlight assembly. Turn on the headlights to change the high...
... of the bulb should fit in the holes in place and clip the end into the headlight assembly. it straight up ; If you need to test the new bulb. 9. (Left side) Reinstall the radiator reserve tank. 1. Unclip the end of the headlight assembly. Turn on the headlights to change the high...
Owner's Manual
Page 197
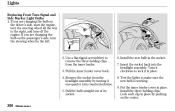
Pull the inner fender cover back. 4. Pull the bulb straight out of its socket. 6. Test the lights to remove the three holding clips. Lock each clip in place. 8. Use a flat-tipped screwdriver to make sure the new bulb is working. 9. ...
Pull the inner fender cover back. 4. Pull the bulb straight out of its socket. 6. Test the lights to remove the three holding clips. Lock each clip in place. 8. Use a flat-tipped screwdriver to make sure the new bulb is working. 9. ...

Owner's Manual
Page 198
... 3. Pull the bulb straight out of the body. 2. Put the side turn it clockwise until it locks. 5. Push the new bulb straight into its socket. Test the lights to pry carefully on the back edge until it snaps into the body, front first. Turn the bulb holder one-quarter turn signal...
... 3. Pull the bulb straight out of the body. 2. Put the side turn it clockwise until it locks. 5. Push the new bulb straight into its socket. Test the lights to pry carefully on the back edge until it snaps into the body, front first. Turn the bulb holder one-quarter turn signal...

Owner's Manual
Page 200
Install the new bulb in the hole of the trunk lining and push on the center until it locks (the center is working. 10.Install the trunk lining and secure it with the fasteners. Test the lights to make sure the new bulb is flush with the fingers on the pointed end until it pops back almost flush with the head). Maintenance 203 To reinstall a fastener, reset the fastener by pushing on the housing. Push the socket into the light assembly and turn it clockwise until it locks. 9. Put the fastener in the socket. 8. Lights 7.
Install the new bulb in the hole of the trunk lining and push on the center until it locks (the center is working. 10.Install the trunk lining and secure it with the fasteners. Test the lights to make sure the new bulb is flush with the fingers on the pointed end until it pops back almost flush with the head). Maintenance 203 To reinstall a fastener, reset the fastener by pushing on the housing. Push the socket into the light assembly and turn it clockwise until it locks. 9. Put the fastener in the socket. 8. Lights 7.

Owner's Manual
Page 201
Test the lights to make sure the new bulb is working. 4. Put the lens back into place. 204 Maintenance Lights Replacing a Rear License Plate Bulb 1. Push the new bulb in the socket. 3. The lens will come down. 2. Push on the left edge of its socket. Insert a flat-tipped screwdriver between the left edge until it bottoms in until it snaps into the light assembly, right side first. Pull the bulb straight out of the lens and the housing.
Test the lights to make sure the new bulb is working. 4. Put the lens back into place. 204 Maintenance Lights Replacing a Rear License Plate Bulb 1. Push the new bulb in the socket. 3. The lens will come down. 2. Push on the left edge of its socket. Insert a flat-tipped screwdriver between the left edge until it bottoms in until it snaps into the light assembly, right side first. Pull the bulb straight out of the lens and the housing.

Owner's Manual
Page 209
.... If further cleaning is needed, use a commercially-available fabric cleaner. Follow the instructions that come with a clean, dry cloth. Pay particular attention to clean them. Test it air dry. You can weaken the belt material. Wipe the vinyl with a mixture of mild soap and lukewarm water, letting it on more difficult...
.... If further cleaning is needed, use a commercially-available fabric cleaner. Follow the instructions that come with a clean, dry cloth. Pay particular attention to clean them. Test it air dry. You can weaken the belt material. Wipe the vinyl with a mixture of mild soap and lukewarm water, letting it on more difficult...

Owner's Manual
Page 231
..., do not take your car's battery has been disconnected or gone dead, these codes are set , the test cannot be completed. See State Emissions Testing on -board diagnostics for a state emissions test until the readiness codes are set the codes again. If they are not set . If your car for the... emissions systems. In some states, part of the emissions testing is to set . Malfunction Indicator Lamp Readiness Codes Your car has certain ''readiness codes'' that are part of the on pages 259 and 260 ....
..., do not take your car's battery has been disconnected or gone dead, these codes are set , the test cannot be completed. See State Emissions Testing on -board diagnostics for a state emissions test until the readiness codes are set the codes again. If they are not set . If your car for the... emissions systems. In some states, part of the emissions testing is to set . Malfunction Indicator Lamp Readiness Codes Your car has certain ''readiness codes'' that are part of the on pages 259 and 260 ....

Owner's Manual
Page 243
...DOT Tire Quality Grading (U.S. Vehicles) ...252 Treadwear ...252 Traction...252 Temperature ...253 Oxygenated Fuels...254 Driving in this section give you should know about your Honda, and the locations of the identification numbers. Technical Information The diagrams in Foreign Countries ...255 Emissions Controls...256 The Clean Air Act ...256 Crankcase Emissions... Timing Control System...257 Secondary Air Injection System...257 Three Way Catalytic Converter ...257 Replacement Parts...257 Three Way Catalytic Converter ...258 State Emission Testing ...259 Technical Information 247
...DOT Tire Quality Grading (U.S. Vehicles) ...252 Treadwear ...252 Traction...252 Temperature ...253 Oxygenated Fuels...254 Driving in this section give you should know about your Honda, and the locations of the identification numbers. Technical Information The diagrams in Foreign Countries ...255 Emissions Controls...256 The Clean Air Act ...256 Crankcase Emissions... Timing Control System...257 Secondary Air Injection System...257 Three Way Catalytic Converter ...257 Replacement Parts...257 Three Way Catalytic Converter ...258 State Emission Testing ...259 Technical Information 247

Owner's Manual
Page 248
...C may depart significantly from highest to these gradings. Uniform Tire Quality Grading Quality grades can be found where applicable on a specified government test course. Traction AA, A, B, C The traction grades, from the norm due to this tire is a comparative rating based on the...addition to lowest, are also graded for treadwear, traction, and temperature performance according to stop on straight-ahead braking traction tests, and does not include acceleration, cornering, hydroplaning, or peak traction characteristics. 252 Technical Information The relative performance of tires ...
...C may depart significantly from highest to these gradings. Uniform Tire Quality Grading Quality grades can be found where applicable on a specified government test course. Traction AA, A, B, C The traction grades, from the norm due to this tire is a comparative rating based on the...addition to lowest, are also graded for treadwear, traction, and temperature performance according to stop on straight-ahead braking traction tests, and does not include acceleration, cornering, hydroplaning, or peak traction characteristics. 252 Technical Information The relative performance of tires ...

Owner's Manual
Page 249
...underinflation, or excessive loading, either separately or in combination, can lead to a level of performance on a specified indoor laboratory test wheel. Technical Information 253 Sustained high temperature can cause the material of heat and its ability to degenerate and reduce tire life... tire failure. Grades B and A represent higher levels of performance which all passenger car tires must meet under controlled conditions on the laboratory test wheel than the minimum required by law. Vehicles) Temperature A, B, C The temperature grades are A (the highest), B, and C, representing...
...underinflation, or excessive loading, either separately or in combination, can lead to a level of performance on a specified indoor laboratory test wheel. Technical Information 253 Sustained high temperature can cause the material of heat and its ability to degenerate and reduce tire life... tire failure. Grades B and A represent higher levels of performance which all passenger car tires must meet under controlled conditions on the laboratory test wheel than the minimum required by law. Vehicles) Temperature A, B, C The temperature grades are A (the highest), B, and C, representing...

Owner's Manual
Page 255
... the next two or three days, you can condition the vehicle for re-testing by doing the following. Keep the vehicle in the onboard diagnostics for the emissions systems. These codes are erased when the battery is disconnected, and .... Without touching the accelerator pedal, start the engine and let it may not pass the test. CONTINUED Technical Information 259 If you must be requested to complete the test. State Emissions Testing Testing of Readiness Codes If you take your vehicle for a state emissions test shortly after several days of driving under a variety of conditions.
... the next two or three days, you can condition the vehicle for re-testing by doing the following. Keep the vehicle in the onboard diagnostics for the emissions systems. These codes are erased when the battery is disconnected, and .... Without touching the accelerator pedal, start the engine and let it may not pass the test. CONTINUED Technical Information 259 If you must be requested to complete the test. State Emissions Testing Testing of Readiness Codes If you take your vehicle for a state emissions test shortly after several days of driving under a variety of conditions.

Owner's Manual
Page 256
..., drive for several seconds without moving the accelerator pedal. (Vehicle speed may vary slightly; If the testing facility determines the readiness codes are still not set, see your Honda dealer. 260 Technical Information State Emissions Testing Select a nearby lightly traveled major highway where you cannot do this is okay.) If you can maintain...
..., drive for several seconds without moving the accelerator pedal. (Vehicle speed may vary slightly; If the testing facility determines the readiness codes are still not set, see your Honda dealer. 260 Technical Information State Emissions Testing Select a nearby lightly traveled major highway where you cannot do this is okay.) If you can maintain...

Owner's Manual
Page 265
... Oil Pressure Indicator ...232 Malfunction Indicator Lamp ...234 Overheated Engine ...229 Emergency Brake ...81 Emergency Flashers ...80 Emergency Trunk Opener ...67 Emissions Controls...256 Emissions Testing, State ...259 Engine Check Engine Light ...47, 234 Compartment, Checking in the ...122 Coolant ...124 Coolant Temperature Gauge ...49 Drive Belt...188 Malfunction Indicator Lamp...
... Oil Pressure Indicator ...232 Malfunction Indicator Lamp ...234 Overheated Engine ...229 Emergency Brake ...81 Emergency Flashers ...80 Emergency Trunk Opener ...67 Emissions Controls...256 Emissions Testing, State ...259 Engine Check Engine Light ...47, 234 Compartment, Checking in the ...122 Coolant ...124 Coolant Temperature Gauge ...49 Drive Belt...188 Malfunction Indicator Lamp...

Owner's Manual
Page 268
... SRS Service...39 SRS Indicator Light ...38, 47 Starting the Engine...135 In Cold Weather at High Altitude ...136 With a Dead Battery ...226 State Emissions Testing ...259 Steam Coming from Engine ...229 Steering Wheel Anti-theft Column Lock ...60 Stereo Sound System ...94 S Safety Belts ...8 Safety Defects, Reporting...264 Safety Labels...
... SRS Service...39 SRS Indicator Light ...38, 47 Starting the Engine...135 In Cold Weather at High Altitude ...136 With a Dead Battery ...226 State Emissions Testing ...259 Steam Coming from Engine ...229 Steering Wheel Anti-theft Column Lock ...60 Stereo Sound System ...94 S Safety Belts ...8 Safety Defects, Reporting...264 Safety Labels...
