Owner's Manual
Page 160
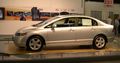
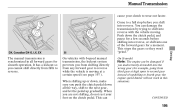
You can decrease the set cruising speed in any of these ways: Press and hold the DECEL/SET button. Tap the brake or clutch pedal lightly with the cruise control turned on the instrument panel goes out. Each time you reach the desired speed. Release the button when you.... The vehicle will return to the desired speed, press the DECEL/ SET button. Resting your vehicle speeds up for passing. Push on the brake or clutch pedal causes the cruise control to speed up about 1 mph (1.6 km/h). To slow down about 1 mph (1.6 km/h). Cruise Control Changing the Set Speed You ...
You can decrease the set cruising speed in any of these ways: Press and hold the DECEL/SET button. Tap the brake or clutch pedal lightly with the cruise control turned on the instrument panel goes out. Each time you reach the desired speed. Release the button when you.... The vehicle will return to the desired speed, press the DECEL/ SET button. Resting your vehicle speeds up for passing. Push on the brake or clutch pedal causes the cruise control to speed up about 1 mph (1.6 km/h). To slow down about 1 mph (1.6 km/h). Cruise Control Changing the Set Speed You ...
Owner's Manual
Page 161
Cruise Control Cancelling Cruise Control You can cancel cruise control in any of these ways: Tap the brake or clutch pedal. Push the CRUISE button on , and the vehicle accelerates to above 25 mph (40 km/h) and then press and release the RES/ACCEL button. ... turns the system off and erases the previous cruising speed. Resuming the Set Speed When you push the CANCEL button, or tap the brake or clutch pedal, the system remembers the previously set cruising speed. Push the CANCEL button on the steering wheel.
Cruise Control Cancelling Cruise Control You can cancel cruise control in any of these ways: Tap the brake or clutch pedal. Push the CRUISE button on , and the vehicle accelerates to above 25 mph (40 km/h) and then press and release the RES/ACCEL button. ... turns the system off and erases the previous cruising speed. Resuming the Set Speed When you push the CANCEL button, or tap the brake or clutch pedal, the system remembers the previously set cruising speed. Push the CANCEL button on the steering wheel.
Owner's Manual
Page 177
The START (III) position does not function unless the clutch pedal is in Park. If the engine does not start in the START (III) position for at a time. If the engine starts, release pressure on ... clear flooding. Automatic Transmission: The immobilizer system protects your vehicle f rom thef t. Do not hold it there while starting to step 5. Manual Transmission: Push the clutch pedal down all the way down . In cold weather, turn the ignition key to this problem. For more than 15 seconds at least 10 seconds...
The START (III) position does not function unless the clutch pedal is in Park. If the engine does not start in the START (III) position for at a time. If the engine starts, release pressure on ... clear flooding. Automatic Transmission: The immobilizer system protects your vehicle f rom thef t. Do not hold it there while starting to step 5. Manual Transmission: Push the clutch pedal down all the way down . In cold weather, turn the ignition key to this problem. For more than 15 seconds at least 10 seconds...
Owner's Manual
Page 178
... situation). the engine speed limiter will not work in all the way, shift to the next gear, and let the pedal up or down the clutch pedal, and pause for a few seconds before you shift into the wrong gear (for example, going from any forward gear to shift into one of... you from shifting directly from third gear at a certain speed (see page 197 ). Push down , make sure you are not shifting, do not rest your clutch to fourth gear; On vehicles with the vehicle moving at high rpms to second gear instead of the forward gears for smooth operation. This stops...
... situation). the engine speed limiter will not work in all the way, shift to the next gear, and let the pedal up or down the clutch pedal, and pause for a few seconds before you shift into the wrong gear (for example, going from any forward gear to shift into one of... you from shifting directly from third gear at a certain speed (see page 197 ). Push down , make sure you are not shifting, do not rest your clutch to fourth gear; On vehicles with the vehicle moving at high rpms to second gear instead of the forward gears for smooth operation. This stops...

Owner's Manual
Page 180
...this occurs, you cannot shift to the ACCESSORY (I) or LOCK (0) position. 3. With the clutch pedal still pressed, start the engine. Have the vehicle checked by a limiter in the engine's computer controls. With the clutch pedal pressed, move the shift lever to the first/ second gear side of the neutral gate..., then shift to reverse, your dealer. Press the clutch pedal, and shift to reverse while the vehicle is moving at a certain speed. On Si model Reverse Lockout 6-speed manual transmission The manual ...
...this occurs, you cannot shift to the ACCESSORY (I) or LOCK (0) position. 3. With the clutch pedal still pressed, start the engine. Have the vehicle checked by a limiter in the engine's computer controls. With the clutch pedal pressed, move the shift lever to the first/ second gear side of the neutral gate..., then shift to reverse, your dealer. Press the clutch pedal, and shift to reverse while the vehicle is moving at a certain speed. On Si model Reverse Lockout 6-speed manual transmission The manual ...
Owner's Manual
Page 183
... first gear. Automatic Transmission Drive (D3) This position is caused by a limiter in deep snow. D3 can operate the transmission much like a manual transmission without a clutch pedal. To increase engine braking when going down steep hills. This position locks the transmission in second gear. Engine Speed Limiter If you exceed the...
... first gear. Automatic Transmission Drive (D3) This position is caused by a limiter in deep snow. D3 can operate the transmission much like a manual transmission without a clutch pedal. To increase engine braking when going down steep hills. This position locks the transmission in second gear. Engine Speed Limiter If you exceed the...

Owner's Manual
Page 189
... Oil Additives ...221 Changing the Oil and Filter ...222 Engine Coolant ...224 Windshield Washers ...227 Automatic Transmission Fluid...228 Manual Transmission Fluid ...229 Brake and Clutch Fluid ...230 Power Steering Fluid ...231 Lights ...232 Cleaning the Seat Belts ...237 Floor Mats ...238 Dust and Pollen Filter ...239 Wiper Blades ...239 Tires...
... Oil Additives ...221 Changing the Oil and Filter ...222 Engine Coolant ...224 Windshield Washers ...227 Automatic Transmission Fluid...228 Manual Transmission Fluid ...229 Brake and Clutch Fluid ...230 Power Steering Fluid ...231 Lights ...232 Cleaning the Seat Belts ...237 Floor Mats ...238 Dust and Pollen Filter ...239 Wiper Blades ...239 Tires...
Owner's Manual
Page 200
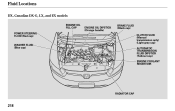
Fluid Locations DX, Canadian DX-G, LX, and EX models ENGINE OIL FILL CAP POWER STEERING FLUID (Red cap) BRAKE FLUID (Black cap) CLUTCH FLUID (Manual transmission only) (Light gray cap) AUTOMATIC TRANSMISSION FLUID DIPSTICK (Yellow loop) ENGINE COOLANT RESERVOIR ENGINE OIL DIPSTICK (Orange handle) WASHER FLUID (Blue cap) RADIATOR CAP 218
Fluid Locations DX, Canadian DX-G, LX, and EX models ENGINE OIL FILL CAP POWER STEERING FLUID (Red cap) BRAKE FLUID (Black cap) CLUTCH FLUID (Manual transmission only) (Light gray cap) AUTOMATIC TRANSMISSION FLUID DIPSTICK (Yellow loop) ENGINE COOLANT RESERVOIR ENGINE OIL DIPSTICK (Orange handle) WASHER FLUID (Blue cap) RADIATOR CAP 218
Owner's Manual
Page 201
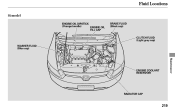
Fluid Locations Si model ENGINE OIL DIPSTICK (Orange handle) ENGINE OIL FILL CAP BRAKE FLUID (Black cap) CLUTCH FLUID (Light gray cap) WASHER FLUID (Blue cap) Maintenance ENGINE COOLANT RESERVOIR RADIATOR CAP 219
Fluid Locations Si model ENGINE OIL DIPSTICK (Orange handle) ENGINE OIL FILL CAP BRAKE FLUID (Black cap) CLUTCH FLUID (Light gray cap) WASHER FLUID (Blue cap) Maintenance ENGINE COOLANT RESERVOIR RADIATOR CAP 219
Owner's Manual
Page 211
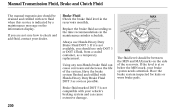
... the time recommendations in the reservoirs monthly. Have the brake system inspected for leaks or worn brake pads. 230 Manual Transmission Fluid, Brake and Clutch Fluid The manual transmission should be between the MIN and MAX marks on the information display. Always use only DOT 3 or DOT 4 fluid,...life of the reservoir. Brake fluid marked DOT 5 is indicated by a maintenance message on the side of the system. Using any non-Honda brake fluid can cause extensive damage. Brake Fluid Check the brake fluid level in the maintenance minder schedule. If you should be drained and...
... the time recommendations in the reservoirs monthly. Have the brake system inspected for leaks or worn brake pads. 230 Manual Transmission Fluid, Brake and Clutch Fluid The manual transmission should be between the MIN and MAX marks on the information display. Always use only DOT 3 or DOT 4 fluid,...life of the reservoir. Brake fluid marked DOT 5 is indicated by a maintenance message on the side of the system. Using any non-Honda brake fluid can cause extensive damage. Brake Fluid Check the brake fluid level in the maintenance minder schedule. If you should be drained and...
Owner's Manual
Page 212
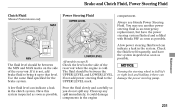
...the side of the reservoir. Clean up to bring it could damage components in the clutch system. Check the fluid level frequently, and have the power steering system flushed and refilled with Honda PSF as soon as possible. Check the level on the side of the reservoir when... A low fluid level can indicate a leak in the engine Turning the steering wheel to the UPPER LEVEL mark. Brake and Clutch Fluid, Power Steering Fluid Clutch Fluid Manual Transmission only MAX Power Steering Fluid UPPER LEVEL compartment. A low power steering fluid level can damage the power steering pump...
...the side of the reservoir. Clean up to bring it could damage components in the clutch system. Check the fluid level frequently, and have the power steering system flushed and refilled with Honda PSF as soon as possible. Check the level on the side of the reservoir when... A low fluid level can indicate a leak in the engine Turning the steering wheel to the UPPER LEVEL mark. Brake and Clutch Fluid, Power Steering Fluid Clutch Fluid Manual Transmission only MAX Power Steering Fluid UPPER LEVEL compartment. A low power steering fluid level can damage the power steering pump...
Owner's Manual
Page 235
... When you turn the ignition switch to the START (III) position, you do not come on what you hear when you have a manual transmission, the clutch pedal must be pushed all , or operates very slowly. See Jump Starting on the headlights, and check their brightness. Store the wheel, jack, and tools...
... When you turn the ignition switch to the START (III) position, you do not come on what you hear when you have a manual transmission, the clutch pedal must be pushed all , or operates very slowly. See Jump Starting on the headlights, and check their brightness. Store the wheel, jack, and tools...
Owner's Manual
Page 247
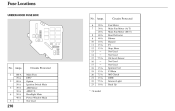
... Fan Moter (M/T) Rear Defroster Blower Hazard FI Stop, Horn Not Used Not Used Oil Level Sensor Not Used Not Used Ignition Coil FI Main MG Clutch DBW Interior Light Back Up 7.5 A No. Amps. 1 2 3 4 5 100 A 70 A 80 A 50 A 30 A 30 A 50 A 40 A Circuits Protected Main Fuse EPS Option Ignition Switch Main ABS...
... Fan Moter (M/T) Rear Defroster Blower Hazard FI Stop, Horn Not Used Not Used Oil Level Sensor Not Used Not Used Ignition Coil FI Main MG Clutch DBW Interior Light Back Up 7.5 A No. Amps. 1 2 3 4 5 100 A 70 A 80 A 50 A 30 A 30 A 50 A 40 A Circuits Protected Main Fuse EPS Option Ignition Switch Main ABS...

Owner's Manual
Page 270
... ...51 Where Should a Child Sit? ...33 Child Seats Installing ...40 Lower Anchors ...41 Selecting ...39 Tether Anchor Points ...45 Cleaning Seat Belts ...237 Clock ...173 Clutch Fluid ...231 CO in the Exhaust ...283 Coat Hook ...104 Cold Weather, Starting in ...194 Compact Spare Tire...252 Console Compartment ...103 Consumer Information...288...
... ...51 Where Should a Child Sit? ...33 Child Seats Installing ...40 Lower Anchors ...41 Selecting ...39 Tether Anchor Points ...45 Cleaning Seat Belts ...237 Clock ...173 Clutch Fluid ...231 CO in the Exhaust ...283 Coat Hook ...104 Cold Weather, Starting in ...194 Compact Spare Tire...252 Console Compartment ...103 Consumer Information...288...
Owner's Manual
Page 271
... the Fuel Tank ...181 Filters Dust and Pollen ...239 Oil ...222 Flashers, Hazard Warning...72 Flat Tire, Changing a ...253 Fluids Automatic Transmission...228 Brake ...230 Clutch ...230 Manual Transmission ...229 Power Steering...231 Windshield Washer ...227 FM Stereo Radio Reception ...167 Folding Rear Seat ...94 Four-way Flashers ...72 CONTINUED E Economy...
... the Fuel Tank ...181 Filters Dust and Pollen ...239 Oil ...222 Flashers, Hazard Warning...72 Flat Tire, Changing a ...253 Fluids Automatic Transmission...228 Brake ...230 Clutch ...230 Manual Transmission ...229 Power Steering...231 Windshield Washer ...227 FM Stereo Radio Reception ...167 Folding Rear Seat ...94 Four-way Flashers ...72 CONTINUED E Economy...

Owner's Manual
Page 272
... (GVWR) ...189 High Altitude, Starting at ...194 High Beam Lever...70 High-mount Brake Light...237 Hood, Opening and Closing the ...182 Horn...68 Hydraulic Clutch ...231 I Identification Number, Vehicle...276 If the Engine Overheats ...261 If the Engine Wont Start ...257 Ignition Keys...74 Switch ...76 Timing Control System ...284...
... (GVWR) ...189 High Altitude, Starting at ...194 High Beam Lever...70 High-mount Brake Light...237 Hood, Opening and Closing the ...182 Horn...68 Hydraulic Clutch ...231 I Identification Number, Vehicle...276 If the Engine Overheats ...261 If the Engine Wont Start ...257 Ignition Keys...74 Switch ...76 Timing Control System ...284...


