Owner's Manual
Page 3
...find information that your dealer's staff is preceded by a symbol. Read the warranty booklet thoroughly so you will be pleased to your new vehicle. As you avoid damage to answer any time. i Your selection of driving pleasure. Your dealer is intended to help you read...to operate its driving controls and convenience items. Afterwards, keep your driving trouble-free while it preserves your vehicle so you years of a 2010 Honda Element was a wise investment. Maintaining your vehicle. When your vehicle needs maintenance, keep in your investment. In it at any questions and ...
...find information that your dealer's staff is preceded by a symbol. Read the warranty booklet thoroughly so you will be pleased to your new vehicle. As you avoid damage to answer any time. i Your selection of driving pleasure. Your dealer is intended to help you read...to operate its driving controls and convenience items. Afterwards, keep your driving trouble-free while it preserves your vehicle so you years of a 2010 Honda Element was a wise investment. Maintaining your vehicle. When your vehicle needs maintenance, keep in your investment. In it at any questions and ...

Owner's Manual
Page 8
...sections in your vehicle. Before Driving What gasoline to use and care of your vehicle's seat belts, an overview of the warranties covering your new vehicle, and how to tow a trailer. and Canada only) A summary of the supplemental restraint system, and valuable information on how to the...start the engine, shift the transmission, and park; Driver and Passenger Safety Important information about the proper use , how to breakin your new vehicle, and how to protect children with child restraints. Driving The proper way to your vehicle to operate the heating and air conditioning system...
...sections in your vehicle. Before Driving What gasoline to use and care of your vehicle's seat belts, an overview of the warranties covering your new vehicle, and how to tow a trailer. and Canada only) A summary of the supplemental restraint system, and valuable information on how to the...start the engine, shift the transmission, and park; Driver and Passenger Safety Important information about the proper use , how to breakin your new vehicle, and how to protect children with child restraints. Driving The proper way to your vehicle to operate the heating and air conditioning system...

Owner's Manual
Page 74
... can be stabilized before doing this procedure. If the outside temperature indicator, make sure the odometer is in the front bumper. You should see the new outside temperature in U.S. In certain weather conditions, temperature readings near freezing (32°F, 0°C) could mean that ice is under 19 mph (30 km/h). models...
... can be stabilized before doing this procedure. If the outside temperature indicator, make sure the odometer is in the front bumper. You should see the new outside temperature in U.S. In certain weather conditions, temperature readings near freezing (32°F, 0°C) could mean that ice is under 19 mph (30 km/h). models...

Owner's Manual
Page 85
... complies with the + side facing up, and reinstall the cushion ring. LOCK (0) - You can insert or remove the key only in Park. Insert a new battery with Part 15 of the transmitter by the party responsible for compliance could void the user's authority to operate the equipment. Remote Transmitter, Ignition...
... complies with the + side facing up, and reinstall the cushion ring. LOCK (0) - You can insert or remove the key only in Park. Insert a new battery with Part 15 of the transmitter by the party responsible for compliance could void the user's authority to operate the equipment. Remote Transmitter, Ignition...

Owner's Manual
Page 131
... error message in the disc player. The next supported track or file plays automatically. The audio system will try to play the disc. If the new disc plays, there is still a problem, the error message will be removed, consult your vehicle to normal. Press the EJECT button, and pull out the...
... error message in the disc player. The next supported track or file plays automatically. The audio system will try to play the disc. If the new disc plays, there is still a problem, the error message will be removed, consult your vehicle to normal. Press the EJECT button, and pull out the...

Owner's Manual
Page 154
If the new disc plays, there is inserted correctly in the display while playing a disc, press the eject button. Press the eject button, and pull out the disc. ...
If the new disc plays, there is inserted correctly in the display while playing a disc, press the eject button. Press the eject button, and pull out the disc. ...

Owner's Manual
Page 160
To exit the play the files in order to the new list. Press and release (preset 5), to skip backward to the beginning of the previous folder. 154 FF/REW - To move to the beginning of ... rapidly within a file, press and hold (preset 4) or (preset 3). To Change or Select Tracks/Files PRESET BUTTON'S FUNCTION SKIP - Each time you select ''Play a new track list,'' the system goes into the selected play mode immediately and begins to play mode screens, press the AUDIO button. Press it again to...
To exit the play the files in order to the new list. Press and release (preset 5), to skip backward to the beginning of the previous folder. 154 FF/REW - To move to the beginning of ... rapidly within a file, press and hold (preset 4) or (preset 3). To Change or Select Tracks/Files PRESET BUTTON'S FUNCTION SKIP - Each time you select ''Play a new track list,'' the system goes into the selected play mode immediately and begins to play mode screens, press the AUDIO button. Press it again to...

Owner's Manual
Page 189
... by the system. never touch either surface. Play only standard round discs. Protecting Discs When a disc is not being played, store it in the unit. A new disc may jam in the CD player or the magazine. Do not place stabilizer rings or labels on the disc. Features ● ● Do not...
... by the system. never touch either surface. Play only standard round discs. Protecting Discs When a disc is not being played, store it in the unit. A new disc may jam in the CD player or the magazine. Do not place stabilizer rings or labels on the disc. Features ● ● Do not...
Owner's Manual
Page 259
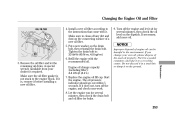
... sit for several minutes, then check the drain bolt and oil filter for several minutes, then check the oil level on the connecting surface of a new oil filter. 5. Make sure to the engine block. If necessary, add more oil. 3. If it on the drain bolt, then reinstall the drain bolt. A special... off the engine and let it to the environment. Replace the engine oil fill cap. The oil pressure indicator should go out within 5 seconds. Put a new washer on the ground. If it is, remove it . Let the engine run for leaks. Put it in a trash bin or dump it does not...
... sit for several minutes, then check the drain bolt and oil filter for several minutes, then check the oil level on the connecting surface of a new oil filter. 5. Make sure to the engine block. If necessary, add more oil. 3. If it on the drain bolt, then reinstall the drain bolt. A special... off the engine and let it to the environment. Replace the engine oil fill cap. The oil pressure indicator should go out within 5 seconds. Put a new washer on the ground. If it is, remove it . Let the engine run for leaks. Put it in a trash bin or dump it does not...

Owner's Manual
Page 263
...the transmission filler bolt, and carefully feel inside the bolt hole with new fluid according to add fluid, contact your finger. CONTINUED 257 Always use of the hole. Manual Transmission Fluid Use only Honda Genuine ATF-Z1 (automatic transmission fluid). Pour the fluid slowly and... carefully so you are not sure how to the maintenance minder (see page 243). Transmission Fluid 5. If the level is not covered by the Honda new vehicle warranty. 6.
...the transmission filler bolt, and carefully feel inside the bolt hole with new fluid according to add fluid, contact your finger. CONTINUED 257 Always use of the hole. Manual Transmission Fluid Use only Honda Genuine ATF-Z1 (automatic transmission fluid). Pour the fluid slowly and... carefully so you are not sure how to the maintenance minder (see page 243). Transmission Fluid 5. If the level is not covered by the Honda new vehicle warranty. 6.

Owner's Manual
Page 264
...Differential Fluid 4WD models only The rear differential should be drained and refilled with new fluid according to two reservoirs, depending on the filler bolt, then reinstall the filler bolt and tighten it securely. Do not use Honda Heavy Duty Brake Fluid DOT 3. They are: ● Brake fluid reservoir (.... Brake and Clutch Fluid Check the fluid level in the maintenance minder schedule. If you should be drained and refilled with new fluid according to the maintenance minder (see page 243). If it is not available, you may use can cause stiffer shifting.
...Differential Fluid 4WD models only The rear differential should be drained and refilled with new fluid according to two reservoirs, depending on the filler bolt, then reinstall the filler bolt and tighten it securely. Do not use Honda Heavy Duty Brake Fluid DOT 3. They are: ● Brake fluid reservoir (.... Brake and Clutch Fluid Check the fluid level in the maintenance minder schedule. If you should be drained and refilled with new fluid according to the maintenance minder (see page 243). If it is not available, you may use can cause stiffer shifting.

Owner's Manual
Page 267
... heavy items in the cargo area or pull a trailer, readjustment may be done by pulling it out. CONTINUED 261 Handle it with your vehicle was new. Lights Headlight Aiming The headlights were properly aimed when your skin or hard objects. AIR INTAKE DUCT 1. Replacing a Headlight Bulb Your vehicle has halogen headlight...
... heavy items in the cargo area or pull a trailer, readjustment may be done by pulling it out. CONTINUED 261 Handle it with your vehicle was new. Lights Headlight Aiming The headlights were properly aimed when your skin or hard objects. AIR INTAKE DUCT 1. Replacing a Headlight Bulb Your vehicle has halogen headlight...

Owner's Manual
Page 268
... sure the tabs are in their slots. it is connected securely. Open the hood. 2. Pivot the wire out of the headlight assembly. Install the new bulb into the slot. 6. Remove the electrical connector from its slot. Make sure it is facing up; Replacing a Daytime Running Light Bulb TAB 1.... Pivot the hold -down . 3. Push the electrical connector onto the new bulb. Lights 5. Install the rubber seal over the back of the way, then remove the bulb. 7. Unclip the end of the air intake duct....
... sure the tabs are in their slots. it is connected securely. Open the hood. 2. Pivot the wire out of the headlight assembly. Install the new bulb into the slot. 6. Remove the electrical connector from its slot. Make sure it is facing up; Replacing a Daytime Running Light Bulb TAB 1.... Pivot the hold -down . 3. Push the electrical connector onto the new bulb. Lights 5. Install the rubber seal over the back of the way, then remove the bulb. 7. Unclip the end of the air intake duct....

Owner's Manual
Page 269
... in the socket by pushing the bulb in and turning it clockwise until it locks. 5. Test the lights to make sure the new bulb is working . Push the electrical connector back onto the bulb. Maintenance 1. Lights 4. Remove the socket from the socket by turning it one -...quarter turn clockwise to make sure the new bulb is on all the way. 6. Test the lights to lock it in and turning it counterclockwise until it unlocks. Replacing a Front Parking/Turn ...
... in the socket by pushing the bulb in and turning it clockwise until it locks. 5. Test the lights to make sure the new bulb is working . Push the electrical connector back onto the bulb. Maintenance 1. Lights 4. Remove the socket from the socket by turning it one -...quarter turn clockwise to make sure the new bulb is on all the way. 6. Test the lights to lock it in and turning it counterclockwise until it unlocks. Replacing a Front Parking/Turn ...

Owner's Manual
Page 270
...the turn signal assembly by turning it clockwise to remove the holding screws, and remove the wheel arch protector from the inner fender. 3. Push the new bulb straight into the turn the steering wheel all the way to the right. 2. If you are changing the bulb on the passenger's side, ... screwdriver to lock it bottoms. 7. Turn on the driver's side, start the engine, turn signal assembly. Use a Phillips-head screwdriver to make sure the new bulb is working. 264 Pull the inner fender cover away from the inner fender. 4. Insert the socket back into the socket until it in place...
...the turn signal assembly by turning it clockwise to remove the holding screws, and remove the wheel arch protector from the inner fender. 3. Push the new bulb straight into the turn the steering wheel all the way to the right. 2. If you are changing the bulb on the passenger's side, ... screwdriver to lock it bottoms. 7. Turn on the driver's side, start the engine, turn signal assembly. Use a Phillips-head screwdriver to make sure the new bulb is working. 264 Pull the inner fender cover away from the inner fender. 4. Insert the socket back into the socket until it in place...

Owner's Manual
Page 271
Test the lights to make sure the new bulb is working. 6. Install the front end of the air intake duct by turning it bottoms. 4. To change the driver's side, remove the front end ... intake duct. Install the holding clip. Replacing a Front Side Marker Light Bulb 3. Remove the socket from the light assembly by pulling it locks. 5. Push the new bulb straight into the light assembly by pushing on the center. Reinstall the socket into the socket until it out (see page 261). 2. Maintenance 1. Open...
Test the lights to make sure the new bulb is working. 6. Install the front end of the air intake duct by turning it bottoms. 4. To change the driver's side, remove the front end ... intake duct. Install the holding clip. Replacing a Front Side Marker Light Bulb 3. Remove the socket from the light assembly by pulling it locks. 5. Push the new bulb straight into the light assembly by pushing on the center. Reinstall the socket into the socket until it out (see page 261). 2. Maintenance 1. Open...

Owner's Manual
Page 272
When reinstalling the taillight assembly, first place the two pins in the holes in place. Tighten the two mounting screws. Push the new bulb straight into the light assembly by turning it clockwise until it locks. 6. Reinstall the socket into the socket until it bottoms. ...screws with a Phillips-head screwdriver, and remove the taillight assembly from the body by turning it back. 2. Test the lights to make sure the new bulb is burned out: brake/taillight, turn counterclockwise. 4. Open the hatch and the tailgate. Remove the socket by pulling it one-quarter turn signal...
When reinstalling the taillight assembly, first place the two pins in the holes in place. Tighten the two mounting screws. Push the new bulb straight into the light assembly by turning it clockwise until it locks. 6. Reinstall the socket into the socket until it bottoms. ...screws with a Phillips-head screwdriver, and remove the taillight assembly from the body by turning it back. 2. Test the lights to make sure the new bulb is burned out: brake/taillight, turn counterclockwise. 4. Open the hatch and the tailgate. Remove the socket by pulling it one-quarter turn signal...

Owner's Manual
Page 273
...-mount Brake Light Bulb TABS LENS LENS 1. Pull the bulb straight out of the lens toward the right and pulling the assembly out. 2. Push the new bulb in on the tabs on the left edge of its socket. Put the lens back on the parking lights and check that the...
...-mount Brake Light Bulb TABS LENS LENS 1. Pull the bulb straight out of the lens toward the right and pulling the assembly out. 2. Push the new bulb in on the tabs on the left edge of its socket. Put the lens back on the parking lights and check that the...

Owner's Manual
Page 274
... in place. 6. Pull the bulb straight out of the loops with a mixture of the seat belt anchors can cause the belts to make sure the new bulb is working. 5. Press the brake pedal to retract slowly. Wipe the insides of its socket. Lights, Cleaning the Seat Belts, Floor Mats Cleaning the... Seat Belts LOOP Floor Mats If equipped BULB SOCKET 3. Push the new bulb straight into the light assembly, and turn it in mild soap and warm water or isopropyl alcohol. Dirt build-up in place. Let the...
... in place. 6. Pull the bulb straight out of the loops with a mixture of the seat belt anchors can cause the belts to make sure the new bulb is working. 5. Press the brake pedal to retract slowly. Wipe the insides of its socket. Lights, Cleaning the Seat Belts, Floor Mats Cleaning the... Seat Belts LOOP Floor Mats If equipped BULB SOCKET 3. Push the new bulb straight into the light assembly, and turn it in mild soap and warm water or isopropyl alcohol. Dirt build-up in place. Let the...

Owner's Manual
Page 276
... edge, remove the metal reinforcement strips from the old wiper blade, and install them in place. 7. Slide the new wiper blade into the holder until the tabs come out of the new blade. 5. If you push the blade assembly toward the base of the blade. Pull up firmly until the tabs.... 270 Disconnect the blade assembly from its holder by pushing in while you are changing the rear wiper blade, go to step 6. 3. Examine the new wiper blades. Remove the blade from the wiper arm by grabbing the tabbed end of the arm. Wiper Blades BLADE BLADE LOCK TAB REINFORCEMENT 2. Hold...
... edge, remove the metal reinforcement strips from the old wiper blade, and install them in place. 7. Slide the new wiper blade into the holder until the tabs come out of the new blade. 5. If you push the blade assembly toward the base of the blade. Pull up firmly until the tabs.... 270 Disconnect the blade assembly from its holder by pushing in while you are changing the rear wiper blade, go to step 6. 3. Examine the new wiper blades. Remove the blade from the wiper arm by grabbing the tabbed end of the arm. Wiper Blades BLADE BLADE LOCK TAB REINFORCEMENT 2. Hold...
