
Owner's Manual
Page 15
Lower the seat cushion until it could move forward in a sudden stop or crash. That could be seriously injured. Lift the seatback up on the seatback to the person sitting there. Always press rearward on the seat cushion to make sure the seat is improperly ...
Lower the seat cushion until it could move forward in a sudden stop or crash. That could be seriously injured. Lift the seatback up on the seatback to the person sitting there. Always press rearward on the seat cushion to make sure the seat is improperly ...
Owner's Manual
Page 17
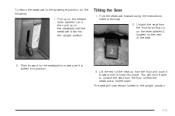
Tilting the Seat 1. Lift the rear of the seat. 2. Unlatch the seat from the floor unless the seatback is locked into place. You will now remain locked in ...
Tilting the Seat 1. Lift the rear of the seat. 2. Unlatch the seat from the floor unless the seatback is locked into place. You will now remain locked in ...

Owner's Manual
Page 20
To unlatch the rear of the seat from the floor, pull up on the release lever labeled 2, at the rear of the seat, and lift the rear of the seat up , roll the seat out of the seat up from the floor. 4. Squeeze the release handle while pulling the seat out. 5. While holding the rear of the vehicle. 1-14 3.
To unlatch the rear of the seat from the floor, pull up on the release lever labeled 2, at the rear of the seat, and lift the rear of the seat up , roll the seat out of the seat up from the floor. 4. Squeeze the release handle while pulling the seat out. 5. While holding the rear of the vehicle. 1-14 3.

Owner's Manual
Page 96
... open the door if your vehicle has a number of theft-deterrent features, we know that nothing we put on it : 1. You can swing down and lift the mirror cover to activate the theft-deterrent system. Sun Visors To block out glare, you can choose different feedback options for 30 seconds, then...
... open the door if your vehicle has a number of theft-deterrent features, we know that nothing we put on it : 1. You can swing down and lift the mirror cover to activate the theft-deterrent system. Sun Visors To block out glare, you can choose different feedback options for 30 seconds, then...

Owner's Manual
Page 125
Release both buttons until the HomeLink® indicator light turns off. 3. Storage Areas Glove Box To open your glove box, lift up the latch and pull the door open. While still holding the HomeLink® button, proceed with Step 2 under "Programming HomeLink®." 2-45 Press and ...
Release both buttons until the HomeLink® indicator light turns off. 3. Storage Areas Glove Box To open your glove box, lift up the latch and pull the door open. While still holding the HomeLink® button, proceed with Step 2 under "Programming HomeLink®." 2-45 Press and ...

Owner's Manual
Page 325
... assist handles to engage the hood latch. 2. Hold up on properly. Latch both hood side latches. 5-11 Pull the handle located inside the vehicle to lift the hood. 4. Before closing the hood, be sure that it is latched. 3. Pull up the hood a few inches from the closed position and then let...
... assist handles to engage the hood latch. 2. Hold up on properly. Latch both hood side latches. 5-11 Pull the handle located inside the vehicle to lift the hood. 4. Before closing the hood, be sure that it is latched. 3. Pull up the hood a few inches from the closed position and then let...

Owner's Manual
Page 334
... the air cleaner/filter off , a backfire can cause a damaging engine fire. The air cleaner not only cleans the air, it aside. 3. Lift the cover upward and set it helps to stop flame if the engine backfires. Care should be burned. Reinstall the cover and...
... the air cleaner/filter off , a backfire can cause a damaging engine fire. The air cleaner not only cleans the air, it aside. 3. Lift the cover upward and set it helps to stop flame if the engine backfires. Care should be burned. Reinstall the cover and...

Owner's Manual
Page 344
...the warning, turn off the engine and get everyone out of the vehicle until it cools down . Also, see : A. You may decide not to lift the hood but to the highest gear while driving - DRIVE (D). Coolant Surge Tank B. Engine Fan If the coolant inside the coolant surge tank is about... 1. Just to full hot at least three minutes while you 'll see "Overheated Engine Protection Operating Mode" listed previously in a traffic jam, shift to lift the hood, here's what you 're parked. If the warning doesn't come back on a level surface. 5-30 Coolant Surge Tank Pressure Cap C.
...the warning, turn off the engine and get everyone out of the vehicle until it cools down . Also, see : A. You may decide not to lift the hood but to the highest gear while driving - DRIVE (D). Coolant Surge Tank B. Engine Fan If the coolant inside the coolant surge tank is about... 1. Just to full hot at least three minutes while you 'll see "Overheated Engine Protection Operating Mode" listed previously in a traffic jam, shift to lift the hood, here's what you 're parked. If the warning doesn't come back on a level surface. 5-30 Coolant Surge Tank Pressure Cap C.

Owner's Manual
Page 369
Reinstall the socket into the lens and turn it clockwise to remove it into the socket. 1. Hook the side of the lens with the hook end in the notch first and then tighten the screw. 5-55 Remove the screw and lift off the lens. 4. Turn the socket counterclockwise to lock it and remove the old bulb. 3. Put a new bulb into place. 5. Roof Marker Lamps Corner Roof Marker Lamps 2.
Reinstall the socket into the lens and turn it clockwise to remove it into the socket. 1. Hook the side of the lens with the hook end in the notch first and then tighten the screw. 5-55 Remove the screw and lift off the lens. 4. Turn the socket counterclockwise to lock it and remove the old bulb. 3. Put a new bulb into place. 5. Roof Marker Lamps Corner Roof Marker Lamps 2.

Owner's Manual
Page 373
To replace the windshield wiper blade assembly do the following: 1. See Scheduled Maintenance on page 6-14. Install a new blade by reversing Steps 1 and 2. 5-59 Lift the wiper arm and turn the blade until it is facing away from the windshield. 2. Windshield Wiper Blade Replacement Windshield wiper blades should be inspected ...
To replace the windshield wiper blade assembly do the following: 1. See Scheduled Maintenance on page 6-14. Install a new blade by reversing Steps 1 and 2. 5-59 Lift the wiper arm and turn the blade until it is facing away from the windshield. 2. Windshield Wiper Blade Replacement Windshield wiper blades should be inspected ...

Owner's Manual
Page 392
Steer to maintain lane position, and then gently brake to a stop , well off the road if possible. {CAUTION: Lifting a vehicle and getting under control by steering the way you want the vehicle to do : If a front tire fails, the flat tire. The jack ...
Steer to maintain lane position, and then gently brake to a stop , well off the road if possible. {CAUTION: Lifting a vehicle and getting under control by steering the way you want the vehicle to do : If a front tire fails, the flat tire. The jack ...

Owner's Manual
Page 398
... attach the jack handle (E) with the UP mark facing you. 5. Slide the ratchet (F) onto the jack handle extension (D) with the hook end connected to the lifting point. Rear Flat Tire: Attach the jack handle extension (D) to the jack handle (E) and then press the clip (arrow) so it engages.
... attach the jack handle (E) with the UP mark facing you. 5. Slide the ratchet (F) onto the jack handle extension (D) with the hook end connected to the lifting point. Rear Flat Tire: Attach the jack handle extension (D) to the jack handle (E) and then press the clip (arrow) so it engages.

Owner's Manual
Page 400
Remove all the wheel nuts and take off the ground so there is enough room for the spare tire to raise the vehicle. Raise the vehicle far enough off the flat tire. 6. Turn the ratchet clockwise to clear the ground. 5-86 {CAUTION: Raising your vehicle with the jack improperly positioned can damage the vehicle and even make the vehicle fall. To help avoid personal injury and vehicle damage, be sure to fit the jack lift head into the proper location before raising the vehicle. 7.
Remove all the wheel nuts and take off the ground so there is enough room for the spare tire to raise the vehicle. Raise the vehicle far enough off the flat tire. 6. Turn the ratchet clockwise to clear the ground. 5-86 {CAUTION: Raising your vehicle with the jack improperly positioned can damage the vehicle and even make the vehicle fall. To help avoid personal injury and vehicle damage, be sure to fit the jack lift head into the proper location before raising the vehicle. 7.

Owner's Manual
Page 420
To remove fuses if you don't have a fuse extractor, hold the end of the vehicle near the battery. See Engine Compartment Overview on page 5-12 for access to the fuse/relay block. Lift the cover for more information on its location. 5-106 Underhood Fuse Block The underhood fuse block in the engine compartment is located on the driver's side of the fuse between your thumb and index finger and pull straight out.
To remove fuses if you don't have a fuse extractor, hold the end of the vehicle near the battery. See Engine Compartment Overview on page 5-12 for access to the fuse/relay block. Lift the cover for more information on its location. 5-106 Underhood Fuse Block The underhood fuse block in the engine compartment is located on the driver's side of the fuse between your thumb and index finger and pull straight out.

Owner's Manual
Page 449
...-out Service (identification required): Replacement keys or locksmith service will be covered within 10 miles. 7-5 HUMMER's Roadside Assistance toll-free number is available for a limited period of time from the date of vehicle purchase/...GM-DRIVE (463-7483) for details. This value-added service is intended to provide you drive in the HUMMER Roadside Assistance program. GM of the replacement key will provide the following services during the Bumper-to-Bumper warranty... determine your vehicle's eligibility, see your vehicle (hand controls, wheelchair/ scooter lifts, etc.).
...-out Service (identification required): Replacement keys or locksmith service will be covered within 10 miles. 7-5 HUMMER's Roadside Assistance toll-free number is available for a limited period of time from the date of vehicle purchase/...GM-DRIVE (463-7483) for details. This value-added service is intended to provide you drive in the HUMMER Roadside Assistance program. GM of the replacement key will provide the following services during the Bumper-to-Bumper warranty... determine your vehicle's eligibility, see your vehicle (hand controls, wheelchair/ scooter lifts, etc.).
