
Owner's Manual
Page 76
... to OFF for more than 2 hours, it will be initialized to zero (--), press the RESET switch for a burned-out fuse or bulb or see your Hyundai dealer. o The drive time will automatically return to '99:59'. As the turn signals at all, there is calculated from the fuel... consumption input. o The total fuel used and the distance since the last average consumption reset. FEATURES OF YOUR HYUNDAI 1 63 MULTI-FUNCTION SWITCH 3. Average Fuel Consumption (MPG) 4. If the fuel is pushed, it will be displayed to blink. Drive Time B340A01A...
... to OFF for more than 2 hours, it will be initialized to zero (--), press the RESET switch for a burned-out fuse or bulb or see your Hyundai dealer. o The drive time will automatically return to '99:59'. As the turn signals at all, there is calculated from the fuel... consumption input. o The total fuel used and the distance since the last average consumption reset. FEATURES OF YOUR HYUNDAI 1 63 MULTI-FUNCTION SWITCH 3. Average Fuel Consumption (MPG) 4. If the fuel is pushed, it will be displayed to blink. Drive Time B340A01A...
Owner's Manual
Page 156
... have sufficient fuel. 10. WARNING: Always wear appropriate shoes when operating your Hyundai has an automatic transaxle, place the shift lever in "P" (Park). To remove the key, always confirm that all bulbs when key is not in "P" or "N" Position (Automatic Transaxle). It may...34 for people, especially children, before putting a car into 'drive'. ! o For additional information about starting, see page 2-5. ! DRIVING YOUR HYUNDAI 2 3 BEFORE STARTING THE ENGINE C020A01NF-AAT TO START THE ENGINE C030A01E-AAT Before you start if the clutch pedal is not depressed fully (Manual...
... have sufficient fuel. 10. WARNING: Always wear appropriate shoes when operating your Hyundai has an automatic transaxle, place the shift lever in "P" (Park). To remove the key, always confirm that all bulbs when key is not in "P" or "N" Position (Automatic Transaxle). It may...34 for people, especially children, before putting a car into 'drive'. ! o For additional information about starting, see page 2-5. ! DRIVING YOUR HYUNDAI 2 3 BEFORE STARTING THE ENGINE C020A01NF-AAT TO START THE ENGINE C030A01E-AAT Before you start if the clutch pedal is not depressed fully (Manual...

Owner's Manual
Page 215
... Checking Drive Belts ...6-22 Checking and Replacing Fuses ...6-22 Checking the Battery ...6-24 Power Steering Fluid Level ...6-26 Headlight Aiming Adjustment ...6-27 Replacement of Light Bulbs ...6-28 Bulb Wattages ...6-36 Fuse Panel Description ...6-37 6 6
... Checking Drive Belts ...6-22 Checking and Replacing Fuses ...6-22 Checking the Battery ...6-24 Power Steering Fluid Level ...6-26 Headlight Aiming Adjustment ...6-27 Replacement of Light Bulbs ...6-28 Bulb Wattages ...6-36 Fuse Panel Description ...6-37 6 6
Owner's Manual
Page 242
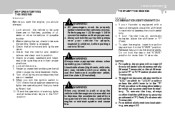
...DO-IT-YOURSELFMAINTENANCE 28 G290B01NF-AAT REPLACEMENT OF LIGHT BULBS Adjustment After Headlight Assembly Replacement Vertical line Horizontal ...GAT H Cut-off line L H Before attempting to replace a light bulb, be sure the switch is similar to the condensation on the headlight .... If the water leaks into the lamp bulb circuitry, have the vehicle checked by the ... 2. This is turned to replace the burned-out bulb with an assembly. Dotted lines in the illustration show ... LED type equipped bulbs with one of the headlights. o Be sure to reach the light bulbs so they may ...
...DO-IT-YOURSELFMAINTENANCE 28 G290B01NF-AAT REPLACEMENT OF LIGHT BULBS Adjustment After Headlight Assembly Replacement Vertical line Horizontal ...GAT H Cut-off line L H Before attempting to replace a light bulb, be sure the switch is similar to the condensation on the headlight .... If the water leaks into the lamp bulb circuitry, have the vehicle checked by the ... 2. This is turned to replace the burned-out bulb with an assembly. Dotted lines in the illustration show ... LED type equipped bulbs with one of the headlights. o Be sure to reach the light bulbs so they may ...
Owner's Manual
Page 243
Replacement instructions: 1. Allow the bulb to cool. Always grasp the bulb by its base, avoid touching the glass. Wear eye protection. 2. Using a socket wrench of the headlight. Open the engine hood. 3. Disconnect the power cord from ...
Replacement instructions: 1. Allow the bulb to cool. Always grasp the bulb by its base, avoid touching the glass. Wear eye protection. 2. Using a socket wrench of the headlight. Open the engine hood. 3. Disconnect the power cord from ...
Owner's Manual
Page 244
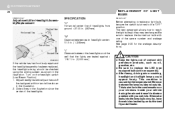
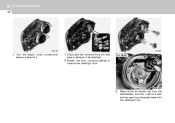
Turn the plastic cover counterclockwise and remove it. 7. Disconnect the connector from the replacement bulb and install the new bulb by matching the plastic base with the headlight hole. Low Beam OMG075038N 9. 6 DO-IT-YOURSELFMAINTENANCE 30 HNF5025 ONF078026N HNF5027 6. Rotate the bulb counterclockwise to remove the headlight bulb. Remove the protective cap from the bulb base in the back of the headlight. 8.
Turn the plastic cover counterclockwise and remove it. 7. Disconnect the connector from the replacement bulb and install the new bulb by matching the plastic base with the headlight hole. Low Beam OMG075038N 9. 6 DO-IT-YOURSELFMAINTENANCE 30 HNF5025 ONF078026N HNF5027 6. Rotate the bulb counterclockwise to remove the headlight bulb. Remove the protective cap from the bulb base in the back of the headlight. 8.

Owner's Manual
Page 245
Front Fog Light (If installed) NOTE: It is recommended that the front fog light bulb should be replaced by an authorized Hyundai dealer. Always wear eye protection when servicing the bulb. Protect the bulb against abrasions or scratches and against liquids when lighted. Use the protective cap and carton to promptly dispose of the used...
Front Fog Light (If installed) NOTE: It is recommended that the front fog light bulb should be replaced by an authorized Hyundai dealer. Always wear eye protection when servicing the bulb. Protect the bulb against abrasions or scratches and against liquids when lighted. Use the protective cap and carton to promptly dispose of the used...
Owner's Manual
Page 246
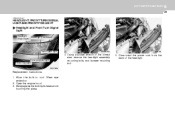
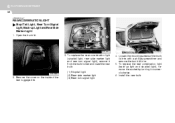
... light and rear turn signal light 4. To replace the rear combination light (stop /tail light), remove the socket by turning it from the bulb holder and install the new bulb. Loosen the mounting screws of the rear luggage trim. (1) Stop/tail light (2) Rear side marker light (3) Rear turn signal light), remove it...
... light and rear turn signal light 4. To replace the rear combination light (stop /tail light), remove the socket by turning it from the bulb holder and install the new bulb. Loosen the mounting screws of the rear luggage trim. (1) Stop/tail light (2) Rear side marker light (3) Rear turn signal light), remove it...
Owner's Manual
Page 247
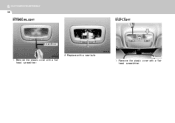
HNF5031-A 2. Remove the luggage compartment light cover on the rear package tray panel with a new bulb. Disconnect the power cord. 4. DO-IT-YOURSELF MAINTENANCE 6 33 G270C01L-AAT LUGGAGE COMPARTMENT LIGHT 1. Replace with a flat-head screwdriver. Open the trunk lid. HNF5032 HTB284 3.
HNF5031-A 2. Remove the luggage compartment light cover on the rear package tray panel with a new bulb. Disconnect the power cord. 4. DO-IT-YOURSELF MAINTENANCE 6 33 G270C01L-AAT LUGGAGE COMPARTMENT LIGHT 1. Replace with a flat-head screwdriver. Open the trunk lid. HNF5032 HTB284 3.
Owner's Manual
Page 248
Remove the plastic cover with a new bulb. G270G01NF 1. Replace with a flathead screwdriver. 1. Remove the plastic cover with a flathead screwdriver. 6 DO-IT-YOURSELFMAINTENANCE 34 G270G01L-AAT G270L01L-AAT INTERIOR LIGHT MAP LIGHT Screwdriver HNF5035 HNF5034 2.
Remove the plastic cover with a new bulb. G270G01NF 1. Replace with a flathead screwdriver. 1. Remove the plastic cover with a flathead screwdriver. 6 DO-IT-YOURSELFMAINTENANCE 34 G270G01L-AAT G270L01L-AAT INTERIOR LIGHT MAP LIGHT Screwdriver HNF5035 HNF5034 2.
Owner's Manual
Page 249
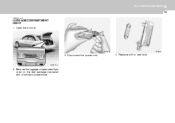
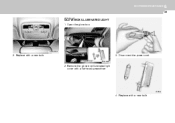
DO-IT-YOURSELF MAINTENANCE 6 35 G270K01L-AAT GLOVE BOX ILLUMINATED LIGHT 1. Screwdriver ONF078039 3. Disconnect the power cord. 2. Replace with a flat-head screwdriver. Remove the glove box illuminated light cover with a new bulb. HTB284 4. Replace with a new bulb. G270G02NF HJM5039 2. Open the glove box.
DO-IT-YOURSELF MAINTENANCE 6 35 G270K01L-AAT GLOVE BOX ILLUMINATED LIGHT 1. Screwdriver ONF078039 3. Disconnect the power cord. 2. Replace with a flat-head screwdriver. Remove the glove box illuminated light cover with a new bulb. HTB284 4. Replace with a new bulb. G270G02NF HJM5039 2. Open the glove box.
Owner's Manual
Page 250
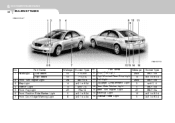
... 15 License Plate Light 5 Socket Type BAY 15d w2.1 x 9.5d BAY 15d sv6-7, 6 BAY 15d BAY 15s w2.1 x 9.5d w2.1 x 9.5d 6 DO-IT-YOURSELFMAINTENANCE 36 BULB WATTAGES G280A01NF-AAT G280A01NF-D No. 1 Headlight 2 3 4 5 6 7 Part Name Low beam High beam Front Turn Signal Light Map Light Interior Light Front Fog Light Front Position...
... 15 License Plate Light 5 Socket Type BAY 15d w2.1 x 9.5d BAY 15d sv6-7, 6 BAY 15d BAY 15s w2.1 x 9.5d w2.1 x 9.5d 6 DO-IT-YOURSELFMAINTENANCE 36 BULB WATTAGES G280A01NF-AAT G280A01NF-D No. 1 Headlight 2 3 4 5 6 7 Part Name Low beam High beam Front Turn Signal Light Map Light Interior Light Front Fog Light Front Position...
Owner's Manual
Page 283
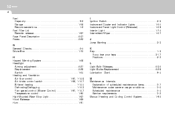
... Instrument Panel Light Control (Rheostat) ...1-69 Interior Light ...1-74 Intermittent Wiper ...1-67 J Jump Starting ...3-3 K Key ...1-3 If you lose your keys ...3-17 Positions ...2-3 L Light Bulb Watages ...6-36 Light Bulbs Replacement ...6-28 Lubrication Chart ...9-4 M Maintenance Intervals Explanation of scheduled maintenance items ...5-7 Maintenance under severe usage conditions ...5-6 Scheduled maintenance ...5-4 Service requirements ...5-2 Manual Heating and Cooling...
... Instrument Panel Light Control (Rheostat) ...1-69 Interior Light ...1-74 Intermittent Wiper ...1-67 J Jump Starting ...3-3 K Key ...1-3 If you lose your keys ...3-17 Positions ...2-3 L Light Bulb Watages ...6-36 Light Bulbs Replacement ...6-28 Lubrication Chart ...9-4 M Maintenance Intervals Explanation of scheduled maintenance items ...5-7 Maintenance under severe usage conditions ...5-6 Scheduled maintenance ...5-4 Service requirements ...5-2 Manual Heating and Cooling...


