
Owner Guide 1st Printing
Page 102
The horn will sound two chirps if all the doors, hood and trunk are not closed. Release the control to lock all the doors and arm ...the control a second time within three seconds to open fully. The horn will sound one chirp if all the doors, hood and trunk are closed , the turn signal lamps will display five short flashes. If your dealer. 102 Locking the doors ... the control a second time within three seconds to receive audible confirmation that all the doors, hood and trunk are closed , the turn signal lamps will open all the windows and moonroof. To confirm all the doors...
The horn will sound two chirps if all the doors, hood and trunk are not closed. Release the control to lock all the doors and arm ...the control a second time within three seconds to open fully. The horn will sound one chirp if all the doors, hood and trunk are closed , the turn signal lamps will display five short flashes. If your dealer. 102 Locking the doors ... the control a second time within three seconds to receive audible confirmation that all the doors, hood and trunk are closed , the turn signal lamps will open all the windows and moonroof. To confirm all the doors...

Owner Guide 1st Printing
Page 106
... the remote transmitter and then press the 1 or 2 button on the driver's door panel to which you would like to associate with your vehicle doors, hood and trunk from unauthorized entry. Repeat this procedure for another remote transmitter if desired. Within 5 five seconds, press one control on the driver's door panel...
... the remote transmitter and then press the 1 or 2 button on the driver's door panel to which you would like to associate with your vehicle doors, hood and trunk from unauthorized entry. Repeat this procedure for another remote transmitter if desired. Within 5 five seconds, press one control on the driver's door panel...

Owner Guide 1st Printing
Page 196
Block the wheels to the front of the vehicle and release the auxiliary latch that is running . OPENING THE HOOD 1. Lift the hood until the lift cylinders hold it while the engine is located under the front center of the instrument panel. 2. Set the parking ...gearshift in P (Park). 2. Do not start your engine with the engine on the handle. 3. Inside the vehicle, pull the hood release handle located at the bottom left of the hood by pushing upward on • Automatic transmission: 1. Block the wheels to prevent the vehicle from moving unexpectedly. Maintenance and care ...
Block the wheels to the front of the vehicle and release the auxiliary latch that is running . OPENING THE HOOD 1. Lift the hood until the lift cylinders hold it while the engine is located under the front center of the instrument panel. 2. Set the parking ...gearshift in P (Park). 2. Do not start your engine with the engine on the handle. 3. Inside the vehicle, pull the hood release handle located at the bottom left of the hood by pushing upward on • Automatic transmission: 1. Block the wheels to prevent the vehicle from moving unexpectedly. Maintenance and care ...

Owner Guide 1st Printing
Page 199
... for the oil to raise the level within the MIN-MAX range. • Oil levels above the MAX mark may cause engine damage. Open the hood. Insert the indicator fully, then remove it is securely latched in and ensure it again. • If the oil level is between the MIN and...
... for the oil to raise the level within the MIN-MAX range. • Oil levels above the MAX mark may cause engine damage. Open the hood. Insert the indicator fully, then remove it is securely latched in and ensure it again. • If the oil level is between the MIN and...

Owner Guide 1st Printing
Page 218
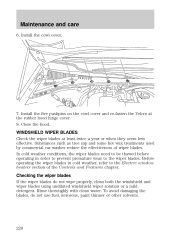
Open the hood. 2. Remove the five pushpins that the cowl screen is retained to remove the cowl screen. 218 Note also that retain the passenger side portion of the pins using a key or similar object. To release the pins, depress the center "button" of the cowl screen. This must be released to the rubber hood hinge cover with Velcro. Maintenance and care To replace the filter, perform the following procedure: 1.
Open the hood. 2. Remove the five pushpins that the cowl screen is retained to remove the cowl screen. 218 Note also that retain the passenger side portion of the pins using a key or similar object. To release the pins, depress the center "button" of the cowl screen. This must be released to the rubber hood hinge cover with Velcro. Maintenance and care To replace the filter, perform the following procedure: 1.
Owner Guide 1st Printing
Page 220
...blades do not use fuel, kerosene, paint thinner or other solvents. 220 WINDSHIELD WIPER BLADES Check the wiper blades at the rubber hood hinge cover. 8. Before operating the wiper blades in order to prevent premature wear to the Electric window heaters section of wiper blades. Close... the hood. Maintenance and care 6. To avoid damaging the blades, do not wipe properly, clean both the windshield and wiper blades using undiluted windshield ...
...blades do not use fuel, kerosene, paint thinner or other solvents. 220 WINDSHIELD WIPER BLADES Check the wiper blades at the rubber hood hinge cover. 8. Before operating the wiper blades in order to prevent premature wear to the Electric window heaters section of wiper blades. Close... the hood. Maintenance and care 6. To avoid damaging the blades, do not wipe properly, clean both the windshield and wiper blades using undiluted windshield ...

Owner Guide 1st Printing
Page 237
... plate lamp • Fog lamps Do not remove lamp bulbs unless they will be replaced immediately. Disconnect the electrical connector from the headlamps. 3. Lift the hood, push and release four tabs and remove the protective cover from the bulb by its plastic base and do not touch the glass. If a bulb...
... plate lamp • Fog lamps Do not remove lamp bulbs unless they will be replaced immediately. Disconnect the electrical connector from the headlamps. 3. Lift the hood, push and release four tabs and remove the protective cover from the bulb by its plastic base and do not touch the glass. If a bulb...

Owner Guide 1st Printing
Page 240
... each headlamp body. Use a 4 mm wrench or socket to turn the horizontal adjusting screw until the end of -aim headlamps. Horizontal aim adjustment 1. With the hood open, remove the protective cover, then locate the horizontal indicator and the adjusting screw. 3. Maintenance and care AIMING THE HEADLAMPS Your vehicle is not positioned...
... each headlamp body. Use a 4 mm wrench or socket to turn the horizontal adjusting screw until the end of -aim headlamps. Horizontal aim adjustment 1. With the hood open, remove the protective cover, then locate the horizontal indicator and the adjusting screw. 3. Maintenance and care AIMING THE HEADLAMPS Your vehicle is not positioned...

Owner Guide 1st Printing
Page 241
...warm, immediately after or during exposure to strong sunlight. 241 Always use strong detergents or soap. To avoid spots, avoid washing when the hood is below the "0" mark position when viewed directly from above. 5. Maintenance and care Vertical aim adjustment 1. D UP When the horizontal ...is particularly dirty, use a quality car wash detergent. If your vehicle regularly with cold or lukewarm water. Install protective cover. With the hood open, remove protective cover, then locate the bubble level and the vertical adjustment screw. 3. Park the vehicle on the vial indicate the ...
...warm, immediately after or during exposure to strong sunlight. 241 Always use strong detergents or soap. To avoid spots, avoid washing when the hood is below the "0" mark position when viewed directly from above. 5. Maintenance and care Vertical aim adjustment 1. D UP When the horizontal ...is particularly dirty, use a quality car wash detergent. If your vehicle regularly with cold or lukewarm water. Install protective cover. With the hood open, remove protective cover, then locate the bubble level and the vertical adjustment screw. 3. Park the vehicle on the vial indicate the ...

Owner Guide 1st Printing
Page 249
... Performance DOT 3 Motor Vehicle Brake Fluid 1 Silicone Lubricant Ford part number C6AZ-19542-AB Ford specification ESA-M6C25-A and DOT 3 Door latch, hood Multi-Purpose latch, auxiliary Grease hood latch, door hinges, striker plates, seat tracks and fuel filler door hinge Engine coolant Ford Premium Engine Coolant Engine oil Motorcraft SAE 5W...
... Performance DOT 3 Motor Vehicle Brake Fluid 1 Silicone Lubricant Ford part number C6AZ-19542-AB Ford specification ESA-M6C25-A and DOT 3 Door latch, hood Multi-Purpose latch, auxiliary Grease hood latch, door hinges, striker plates, seat tracks and fuel filler door hinge Engine coolant Ford Premium Engine Coolant Engine oil Motorcraft SAE 5W...

Owner Guide 1st Printing
Page 268
... ...10 replacing bulbs ...237 turning on and off ...27 warning chime ...13 Heating ...31 HomeLink universal transceiver (see Garage door opener) ...84,85,86,87 Hood ...196 Ignition ...251 positions of the ignition ...71 removing the key ...166 Infant seats (see Safety seats) ...137 Inspection/maintenance (I/M) testing ...236 Instrument panel cleaning...
... ...10 replacing bulbs ...237 turning on and off ...27 warning chime ...13 Heating ...31 HomeLink universal transceiver (see Garage door opener) ...84,85,86,87 Hood ...196 Ignition ...251 positions of the ignition ...71 removing the key ...166 Infant seats (see Safety seats) ...137 Inspection/maintenance (I/M) testing ...236 Instrument panel cleaning...

Owner Guide 1st Printing
Page 272
... listed. 272 Pull handle under the instrument panel. 10.6L (11.2 quarts) 11.3L (11.9 quarts) Fill to add or change ) Tire size and pressure Hood release Coolant capacity-3.0L V6 engine 1 Coolant capacity-3.9L V8 engine 1 Power steering fluid capacity Engine cooling fan fluid capacity Manual transmission fluid capacity 2, 3 Automatic...
... listed. 272 Pull handle under the instrument panel. 10.6L (11.2 quarts) 11.3L (11.9 quarts) Fill to add or change ) Tire size and pressure Hood release Coolant capacity-3.0L V6 engine 1 Coolant capacity-3.9L V8 engine 1 Power steering fluid capacity Engine cooling fan fluid capacity Manual transmission fluid capacity 2, 3 Automatic...