Owner Guide 2nd Printing
Page 61
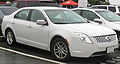
...the glass. The oil from snap strap attachment and position it to gain access path to break the next time the headlamps are operated. 61 2009 Milan (mln) Owners Guide, 2nd Printing USA (fus) Carefully pull bulb straight out of children's reach. WARNING: Handle a halogen headlamp bulb ... open the hood. 2. Grasp the bulb only by rotating it counterclockwise, then pulling it and pulling rearward. 5. Remove the protective cap/grill from the headlamp housing by grabbing it straight out of all the bulbs frequently. Lights Replacing exterior bulbs Check the operation of the lamp ...
...the glass. The oil from snap strap attachment and position it to gain access path to break the next time the headlamps are operated. 61 2009 Milan (mln) Owners Guide, 2nd Printing USA (fus) Carefully pull bulb straight out of children's reach. WARNING: Handle a halogen headlamp bulb ... open the hood. 2. Grasp the bulb only by rotating it counterclockwise, then pulling it and pulling rearward. 5. Remove the protective cap/grill from the headlamp housing by grabbing it straight out of all the bulbs frequently. Lights Replacing exterior bulbs Check the operation of the lamp ...
Owner Guide 2nd Printing
Page 62
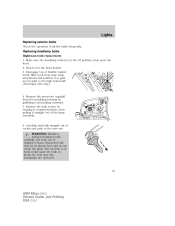
... sure the protective cap is in a clockwise direction (Driver side only). 3. Remove the vertical shield from the air filter assembly (Driver side only). 62 2009 Milan (mln) Owners Guide, 2nd Printing USA (fus) Tuck the two lead wires into the lamp assembly, hold the bulb socket at 15 degrees clockwise from... you changed the bulb, you should not need to the housing circular ring by reversing step 3 (Passenger side only). 13. Install the protective cap/grill to align it forward. 11. Use the two lead wires oriented up in the off position, then open the hood. 2. For ease of bulb ...
... sure the protective cap is in a clockwise direction (Driver side only). 3. Remove the vertical shield from the air filter assembly (Driver side only). 62 2009 Milan (mln) Owners Guide, 2nd Printing USA (fus) Tuck the two lead wires into the lamp assembly, hold the bulb socket at 15 degrees clockwise from... you changed the bulb, you should not need to the housing circular ring by reversing step 3 (Passenger side only). 13. Install the protective cap/grill to align it forward. 11. Use the two lead wires oriented up in the off position, then open the hood. 2. For ease of bulb ...

Owner Guide 2nd Printing
Page 63
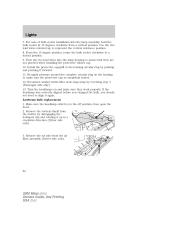
... the bulb (Passenger side only). 10. Let go of the bulb socket and leave it and pulling rearward. 7. Lights 4. Remove the protective cap/grill from the exterior wheel well area. Disconnect the electrical connector from the bulb socket and discard the old bulb socket. 11. From the exterior wheel... well area, reach arm through splash shield opening to the electrical connector. 63 2009 Milan (mln) Owners Guide, 2nd Printing USA (fus) Reach over the front bolster in the engine area and, with a tool if necessary, bring the...
... the bulb (Passenger side only). 10. Let go of the bulb socket and leave it and pulling rearward. 7. Lights 4. Remove the protective cap/grill from the exterior wheel well area. Disconnect the electrical connector from the bulb socket and discard the old bulb socket. 11. From the exterior wheel... well area, reach arm through splash shield opening to the electrical connector. 63 2009 Milan (mln) Owners Guide, 2nd Printing USA (fus) Reach over the front bolster in the engine area and, with a tool if necessary, bring the...

Owner Guide 2nd Printing
Page 64
...bulb (Passenger side only). 14. Reach over the front bolster. 3. After the new bulb is in a clockwise direction (Driver side only). 64 2009 Milan (mln) Owners Guide, 2nd Printing USA (fus) From the exterior wheel well area, reach arm through splash shield opening to locked position. 15.... switch is installed, carefully let the bulb socket dangle downward near the lamp housing (Passenger side only). 13. Install the protective cap/grill to the housing circular ring by aligning the indexing fingers, then rotate clockwise to install bulb socket with screw (Passenger side only). 18...
...bulb (Passenger side only). 14. Reach over the front bolster. 3. After the new bulb is in a clockwise direction (Driver side only). 64 2009 Milan (mln) Owners Guide, 2nd Printing USA (fus) From the exterior wheel well area, reach arm through splash shield opening to locked position. 15.... switch is installed, carefully let the bulb socket dangle downward near the lamp housing (Passenger side only). 13. Install the protective cap/grill to the housing circular ring by aligning the indexing fingers, then rotate clockwise to install bulb socket with screw (Passenger side only). 18...