

Owner's Manual
Page 11
Roof rack (P. 2-44) Vehicle loading (P. 9-13) Rear window and outside mirror (if so equipped) defroster switch (P. 2-27) Rear window washer (P. 2-26) Lift gate (P. 3-9) Spare tire (P. 6-2) Replacing bulbs (P. 8-27) Fuel-filler door (P. 3-10) Child safety rear door lock (P. 3-5) 4. 5. 6. 7. 8. 9. See the page number indicated in parentheses for operating details. WII0057 0-4 Illustrated table of contents EXTERIOR REAR 1. 2. 3.
Roof rack (P. 2-44) Vehicle loading (P. 9-13) Rear window and outside mirror (if so equipped) defroster switch (P. 2-27) Rear window washer (P. 2-26) Lift gate (P. 3-9) Spare tire (P. 6-2) Replacing bulbs (P. 8-27) Fuel-filler door (P. 3-10) Child safety rear door lock (P. 3-5) 4. 5. 6. 7. 8. 9. See the page number indicated in parentheses for operating details. WII0057 0-4 Illustrated table of contents EXTERIOR REAR 1. 2. 3.

Owner's Manual
Page 25
...toward a person. Slide the seat to carry longer objects, be sure this section. To return the front passenger's seat to a seating position, lift up to an upright position. Lift up on the recline lever, located on the seatback and push it up on the outside edge of the seat, and fold the... the seatback to a proper seating position. Secure objects away from the area in this cargo is released, it is in the fold-down position. Then lift up on the upper corner of the seatback to release the back of these areas by passengers could cause severe injury or even death. WARNING...
...toward a person. Slide the seat to carry longer objects, be sure this section. To return the front passenger's seat to a seating position, lift up to an upright position. Lift up on the recline lever, located on the seatback and push it up on the outside edge of the seat, and fold the... the seatback to a proper seating position. Secure objects away from the area in this cargo is released, it is in the fold-down position. Then lift up on the upper corner of the seatback to release the back of these areas by passengers could cause severe injury or even death. WARNING...

Owner's Manual
Page 27
... and supplemental restraint system Make sure to provide additional space when folding the 2nd row seatbacks flat. To remove the 2nd row bench seat cushions: 1. Lift up and fold each of the red release handles on the seat base toward the front of each seat cushion, to an upright position. Pull...
... and supplemental restraint system Make sure to provide additional space when folding the 2nd row seatbacks flat. To remove the 2nd row bench seat cushions: 1. Lift up and fold each of the red release handles on the seat base toward the front of each seat cushion, to an upright position. Pull...

Owner's Manual
Page 28
.... Use of the seat cushions down until they are not completely secured, passengers may be securely stored to prevent them from the seat base. 3. Then lift up on the bottom of these areas by passengers without proper restraints could cause personal injury. ● When returning the seatbacks to ride in the...
.... Use of the seat cushions down until they are not completely secured, passengers may be securely stored to prevent them from the seat base. 3. Then lift up on the bottom of these areas by passengers without proper restraints could cause personal injury. ● When returning the seatbacks to ride in the...

Owner's Manual
Page 118
... could come loose and cause personal injury. ● Properly secure all cargo with ropes or straps to secure cargo with the luggage board tethered to lift the luggage board. Secure any area of straps. WARNING WARNING Do not drive with ropes or other types of your vehicle is extremely dangerous to...
... could come loose and cause personal injury. ● Properly secure all cargo with ropes or straps to secure cargo with the luggage board tethered to lift the luggage board. Secure any area of straps. WARNING WARNING Do not drive with ropes or other types of your vehicle is extremely dangerous to...

Owner's Manual
Page 122
... rear). label (located on the roof rack. Use the Torxdriver provided in this manual. Tighten the crossbar adjusting screws with rope. 5. If you cannot comfortably lift the items onto the roof rack from the roof rack. Be careful that load is loosened, move the crossbar so the cargo can be positioned...
... rear). label (located on the roof rack. Use the Torxdriver provided in this manual. Tighten the crossbar adjusting screws with rope. 5. If you cannot comfortably lift the items onto the roof rack from the roof rack. Be careful that load is loosened, move the crossbar so the cargo can be positioned...

Owner's Manual
Page 123
Turn the handle counterclockwise. WARNING The lid should be closed . Open the lid. 2. Raise the lid. Lift the gear basket to reinstall. 5. LIC0869 LIC0870 To open the gear basket lid: 1 2 Gear basket (if so equipped) NOTE: Cargo in the gear basket must ...
Turn the handle counterclockwise. WARNING The lid should be closed . Open the lid. 2. Raise the lid. Lift the gear basket to reinstall. 5. LIC0869 LIC0870 To open the gear basket lid: 1 2 Gear basket (if so equipped) NOTE: Cargo in the gear basket must ...

Owner's Manual
Page 125
... the corresponding windows. WIC0343 WIC0874 LIC0410 Front passenger's power window switch The passenger's window switch operates only the corresponding passenger's window. To stop the window, lift the switch up while the window is depressed, only the driver's side window can be held.
... the corresponding windows. WIC0343 WIC0874 LIC0410 Front passenger's power window switch The passenger's window switch operates only the corresponding passenger's window. To stop the window, lift the switch up while the window is depressed, only the driver's side window can be held.

Owner's Manual
Page 127
MAP LIGHTS CARGO LIGHT LIC0790 LIC0590 To turn them off when the lift gate is illuminated. To operate, push the switch to the desired position. The light turns off , press the switches again. This could result in a discharged ... with the engine stopped. CAUTION Do not use for extended periods of door position or lock status. Normal (center) position: The light illuminates when the lift gate is opened. To turn the map lights on the overhead trim has a threeposition switch.
MAP LIGHTS CARGO LIGHT LIC0790 LIC0590 To turn them off when the lift gate is illuminated. To operate, push the switch to the desired position. The light turns off , press the switches again. This could result in a discharged ... with the engine stopped. CAUTION Do not use for extended periods of door position or lock status. Normal (center) position: The light illuminates when the lift gate is opened. To turn the map lights on the overhead trim has a threeposition switch.

Owner's Manual
Page 128
3 Pre-driving checks and adjustments Keys ...3-2 NISSAN Vehicle Immobilizer System keys ...3-2 Doors ...3-3 Locking with key...3-3 Locking with inside lock knob ...3-3 Locking with power door lock switch ...3-4 Automatic door locks ...3-4 Child safety rear door lock ...3-5 Remote keyless entry system ...3-5 How to use remote keyless entry system ...3-6 Hood ...3-9 Lift gate ...3-9 Fuel-filler door ...3-10 Opening...
3 Pre-driving checks and adjustments Keys ...3-2 NISSAN Vehicle Immobilizer System keys ...3-2 Doors ...3-3 Locking with key...3-3 Locking with inside lock knob ...3-3 Locking with power door lock switch ...3-4 Automatic door locks ...3-4 Child safety rear door lock ...3-5 Remote keyless entry system ...3-5 How to use remote keyless entry system ...3-6 Hood ...3-9 Lift gate ...3-9 Fuel-filler door ...3-10 Opening...

Owner's Manual
Page 136
... and adjustments 3-9 This could cause the hood to fly open and result in the "Starting and driving" section of the hood. 2 3 When closing the lift gate. See "Exhaust gas" in an accident. ● If you see steam or smoke coming from opening while driving. ● Do not drive with ... the hood lock release handle located below the driver's side instrument panel. This allows proper engagement of the hood to its original position. HOOD LIFT GATE WARNING ● Make sure the hood is completely closed securely to avoid injury do not open . The hood will spring up slightly.
... and adjustments 3-9 This could cause the hood to fly open and result in the "Starting and driving" section of the hood. 2 3 When closing the lift gate. See "Exhaust gas" in an accident. ● If you see steam or smoke coming from opening while driving. ● Do not drive with ... the hood lock release handle located below the driver's side instrument panel. This allows proper engagement of the hood to its original position. HOOD LIFT GATE WARNING ● Make sure the hood is completely closed securely to avoid injury do not open . The hood will spring up slightly.

Owner's Manual
Page 137
FUEL-FILLER DOOR ● Do not attempt to lock or unlock all doors including the lift gate simultaneously. To open . OPENING THE FUEL-FILLER LID Pull the lid to open the lift gate, pull up on the handle. It has a built-in safety valve needed for proper operation of serious injury or death... door lock system allows you to top off the fuel tank after the fuel pump nozzle shuts off automatically. To close, lower and push the lift gate down securely. FUEL-FILLER CAP WARNING ● Gasoline is misused or mishandled.
FUEL-FILLER DOOR ● Do not attempt to lock or unlock all doors including the lift gate simultaneously. To open . OPENING THE FUEL-FILLER LID Pull the lid to open the lift gate, pull up on the handle. It has a built-in safety valve needed for proper operation of serious injury or death... door lock system allows you to top off the fuel tank after the fuel pump nozzle shuts off automatically. To close, lower and push the lift gate down securely. FUEL-FILLER CAP WARNING ● Gasoline is misused or mishandled.

Owner's Manual
Page 197
... would normally require the assistance of the exhaust system. The vehicle is raised for any extended length of time. ● Keep the lift gate and rear windows closed while driving, otherwise exhaust gases could accidentally injure themselves or others alone in your vehicle. You have the...service. c. Carbon monoxide is an emission control device installed in a closed spaces such as dry grass, waste paper or rags. Also, on the lift gate or the body, follow these precautions: 1. EXHAUST GAS (carbon monoxide) WARNING ● Do not breathe exhaust gases; If you suspect that ...
... would normally require the assistance of the exhaust system. The vehicle is raised for any extended length of time. ● Keep the lift gate and rear windows closed while driving, otherwise exhaust gases could accidentally injure themselves or others alone in your vehicle. You have the...service. c. Carbon monoxide is an emission control device installed in a closed spaces such as dry grass, waste paper or rags. Also, on the lift gate or the body, follow these precautions: 1. EXHAUST GAS (carbon monoxide) WARNING ● Do not breathe exhaust gases; If you suspect that ...

Owner's Manual
Page 240
It may cause the This is on the vehicle to lift the vehicle. Fit the square end of the jack rod into the T-shaped opening of ...it is especially true with limited slip CAUTION Be sure to center the spare tire suspending plate on the wheel and then lift the spare tire. ● Do not allow passengers to stay in ● Use only the jack provided with your... the jack body and the following instructions. 1. Loosen each wheel nut one or two turns by the jack. for lifting only your specific vehicle model and jack type. Once the spare tire is off the ground. Do not remove the ...
It may cause the This is on the vehicle to lift the vehicle. Fit the square end of the jack rod into the T-shaped opening of ...it is especially true with limited slip CAUTION Be sure to center the spare tire suspending plate on the wheel and then lift the spare tire. ● Do not allow passengers to stay in ● Use only the jack provided with your... the jack body and the following instructions. 1. Loosen each wheel nut one or two turns by the jack. for lifting only your specific vehicle model and jack type. Once the spare tire is off the ground. Do not remove the ...

Owner's Manual
Page 241
Place the jack directly under the jack-up point as shown. 4. Carefully raise the vehicle until the tire clears the ground. 5. Remove the wheel nuts and then remove the tire. 6-6 In case of the frame. Install the assembled jack rod into the jack as illustrated so the top of the jack contacts the vehicle at the jack-up points are indicated by stamped arrows on firm and level ground. 3. WCE0154 LCE0087 2. The jack should be used on the side of emergency To lift the vehicle, securely hold the jack lever and rod. The front tire jack-up point.
Place the jack directly under the jack-up point as shown. 4. Carefully raise the vehicle until the tire clears the ground. 5. Remove the wheel nuts and then remove the tire. 6-6 In case of the frame. Install the assembled jack rod into the jack as illustrated so the top of the jack contacts the vehicle at the jack-up points are indicated by stamped arrows on firm and level ground. 3. WCE0154 LCE0087 2. The jack should be used on the side of emergency To lift the vehicle, securely hold the jack lever and rod. The front tire jack-up point.

Owner's Manual
Page 244
... battery (if so equipped). Replace the vent caps (if so equipped). CAUTION Do not keep the starter motor engaged for example, strut mounting bolt, engine lift bracket, etc.) - not to the battery. ● Make sure the jumper cables do not touch moving parts in the engine compartment and that the cable...
... battery (if so equipped). Replace the vent caps (if so equipped). CAUTION Do not keep the starter motor engaged for example, strut mounting bolt, engine lift bracket, etc.) - not to the battery. ● Make sure the jumper cables do not touch moving parts in the engine compartment and that the cable...

Owner's Manual
Page 246
.... If any of emergency 6-11 Incorrect towing equipment could damage your vehicle repaired at a NISSAN dealer. Local service operators are available from a NISSAN dealer. Add coolant to your vehicle, NISSAN recommends having a service operator tow your vehicle, all State (Provincial in Canada) and local...vehicle (RV), refer to have the service operator carefully read the following precautions: For information about towing your vehicle after it has been lifted by a tow truck. In case of these conditions apply, dollies or a flatbed tow truck must be used. ● Always attach...
.... If any of emergency 6-11 Incorrect towing equipment could damage your vehicle repaired at a NISSAN dealer. Local service operators are available from a NISSAN dealer. Add coolant to your vehicle, NISSAN recommends having a service operator tow your vehicle, all State (Provincial in Canada) and local...vehicle (RV), refer to have the service operator carefully read the following precautions: For information about towing your vehicle after it has been lifted by a tow truck. In case of these conditions apply, dollies or a flatbed tow truck must be used. ● Always attach...
Owner's Manual
Page 268
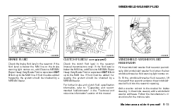
...up to the washer for the mixture ratio. Add windshield-washer fluid when the low windshield-washer fluid warning light comes on , add Genuine NISSAN Super Heavy Duty Brake Fluid or equivalent DOT 3 fluid up to "Capacities and recommended fuel/lubricants" in the "Technical and consumer information" ... the fluid level is below the MIN line or the brake warning light comes on . To fill the windshield-washer fluid reservoir, lift the cap off the reservoir and pour the windshieldwasher fluid into the reservoir opening. Follow the manufacturer's instructions for better cleaning. For further...
...up to the washer for the mixture ratio. Add windshield-washer fluid when the low windshield-washer fluid warning light comes on , add Genuine NISSAN Super Heavy Duty Brake Fluid or equivalent DOT 3 fluid up to "Capacities and recommended fuel/lubricants" in the "Technical and consumer information" ... the fluid level is below the MIN line or the brake warning light comes on . To fill the windshield-washer fluid reservoir, lift the cap off the reservoir and pour the windshieldwasher fluid into the reservoir opening. Follow the manufacturer's instructions for better cleaning. For further...

Owner's Manual
Page 275
... and release it until it with the windshield. Rotate wiper blade so the dimple is opened. ● Make sure the wiper blades contact the glass; 6. Lift the wiper arm away from wind pressure. Remove the wiper blade. 3 4. otherwise the arms may be careful not to its original position; Return the wiper...
... and release it until it with the windshield. Rotate wiper blade so the dimple is opened. ● Make sure the wiper blades contact the glass; 6. Lift the wiper arm away from wind pressure. Remove the wiper blade. 3 4. otherwise the arms may be careful not to its original position; Return the wiper...

Owner's Manual
Page 276
Insert a new blade onto the wiper arm and snap into place. 2 3 Maintenance and do-it-yourself 8-21 WDI0292 Rear window wiper blade 1 Lift the wiper arm away from the rear window. Push the wiper blade in and pivot until the blade becomes free.
Insert a new blade onto the wiper arm and snap into place. 2 3 Maintenance and do-it-yourself 8-21 WDI0292 Rear window wiper blade 1 Lift the wiper arm away from the rear window. Push the wiper blade in and pivot until the blade becomes free.
