

Owners Manual
Page 9
Indicator symbols on the instrument panel Brake system warning light *1 Seat belt reminder light*1 Headlight high beam indicator light Low oil pressure warning light*1 Malfunction indicator lamp*1 Overdrive-of f indicator light*2 "PWR" mode indicator light Automatic transmission second start indicator ...
Indicator symbols on the instrument panel Brake system warning light *1 Seat belt reminder light*1 Headlight high beam indicator light Low oil pressure warning light*1 Malfunction indicator lamp*1 Overdrive-of f indicator light*2 "PWR" mode indicator light Automatic transmission second start indicator ...

Owners Manual
Page 48
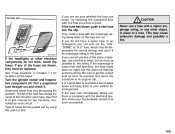
To use the vanity mirror, swing down the sun visor and open the cover. 42 Anti-glare mirror inside rear view Vanity mirrors Pull the lever toward you to the position with most clarity, push the day-night charge lever away from the headlights of the vehicle behind you (daylight driving position). Before adjusting the mirror to reduce glare from you during night driving. Remember that by reducing glare you open the cover. The vanity light comes on when you also lose some rear view clarity.
To use the vanity mirror, swing down the sun visor and open the cover. 42 Anti-glare mirror inside rear view Vanity mirrors Pull the lever toward you to the position with most clarity, push the day-night charge lever away from the headlights of the vehicle behind you (daylight driving position). Before adjusting the mirror to reduce glare from you during night driving. Remember that by reducing glare you open the cover. The vanity light comes on when you also lose some rear view clarity.

Owners Manual
Page 49
... the key to park for a long period when the engine is not running. Chapter 1-4 Lights, Wipers and Defogger S S S S S S S S S Headlight and turn signals Emergency flashers Instrument panel light control Ignition switch light Interior lights Personal light Windshield wipers and washer Rear window wiper and washer... Rear window defogger Headlights and turn off when the driver's door is off . The lights automatically turn signals NOTICE To prevent the battery from ...
... the key to park for a long period when the engine is not running. Chapter 1-4 Lights, Wipers and Defogger S S S S S S S S S Headlight and turn signals Emergency flashers Instrument panel light control Ignition switch light Interior lights Personal light Windshield wipers and washer Rear window wiper and washer... Rear window defogger Headlights and turn off when the driver's door is off . The lights automatically turn signals NOTICE To prevent the battery from ...

Owners Manual
Page 50
...drivers if your vehicle as possible. To turn signal light switch will flash. All the turn signal lever partway and holding it there. For the headlight flasher, pull it toward you . The turn signal is not running. 44 Always pull your vehicle must be in the conventional manner. For ... the instrument panel indicates high beam is off the road as far off . Turn on . Pull it further back. The headlight flasher works even when the headlight switch is on the emergency flashers to cancel it might be stopped where it by moving the turn signal lights will not work...
...drivers if your vehicle as possible. To turn signal light switch will flash. All the turn signal lever partway and holding it there. For the headlight flasher, pull it toward you . The turn signal is not running. 44 Always pull your vehicle must be in the conventional manner. For ... the instrument panel indicates high beam is off the road as far off . Turn on . Pull it further back. The headlight flasher works even when the headlight switch is on the emergency flashers to cancel it might be stopped where it by moving the turn signal lights will not work...

Owners Manual
Page 155
... should be in any latched position. See Chapter 7-2 for smooth operation and uneven pedal effort or catching. Lights Make sure the headlights, stop lights, tail lights, turn signal lights, and other lights are all brakes released. Steering wheel Be alert for smooth operation...Check the lock release button of all service reminder indicators and warning buzzers function properly. See Chapter 7-3 for proper and smooth operation. Check headlight aim. Seats Check that the latches lock securely. Washer fluid Make sure there is correct. See Chapter 7-3 for additional information. See ...
... should be in any latched position. See Chapter 7-2 for smooth operation and uneven pedal effort or catching. Lights Make sure the headlights, stop lights, tail lights, turn signal lights, and other lights are all brakes released. Steering wheel Be alert for smooth operation...Check the lock release button of all service reminder indicators and warning buzzers function properly. See Chapter 7-3 for proper and smooth operation. Check headlight aim. Seats Check that the latches lock securely. Washer fluid Make sure there is correct. See Chapter 7-3 for additional information. See ...

Owners Manual
Page 170
... wheel damage such as they may adversely affect handling, wheel and bearing life, brake cooling, speedometer/ odometer calibration, stopping ability, headlight aim, bumper height, vehicle ground clearance, and tire or snow chain clearance to the body and chassis. WHEEL SELECTION When replacing wheels... wheels are still tight after driving 1600 km (1000 miles). When balancing your Toyota dealer. Never use only Toyota balance weights or equivalent and a plastic or rubber hammer. Use only the Toyota wheel nuts and wrench designed for your aluminum wheels for a tubeless tire. As...
... wheel damage such as they may adversely affect handling, wheel and bearing life, brake cooling, speedometer/ odometer calibration, stopping ability, headlight aim, bumper height, vehicle ground clearance, and tire or snow chain clearance to the body and chassis. WHEEL SELECTION When replacing wheels... wheels are still tight after driving 1600 km (1000 miles). When balancing your Toyota dealer. Never use only Toyota balance weights or equivalent and a plastic or rubber hammer. Use only the Toyota wheel nuts and wrench designed for your aluminum wheels for a tubeless tire. As...

Owners Manual
Page 171
... medical attention immediately. Chapter 7-3 Electrical components S S S S S S S Checking battery condition Battery recharging precautions Checking and replacing fuses Checking the fusible links Adding washer fluid Checking the headlight aim Replacing light bulbs Checking battery condition- -Precautions ! CAUTION BATTERY PRECAUTIONS The battery produces flammable and explosive hydrogen gas. S Avoid contact with milk of magnesia...
... medical attention immediately. Chapter 7-3 Electrical components S S S S S S S Checking battery condition Battery recharging precautions Checking and replacing fuses Checking the fusible links Adding washer fluid Checking the headlight aim Replacing light bulbs Checking battery condition- -Precautions ! CAUTION BATTERY PRECAUTIONS The battery produces flammable and explosive hydrogen gas. S Avoid contact with milk of magnesia...
Owners Manual
Page 175
... with the amperage rating designated on the fuse box lid. If the new fuse immediately blows out, there is good. If the headlights or other object, in your Toyota dealer correct it as soon as possible and return the substitute to its amperage rating is lower, but this manual for each circuit...
... with the amperage rating designated on the fuse box lid. If the new fuse immediately blows out, there is good. If the headlights or other object, in your Toyota dealer correct it as soon as possible and return the substitute to its amperage rating is lower, but this manual for each circuit...

Owners Manual
Page 176
... the manufacturer's directions for a driving (with water. If any of electrical overload determined and repaired by your Toyota dealer. Do not use washer fluid containing antifreeze. Before checking the headlight aim: 1. You may use a genuine Toyota fusible link or equivalent for a temporary fix. This product is not deformed. 2. If there is an overload...
... the manufacturer's directions for a driving (with water. If any of electrical overload determined and repaired by your Toyota dealer. Do not use washer fluid containing antifreeze. Before checking the headlight aim: 1. You may use a genuine Toyota fusible link or equivalent for a temporary fix. This product is not deformed. 2. If there is an overload...

Owners Manual
Page 177
... and require special handling. Do not touch the glass part of a bulb with the wattage ratings given in the table. ! To check the headlight aim, check the vertical and horizontal gauges. 1. The bubble of the gauge should not deviate by more than one mark on either side of ... the beam angle gauge (horizontal movement). If the error is over the value specified above, take the vehicle to your Toyota dealer to the bulbs. Light bulbs Headlights (inner) Headlights (outer) Front turn signal lights Parking and front side marker lights Rear side marker lights Rear turn signal lights Stop and...
... and require special handling. Do not touch the glass part of a bulb with the wattage ratings given in the table. ! To check the headlight aim, check the vertical and horizontal gauges. 1. The bubble of the gauge should not deviate by more than one mark on either side of ... the beam angle gauge (horizontal movement). If the error is over the value specified above, take the vehicle to your Toyota dealer to the bulbs. Light bulbs Headlights (inner) Headlights (outer) Front turn signal lights Parking and front side marker lights Rear side marker lights Rear turn signal lights Stop and...

Owners Manual
Page 178
... Turn the bulb counterclockwise on the socket and remove the bulb. When aiming adjustment is tight, wiggle it. -Headlight bulbs Light bulbs License plate lights Interior lights Personal light Glovebox light Luggage compartment light Door courtesy light Vanity lights ... B: HB3 halogen bulbs C: Single end bulbs D: Wedge base bulbs E: Double end bulbs 1. If the connector is necessary, contact your Toyota dealer. 172 b. RIGHT-HAND HEADLIGHT: Remove the engine coolant reservoir. Aiming is not necessary after replacing the bulb. Install a new bulb and insert the connector. To install...
... Turn the bulb counterclockwise on the socket and remove the bulb. When aiming adjustment is tight, wiggle it. -Headlight bulbs Light bulbs License plate lights Interior lights Personal light Glovebox light Luggage compartment light Door courtesy light Vanity lights ... B: HB3 halogen bulbs C: Single end bulbs D: Wedge base bulbs E: Double end bulbs 1. If the connector is necessary, contact your Toyota dealer. 172 b. RIGHT-HAND HEADLIGHT: Remove the engine coolant reservoir. Aiming is not necessary after replacing the bulb. Install a new bulb and insert the connector. To install...

Owners Manual
Page 187
...injection system 17. HAZ-HORN 15 A: Emergency flashers, horns 21. Fuses (type C) 24. DIFF 30 A: Differential lock system 15. HEAD (RH) 15 A: Right-hand headlights 19. ABS 60 A: Anti-lock brake system 181 AM 1 50 A: All components in "CIG", "WIPER", "GAUGE", "TURN", "ECU-IG", "REAR-HTR", "...tape player, power antenna, vanity lights Fuses (type B) 22. CHARGE 7.5 A: Charging system, discharge warning light 16. HEAD (LH) 15 A: Left-hand headlights 20. FL HEATER 40 A: Air conditioning system 23. CDS-FAN 20 A: No circuit 18. FL POWER 30 A: Power windows, power door lock system, electric...
...injection system 17. HAZ-HORN 15 A: Emergency flashers, horns 21. Fuses (type C) 24. DIFF 30 A: Differential lock system 15. HEAD (RH) 15 A: Right-hand headlights 19. ABS 60 A: Anti-lock brake system 181 AM 1 50 A: All components in "CIG", "WIPER", "GAUGE", "TURN", "ECU-IG", "REAR-HTR", "...tape player, power antenna, vanity lights Fuses (type B) 22. CHARGE 7.5 A: Charging system, discharge warning light 16. HEAD (LH) 15 A: Left-hand headlights 20. FL HEATER 40 A: Air conditioning system 23. CDS-FAN 20 A: No circuit 18. FL POWER 30 A: Power windows, power door lock system, electric...

