

Operation Guide
Page 1
After reading, store them in a safe place for purchasing this projector. The meanings of these manuals to incorrect handling. S15/X15 Multimedia Projector Operator's Guide Thank you for future reference. About this manual Various symbols are trademarks of the Video Electronics Standard Association. • Windows is a registered trademark ...
After reading, store them in a safe place for purchasing this projector. The meanings of these manuals to incorrect handling. S15/X15 Multimedia Projector Operator's Guide Thank you for future reference. About this manual Various symbols are trademarks of the Video Electronics Standard Association. • Windows is a registered trademark ...

Operation Guide
Page 2
.... . 22 Accessories 54 Using the menu function 22 Technical(English only) (Please see the end of this manual 1 EASY MENU 25 Contents 2 Projector features 3 Aspect, Zoom, Keystone, Mode, Bright, Contrast, Color, Tint, Sharpness, Whisper, Mirror, Reset, About contents of package . . ...3 Filter time, Language, Part names 4 Go to advanced menu Projector 4 PICTURE menu 27 Controls 5 Bright, Contrast, Gamma, Color temp, Remote control 5 Color, Tint, Sharpness, Progressive, Preparations 6 Fastening the ...
.... . 22 Accessories 54 Using the menu function 22 Technical(English only) (Please see the end of this manual 1 EASY MENU 25 Contents 2 Projector features 3 Aspect, Zoom, Keystone, Mode, Bright, Contrast, Color, Tint, Sharpness, Whisper, Mirror, Reset, About contents of package . . ...3 Filter time, Language, Part names 4 Go to advanced menu Projector 4 PICTURE menu 27 Controls 5 Bright, Contrast, Gamma, Color temp, Remote control 5 Color, Tint, Sharpness, Progressive, Preparations 6 Fastening the ...

Operation Guide
Page 3
...SEARCH ASPECT AUTO BLANK MAGNIFY ON OFF FREEZE POSITION VOLUME MUTE KEYSTONE ZOOM -+ MENU ESC ENTER RESET Remote control (with two AA batteries) S15/X15 VGA cable Power cord (US, UK, EUROPE) Operator's Guide Product SafetyGuide Quick Start Guide Warranty Filter cover (for the lens part...gets a large image from short distance. High Brightness Newly developed 165W UHB (Ultra High Brightness) lamp gives you want. For moving the projector, be still kept as NTSC / PAL / SECAM video signals onto a screen. The image can be sure to realize quieter operation. It requires ...
...SEARCH ASPECT AUTO BLANK MAGNIFY ON OFF FREEZE POSITION VOLUME MUTE KEYSTONE ZOOM -+ MENU ESC ENTER RESET Remote control (with two AA batteries) S15/X15 VGA cable Power cord (US, UK, EUROPE) Operator's Guide Product SafetyGuide Quick Start Guide Warranty Filter cover (for the lens part...gets a large image from short distance. High Brightness Newly developed 165W UHB (Ultra High Brightness) lamp gives you want. For moving the projector, be still kept as NTSC / PAL / SECAM video signals onto a screen. The image can be sure to realize quieter operation. It requires ...

Operation Guide
Page 4
Part names Part names Projector Vent (10) Lens (16, 45) Lens cover (6, 16) Front-Right side Focus ring (19) Remote sensor (8) Speaker Elevator button (...
Part names Part names Projector Vent (10) Lens (16, 45) Lens cover (6, 16) Front-Right side Focus ring (19) Remote sensor (8) Speaker Elevator button (...
Operation Guide
Page 6
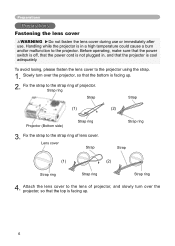
...cool adequately. Before operating, make sure that the power switch is off, that the projector is not plugged in a high temperature could cause a burn and/or malfunction to the projector. Strap ring Strap Strap (1) (2) Projector (Bottom side) Strap ring 3. Lens cover Strap Strap ring Strap (1) (2) Strap ring...the bottom is facing up . 2. Attach the lens cover to the strap ring of lens cover. Fix the strap to the projector using the strap. 1. Preparations Preparations Fastening the lens cover WARNING ►Do not fasten the lens cover during use or immediately...
...cool adequately. Before operating, make sure that the power switch is off, that the projector is not plugged in a high temperature could cause a burn and/or malfunction to the projector. Strap ring Strap Strap (1) (2) Projector (Bottom side) Strap ring 3. Lens cover Strap Strap ring Strap (1) (2) Strap ring...the bottom is facing up . 2. Attach the lens cover to the strap ring of lens cover. Fix the strap to the projector using the strap. 1. Preparations Preparations Fastening the lens cover WARNING ►Do not fasten the lens cover during use or immediately...
Operation Guide
Page 8
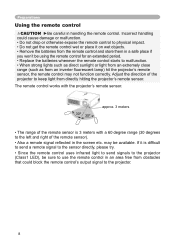
... to send a remote signal to the sensor directly, please try. • Since the remote control uses infrared light to send signals to the projector (Class1 LED), be available. may not function correctly. Preparations Using the remote control CAUTION ►Be careful in an area free from obstacles that...8226; When strong lights such as direct sunlight or light from an extremely close range (such as from an inverter fluorescent lamp) hit the projector's remote sensor, the remote control may be sure to use the remote control in handling the remote control. If it on wet objects. •...
... to send a remote signal to the sensor directly, please try. • Since the remote control uses infrared light to send signals to the projector (Class1 LED), be available. may not function correctly. Preparations Using the remote control CAUTION ►Be careful in an area free from obstacles that...8226; When strong lights such as direct sunlight or light from an extremely close range (such as from an inverter fluorescent lamp) hit the projector's remote sensor, the remote control may be sure to use the remote control in handling the remote control. If it on wet objects. •...

Operation Guide
Page 9
... Please change in a high temperature could cause a burn and/or malfunction to the projector. Filter cover's knob Air filter's knob 3. When the projector is placed lens-side up, hold the projector. 2. While the projector is installed bottom up, please use the accessory filter cover for bottom-up .... than usual filter cover, to fall. Set a new or cleaned air filter to the projector's ports. Disconnect all the connectors and adapters that the projector is facing up use. Interlocking the tabs, snap the filter cover for bottom-up use WARNING &#...
... Please change in a high temperature could cause a burn and/or malfunction to the projector. Filter cover's knob Air filter's knob 3. When the projector is placed lens-side up, hold the projector. 2. While the projector is installed bottom up, please use the accessory filter cover for bottom-up .... than usual filter cover, to fall. Set a new or cleaned air filter to the projector's ports. Disconnect all the connectors and adapters that the projector is facing up use. Interlocking the tabs, snap the filter cover for bottom-up use WARNING &#...

Operation Guide
Page 10
...bottom of the air filter. • For the projector installed bottom-up, use . The high temperature of the projector could cause a fire, an electric shock and/or malfunction to the projector. • Don't place the projector near a humidifier, a smoking space or a ... nothing containing the liquid near the projector. ►Adjust the direction of the projector to keep light from directly hitting the projector's remote sensor. 10 Damping the projector or inserting liquid in the projector could cause an injury and/or damage to the projector. CAUTION ►Avoid a smoky,...
...bottom of the air filter. • For the projector installed bottom-up, use . The high temperature of the projector could cause a fire, an electric shock and/or malfunction to the projector. • Don't place the projector near a humidifier, a smoking space or a ... nothing containing the liquid near the projector. ►Adjust the direction of the projector to keep light from directly hitting the projector's remote sensor. 10 Damping the projector or inserting liquid in the projector could cause an injury and/or damage to the projector. CAUTION ►Avoid a smoky,...
Operation Guide
Page 12
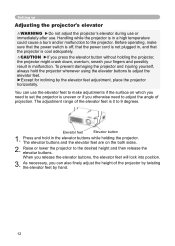
... of projection. The elevator buttons and the elevator feet are on which you need to set the projector is uneven or if you press the elevator button without holding the projector. Handling while the projector is in malfunction. As necessary, you release the elevator buttons, the elevator feet will lock into ...range of the elevator feet is 0 to the desired height and then release the elevator buttons. When you can use . Press and hold the projector whenever using the elevator buttons to adjust the elevator feet. ►Except for inclining by hand. 12 Setting up Adjusting the...
... of projection. The elevator buttons and the elevator feet are on which you need to set the projector is uneven or if you press the elevator button without holding the projector. Handling while the projector is in malfunction. As necessary, you release the elevator buttons, the elevator feet will lock into ...range of the elevator feet is 0 to the desired height and then release the elevator buttons. When you can use . Press and hold the projector whenever using the elevator buttons to adjust the elevator feet. ►Except for inclining by hand. 12 Setting up Adjusting the...

Operation Guide
Page 13
... all devices prior to connecting them to simultaneous LCD and CRT display). NOTE • Whenever attempting to connect a laptop computer to the projector, be used with VESA DDC 2B. display devices). Use of some of connection is attempted. • Please use other type of these... adjust function may take advantage of the computer, its operating system and peripheral equipment (i.e. Attempting to connect a live device to the projector may generate extremely loud noises or other abnormalities that you may not be able to see a check box to change the resolution. Plug...
... all devices prior to connecting them to simultaneous LCD and CRT display). NOTE • Whenever attempting to connect a laptop computer to the projector, be used with VESA DDC 2B. display devices). Use of some of connection is attempted. • Please use other type of these... adjust function may take advantage of the computer, its operating system and peripheral equipment (i.e. Attempting to connect a live device to the projector may generate extremely loud noises or other abnormalities that you may not be able to see a check box to change the resolution. Plug...
Operation Guide
Page 15
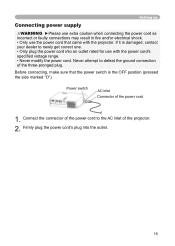
... incorrect or faulty connections may result in fire and/or electrical shock. • Only use with the projector. Power switch AC inlet Connector of the three-pronged plug. Connect the connector of the projector. 2. Before connecting, make sure that came with the power cord's specified voltage range. • Never...
... incorrect or faulty connections may result in fire and/or electrical shock. • Only use with the projector. Power switch AC inlet Connector of the three-pronged plug. Connect the connector of the projector. 2. Before connecting, make sure that came with the power cord's specified voltage range. • Never...

Operation Guide
Page 16
... VOLUME MUTE KEYSTONE ZOOM -+ MENU ESC ENTER RESET STANDBY/ON button LAMP TEMP POWER INPUT MENU STANDBY/ON POWER indicator Power switch 1. The projector lamp will light up and the POWER indicator will light to the ON position. POWER (Blinking green) POWER (Solid green) To display the... picture, select an input signal according to the projector and outlet. 2. POWER (Solid orange) 3. Open the lens cover, and set the power switch to solid orange. Power on/off Power on...
... VOLUME MUTE KEYSTONE ZOOM -+ MENU ESC ENTER RESET STANDBY/ON button LAMP TEMP POWER INPUT MENU STANDBY/ON POWER indicator Power switch 1. The projector lamp will light up and the POWER indicator will light to the ON position. POWER (Blinking green) POWER (Solid green) To display the... picture, select an input signal according to the projector and outlet. 2. POWER (Solid orange) 3. Open the lens cover, and set the power switch to solid orange. Power on/off Power on...

Operation Guide
Page 17
... making sure that the power indicator lights to solid orange, set the power switch to the OFF position. Press the STANDBY/ON button on the projector or remote control again while the message is green or blinking. POWER (Blinking orange) POWER (Solid orange) 3. Do not set the power switch...power cord until the procedure is completed. The message "Power off with a power failure or the restart switch, before turning on again, make the projector cool down at least 10 minutes without operating. 1. Make sure that the power indicator lights to solid orange, set the power switch to the ...
... making sure that the power indicator lights to solid orange, set the power switch to the OFF position. Press the STANDBY/ON button on the projector or remote control again while the message is green or blinking. POWER (Blinking orange) POWER (Solid orange) 3. Do not set the power switch...power cord until the procedure is completed. The message "Power off with a power failure or the restart switch, before turning on again, make the projector cool down at least 10 minutes without operating. 1. Make sure that the power indicator lights to solid orange, set the power switch to the ...
Operation Guide
Page 18
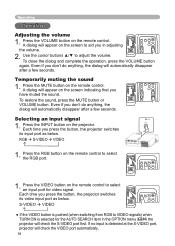
... muting the sound 1. A dialog will check the VIDEO port automatically. Even if you in the OPTION menu (38) POSITION theMENU projector will automatically disappear ENTER after a few seconds. VIDEO STANDBY/ON RGB SEARCH ASPECT AUTO BLANK MAGNIFY ON OFF FREEZE POSITION VOLUME MUTE KEYSTONE ...If the VIDEO button is pushed (when switching from RGB to VIDEO signals) whenZOOM - + TURN ON is detected at the S-VIDEOENTER port, projector will appear on the screen indicating that you don't do anything , the dialog will check the S-VIDEO port first. If no ...
... muting the sound 1. A dialog will check the VIDEO port automatically. Even if you in the OPTION menu (38) POSITION theMENU projector will automatically disappear ENTER after a few seconds. VIDEO STANDBY/ON RGB SEARCH ASPECT AUTO BLANK MAGNIFY ON OFF FREEZE POSITION VOLUME MUTE KEYSTONE ...If the VIDEO button is pushed (when switching from RGB to VIDEO signals) whenZOOM - + TURN ON is detected at the S-VIDEOENTER port, projector will appear on the screen indicating that you don't do anything , the dialog will check the S-VIDEO port first. If no ...
Operation Guide
Page 19
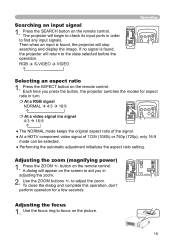
...ON OFF FREEZE POSITION VOLUME MUTE KEYSTONE ZOOM -+ MENU ESC ENTER RESET Adjusting the focus 1. Then when an input is found , the projector will return to the state selected before the operation. Use the ZOOM buttons +/- To close the dialog and complete this operation, don't ...aspect ratio in turn. At a RGB signal NORMAL 4:3 16:9 At a video signal /no signal is found , the projector will stop searching and display the image. Use the focus ring to find any input signals. If no signal 4:3 16:9 VIDEO STANDBY/ON...
...ON OFF FREEZE POSITION VOLUME MUTE KEYSTONE ZOOM -+ MENU ESC ENTER RESET Adjusting the focus 1. Then when an input is found , the projector will return to the state selected before the operation. Use the ZOOM buttons +/- To close the dialog and complete this operation, don't ...aspect ratio in turn. At a RGB signal NORMAL 4:3 16:9 At a video signal /no signal is found , the projector will stop searching and display the image. Use the focus ring to find any input signals. If no signal 4:3 16:9 VIDEO STANDBY/ON...
Operation Guide
Page 21
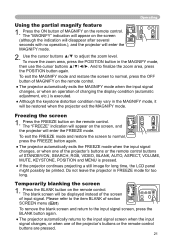
... the cursor buttons ▲/▼ to finalize the zoom area, press the POSITION button again. POSITION ZOOM -+ MENU ● The projector automatically returns to normal, press the OFF button of MAGNIFY on the remote control. The "FREEZE" indication will appear on the screen (although the...mode, then use the cursor buttons And to adjust the zoom level. The "MAGNIFY" indication will appear on the screen, and the projector will enter the MAGNIFY mode. VIDEO STANDBY/ON RGB SEARCH ASPECT AUTO BLANK MAGNIFY ON OFF FREEZE POSITION VOLUME MUTE KEYSTONE ZOOM -+ MENU...
... the cursor buttons ▲/▼ to finalize the zoom area, press the POSITION button again. POSITION ZOOM -+ MENU ● The projector automatically returns to normal, press the OFF button of MAGNIFY on the remote control. The "FREEZE" indication will appear on the screen (although the...mode, then use the cursor buttons And to adjust the zoom level. The "MAGNIFY" indication will appear on the screen, and the projector will enter the MAGNIFY mode. VIDEO STANDBY/ON RGB SEARCH ASPECT AUTO BLANK MAGNIFY ON OFF FREEZE POSITION VOLUME MUTE KEYSTONE ZOOM -+ MENU...

Operation Guide
Page 22
... correctly with some menu is operated using the OFF same methods. Each of these menus are asLAMP follows. The basic operations of choices on the projector. FREEZE KEYSTONE TEMP POWER VIDEO STANDBY/ON RGB SEARCH ASPECT AUTO BLANK MAGNIFY ON OFF FREEZE POSITION VOLUME MUTE KEYSTONE ZOOM -+ MENU ESC ENTER RESET... TURN OFF MY MEMORY SAVE 1 Advanced MENU EASY MENU EASY MENU 22 VIDEO RGB SEARCH ASPECT AUTO BLANK Using the menu function MAGNIFY VOLUME This projector haONs the following menus: PICTURE, IMAGE, INPUT, SETUP, SCREEN, OPTION and EAMUSTE Y MENU.
... correctly with some menu is operated using the OFF same methods. Each of these menus are asLAMP follows. The basic operations of choices on the projector. FREEZE KEYSTONE TEMP POWER VIDEO STANDBY/ON RGB SEARCH ASPECT AUTO BLANK MAGNIFY ON OFF FREEZE POSITION VOLUME MUTE KEYSTONE ZOOM -+ MENU ESC ENTER RESET... TURN OFF MY MEMORY SAVE 1 Advanced MENU EASY MENU EASY MENU 22 VIDEO RGB SEARCH ASPECT AUTO BLANK Using the menu function MAGNIFY VOLUME This projector haONs the following menus: PICTURE, IMAGE, INPUT, SETUP, SCREEN, OPTION and EAMUSTE Y MENU.
Operation Guide
Page 25
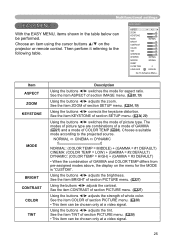
... buttons ◄/► adjusts the zoom. See the item COLOR of GAMMA and COLOR TEMP differs from pre-assigned modes above, the display on the projector or remote control. See the item ASPECT of section SETUP menu. (34, 19) Using the buttons ◄/► corrects the keystone distortion. Choose an...
... buttons ◄/► adjusts the zoom. See the item COLOR of GAMMA and COLOR TEMP differs from pre-assigned modes above, the display on the projector or remote control. See the item ASPECT of section SETUP menu. (34, 19) Using the buttons ◄/► corrects the keystone distortion. Choose an...
Operation Guide
Page 27
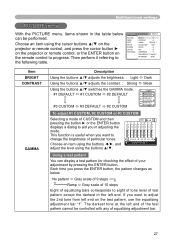
... an item using the buttons ◄/►, and adjust the level using the cursor buttons ▲/▼ on the projector or remote control, and press the cursor button ► on the projector or remote control, or the ENTER button on the test pattern, use the equalizing adjustment bar "1". Each time you in...
... an item using the buttons ◄/►, and adjust the level using the cursor buttons ▲/▼ on the projector or remote control, and press the cursor button ► on the projector or remote control, or the ENTER button on the test pattern, use the equalizing adjustment bar "1". Each time you in...
Operation Guide
Page 29
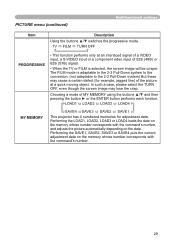
...; This function performs only at a quick moving object. LOAD1 LOAD2 LOAD3 LOAD4 MY MEMORY SAVE4 SAVE3 SAVE2 SAVE1 This projector has 4 numbered memories for example, jagged line) of the picture at an interlaced signal of a VIDEO input, a S-VIDEO input or a component video input of MY...
...; This function performs only at a quick moving object. LOAD1 LOAD2 LOAD3 LOAD4 MY MEMORY SAVE4 SAVE3 SAVE2 SAVE1 This projector has 4 numbered memories for example, jagged line) of the picture at an interlaced signal of a VIDEO input, a S-VIDEO input or a component video input of MY...


