
Operation Guide
Page 2
... contents of package . . 3 Filter time, Language, Part names 4 Go to advanced menu Projector 4 PICTURE menu 27 Controls 5 Bright, Contrast, Gamma, Color temp, Remote control 5 Color, Tint, Sharpness, Progressive, Preparations 6 Fastening the lens cover 6 Putting batteries 7 Using the remote control 8 About the filter cover for machine defects . . . . 50 Freezing the screen 21 Specifications...
... contents of package . . 3 Filter time, Language, Part names 4 Go to advanced menu Projector 4 PICTURE menu 27 Controls 5 Bright, Contrast, Gamma, Color temp, Remote control 5 Color, Tint, Sharpness, Progressive, Preparations 6 Fastening the lens cover 6 Putting batteries 7 Using the remote control 8 About the filter cover for machine defects . . . . 50 Freezing the screen 21 Specifications...

Operation Guide
Page 3
... Lens cover) VIDEO STANDBY/ON RGB SEARCH ASPECT AUTO BLANK MAGNIFY ON OFF FREEZE POSITION VOLUME MUTE KEYSTONE ZOOM -+ MENU ESC ENTER RESET Remote control (with two AA batteries) S15/X15 VGA cable Power cord (US, UK, EUROPE) Operator's Guide Product SafetyGuide Quick Start Guide Warranty Filter cover (for reducing acoustic noise to...
... Lens cover) VIDEO STANDBY/ON RGB SEARCH ASPECT AUTO BLANK MAGNIFY ON OFF FREEZE POSITION VOLUME MUTE KEYSTONE ZOOM -+ MENU ESC ENTER RESET Remote control (with two AA batteries) S15/X15 VGA cable Power cord (US, UK, EUROPE) Operator's Guide Product SafetyGuide Quick Start Guide Warranty Filter cover (for reducing acoustic noise to...

Operation Guide
Page 5
..., 17, 48) INPUT button (18) Cursor buttons 18~40) STANDBY/ON button (16, 17) LAMP TEMP POWER INPUT MENU STANDBY/ON Part names Remote control SEARCH button (19) RGB button (18) VIDEO button (18) ASPECT button (19) MAGNIFY ON button (21) OFF button (21...
..., 17, 48) INPUT button (18) Cursor buttons 18~40) STANDBY/ON button (16, 17) LAMP TEMP POWER INPUT MENU STANDBY/ON Part names Remote control SEARCH button (19) RGB button (18) VIDEO button (18) ASPECT button (19) MAGNIFY ON button (21) OFF button (21...

Operation Guide
Page 7
... • Do not recharge, short circuit, solder or disassemble a battery. • Do not allow a battery in . To use the remote control, please load the batteries. Remove the battery cover. Replace the battery cover in the direction of the surrounding environment. • Be sure to...their plus and minus terminals are correctly aligned when loading a battery. • Keep a battery away from the remote control and store them only as indicated in the remote control. 3. Close the battery cover. Improper use may result in battery explosion, cracking or leakage, which could result ...
... • Do not recharge, short circuit, solder or disassemble a battery. • Do not allow a battery in . To use the remote control, please load the batteries. Remove the battery cover. Replace the battery cover in the direction of the surrounding environment. • Be sure to...their plus and minus terminals are correctly aligned when loading a battery. • Keep a battery away from the remote control and store them only as indicated in the remote control. 3. Close the battery cover. Improper use may result in battery explosion, cracking or leakage, which could result ...
Operation Guide
Page 8
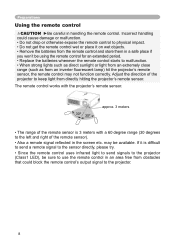
... reflected in an area free from obstacles that could cause damage or malfunction. • Do not drop or otherwise expose the remote control to the projector. 8 If it is 3 meters with a 60 degree range (30 degrees to the left and right of the projector ...to keep light from an inverter fluorescent lamp) hit the projector's remote sensor, the remote control may be using the remote control for an extended period. • Replace the batteries whenever the remote control starts to malfunction. • When strong lights such as direct sunlight or light from an...
... reflected in an area free from obstacles that could cause damage or malfunction. • Do not drop or otherwise expose the remote control to the projector. 8 If it is 3 meters with a 60 degree range (30 degrees to the left and right of the projector ...to keep light from an inverter fluorescent lamp) hit the projector's remote sensor, the remote control may be using the remote control for an extended period. • Replace the batteries whenever the remote control starts to malfunction. • When strong lights such as direct sunlight or light from an...

Operation Guide
Page 16
... cord is emitted. Then wait several seconds because buttons may not function for these several seconds. When the power is completely on the projector or remote control.
... cord is emitted. Then wait several seconds because buttons may not function for these several seconds. When the power is completely on the projector or remote control.

Operation Guide
Page 17
...the OFF position while the POWER indicator is complete. The message "Power off ? 2. Then the POWER indicator will appear on the projector or remote control. Make sure that the power indicator lights to solid orange, set the power switch to the OFF position. In such a case, please ...(Solid orange) 3. will stop blinking and light to be used for approximately 5 seconds. Press the STANDBY/ON button on the projector or remote control again while the message is not to solid orange when the lamp cooling is green or blinking. For safety purposes, disconnect the power cord if...
...the OFF position while the POWER indicator is complete. The message "Power off ? 2. Then the POWER indicator will appear on the projector or remote control. Make sure that the power indicator lights to solid orange, set the power switch to the OFF position. In such a case, please ...(Solid orange) 3. will stop blinking and light to be used for approximately 5 seconds. Press the STANDBY/ON button on the projector or remote control again while the message is not to solid orange when the lamp cooling is green or blinking. For safety purposes, disconnect the power cord if...
Operation Guide
Page 18
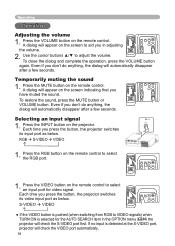
...port as below . Each time you have muted the sound. A dialog will appear on the remote control. Press the RGB button on the remote control. Press the VOLUME button on the remote control to VIDEO signals) whenZOOM - + TURN ON is detected at the S-VIDEOENTER port, projector will...Each time you don't do anything , the dialog will check the S-VIDEO port first. Press the VIDEO button on the remote control to adjust the volume. Operating Operating Adjusting the volume VIDEO STANDBY/ON RGB SEARCH STANDBY/ON 1. ESC RESET 18 RGB ...
...port as below . Each time you have muted the sound. A dialog will appear on the remote control. Press the RGB button on the remote control. Press the VOLUME button on the remote control to VIDEO signals) whenZOOM - + TURN ON is detected at the S-VIDEOENTER port, projector will...Each time you don't do anything , the dialog will check the S-VIDEO port first. Press the VIDEO button on the remote control to adjust the volume. Operating Operating Adjusting the volume VIDEO STANDBY/ON RGB SEARCH STANDBY/ON 1. ESC RESET 18 RGB ...
Operation Guide
Page 19
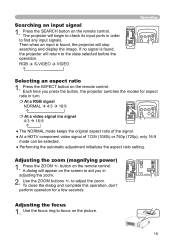
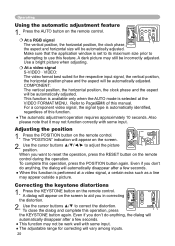
...Searching an input signal 1. POSITION -+ MENU ● At a HDTV component video signal of the signal. Press the ASPECT button on the remote control. ESC RESET ● Performing the automatic adjustment initializes the aspect ratio setting. To close the dialog and complete this operation, don't perform... ratio in order to find any input signals. A dialog will stop searching and display the image. to focus on the remote control. RGB S-VIDEO VIDEO Operating STANDBY/ON VIDEO RGB SEARCH ASPECT AUTO BLANK STANDBY/ON VIDEO RGB SEARCH MAGNIFY HOME...
...Searching an input signal 1. POSITION -+ MENU ● At a HDTV component video signal of the signal. Press the ASPECT button on the remote control. ESC RESET ● Performing the automatic adjustment initializes the aspect ratio setting. To close the dialog and complete this operation, don't perform... ratio in order to find any input signals. A dialog will stop searching and display the image. to focus on the remote control. RGB S-VIDEO VIDEO Operating STANDBY/ON VIDEO RGB SEARCH ASPECT AUTO BLANK STANDBY/ON VIDEO RGB SEARCH MAGNIFY HOME...
Operation Guide
Page 20
..., the horizontal position phase and the aspect will appear on the screen to reset the operation, press the RESET button on the remote control during the operation. To complete this feature. Press the KEYSTONE button on the screen. A dialog will be incorrectly adENTEjRusted. Even if... you in correcting the distortion. Press the AUTO button on the remote control. Refer to use this operation, press the POSITION button again. MAGNIFY ON VOLUME MUTE Adjusting the position VIDEO STANDBY/ON RGB SEARCH ...
..., the horizontal position phase and the aspect will appear on the screen to reset the operation, press the RESET button on the remote control during the operation. To complete this feature. Press the KEYSTONE button on the screen. A dialog will be incorrectly adENTEjRusted. Even if... you in correcting the distortion. Press the AUTO button on the remote control. Refer to use this operation, press the POSITION button again. MAGNIFY ON VOLUME MUTE Adjusting the position VIDEO STANDBY/ON RGB SEARCH ...
Operation Guide
Page 21
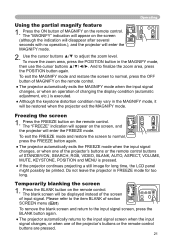
...9679; The projector automatically returns to the input signal screen when the input ENTER signal changes, or when one of the projector's buttons or the remote control buttons of STANDBY/ON, SEARCH, RGB, VIDEO, BLANK, AUTO, ASPECT, VOLUME, MUTE, KEYSTONE, POSITION and MENU is executed. ● Although...the screen 1. Please refer to normal, press the OFF button of MAGNIFY on the screen, and the projector will appear on the remote control. The blank screen will be displayed instead of the screen VIDEO STANDBY/ON RGB SEARCH ASPECT AUTO BLANK MAGNIFY ON OFF FREEZE VOLUME ...
...9679; The projector automatically returns to the input signal screen when the input ENTER signal changes, or when one of the projector's buttons or the remote control buttons of STANDBY/ON, SEARCH, RGB, VIDEO, BLANK, AUTO, ASPECT, VOLUME, MUTE, KEYSTONE, POSITION and MENU is executed. ● Although...the screen 1. Please refer to normal, press the OFF button of MAGNIFY on the screen, and the projector will appear on the remote control. The blank screen will be displayed instead of the screen VIDEO STANDBY/ON RGB SEARCH ASPECT AUTO BLANK MAGNIFY ON OFF FREEZE VOLUME ...

Operation Guide
Page 22
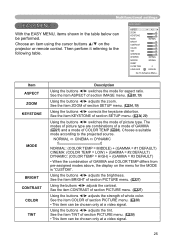
... using the cursor buttons ▲/▼, then press the cursor button ► or the ENTER button. To display a menu Press the MENU button on the remote control or one of choices on the projector. At the Advance menu, when some input. Each of these menus are asLAMP follows. Multifunctional settings Multifunctional settings...
... using the cursor buttons ▲/▼, then press the cursor button ► or the ENTER button. To display a menu Press the MENU button on the remote control or one of choices on the projector. At the Advance menu, when some input. Each of these menus are asLAMP follows. Multifunctional settings Multifunctional settings...
Operation Guide
Page 25
...;/► adjusts the zoom. See the item BRIGHT of GAMMA and COLOR TEMP differs from pre-assigned modes above, the display on the projector or remote control. NORMAL CINEMA DYNAMIC NORMAL: (COLOR TEMP = MIDDLE) + (GAMMA = #1 DEFAULT) CINEMA: (COLOR TEMP = LOW) + (GAMMA = #2 DEFAULT) DYNAMIC: (COLOR TEMP = HIGH) + (GAMMA = #3 DEFAULT) • When...
...;/► adjusts the zoom. See the item BRIGHT of GAMMA and COLOR TEMP differs from pre-assigned modes above, the display on the projector or remote control. NORMAL CINEMA DYNAMIC NORMAL: (COLOR TEMP = MIDDLE) + (GAMMA = #1 DEFAULT) CINEMA: (COLOR TEMP = LOW) + (GAMMA = #2 DEFAULT) DYNAMIC: (COLOR TEMP = HIGH) + (GAMMA = #3 DEFAULT) • When...
Operation Guide
Page 27
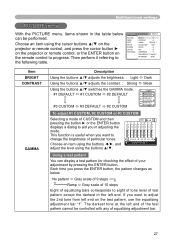
...or #3 CUSTOM Selecting a mode of equalizing adjustment bar. 27 Each time you want to adjust the 2nd tone from left end on the remote control to change the brightness of your adjustment by pressing the ENTER button. This function is useful when you press the ENTER button, the pattern ... buttons ◄/►, and adjust the level using the cursor buttons ▲/▼ on the projector or remote control, and press the cursor button ► on the projector or remote control, or the ENTER button on the test pattern, use the equalizing adjustment bar "1". The darkest tone at ...
...or #3 CUSTOM Selecting a mode of equalizing adjustment bar. 27 Each time you want to adjust the 2nd tone from left end on the remote control to change the brightness of your adjustment by pressing the ENTER button. This function is useful when you press the ENTER button, the pattern ... buttons ◄/►, and adjust the level using the cursor buttons ▲/▼ on the projector or remote control, and press the cursor button ► on the projector or remote control, or the ENTER button on the test pattern, use the equalizing adjustment bar "1". The darkest tone at ...

Operation Guide
Page 30
...9660; adjusts the over-scan ratio. Choose an item using the cursor buttons ▲/▼ on the projector or remote control, and press the cursor button ► on the projector or remote control, or the ENTER button on the menu during this item can't be performed. In such a case, please adjust ...small. • The number displayed on the remote control to the following table. At a RGB signal 4:3 16:9 NORMAL At a video signal / no signal 4:3 16:9 • The ...
...9660; adjusts the over-scan ratio. Choose an item using the cursor buttons ▲/▼ on the projector or remote control, and press the cursor button ► on the projector or remote control, or the ENTER button on the menu during this item can't be performed. In such a case, please adjust ...small. • The number displayed on the remote control to the following table. At a RGB signal 4:3 16:9 NORMAL At a video signal / no signal 4:3 16:9 • The ...
Operation Guide
Page 32
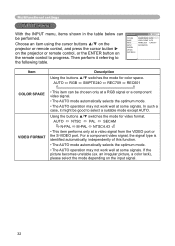
... in the table below can be performed. Choose an item using the cursor buttons ▲/▼ on the projector or remote control, and press the cursor button ► on the projector or remote control, or the ENTER button on the input signal. 32 AUTO RGB SMPTE240 REC709 REC601 COLOR SPACE...; switches the mode for video format. In such a case, it referring to progress. an irregular picture, a color lack), please select the mode depending on the remote control to the following table.
... in the table below can be performed. Choose an item using the cursor buttons ▲/▼ on the projector or remote control, and press the cursor button ► on the projector or remote control, or the ENTER button on the input signal. 32 AUTO RGB SMPTE240 REC709 REC601 COLOR SPACE...; switches the mode for video format. In such a case, it referring to progress. an irregular picture, a color lack), please select the mode depending on the remote control to the following table.
Operation Guide
Page 34
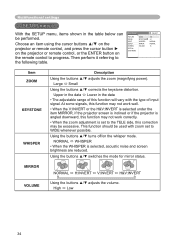
...and screen brightness are reduced. Choose an item using the cursor buttons ▲/▼ on the projector or remote control, and press the cursor button ► on the projector or remote control, or the ENTER button on the whisper mode. Upper in the data Lower in the table below... can be excessive. Using the buttons ▲/▼ turns off/on the remote control to the following table. Using the buttons ▲/▼ switches the mode for mirror status. High Low 34 Then perform it referring...
...and screen brightness are reduced. Choose an item using the cursor buttons ▲/▼ on the projector or remote control, and press the cursor button ► on the projector or remote control, or the ENTER button on the whisper mode. Upper in the data Lower in the table below... can be excessive. Using the buttons ▲/▼ turns off/on the remote control to the following table. Using the buttons ▲/▼ switches the mode for mirror status. High Low 34 Then perform it referring...

Operation Guide
Page 35
... you can be performed. Choose an item using the cursor buttons ▲/▼ on the projector or remote control, and press the cursor button ► on the projector or remote control, or the ENTER button on the remote control to the following table. To quit the operation, press the MENU button or keep no operation for...
... you can be performed. Choose an item using the cursor buttons ▲/▼ on the projector or remote control, and press the cursor button ► on the projector or remote control, or the ENTER button on the remote control to the following table. To quit the operation, press the MENU button or keep no operation for...

Operation Guide
Page 38
Choose an item using the cursor buttons ▲/▼ on the projector or remote control, and press the cursor button ► on the projector or remote control, or the ENTER button on /off automatically. When the time is selected, detecting no -signal or an unsuitable signal ... :SELECT AUTO SEARCH AUTO OFF LAMP TIME FILTER TIME SERVICE TURN OFF 0 0 0 Item AUTO SEARCH Description Using the buttons ▲/▼ turns on the remote control to the section "Turning off . Long (max. 99 minutes) Short (min. 0 minute = DISABLE) AUTO OFF ENABLE AUTO OFF DISABLE 10...
Choose an item using the cursor buttons ▲/▼ on the projector or remote control, and press the cursor button ► on the projector or remote control, or the ENTER button on /off automatically. When the time is selected, detecting no -signal or an unsuitable signal ... :SELECT AUTO SEARCH AUTO OFF LAMP TIME FILTER TIME SERVICE TURN OFF 0 0 0 Item AUTO SEARCH Description Using the buttons ▲/▼ turns on the remote control to the section "Turning off . Long (max. 99 minutes) Short (min. 0 minute = DISABLE) AUTO OFF ENABLE AUTO OFF DISABLE 10...

Operation Guide
Page 39
Performing this item resets the time. Pressing the RESET button on the remote control or the button ► on the projector for about 3 seconds displays a dialog to make sure. It is shown in the OPTION menu as the use ... the button ▲. It is shown in the OPTION menu as the use time of the air filter. Pressing the RESET button on the remote control or the button ► on the projector for about 3 seconds displays a dialog to make sure. The filter time is the time counted after the...
Performing this item resets the time. Pressing the RESET button on the remote control or the button ► on the projector for about 3 seconds displays a dialog to make sure. It is shown in the OPTION menu as the use ... the button ▲. It is shown in the OPTION menu as the use time of the air filter. Pressing the RESET button on the remote control or the button ► on the projector for about 3 seconds displays a dialog to make sure. The filter time is the time counted after the...